

Welcome to my STITCHED Tutorial Blog Hop!
Today, I thought we’d do something both fun and useful…make a cute oven mitt!
This is a project already had on my mind when the opportunity to participate in the STITCHED Tutorial Blog Hop came up. It seemed like the ideal time to make this project a reality!
Read through the post, then leave a comment for a chance to win one of two owl fat quarters! Winners announced Tuesday March 20, 2012!
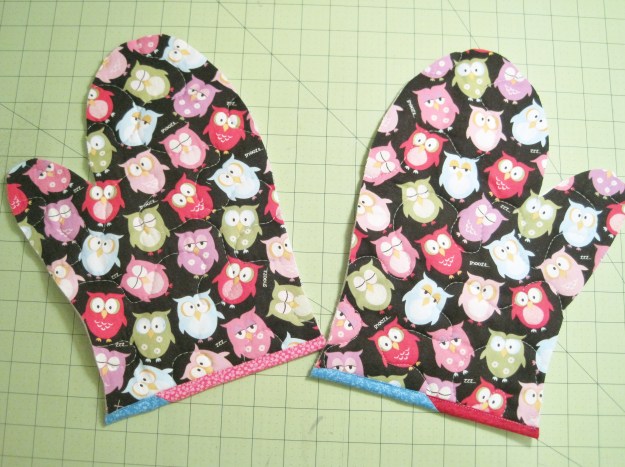
Making an oven mitt is a great way to bring fun fabrics into your everyday life. I chose fabrics from my stash. You can do that, too, or use this as an excuse to buy a couple of new fat quarters. You can also incorporate quilt blocks or the recycled materials of your choice for a unique and fun oven mitt!
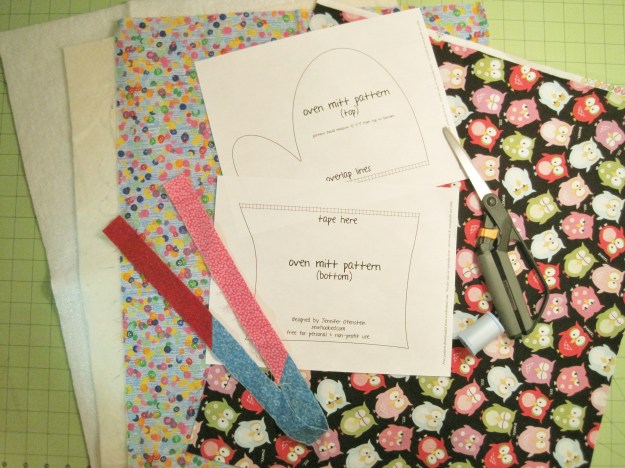
For each oven mitt you want to make you’ll need the following:
- 1 fat quarter for the outside, pressed
- 1 fat quarter for the inside, pressed
- OR 1/2 yard for both inside and outside, pressed
- Cotton batting, approximately fat quarter size (18″ x 22″)
- Hobbs Thermore Batting or another batting made specifically for potholders, etc., approximately fat quarter size (18″ x 22″)
- 2 1/2″ x 18″ strip of fabric OR a scrap of quilt binding (shown)
- Fabric Scissors
- Paper Scissors
- Fabric Snips (optional)
- Thread
- Water Soluble Glue Stick
- Sewing Machine
- Size 80 or 90 Sewing Machine Needle
- Optional: Free-motion foot
- Also optional, but very useful: Walking Foot for your sewing machine
- Oven Mitt Pattern; for best results, print with no scaling
- Dowel Rod, any size

First, we’ll prepare our pattern. Overlap the center lines and tape the pattern together, as shown.
 Trim the excess paper from the pattern using your paper scissors.

Once printed and trimmed, the pattern should measure approximately 12 1/4″ from top to bottom.

Next, we’ll layer our fabrics. The owl fabric will be my “outside fabric” and the dot fabric will be my “inside fabric.”
These are layered together with the two kinds of batting just like for any quilt sandwich.
The fabrics face right sides out, with the Thermore directly under the “outside fabric.” It is important that the Thermore be directly under the “outside” fabric so that it will be closest to the heat when the oven mitt is in use.
Since we’re working with such a small area, we will not be pinning, instead, we will glue baste the fabrics to the two layers of batting.

Place dots of glue 6″ – 8″ apart directly on the batting.
You’ll do this for both the front (“outside”) and back (“inside”).
You do not need to baste the two layers of a batting together. They will grip to each other without glue.

Smooth the fabric to the batting. Once you’ve smoothed it by hand, take the quilt sandwich to your ironing board and press to remove any bubbles or creases. This will also help set the glue.

I chose free-motion for my quilt sandwich. How you quilt your sandwich is up to you.

If you free-motion your quilt sandwich, be sure to drop your feed dogs!
If you’re new to free-motion quilting, check out Leah Day’s blog, The Free Motion Quilting Project
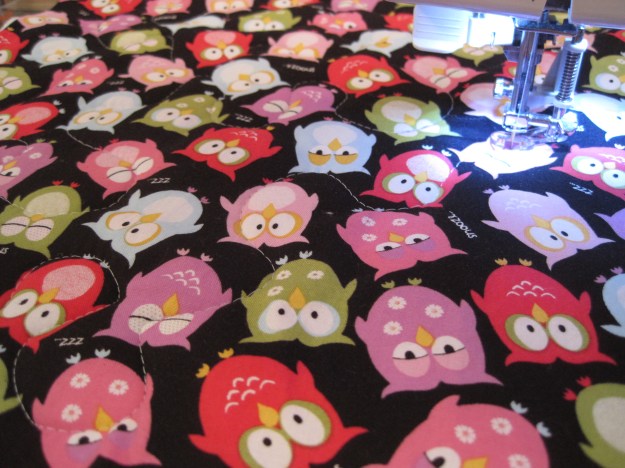
I decided to keep it simple and created a large meander to quilt the layers together.
For a simpler approach, you can try Straight Line Quilting. Here’s a great tutorial from Tall Grass Prairie Studio.
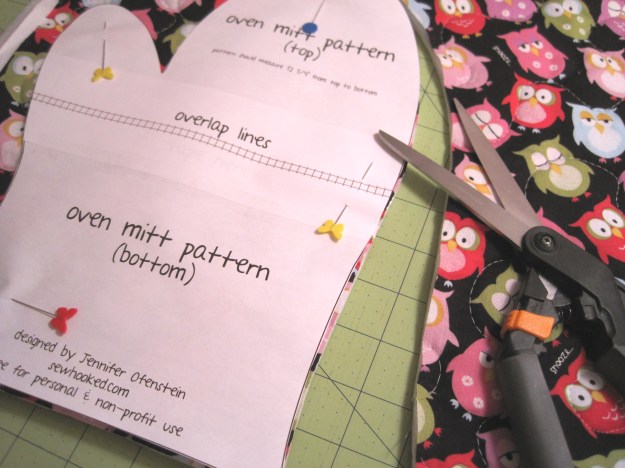
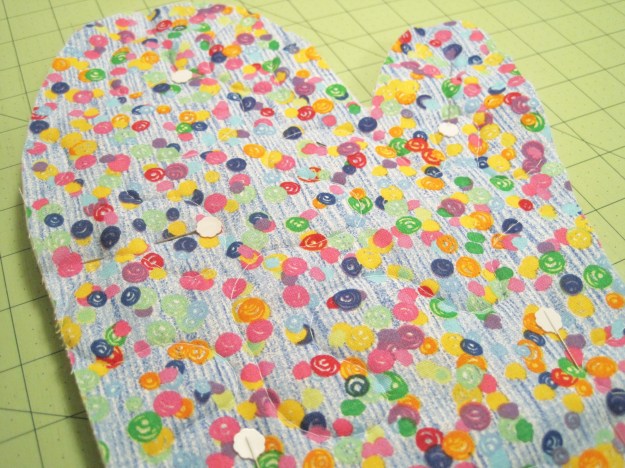
Once your sandwich is quilted, pin the paper pattern to the top or “outside.”
My fabric is directional, so I made sure that the owls would be pointed in the correct direction.
Using your fabric scissors, cut around the paper pattern.
For the second side of the oven mitt, turn the pattern over so you can cut the reverse with your fabric scissors.

You will have two pieces for your oven mitt. They should be mirror image.
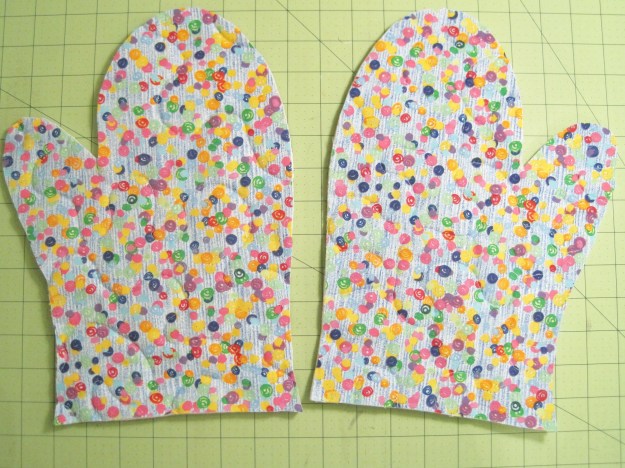
Just for fun, here are the same two pieces from the other side!
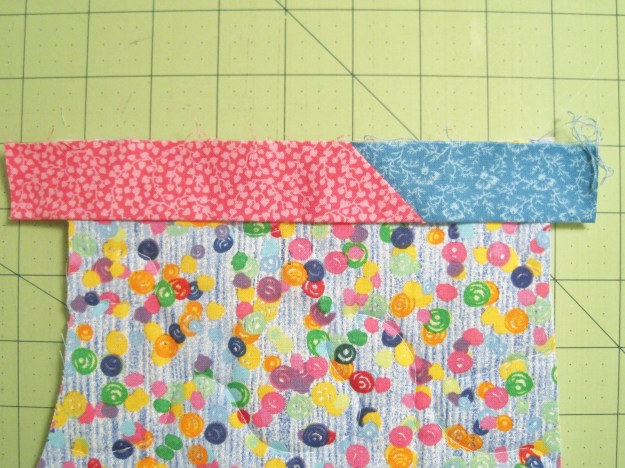
Fold the 2 1/2″ strip in half and press OR use a binding remnant.
Align the raw edges along the “inside” fabric where the mitt opening will be.
If you were free-motion quilting earlier, remember to raise your feed dogs and change your presser foot.
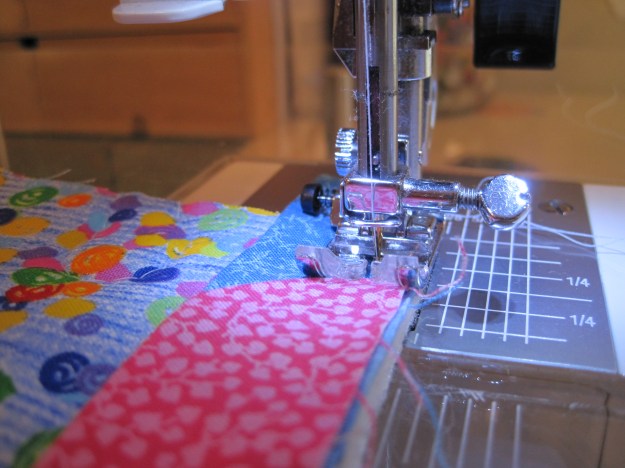
Straight stitch the binding 1/4″ from the edge of the mitt.
Repeat for the second side.

When you fold the binding out, it will look like this.
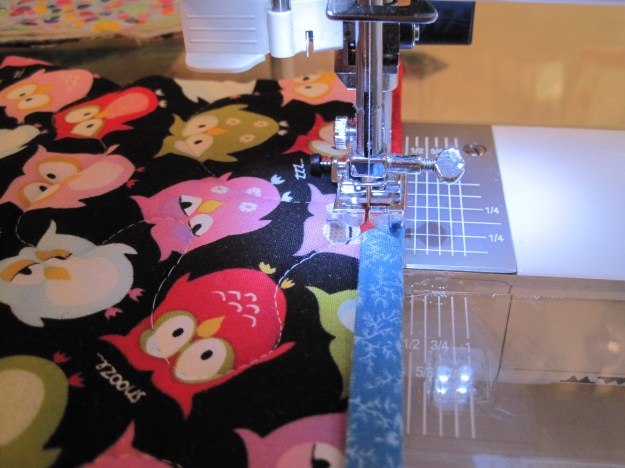
Roll the binding to the outside. Top stitch near the edge of the binding using a straight or decorative stitch.
Repeat for other side of the mitt.
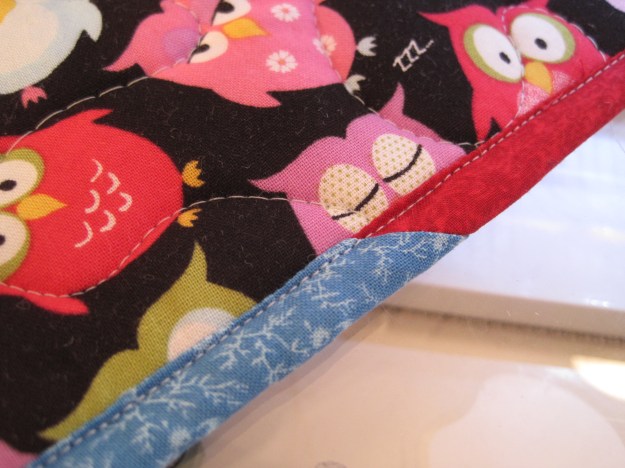
Your binding will look like this.

Trim off any excess binding.
Each side of the mitt is bound individually. You can opt to use continuous binding, but I find this to be a much simpler method.

Binding, from the other side.
Now, with right sides together, align the two halves of the oven mitt. This is going to be a thick sandwich!
You’ll be stitching through four layers of fabric and four layers of batting.

Stitch the oven mitt together using a generous 1/4″ seam. Back stitch at the beginning.
I was able to use my presser foot for a guide.

Back stitch on both sides of the thumb.

Back stitch when you get to the end.

Once the two sides are stitched together, snip the area between the thumb and fingers.
If you have Fabric Snips, this is a great time to use them.

Snip the curve for easier turning.

Snip the binding corners.

Now comes the hardest part…turning this guy right side out!
With your hand inside the mitt, tuck the end inside and grab on, slowing working the mitt until you have the mitt turned right side out.

If you need it, use a dowel rod to poke the rest of the mitt into shape.

The dowel rod is especially useful for the thumb! Be careful when working on the thumb, you don’t want to pop any stitches.
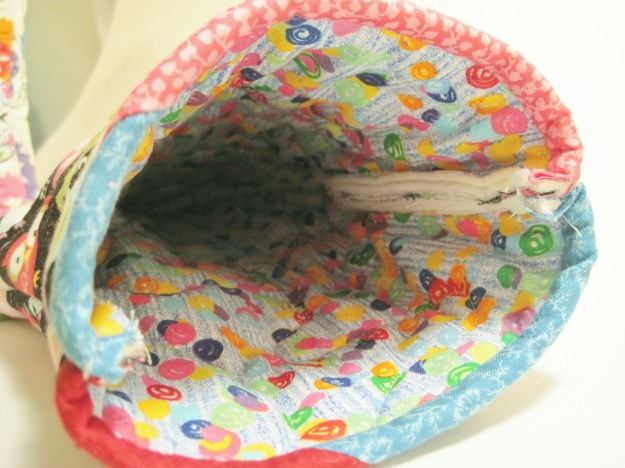
Here’s what your mitt looks like from the inside. Nice and thick to protect your hands from hot pans!
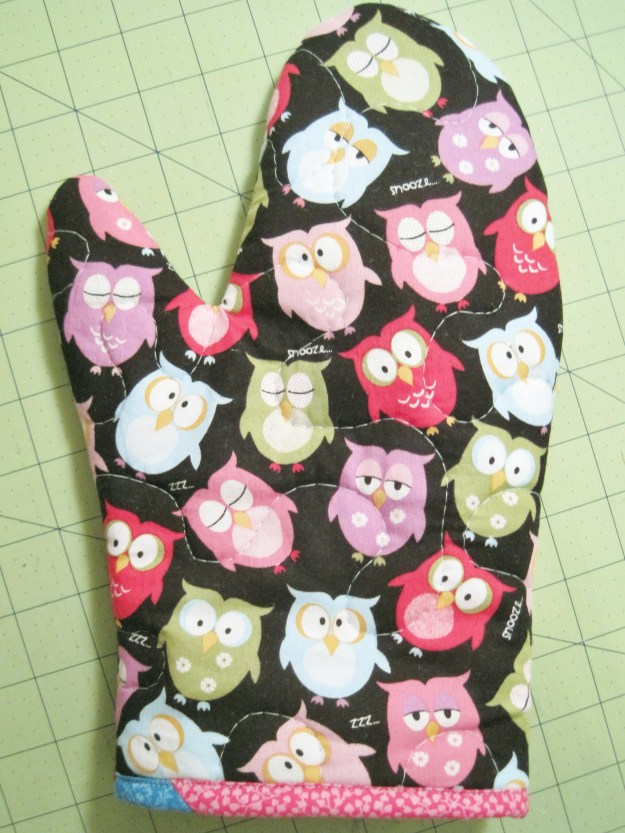
Ta-Da! We’re done!

You will have some scrappy bits of quilted material left. I used mine to make hand covers for my cast iron skillets!
And just for fun, this was my prototype. I made this one with a hand-drawn version of the pattern. By making a prototype, I was able to work out the tricker bits and figure out the best way to go about this project.
Visit the rest of the STITCHED Blog Hoppers!
Reminders:
In honor of my participation in the STITCHED Tutorial Blog Hop, get 15% off your TOTAL PURCHASE from the Sewhooked Shop during the month of March with coupon code MARCH15. Not valid on etsy or craftsy.

The Paper Pieced Pattern-A-Day blog hop is coming April 1, 2012! We have a full compliment of designers ready to share awesome Garden Party-themed FREE paper pieced patterns with you!
Don’t forget to comment for a chance to win a fat quarter of the owl fabric used in this tutorial!
Add your Sewhooked-related photos to my flickr group and you might be featured in a future post!

Posts on this blog may contain affiliate links to help cover the cost of my website. I thank you for your generous support. ♥


Posts on this blog may contain affiliate links to help cover the cost of my website. I thank you for your generous support. ♥

Jennifer,
I sooooo love this.
I am inspired to make a pair….and the handle cover for cast iron pots are a great idea.
Thank you for sharing.
Alma
Thanks, Alma! Once you make one, it’s hard to stop. I love getting to combine fun and crafty with practical. 🙂
PERFECT!!!! I always give tea towels and oven mitts as wedding presents (it’s something everyone forgets about!!) and now I can gift hand made ones 😀
Wonderful! Have fun with it…it’s a great way to use small amounts of cute fabrics!
Thank you Jennifer, (and Alma for directly me here) for a fabulous tutorial. I love your step by step instructions illustrated with such clear phots. Thank you so much.
You’re very welcome! I hope you give it a try. 🙂
So cute! I love cute and practical projects. Awesome tutorial!
Thank you! Putting this together was a lot of fun!
Thanks for this tutorial Jennifer. It is super clear & easy to understand, and your pics are perfect. (I also really like your choice of fabrics, they’re adorable). I can’t wait to make a pair myself.
I was wondering if several layers of regular batting would do the same thing as the thermal batting? I don’t have any on hand, and was thinking I’d love to start this project tonight!
Thank you 🙂
Oh, I think so! I’d say three layers of regular cotton batting would be plenty. Let me know if you try and I’ll add the info to the post!
Great, thanks Jennifer – I’ll give it a try & let you know how it works out 🙂
Hi again Jennifer,
Success, I was able to make the mitt using 3 layers of regular cotton batting. My machine wasn’t too excited about going through so many layers (when sewing the front & back together) but with a bit of patience, I was able to get it completed.
Thank you so very much for such a clear & easy to follow tutorial, it is much appreciated!
Fantastic, I’m thrilled to hear it!
Any chance of a photo?
Yes, I’d be happy to. (I’ll need to take a photo when I get home tonight) Will I be able to post it in a reply here, or will I need to send it somewhere else?
You should be able to post it here, if not, I have a flickr group! http://www.flickr.com/groups/sewhooked_projects/
So Cute, So Practical! LOVE, LOVE!!
Thanks Erin!
awesome! I needed new oven mitts – these will be perfect
Wonderful, I hope you give them a try!
Love the owl print – I definitely will make some of these mitts – would make great gifts, too! Thanks for the tutorial!!!
I love the owls, too…I might have bought a wee bit more than I needed! Glad you enjoyed the tutorial!
Very clear tutorial, I especially like the way you point us to other blogs for elaborations, it gives a nice feeling of a community generously sharing knowledge, thank you!
Thanks, Lotte! This tutorial was loads of fun to work on, and I always love an opportunity to share yet another great tutorial (or two!) with you all!
Awesome! I can make this!! I will have to look for that therm batting tomorrow at the LQS. Fun fun!!
You can make it! It’s sooo easy, and so much fun! 😀
So cute! Great tutorial! Thanks for sharing!
Thanks, I hope you get a chance to give it a try!
Adorable!!! love the fabric, I’ve done simple potholders but really want to tackle the mitt!
I hope you give it a try, it’s such a fun way to use cute fabrics!
Thanks for a great tutorial!
I love the owl fabric! off to download the pattern now!
Thanks, enjoy!
Love the binding. Great tip to do each side individually. Can’t wait to try this, your directions are very clear.
I thought splitting the binding would make for a quicker finish, and it really does! Thanks for commenting. 🙂
Very nice idea. I think the pot handle is a great idea. I just burned my hand last week, grabbing a pan that was still too hot. The owl fabric is so sweet.
I LOVE OWLS!!! If I won this fabric I would make this Oven Mitt. You can never have enough oven mitts!
I finally got my love of sewing mojo back after reading many of these kind of tutorials to help me get back to using my sewing machine. Love the owl fabric!!! I love making pot holders and oven mitt. Making some for my RV to get ready for the summer holiday.
Thank’s for sharing!! Love the fabric ;o) Have a nice day :o)