Crack open the WAY BACK MACHINE for today’s 31 Days of Halloween!
Today we have a fast, easy costuming option for the Harry Potter fans out there.


Originally created in 2006 for a Craftster Swap, I’m breaking this tutorial out today for anyone that might not have a costume in mind, or, like me, might need something a wee bit cooler to wear come Halloween!
The best part about this project is that you can sew it by hand if you don’t have a machine or use a serger to finish it even faster!
You’ll need:
- 1 red t-shirt
- 1 black t-shirt in the same size and style as the red t-shirt
- Rotary cutter, 24″ rotary ruler & cutting mat
- OR a straight edge, pencil and sharp scissors
- Seam ripper
- Pins
- Sewing machine, serger or needle and thread
- Freezer Paper, cut into 2 8 ½” x 11” sheets (print Hogwarts Crest Stencil & Potter/Star Stencil on these sheets)
- fabric paint in red, green, blue, yellow, white and gold
- foam paintbrushes
Instructions


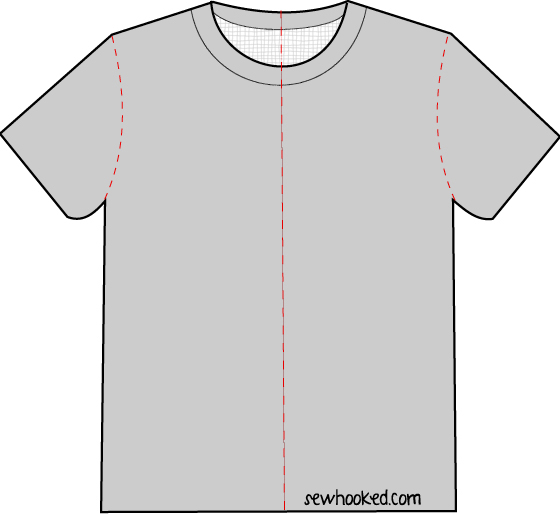
- Find the center of each shirt by folding in half towards the front and matching the sleeves.
- Mark the top and the bottom with a pin.
- If using a rotary cutter, this is your cutting line.
- If using a straight edge, draw a pencil line from top to bottom.
- Cut as straight as possible.
Sleeve Reconstruction

- Select the red shirt right (right side when the shirt is worn) and black shirt left and carefully remove the sleeves from each side of the shirt using a seam ripper. Be very careful to not stretch the fabric.

- Swap the sleeves so that red sleeve is with black shirt piece and the black sleeve is with red.
- Turn the shirt half you are working on inside out and place the sleeve, right side out inside the
- sleeve hole (right sides will be together), matching the top and bottom creases. Pin the sleeve in place, being careful not to stretch the fabric.
- Using a serger or a stretch stitch on your sewing machine, stitch in a 1/4″ to 1/2″ seam all the way around.
- If stitching by hand, take small stitches.
- Repeat for second sleeve.
Shirt Body Reconstruction
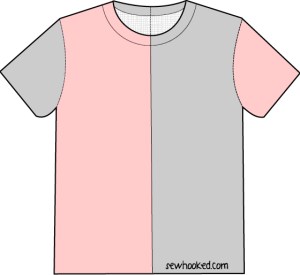
- Place one shirt half inside the other, right sides together so that the wrong sides of the seam lines will be on the outside. You will have two seams, a front seam and a back seam.
- Carefully pin every few inches starting at the t-shirt ribbing and work your way down, trying not to stretch the fabric.
- If the bottoms hems do not meet, pin the bottom edges together and ease along the middle of the shirt (t-shirts can be really wonky, but you can make it work!).
- Carefully stitch along this line as for the sleeves.
- Snip the corners of the inside seams on the diagonal.
- Turn the shirt right side out.
Stenciling the front (Hogwarts Crest)
- Cut out the four sections of the Hogwarts Crest stencil.
- Place cardboard or newspaper inside the t-shirt to protect from bleed through.
- Using a warm iron, carefully place the stencil on the upper left side of the shirt (the black
- side).
- Stencil the upper left section red, the upper right section green, the lower left section yellow and the lower right section blue*.
- Gently peel stencil away and allow to dry.
- Optional: Paint a cursive “H” over the four sections in gold paint.
Stenciling the back (Potter & Star)
- Cut out the Potter and Star stencil.
- Optional: Create a stencil with your own name using a Sans Serif font OR use purchased iron on letters.
- Place cardboard or newspaper inside the t-shirt to protect from bleed through.
- Using a warm iron, carefully place the stencil in the middle of the back of the shirt, matching center lines.
- Stencil the name and star with red paint.
- Gently peel away and allow to dry.
*I recommend testing your paint on dark fabric before you start. Some paints will need multiple layers. If the paint doesn’t cover, you can start with a white base coat.
Need more information on stenciling? Check out my post from last week!

LAST DAY: As a special bonus for my readers, get 50% off Machine Quilting: Free Motion & More until October 15, 12015! Original price is $39.99, get it now for $19.99! Offer good until 10/15/15 @11:59pm MT.
Are you making projects from 31 Days of Halloween? Share your photos with my flickr group! There will be a fun surprise after Halloween for one lucky winner!