Edited to add: This tutorial was written in 2014. It may not work with all versions of Adobe Reader. You can also use the chart below to enlarge patterns on printers that include that feature. Thanks!
Today, I’m sharing a rare mirror post with my fandom site, Fandom In Stitches, but this is more than worth posting twice.
I read and answer a lot (and by a lot, I mean tons!) of email for both Sewhooked and Fandom in Stitches and the question I answer most often is this: How do I resize a quilt block pattern?
The easiest way to ENLARGE or REDUCE a quilt block pattern is to print it as a poster using Adobe Reader and the chart below.
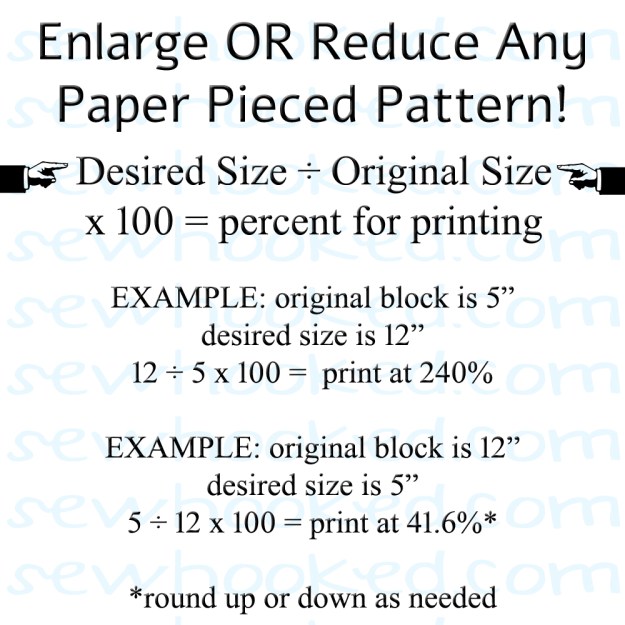
If I don’t have the size you need, I’ve got you covered! Here’s the formula used to get the size you need:

|
|
|
|
|
|
|
|
|
|
|
|
ENLARGE OR REDUCE PATTERNS USING THIS SCALE
|
|
|
|
|
Pattern Size Needed |
|
|
|
|
4″ |
5″ |
6″ |
7″ |
8″ |
9″ |
10″ |
11″ |
12″ |
|
Pattern Size |
|
|
|
|
|
|
|
|
|
|
4″ |
100% |
125% |
150% |
175% |
200% |
225% |
250% |
275% |
300% |
|
5″ |
80% |
100% |
120% |
140% |
160% |
180% |
200% |
220% |
240% |
|
6″ |
67% |
83% |
100% |
117% |
133% |
150% |
167% |
183% |
200% |
|
7″ |
52% |
71% |
88% |
100% |
114% |
128% |
143% |
152% |
171% |
|
8″ |
50% |
62% |
75% |
87% |
100% |
112% |
125% |
137% |
150% |
|
9″ |
44% |
55% |
66% |
77% |
88% |
100% |
111% |
122% |
133% |
|
10″ |
40% |
50% |
60% |
70% |
80% |
90% |
100% |
110% |
120% |
|
11″ |
36% |
45% |
54% |
63% |
72% |
81% |
90% |
100% |
109% |
|
12″ |
34% |
42% |
50% |
59% |
67% |
78% |
84% |
93% |
100% |
Follow these steps and use the chart below to make it even easier:
- Download the PDF quilt block pattern file.
- Open pattern in Adobe Reader.
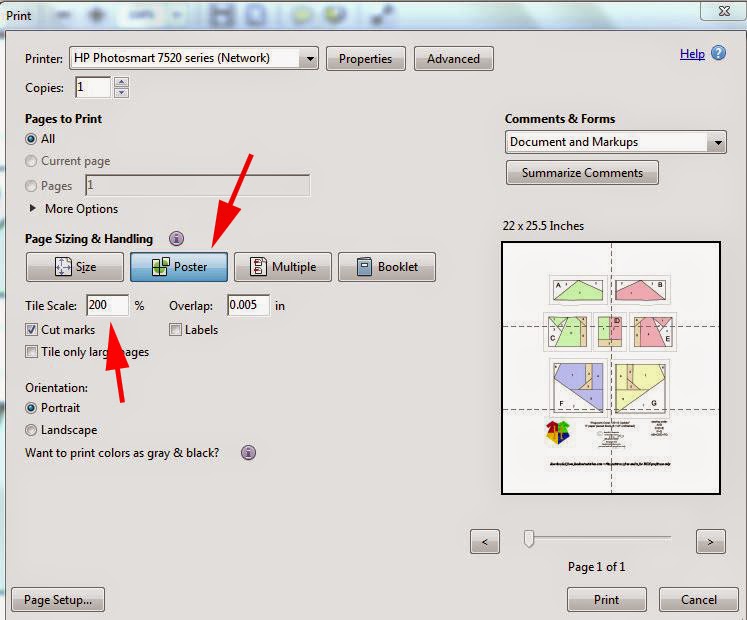
- Open the Print dialog (shown below) by clicking the printer icon.
- Choose which Pages to Print. In the example “All” is chosen, but if there is an instruction page, skip that and just enlarge the pattern pages. It may be least confusing to enlarge one page at a time.
- Under Paper Sizing & Handling, choose Poster (see image).
- Determine the starting Pattern Size and the chart below to determine what percentage to enlarge to Pattern Size Needed. For example, to print a 5″ pattern at 10″, Tile Scale (see below) will need to be 200%.
- Print these instructions for easy reference.
Big thanks to Fandom In Stitches Designer Addie Clark for sharing the poster printing tip over on the Fandom In Stitches Facebook Group.
♥
Join the Sewhooked Facebook Group for community, support & occasional prizes! I’m there, as are many friends of Sewhooked.

Posts on this blog may contain affiliate links. Thank you for your support. ♥