

Edited to add: This tutorial was written in 2014. It may not work with all versions of Adobe Reader. You can also use the chart below to enlarge patterns on printers that include that feature. Thanks!
Today, I’m sharing a rare mirror post with my fandom site, Fandom In Stitches, but this is more than worth posting twice.
I read and answer a lot (and by a lot, I mean tons!) of email for both Sewhooked and Fandom in Stitches and the question I answer most often is this: How do I resize a quilt block pattern?
The easiest way to ENLARGE or REDUCE a quilt block pattern is to print it as a poster using Adobe Reader and the chart below.
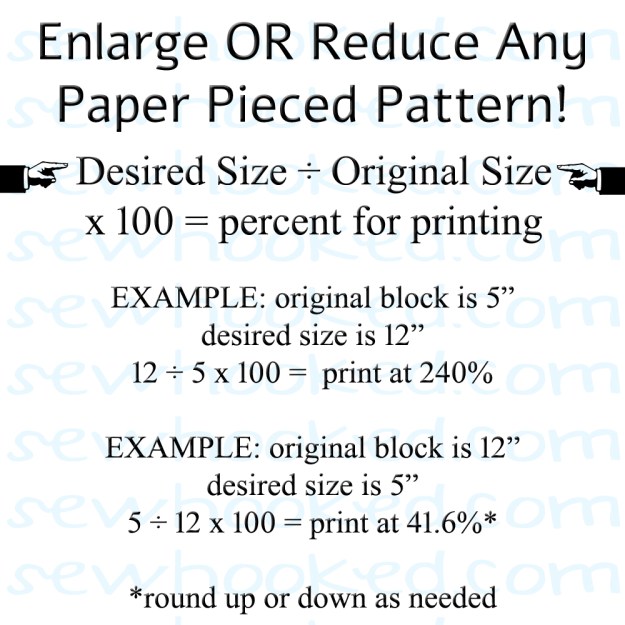
If I don’t have the size you need, I’ve got you covered! Here’s the formula used to get the size you need:
|
ENLARGE OR REDUCE PATTERNS USING THIS SCALE
|
||||||||||
| Pattern Size Needed | ||||||||||
| 4″ | 5″ | 6″ | 7″ | 8″ | 9″ | 10″ | 11″ | 12″ | ||
| Pattern Size | ||||||||||
| 4″ | 100% | 125% | 150% | 175% | 200% | 225% | 250% | 275% | 300% | |
| 5″ | 80% | 100% | 120% | 140% | 160% | 180% | 200% | 220% | 240% | |
| 6″ | 67% | 83% | 100% | 117% | 133% | 150% | 167% | 183% | 200% | |
| 7″ | 52% | 71% | 88% | 100% | 114% | 128% | 143% | 152% | 171% | |
| 8″ | 50% | 62% | 75% | 87% | 100% | 112% | 125% | 137% | 150% | |
| 9″ | 44% | 55% | 66% | 77% | 88% | 100% | 111% | 122% | 133% | |
| 10″ | 40% | 50% | 60% | 70% | 80% | 90% | 100% | 110% | 120% | |
| 11″ | 36% | 45% | 54% | 63% | 72% | 81% | 90% | 100% | 109% | |
| 12″ | 34% | 42% | 50% | 59% | 67% | 78% | 84% | 93% | 100% | |
Follow these steps and use the chart below to make it even easier:
- Download the PDF quilt block pattern file.
- Open pattern in Adobe Reader.
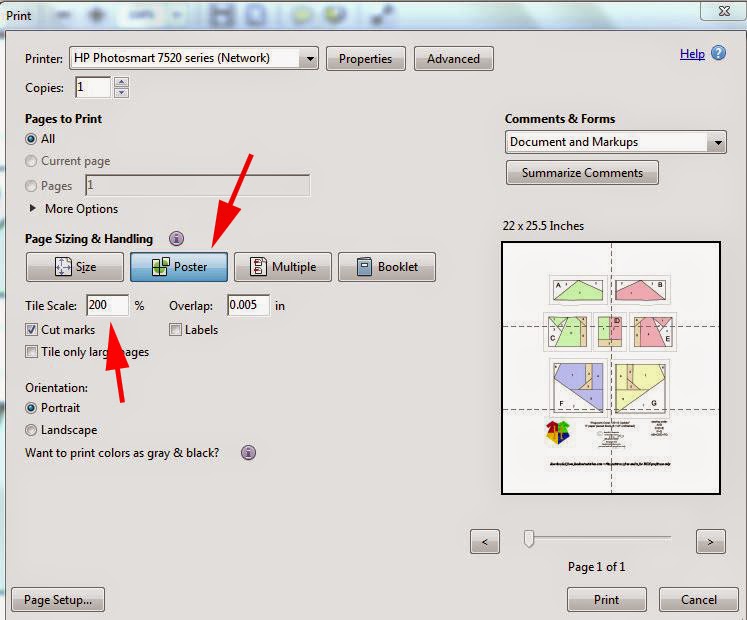
- Open the Print dialog (shown below) by clicking the printer icon.
- Choose which Pages to Print. In the example “All” is chosen, but if there is an instruction page, skip that and just enlarge the pattern pages. It may be least confusing to enlarge one page at a time.
- Under Paper Sizing & Handling, choose Poster (see image).
- Determine the starting Pattern Size and the chart below to determine what percentage to enlarge to Pattern Size Needed. For example, to print a 5″ pattern at 10″, Tile Scale (see below) will need to be 200%.
- Print these instructions for easy reference.
Big thanks to Fandom In Stitches Designer Addie Clark for sharing the poster printing tip over on the Fandom In Stitches Facebook Group.
♥
Join the Sewhooked Facebook Group for community, support & occasional prizes! I’m there, as are many friends of Sewhooked.

Posts on this blog may contain affiliate links. Thank you for your support. ♥

Thank you for this information on enlarging, etc.. This is truly helpful.
You’re welcome, Judy!
Thank you so much, I have bookmarked this email and now can refer to it when I have things to enlarge. You make my life easier, thanks again, Lynn
My pleasure, Lynne, I’m glad it’s helpful.
Thank you very much. My loved this help from you. I I enlarge these patterns but a longer road where I took a long time and spent a lot of paper printing and testing the extent that I required.
I am so glad you posted this. Thank you, thank you.
My pleasure, Vicki! It’s so much easier than I used to do it and I just had to share!
Thank you for chart and directions. I always had to figure it out.
Awesome! Thanks for the tip!
Thanks for posting this, I printed it off and pinned it to my sewing note broad!!
My pleasure! Some things are too good not to share. 😀
Thank you!
My pleasure!
Looks easy, BUT, I want to reduce a pattern to paint on a smaller surface. Can you help?
Hi Cheryl,
You can reduce an image using the same technique. If you know approximately the size you’re starting out with, you can still use the quilt block chart to figure out what percentage to reduce.
Good luck with your project! 🙂
This is great info, one question…when I used a 200% enlargement the seam allowances go from 1/4inch to 1/2inch. When sewing 2 pieces together, do I still sew on the line that I normally sew or do I sew where the 1/4 inch would be?
Jaylene, when sewing the units together, you’ll trim those 1/2″ seam allowances down to 1/4″. Happy stitching! 🙂
Thanks Jennifer! I am getting ready to make a 10inch Whomping Willow!
Thank you so much for the information! I had no clue how to reduce a pattern I’d bought and your info helped enormously!
I’m thrilled that you found it useful. 🙂
Does this method take into consideration the seam allowance and the reduction or increase of it when changing the size of the pattern piece?
For example:
If I start out with an 8″ pattern piece that has a 1/2″ seam allowance, when I reduce it by 50%, will my seam allowance be reduced to 1/4″? When grading patterns, is it really as simple as just reducing or enlarging the pieces? It just seems (to me) that if I take a pattern that is made to fit an average person that’s 5’6″ and reduce it to fit a thinner person who is also 5’6″, not only will the width be altered, but so will the length.
Also, when you give measurements of the pattern piece, is that how wide the pattern piece actually measures?
Thank you.
Hi there,
This technique is intended specifically for enlarging/reducing quilt blocks. It would definitely not be recommended for clothing. I’m sorry for any confusion on that point.
Happy stitching!
Oh wow! You are awesome! Thank you very much
My pleasure!
Does this work for baby patterns say from 000 to 00? And so on
Unfortunately, that’s not a question I can really answer. This scale is intended for quilt blocks, which are much more straightforward than garments. I am sorry not to be more helpful.
This is amazing! I’ve used this method three times to enlarge your 7 pointed star pattern to different sizes. And I just discovered your blog last week!
Well, welcome to my world! 😀 I’m so glad you’ve found the tutorial useful!
Just the ticket! Before printing this chart, my enlarging has been a hit and miss effort. Thanks!
Awesome! I’m so glad you found it helpful! I’m not awesome at math, so I love having cheat sheets. 🙂
I just found this chart and have been wondering how I’ve survived without it!! Thank you!!!
One question. Do I have to put anything different in the “Overlap” box? For example; Change it to 0?
You are very welcome! I have always left the Overlap setting at the default and have never had any issues with lining up my patterns. I hope that helps. 🙂
THANK YOU SO MUCH for sharing this information! I have always struggled with reducing and enlarging patterns. This is going to come in so handy! I’ve been making tree blocks to send over to the quilt guild for Australia, and have a few that I’ve been trying to figure out how to enlarge to their requested size, including a couple of your tree patterns! Again…thank you, thank you, thank you!
Gina! You are so, so welcome! ♥
Thanks so much for the Enlarge/Reduce chart. It will come in handy very much.
My pleasure, Bonnie!
Thank you so much for the Enlarge/Reduce chart. It will come in very handy.
Thank you for the enlarging chart. It is quite handy.
I’m so glad you found us it useful!
is this the size of the unfinished block or the finished block?
It’s the size of the finished block.