
Craftsy Pattern Shop ♥ Etsy Shop
Facebook ♥ Sewhooked on FB ♥ Sewhooked Facebook Group
Posts on this blog contain affiliate links. Thank you for your support. ♥

Craftsy Pattern Shop ♥ Etsy Shop
Facebook ♥ Sewhooked on FB ♥ Sewhooked Facebook Group
Posts on this blog contain affiliate links. Thank you for your support. ♥
Craftsy Pattern Shop ♥ Etsy Shop
Facebook ♥ Sewhooked on FB ♥ Sewhooked Facebook Group
Posts on this blog contain affiliate links. Thank you for your support. ♥

At last and as promised, the Metroid charts are here!

Earlier this month, I finished the quilt above, dubbed “Quilt-Roid.” See my Talk to Me Tuesday about it here.
Below, I share the charts for Samus (the tough lady shown here in yellow) and the Metroid (the creepy little critter in the top right).
Please note, this is NOT a pattern for the entire quilt. These are charts to piece the two characters with some additional suggestions and information. You can use this to make something similar to what I did or use the charts in your own creations.
I’m planning to use just the head part of the Samus pattern sometime soon to make a cushion for my Metroid-loving daughter.
Find my Fandom-themed patterns here on Sewhooked under Free Quilt Patterns: Free Fandom Quilt Patterns. I will also be posting this to Fandom in Stitches in the near future. It’s in the rather long queue!
♥

Pre-cut your fabric squares to save time.

I like to print my chart and then break it into smaller chunks so that I don’t get overwhelmed.
I start from the left and work my way across, marking off what I’ve done as I go so I don’t get lost.

Chain piecing is EVERYTHING.


I chain piece from the top down, keeping the threads between the rows intact so that nothing will be out of place. When the rows are together, go back and sew together the horizontal seams, matching seams.

Use my homemade spray starch for a smooth, flat finish. I find this especially useful when working with solids. Recipe adapted from one shared years ago by my friend Linda.
Join the Sewhooked Facebook Group for community, support & occasional prizes! I’m there, as are many friends of Sewhooked.
Craftsy Pattern Shop ♥ Etsy Shop
Facebook ♥ Sewhooked on FB ♥ Sewhooked Facebook Group
Posts on this blog contain affiliate links. Thank you for your support. ♥
Craftsy Pattern Shop ♥ Etsy Shop
Facebook ♥ Sewhooked on FB ♥ Sewhooked Facebook Group
Posts on this blog contain affiliate links. Thank you for your support. ♥
Craftsy Pattern Shop ♥ Etsy Shop
Facebook ♥ Sewhooked on FB ♥ Sewhooked Facebook Group
Posts on this blog contain affiliate links. Thank you for your support. ♥
Baby, it is HOT outside!
Craftsy Pattern Shop ♥ Etsy Shop
Facebook ♥ Sewhooked on FB ♥ Sewhooked Facebook Group
Posts on this blog contain affiliate links. Thank you for your support. ♥
Back in 2012, when Fandom in Stitches was in its infancy, a friend and then-TTMT video maker, Satia, shared a drawing for a pattern idea:

Original drawing by Satia Schutz. Used with permission.

Using her Naruto-inspired drawing, I turned her design into a pattern to paper piece.
Today, I’m sharing this pattern once again. No updates are needed from the 2012 version because it is a clean and simple pattern, with pieces to make a 6″ or 10″ block.
You can see the 2012 blog post from Fandom in Stitches here.
Enjoy!

Print or Save from Google Drive
Don’t you just love the repeat?
Join the Sewhooked Facebook Group for community, support & occasional prizes! I’m there, as are many friends of Sewhooked.
Craftsy Pattern Shop ♥ Etsy Shop
Facebook ♥ Sewhooked on FB ♥ Sewhooked Facebook Group
Posts on this blog contain affiliate links. Thank you for your support. ♥
This was one of those videos where I thought I had nothing to show and then I did! ♥
Craftsy Pattern Shop ♥ Etsy Shop
Facebook ♥ Sewhooked on FB ♥ Sewhooked Facebook Group
Posts on this blog contain affiliate links. Thank you for your support. ♥
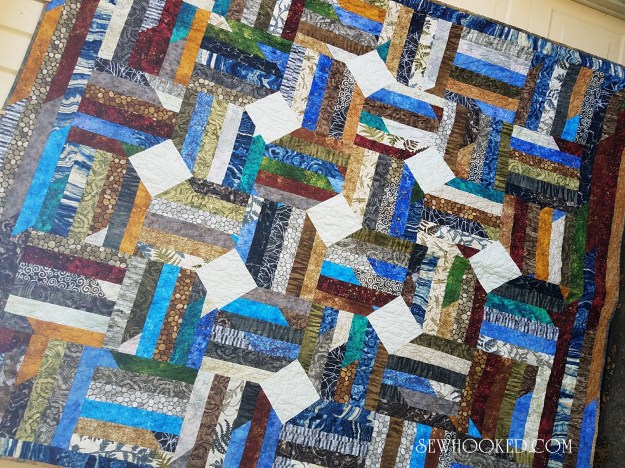
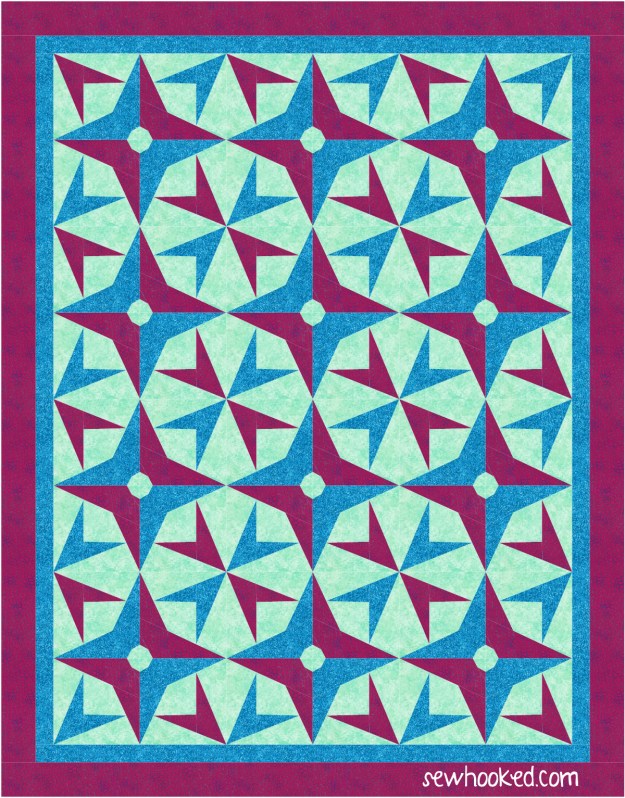
A few weeks ago, I shared the wedding quilt I designed for my husband’s brother and his new wife. I dubbed the quilt “Diamonds in the Rails” because of the diamond pattern inside of the more traditional rail fence.
This was supposed to be a tutorial, but I guess I should know myself better than that! I started writing and what began as a tutorial ended up as a full-blown pattern. Oops!
It’s been a while since I had a Free Pattern Friday, so why not?
My version is made using Northcott Stonehenge for the “rails” and Northcott Artisan spirit (I sadly can’t remember the specific print name) for the “diamonds.” All of this fabric was left over from my Project of Doom 2015. I talk more about this quilt and it’s design in this TTMT.
Diamonds in the Rails, as shown, finishes 76” x 88” (plus 1/2″ for binding). I’ve included some ideas for variations in the pattern including how to make a smaller version as well as a coloring page for those of you who like to plan your fabric placement.
Diamond in the Rails is an easy peasy pattern you can crank out in no time. Use strip & chain piecing to make it go even faster. If you make your own version, I’d love to see it!
Enjoy! ♥

Print or Save from Google Drive
Join the Sewhooked Facebook Group for community, support & occasional prizes! I’m there, as are many friends of Sewhooked.
Craftsy Pattern Shop ♥ Etsy Shop
Facebook ♥ Sewhooked on FB ♥ Sewhooked Facebook Group
Posts on this blog contain affiliate links. Thank you for your support. ♥
Happy Tuesday! I have a tiny update with a tiny amount to share!
Diamonds in the Rails tutorial on Friday…promise! ♥
Craftsy Pattern Shop ♥ Etsy Shop
Facebook ♥ Sewhooked on FB ♥ Sewhooked Facebook Group
Posts on this blog contain affiliate links. Thank you for your support. ♥
