
66” x 82” pieced (plus binding)
Blocks are 14” (14 1/2” with seam allowance)
Clover All Over was designed to use a custom jelly roll that my friends over at Talk To Me Tuesday and I created for our 2019 swap. We each shared 2 1/2” fabric strips we loved, and then sorted them all into new jelly rolls for each of us to share!

☘ Printable copy of CLOVER ALL OVER ☘
Watch my video about this quilt top!

I used the fabric received from my jelly roll swap, plus a variety of fabrics pulled from my stash for backgrounds.

My fabric, cut and ready to go!
 These blocks go together VERY quickly. I sorted and chain pieced everything to make it go faster!
☘ Printable copy of CLOVER ALL OVER ☘
Clover All Over is a super simple quilt to make. It requires one block that is repeated, sashing, and cornerstones. Make it solid or make it scrappy! An optional coloring sheet can be found on the last page of the printable instructions.

These instructions only use a few colors for simplicity in explanation. Use the fabrics that speak to you!
Adapt as needed for your own use.

Note: For my own version of this quilt, I used a jelly roll for the petals, block centers, and cornerstones. Each 2 1/2” strip should make enough cut pieces for two petals, plus four 2 1/2” squares.
Cutting Instructions for ONE BLOCK
☘ Printable copy of CLOVER ALL OVER ☘

To make a 66” x 82” quilt as shown, you’ll need to make 20 blocks.
☘ Printable copy of CLOVER ALL OVER ☘
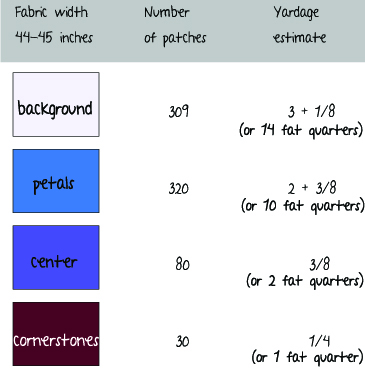
For 20 BLOCKS, Cut:
Background
-
180 – 2 1/2” x 2 1/2”
-
80 – 2 1/2” x 4 1/2”
Petals
-
160 – 2 1/2” x 2 1/2”
-
80 – 2 1/2” x 4 1/2”
-
80 – 2 1/2” x 6 1/2”
Center
For sashing for quilt assembly, cut:
Background
Cornerstones

☘ Printable copy of CLOVER ALL OVER ☘
For Block Assembly

Use 1/4” seam allowance throughout.
You can make multiple blocks at once and all steps can be chain pieced.
-
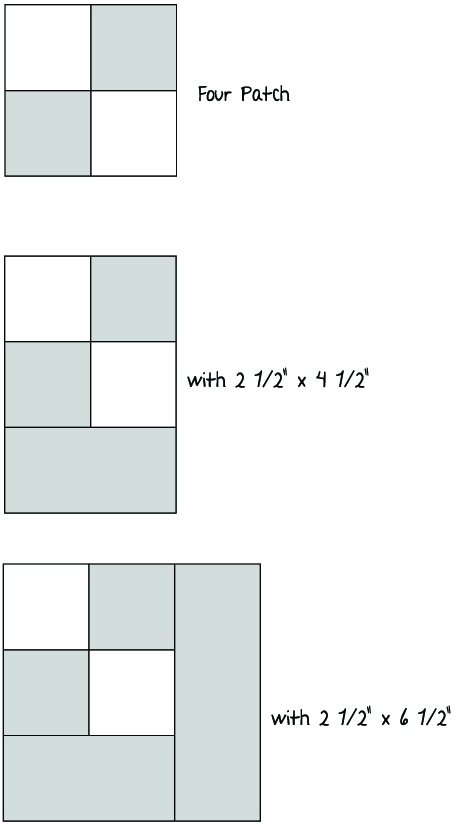
Make a four patch using 2 – 2 1/2” x 2 1/2” PETAL fabrics and 2 – 2 1/2” x 2 1/2” BACKGROUND fabrics.
-
Press four patch open
-
Stitch 2 1/2” x 4 1/2” PETAL fabric to four patch unit, making sure that the PETAL fabric aligns as shown in the photo above.
-
Press.
-
Stitch 2 1/2” x 6 1/2” PETAL fabric to four patch unit, making sure fabric aligns as shown in the photo above.
-
One petal is complete.
-
Repeat for remaining petals. Want to go faster? All steps can be chain pieced!
-
FOR BLOCK SASHING – sew together 2 1/2” x 2 1/2” center fabric with 2 1/2” x 4 1/2” background fabric.
-
Finish block by stitching together the following, making sure that the four patch units are aligned to the OUTSIDE of the block.
Petal > Block Sashing > Petal
+ Block Sashing > 2 1/2” background > Block Sashing
+ Petal > Block Sashing > Petal
For ROW ASSEMBLY

Assemble rows by piecing 2 1/2” x 14 1/2” BACKGROUND with BLOCKS as shown above. Rows include four blocks and five background sashing units.
For SASHING ASSEMBLY


Assemble Sashing by piecing 2 1/2” x 2 1/2” CORNERSTONES with 2 1/2” x 14 1/2” BACKGROUND as shown above. Even your sashing can be chain pieced (see mine, above)!
For QUILT ASSEMBLY
Sewing from top to bottom stitch Sashing > Row of Blocks > Sashing. You should have 5 rows of 4 blocks each and six rows of sashing.
☘ Printable copy of CLOVER ALL OVER ☘
I’d love to see your version of this quilt! Share a link in comments or post about it over in the Sewhooked Facebook Group!
Happy stitching!

Sewhooked Pattern Shop
My Quilty Facebook ♥ Sewhooked on FB
Sewhooked Facebook Group
Instagram
Posts on this blog may contain affiliate links. Thank you for your support. ♥


