Thank you all for your encouragement and thoughts about my new Patreon page! I quite honestly could not do this without you. ♥
And now…our free pattern!
Inspired by my round up of hand patterns a few weeks ago, I have officially checked a pattern off of the list of things I want to create: a hand making a peace sign.
I hope you enjoy this free 10″ paper pieced pattern designed using my very own left hand for inspiration. Tested for you by Amanda, @muchoxoxo on Instagram.
Want to connect with other quilters working on Paper Piecing Vintage and other Sewhooked projects? Join the Sewhooked Facebook Group for community, support & prizes!I’ll be there, as will my awesome pattern tester Amber along with many other friends of Sewhooked. We’ll answer your questions and nudge you along if you need it. Joining the group is not required, but it is fun!
PPV was my 2014 Block of the Month. This project was inspired by old-fashioned, hand-pieced quilt blocks. Because I LOVE paper piecing, I couldn’t help but create my own versions of traditional patterns I love using my favorite technique.
Quilting along with us is easy! The Paper Piecing Vintage quilt pattern already exists, so you don’t have to anxiously await each pattern to be released.
We’re making this quilt together, one block at a time, as a group. We’ll be making two blocks a month. I’ll prompt you on the second and fourth Monday to remind you which block to work on next. With a little work and a little luck, we’ll have a finished quilt top by the end of June!
Get the completed quilt pattern (more info below) from CRAFTSYor ETSY for $10 (previously $12). If you already own this pattern, you are ready to go!
Individual blocks now available by popular demand: If you want to make just one or two blocks from the set, I am releasing these patterns individually as we go. (Link to purchase Block 6 below.)
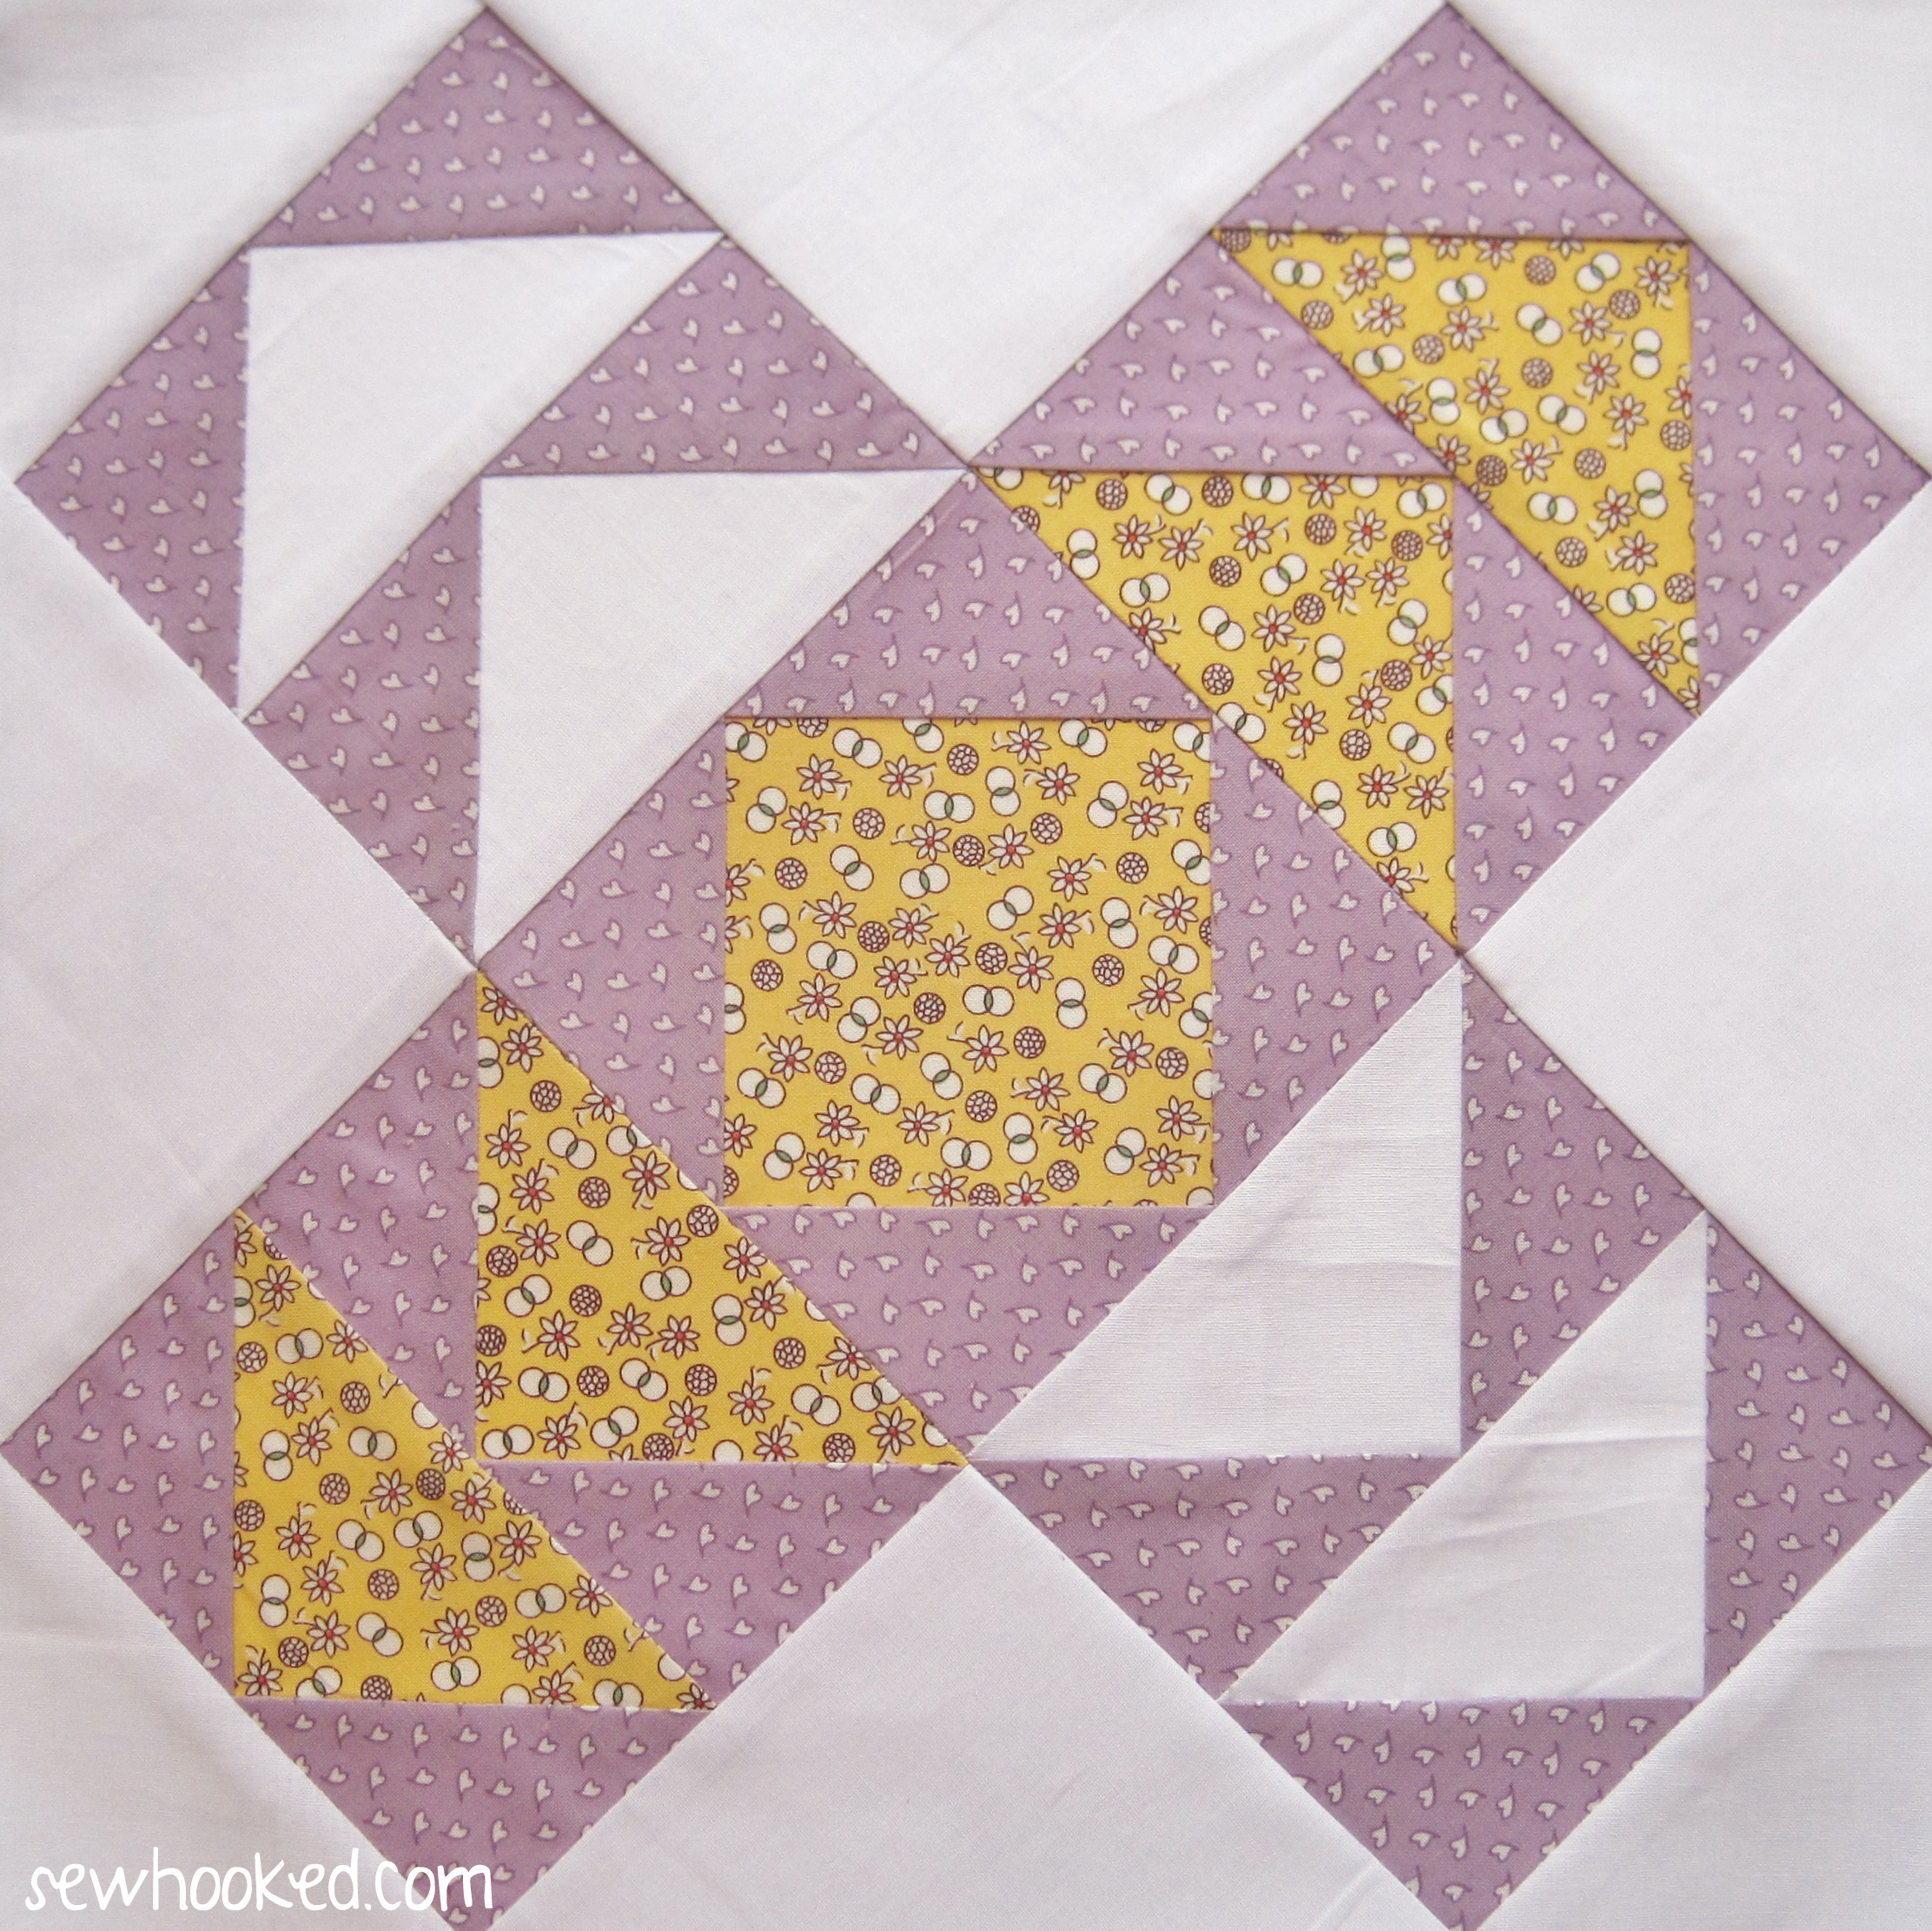
The following is the June 2014 block (Block 6 for us) made for my 1930’s vintage fabric-inspired version of this quilt (above).
Today’s pattern, Block 6 (June 2014), is Sweet Basket. You can find it beginning on page 28 in Paper Piecing Vintage, or you can purchase JUST this block pattern here.
All patterns for PPV are 6″ & 12″ (w/o seam allowance). The size you make is up to you.
The vintage version (above) is from my 2014 PPV.
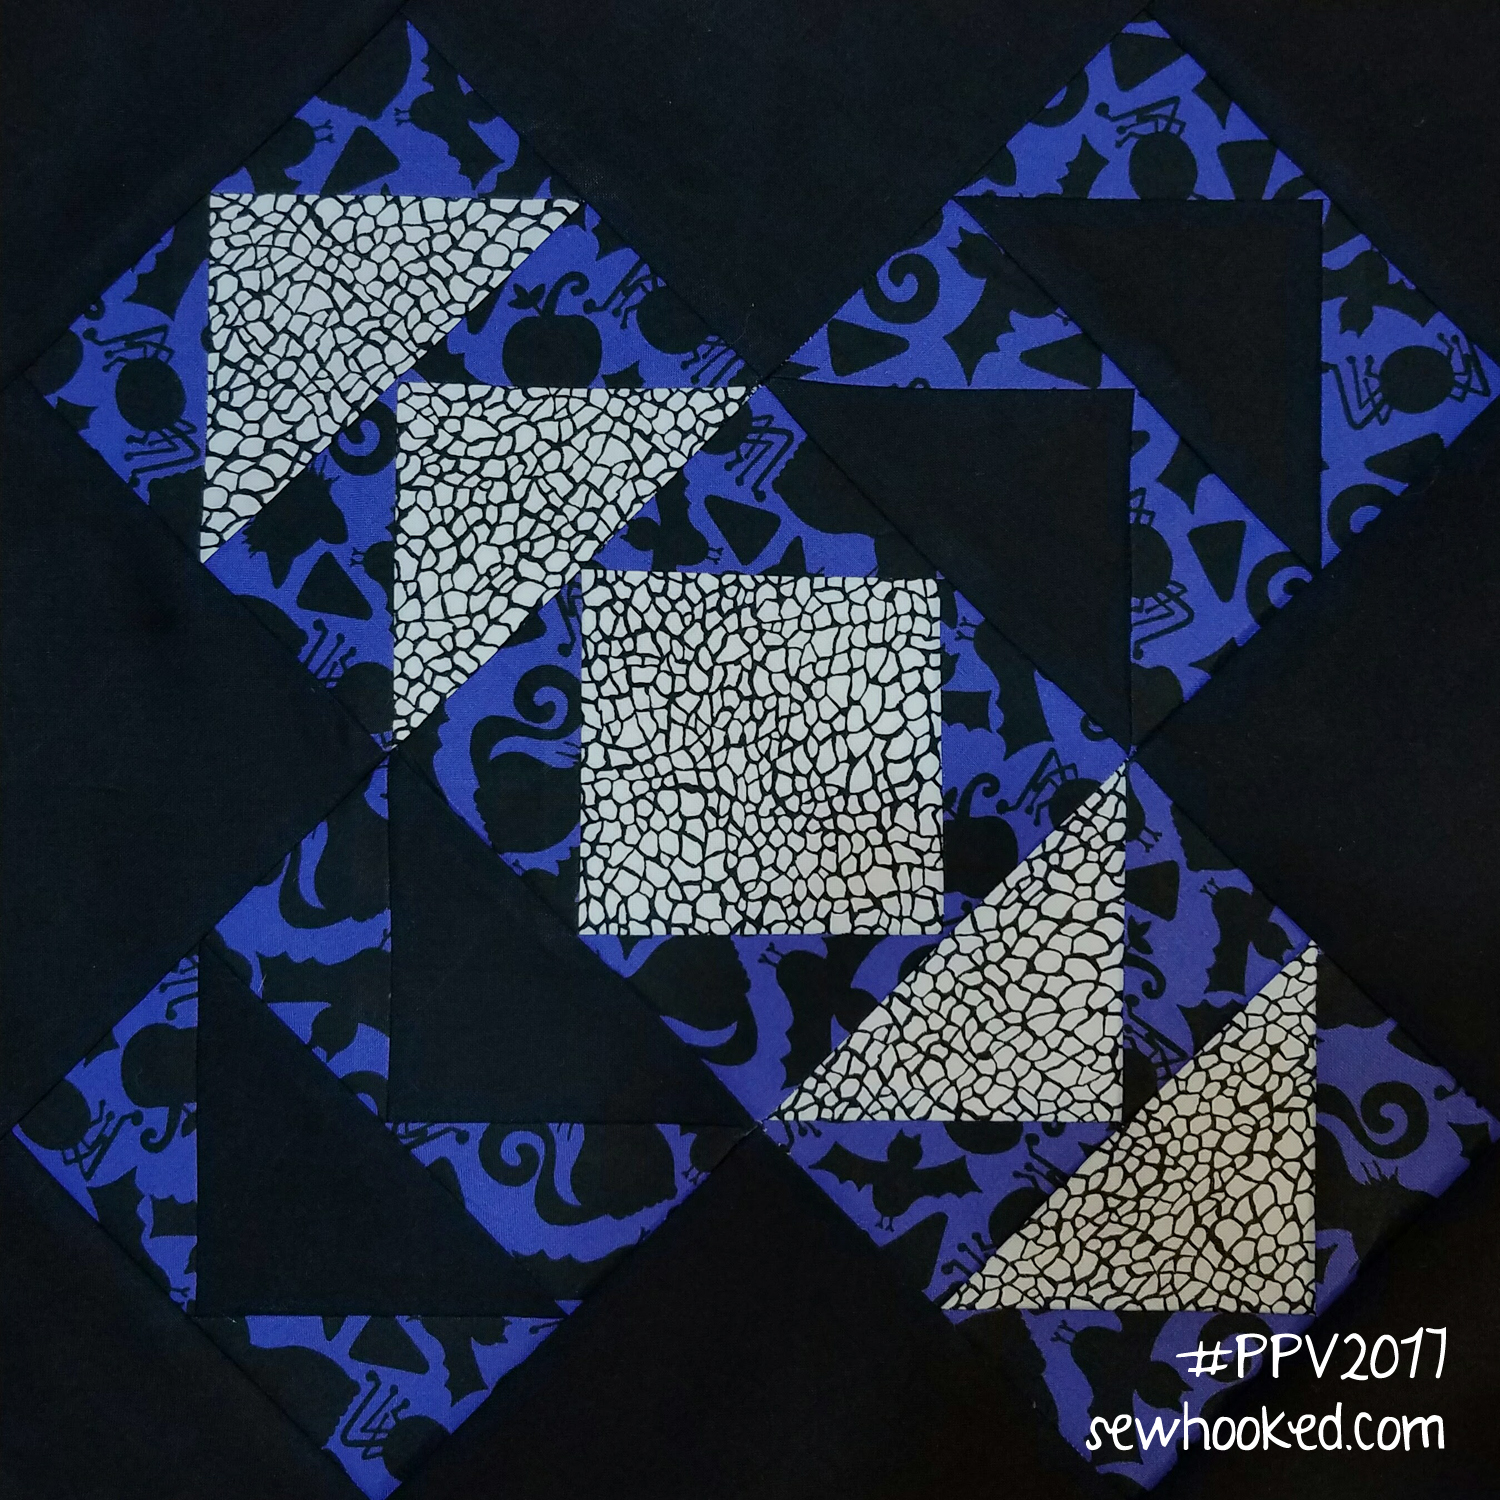
My 2017 PPV Halloween Quilt Block
What can I say? The block is called Sweet Basket and this fun fabric made me think of a Trick-or-Treat bag. It was a simple choice to make!
Making the 12″ block? Precut 3″ squares and then cut those in half on the diagonal for easy piecing of the triangles. You can make them a bit smaller, but I like a little wiggle room.
This is my color inspiration, created in EQ (subject to change as I quilt along!).
Since I’m using a lot of Halloween scraps, I’m also cutting the piano keys as I go from the leftover fabrics from each block. It will be a huge time saver at the end!
If you’d like to do a little planning, too, there is a coloring page included in the complete pattern on page 64.
Get the complete Paper Piecing Vintage pattern for $10 from…
3/4 yards (total) of multiple fabrics for optional piano key border (divide the amount across the number of fabrics you wish to use)
♥
Want to connect with other quilters working on Paper Piecing Vintage? Join the Sewhooked Facebook Group for community, support & prizes!I’ll be there, as will my awesome pattern tester Amber and many friends of Sewhooked. We’ll answer your questions and nudge you along if you need it. Joining the group is not required to quilt along.
In 2015, I participated in the EQ7 Row Along hosted by Marianne of Seams To Be Sew. Rows were created by a variety of designers to represent each of the four seasons.
My row was Spring-themed! For me, that means new life: baby chicks, grass growing, and flowers popping to life.
Well, as you probably know by now, I love block sets. Most of my events start with a block set. I couldn’t pass up an opportunity to share mix & match blocks to use for a row or for anything else the quilter might like. Each block is 6″ finished.
Want to connect with other quilters working on Paper Piecing Vintage and other Sewhooked projects? Join the Sewhooked Facebook Group for community, support & prizes!I’ll be there, as will my awesome pattern tester Amber along with many other friends of Sewhooked. We’ll answer your questions and nudge you along if you need it. Joining the group is not required, but it is fun!
There is nothing I love more than a clear blue sky and some spring sunshine. Having my kids home from college for Spring Break has made even the cloudy days feel clear and blue!
Today, I have a sweet 5″ pattern to paper piece. Want a different size? I can help with that.
Want to connect with other quilters working on Paper Piecing Vintage and other Sewhooked projects? Join the Sewhooked Facebook Group for community, support & prizes!I’ll be there, as will my awesome pattern tester Amber along with many other friends of Sewhooked. We’ll answer your questions and nudge you along if you need it. Joining the group is not required, but it is fun!
PPV was my 2014 Block of the Month. This project was inspired by old-fashioned, hand-pieced quilt blocks. Because I LOVE paper piecing, I couldn’t help but create my own versions of traditional patterns I love using my favorite technique.
Quilting along with us is easy! The Paper Piecing Vintage quilt pattern already exists, so you don’t have to anxiously await each pattern to be released.
We’re making this quilt together, one block at a time, as a group. We’ll be making two blocks a month. I’ll prompt you on the second and fourth Monday to remind you which block to work on next. With a little work and a little luck, we’ll have a finished quilt top by the end of June!
Get the completed quilt pattern (more info below) from CRAFTSYor ETSY for $10 (previously $12). If you already own this pattern, you are ready to go!
Individual blocks available by popular demand! If you want to make just one or two blocks from the set, I am releasing these patterns individually as we go. (Link to purchase Block 5 below.)
The following is the May 2014 block (Block 5 for us) made for my 1930’s vintage fabric-inspired version of this quilt (above).
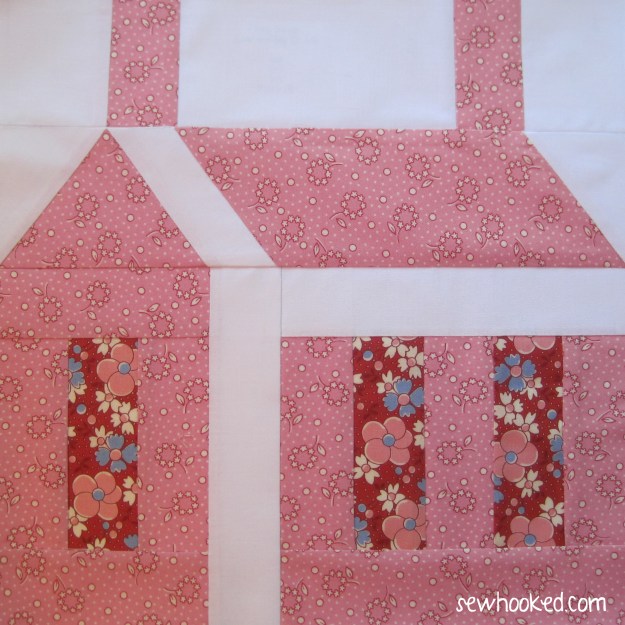
Today’s pattern, Block 5 (May 2014), is Our Little House. You can find it beginning on page 22 in Paper Piecing Vintage, or you can purchase JUST this block pattern here.
All patterns for PPV are 6″ & 12″ (w/o seam allowance). The size you make is up to you.
The vintage version (above) is from my 2014 PPV.
My 2017 PPV Halloween Quilt Block
I’ve been saving these sweet and happy ghosts just for this block.
Because you know… haunted house! ♥
I love how fun each Halloween-themed block is coming out.
Now, to get back to cutting out piano keys so I don’t have to do them all in June!
This is my color inspiration, created in EQ (subject to change as I quilt along!).
Since I’m using a lot of Halloween scraps, I’m also cutting the piano keys as I go from the leftover fabrics from each block. It will be a huge time saver at the end!
If you’d like to do a little planning, too, there is a coloring page included in the complete pattern on page 64.
Get the complete Paper Piecing Vintage pattern for $10 from…
3/4 yards (total) of multiple fabrics for optional piano key border (divide the amount across the number of fabrics you wish to use)
♥
Want to connect with other quilters working on Paper Piecing Vintage? Join the Sewhooked Facebook Group for community, support & prizes!I’ll be there, as will my awesome pattern tester Amber and many friends of Sewhooked. We’ll answer your questions and nudge you along if you need it. Joining the group is not required to quilt along.
For my birthday last year, I ordered a DNA kit from Ancestry. I’ve dabbled in genealogy off and on for years and I grew up hearing family stories, but there wasn’t much about where our family immigrated from before landing in Texas. I had always been curious, so DNA!
Do you think they make a “Kiss Me, I’m 16% Irish” tees?
Today, in honor of my 16%, and of St. Patrick’s Day on March 17 (a week from today), I have two Ireland-inspired free patterns to share.
Enjoy! ☘
A 6″ x 8″ pattern to paper piece, this little flag is SUPER fast and easy. It would also work for a variety of other flags by simply switching out the colors as needed.
Whatever you call it, this shape is kind of everywhere and on everything during March. I have found one four leaf clover in my life. Also, I kind of love the word Shamrock. It’s a good word! 5″ paper pieced.
Want to connect with other quilters working on Paper Piecing Vintage and other Sewhooked projects? Join the Sewhooked Facebook Group for community, support & prizes!I’ll be there, as will my awesome pattern tester Amber along with many other friends of Sewhooked. We’ll answer your questions and nudge you along if you need it. Joining the group is not required, but it is fun!
Want to connect with other quilters working on Paper Piecing Vintage and other Sewhooked projects? Join the Sewhooked Facebook Group for community, support & prizes!I’ll be there, as will my awesome pattern tester Amber along with many other friends of Sewhooked. We’ll answer your questions and nudge you along if you need it. Joining the group is not required, but it is fun!
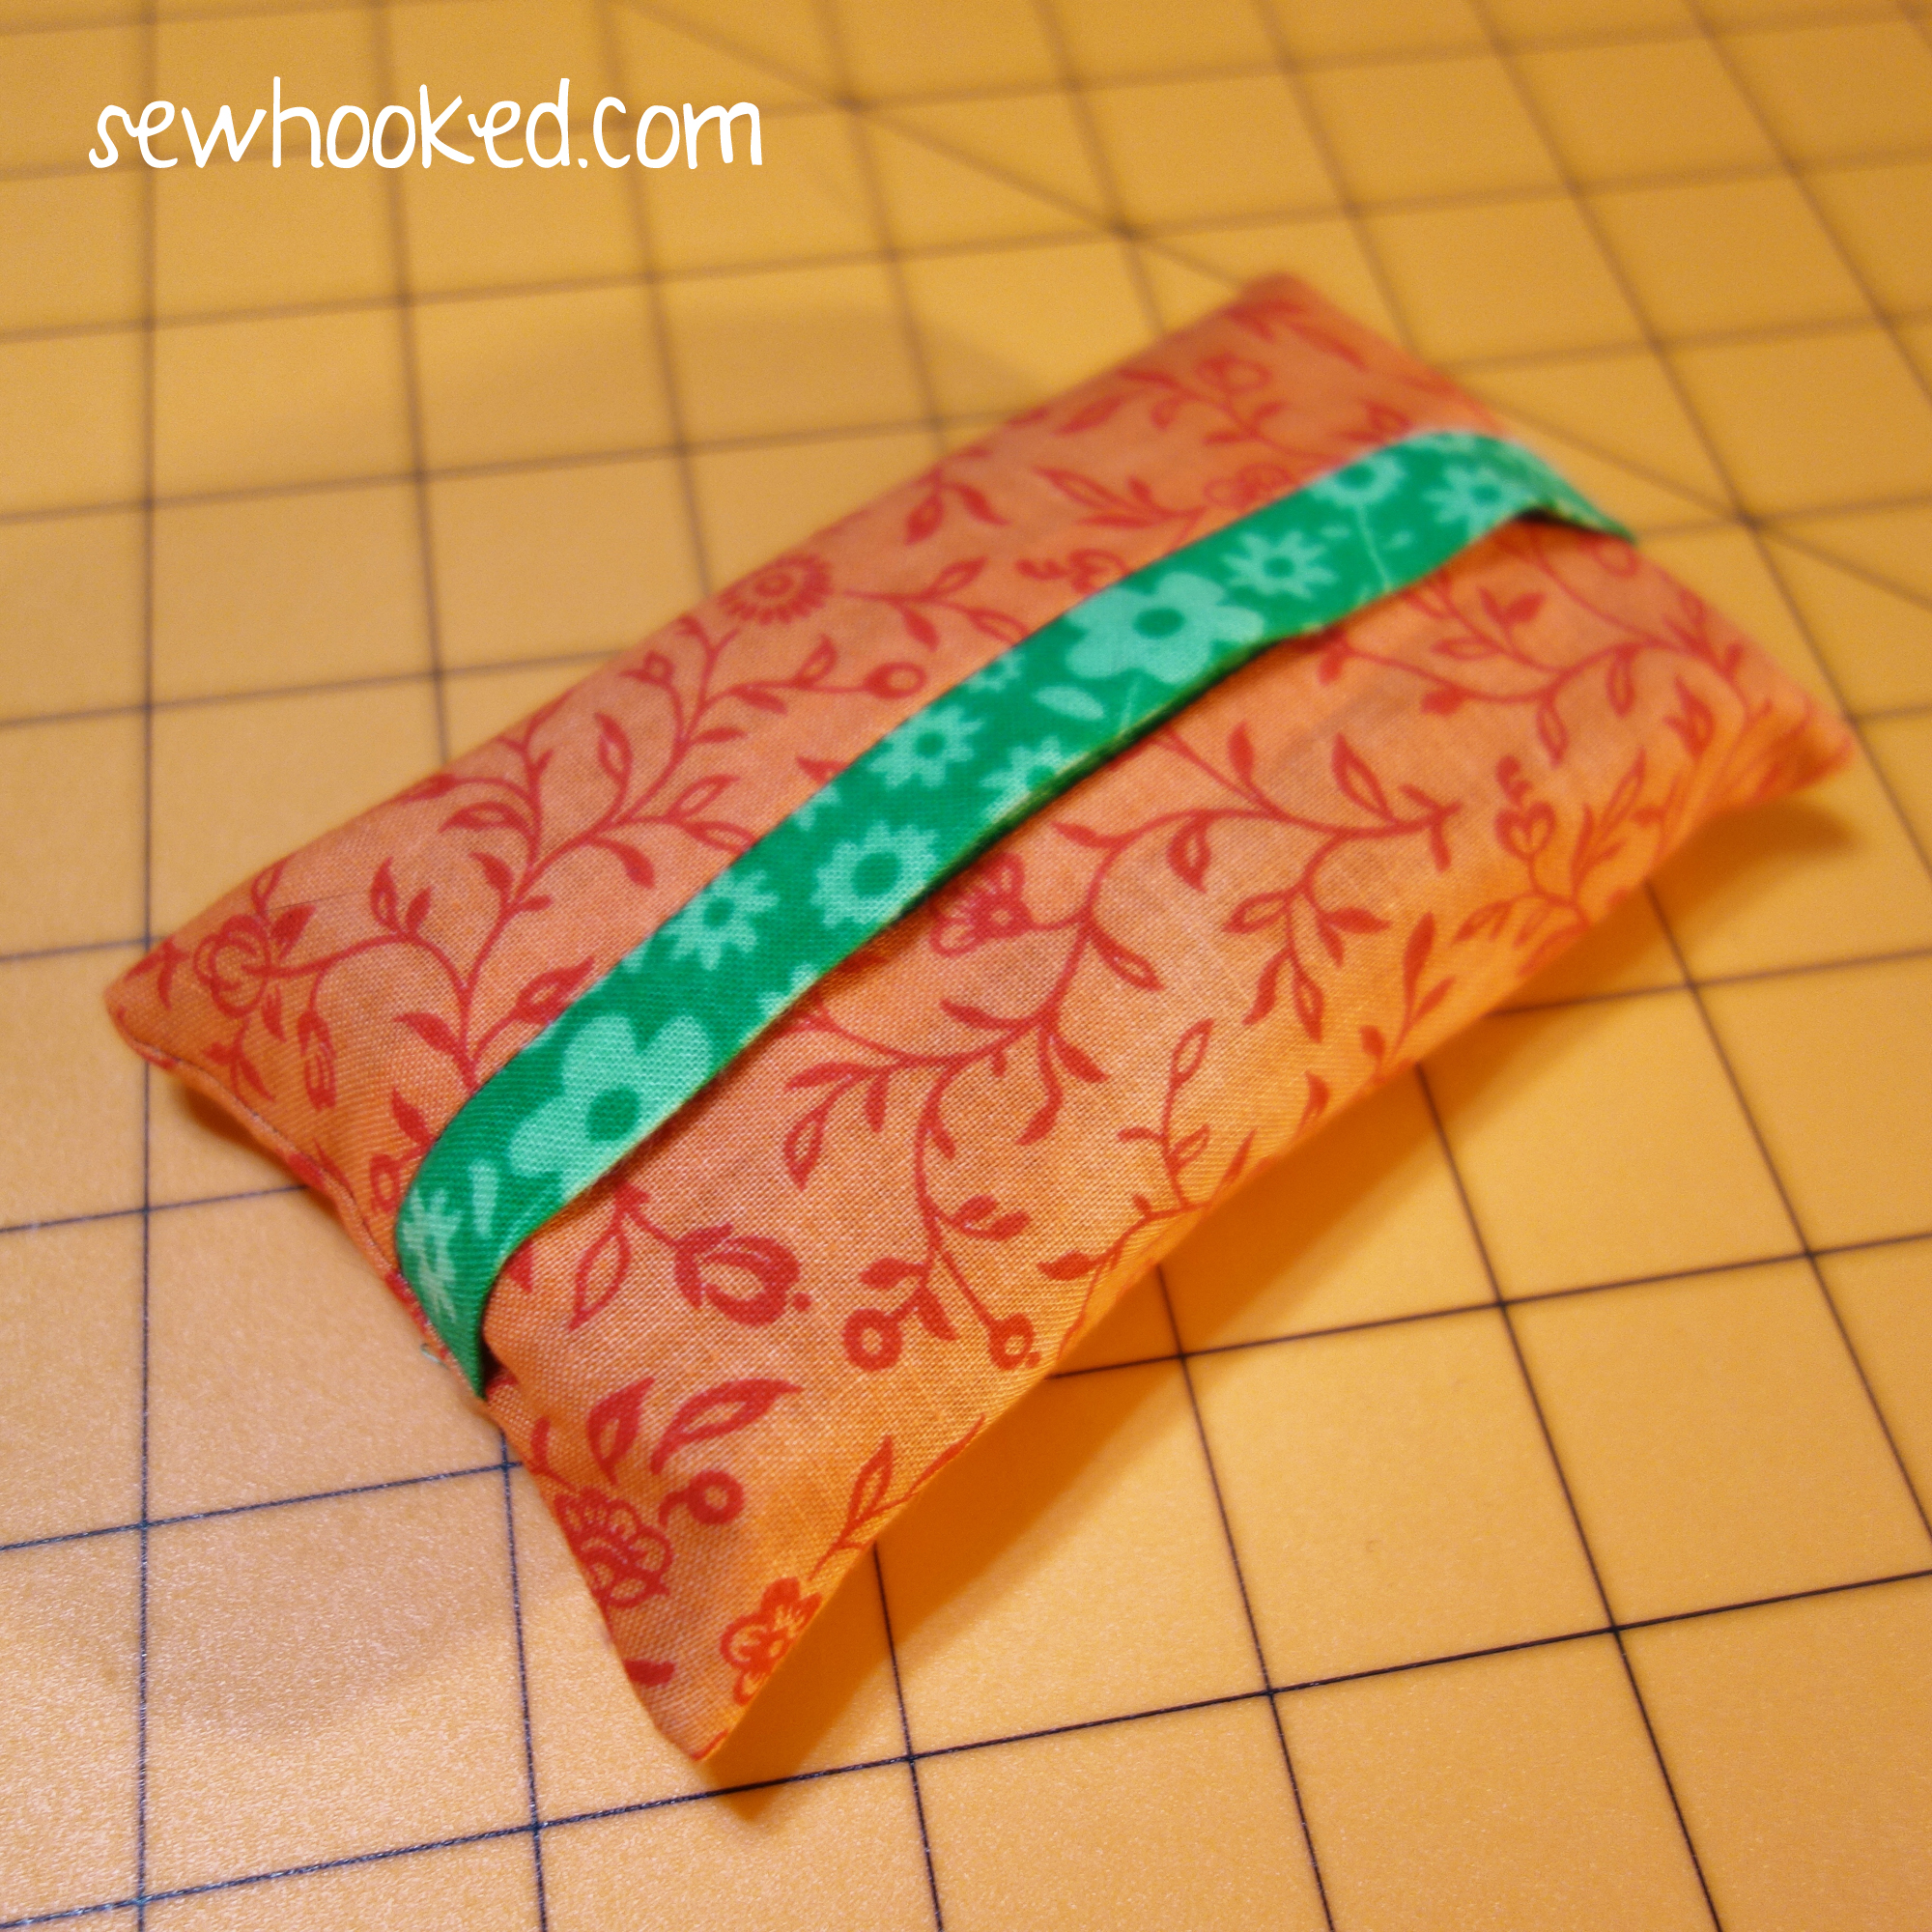
As promised several Talk to Me Tuesdays ago, we have a super simple tutorial to make a self-trimmed tissue packet cover.
Don’t want trim? I have instructions for that, too!
Please note that this tissue cover is sized to fit Kleenex Facial Tissues. Mine are a generic version but are the same size as the Kleenex. Use the brand works for you.
Adjust the dimensions if needed. You can also play with quilt blocks and directional fabric as desired.
These little packets make great gifts, swap additions, and are perfect for keeping your tissues clean and safe in your bag or purse.
First up! Self-Trimming Tissue Cover…
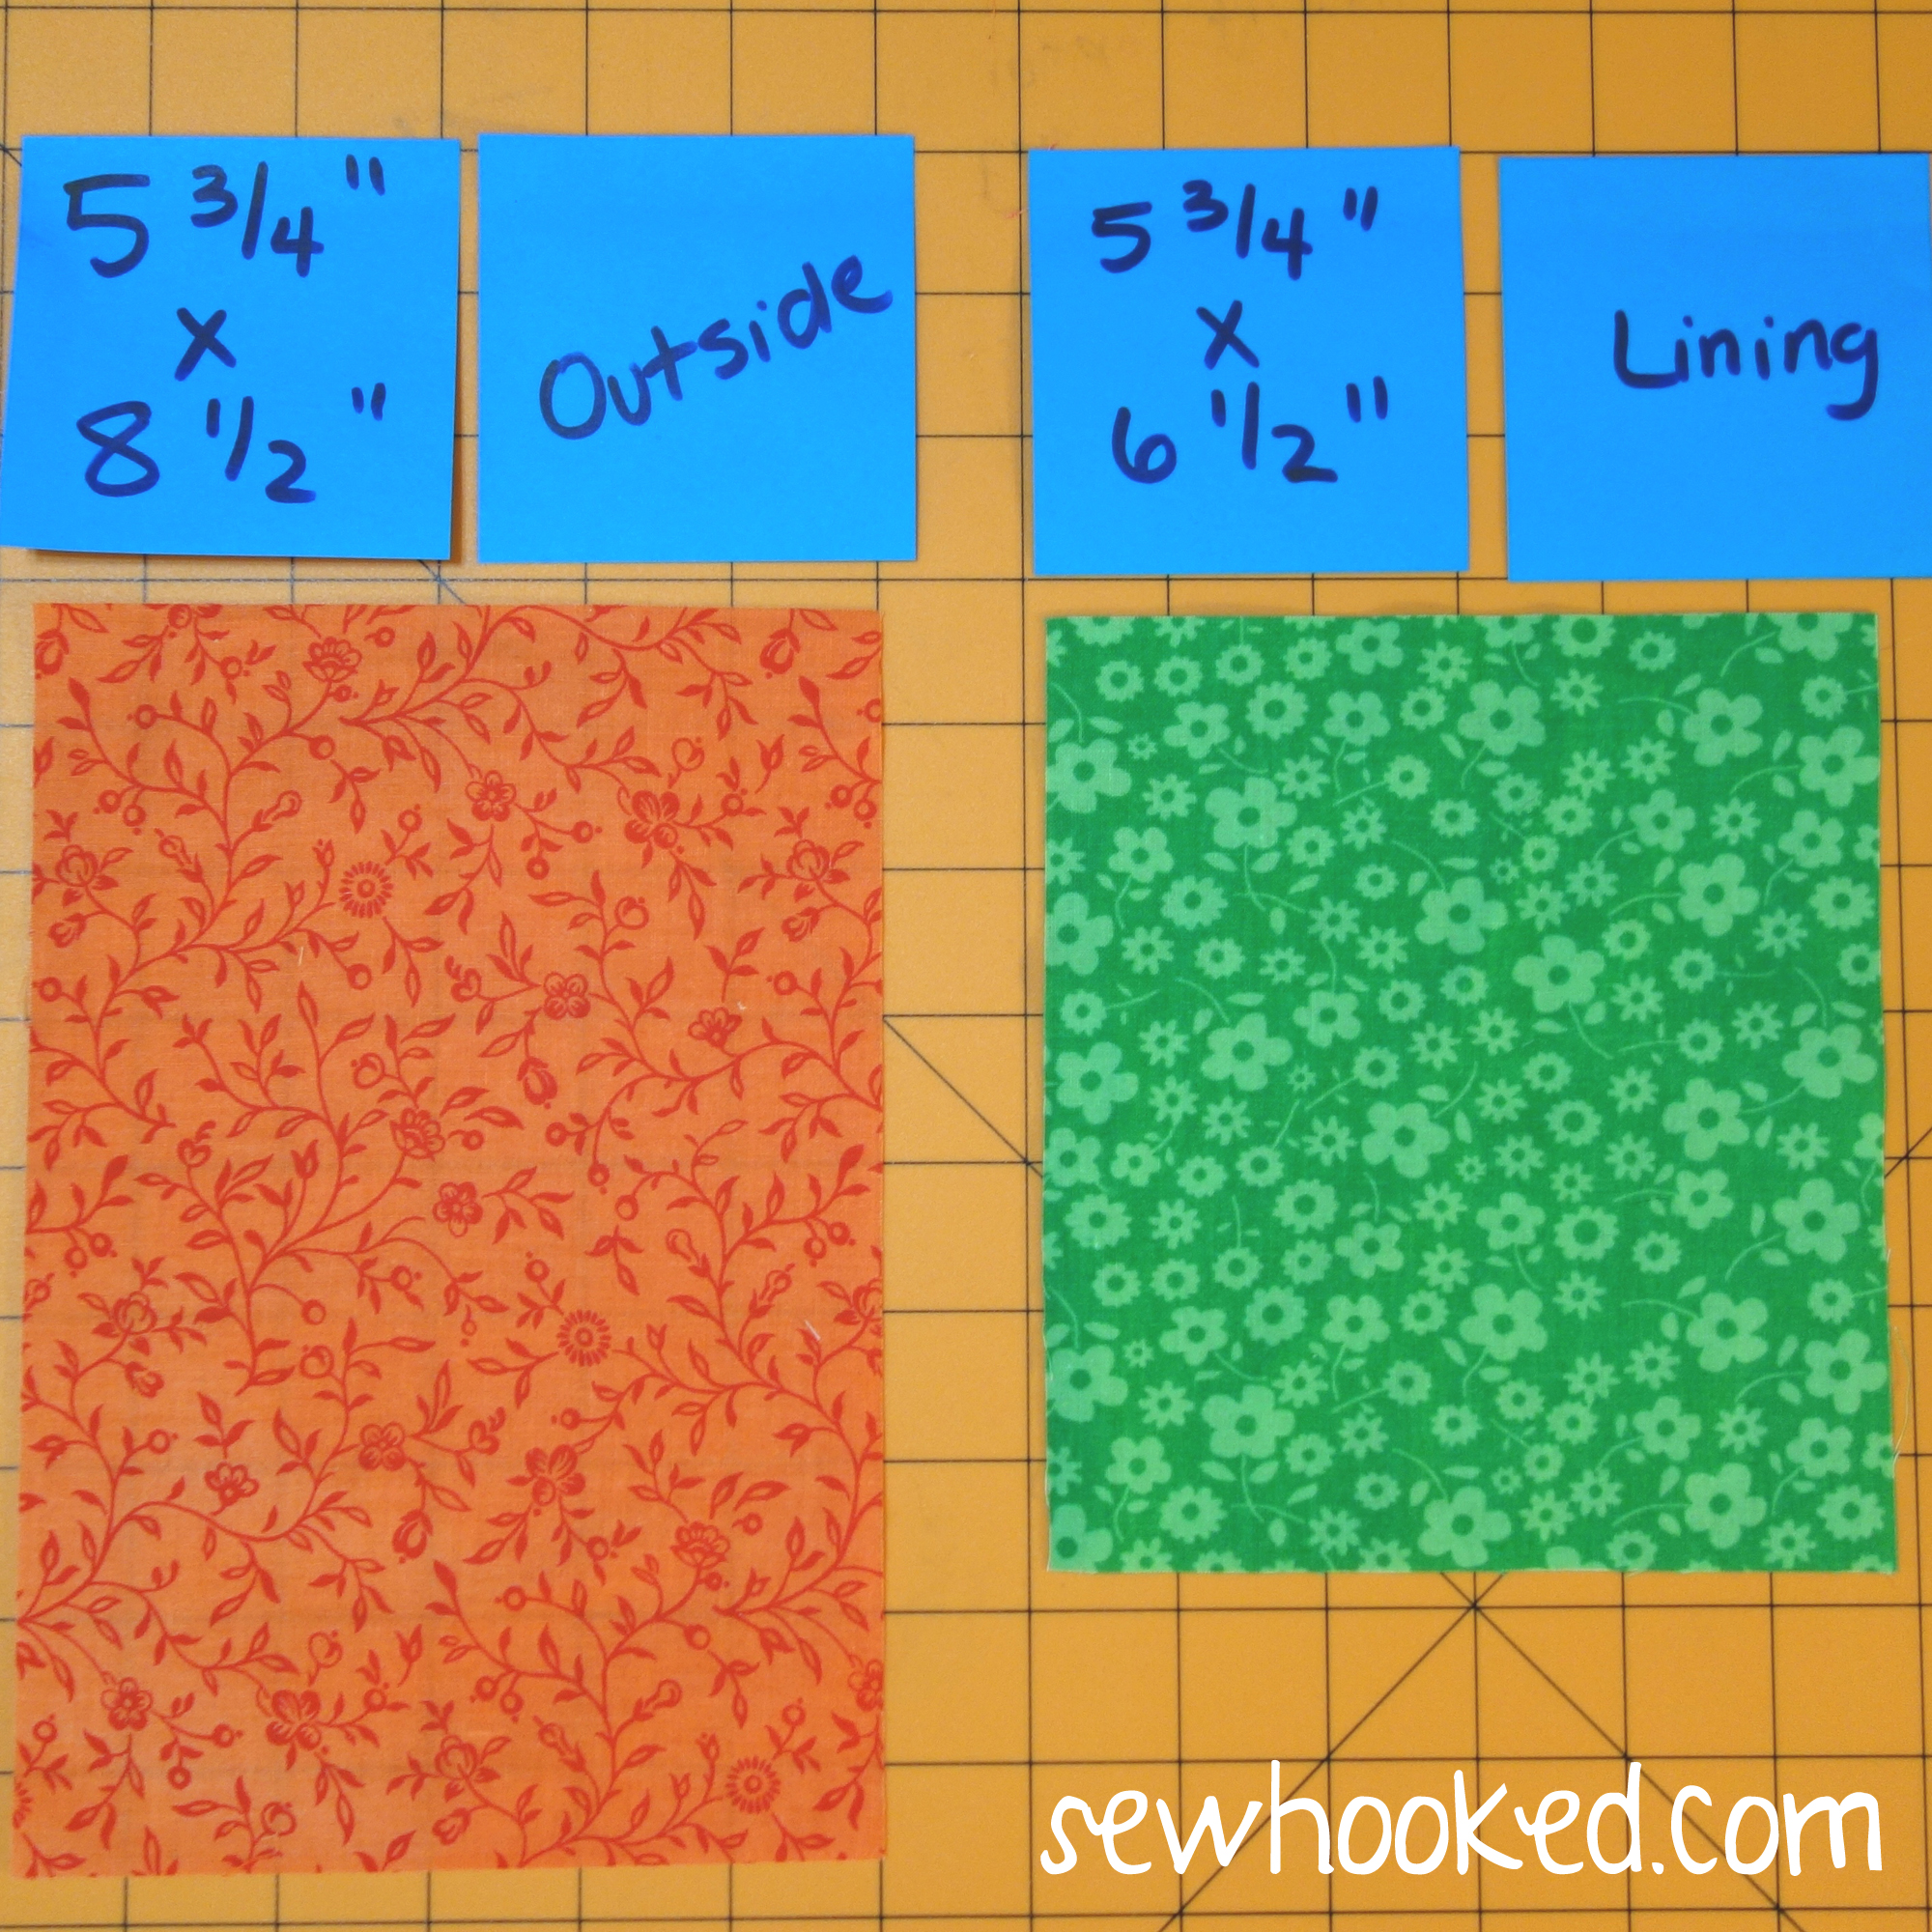
You’ll need fabric in two colors. I’m using contrasting colors to make the lining and outside very obvious. For both the trimmed and non-trimmed version, the outside will be orange.
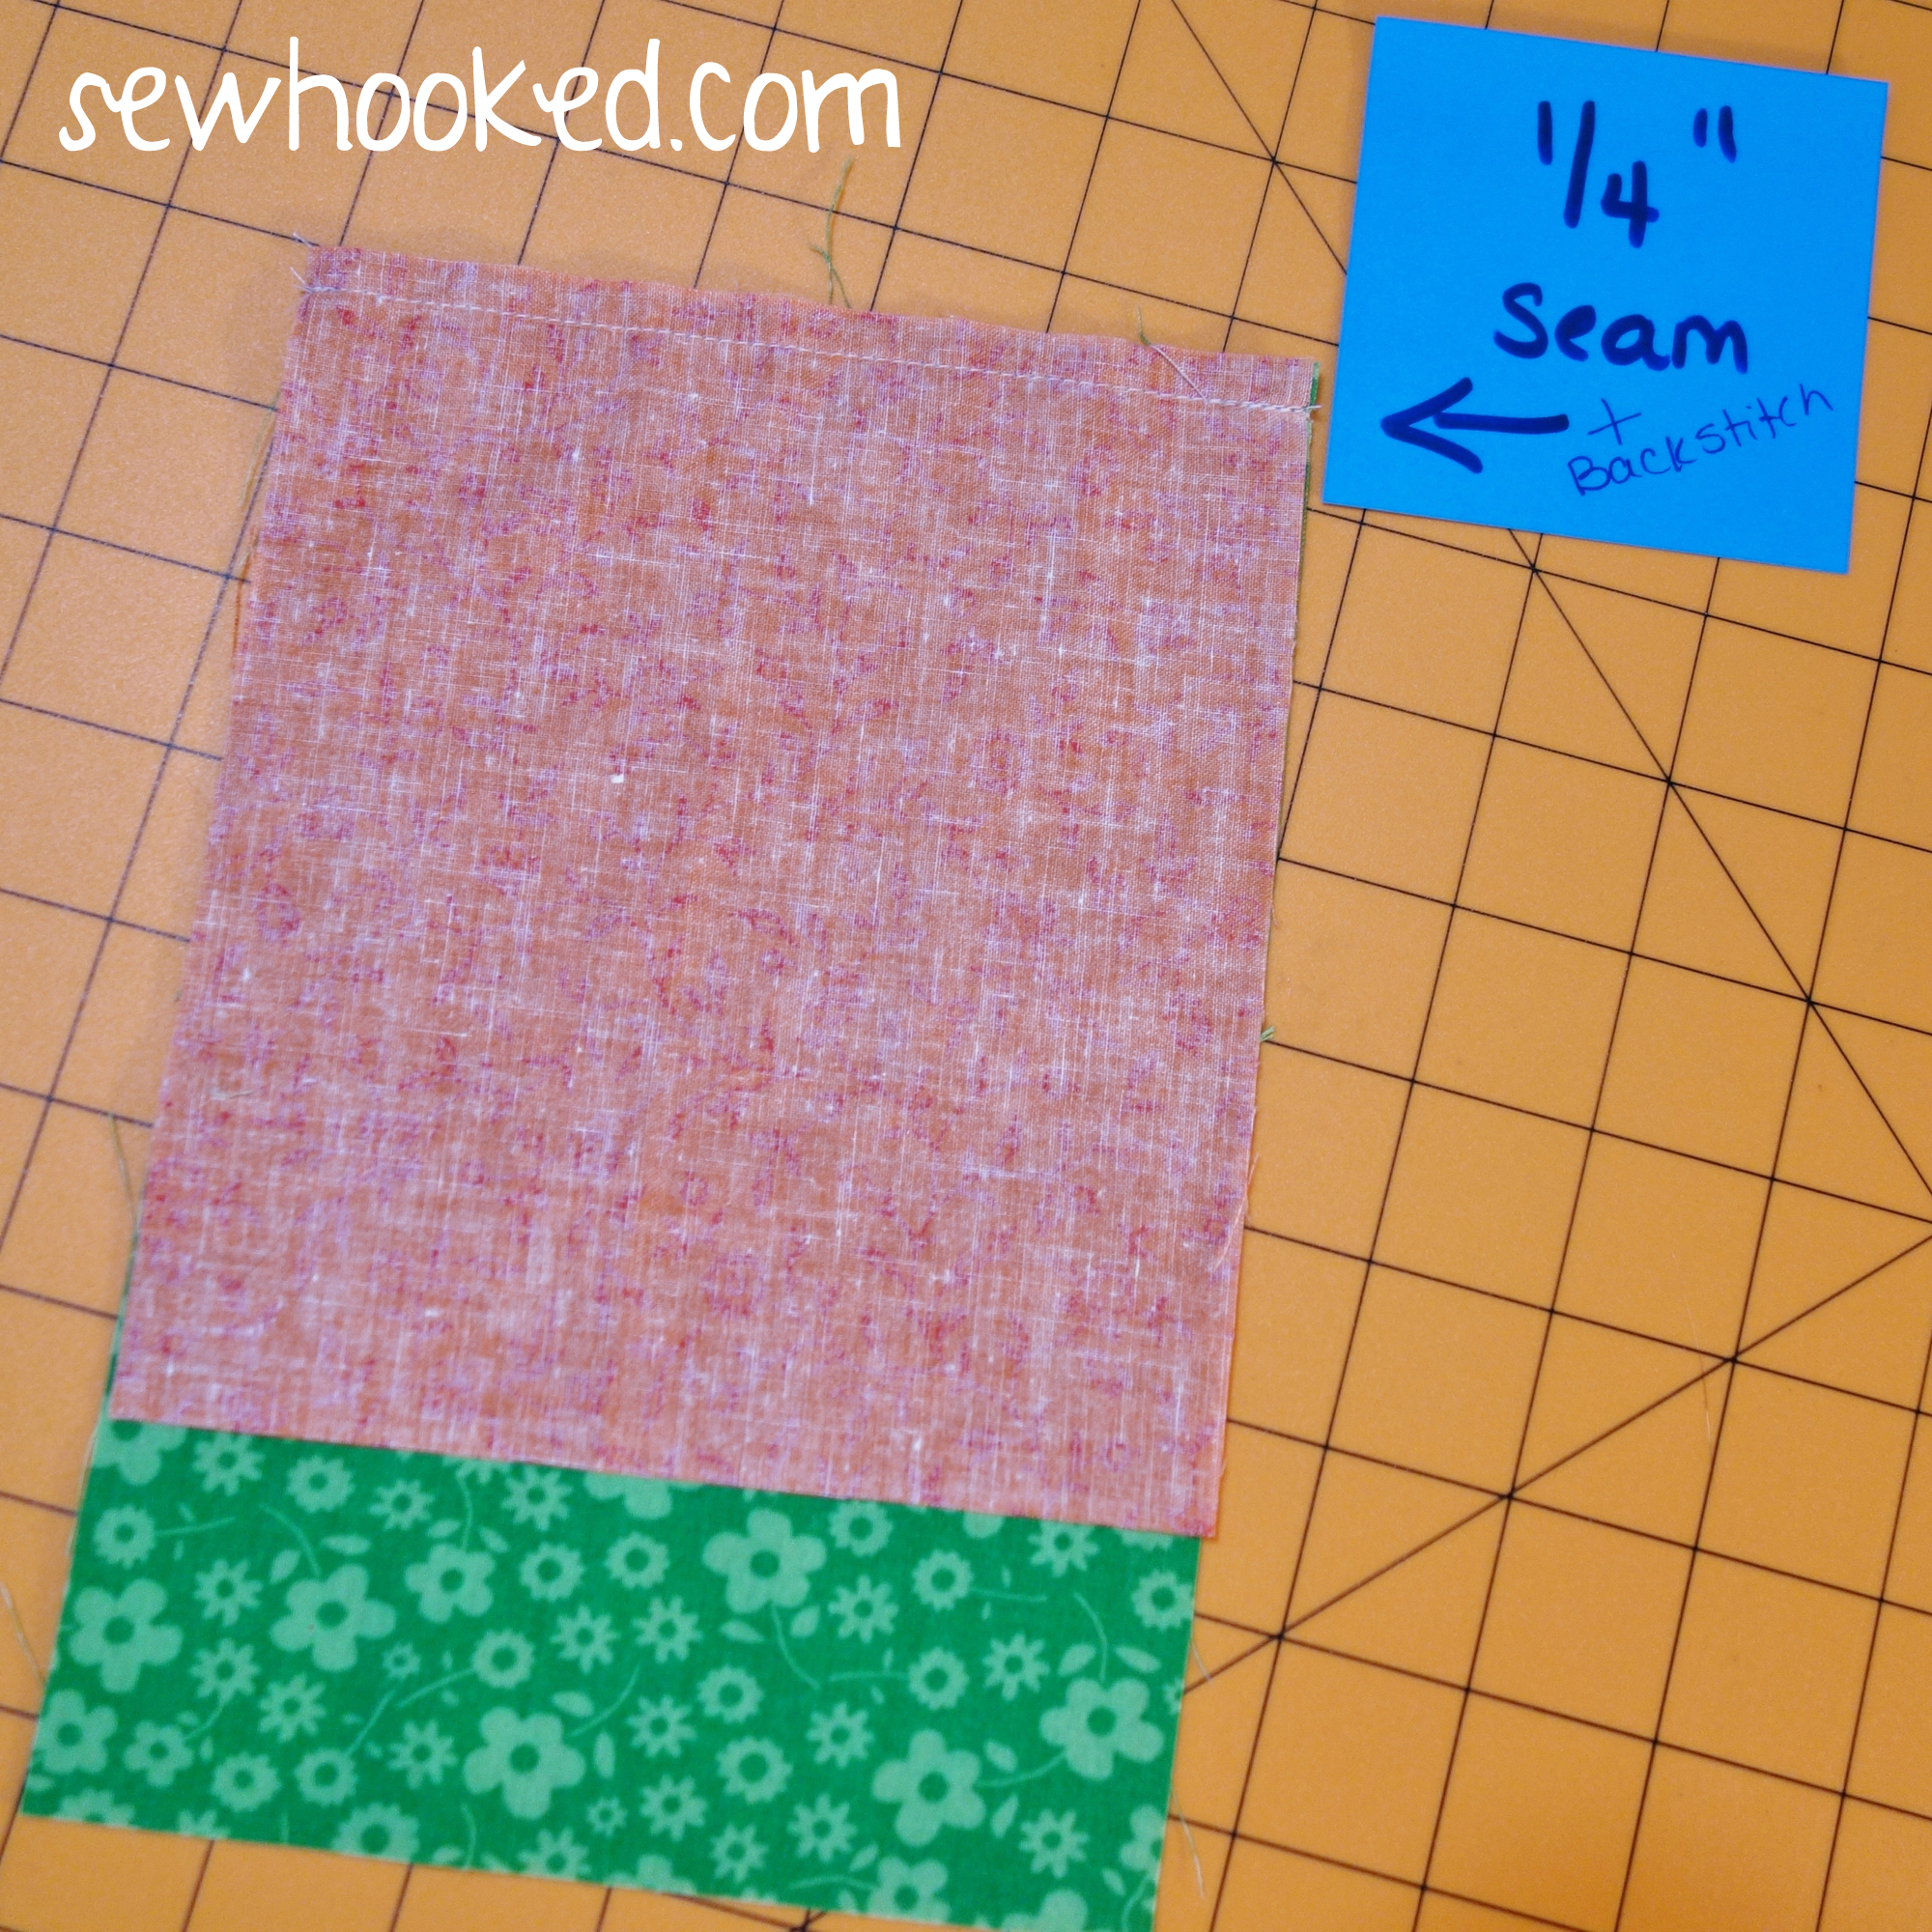
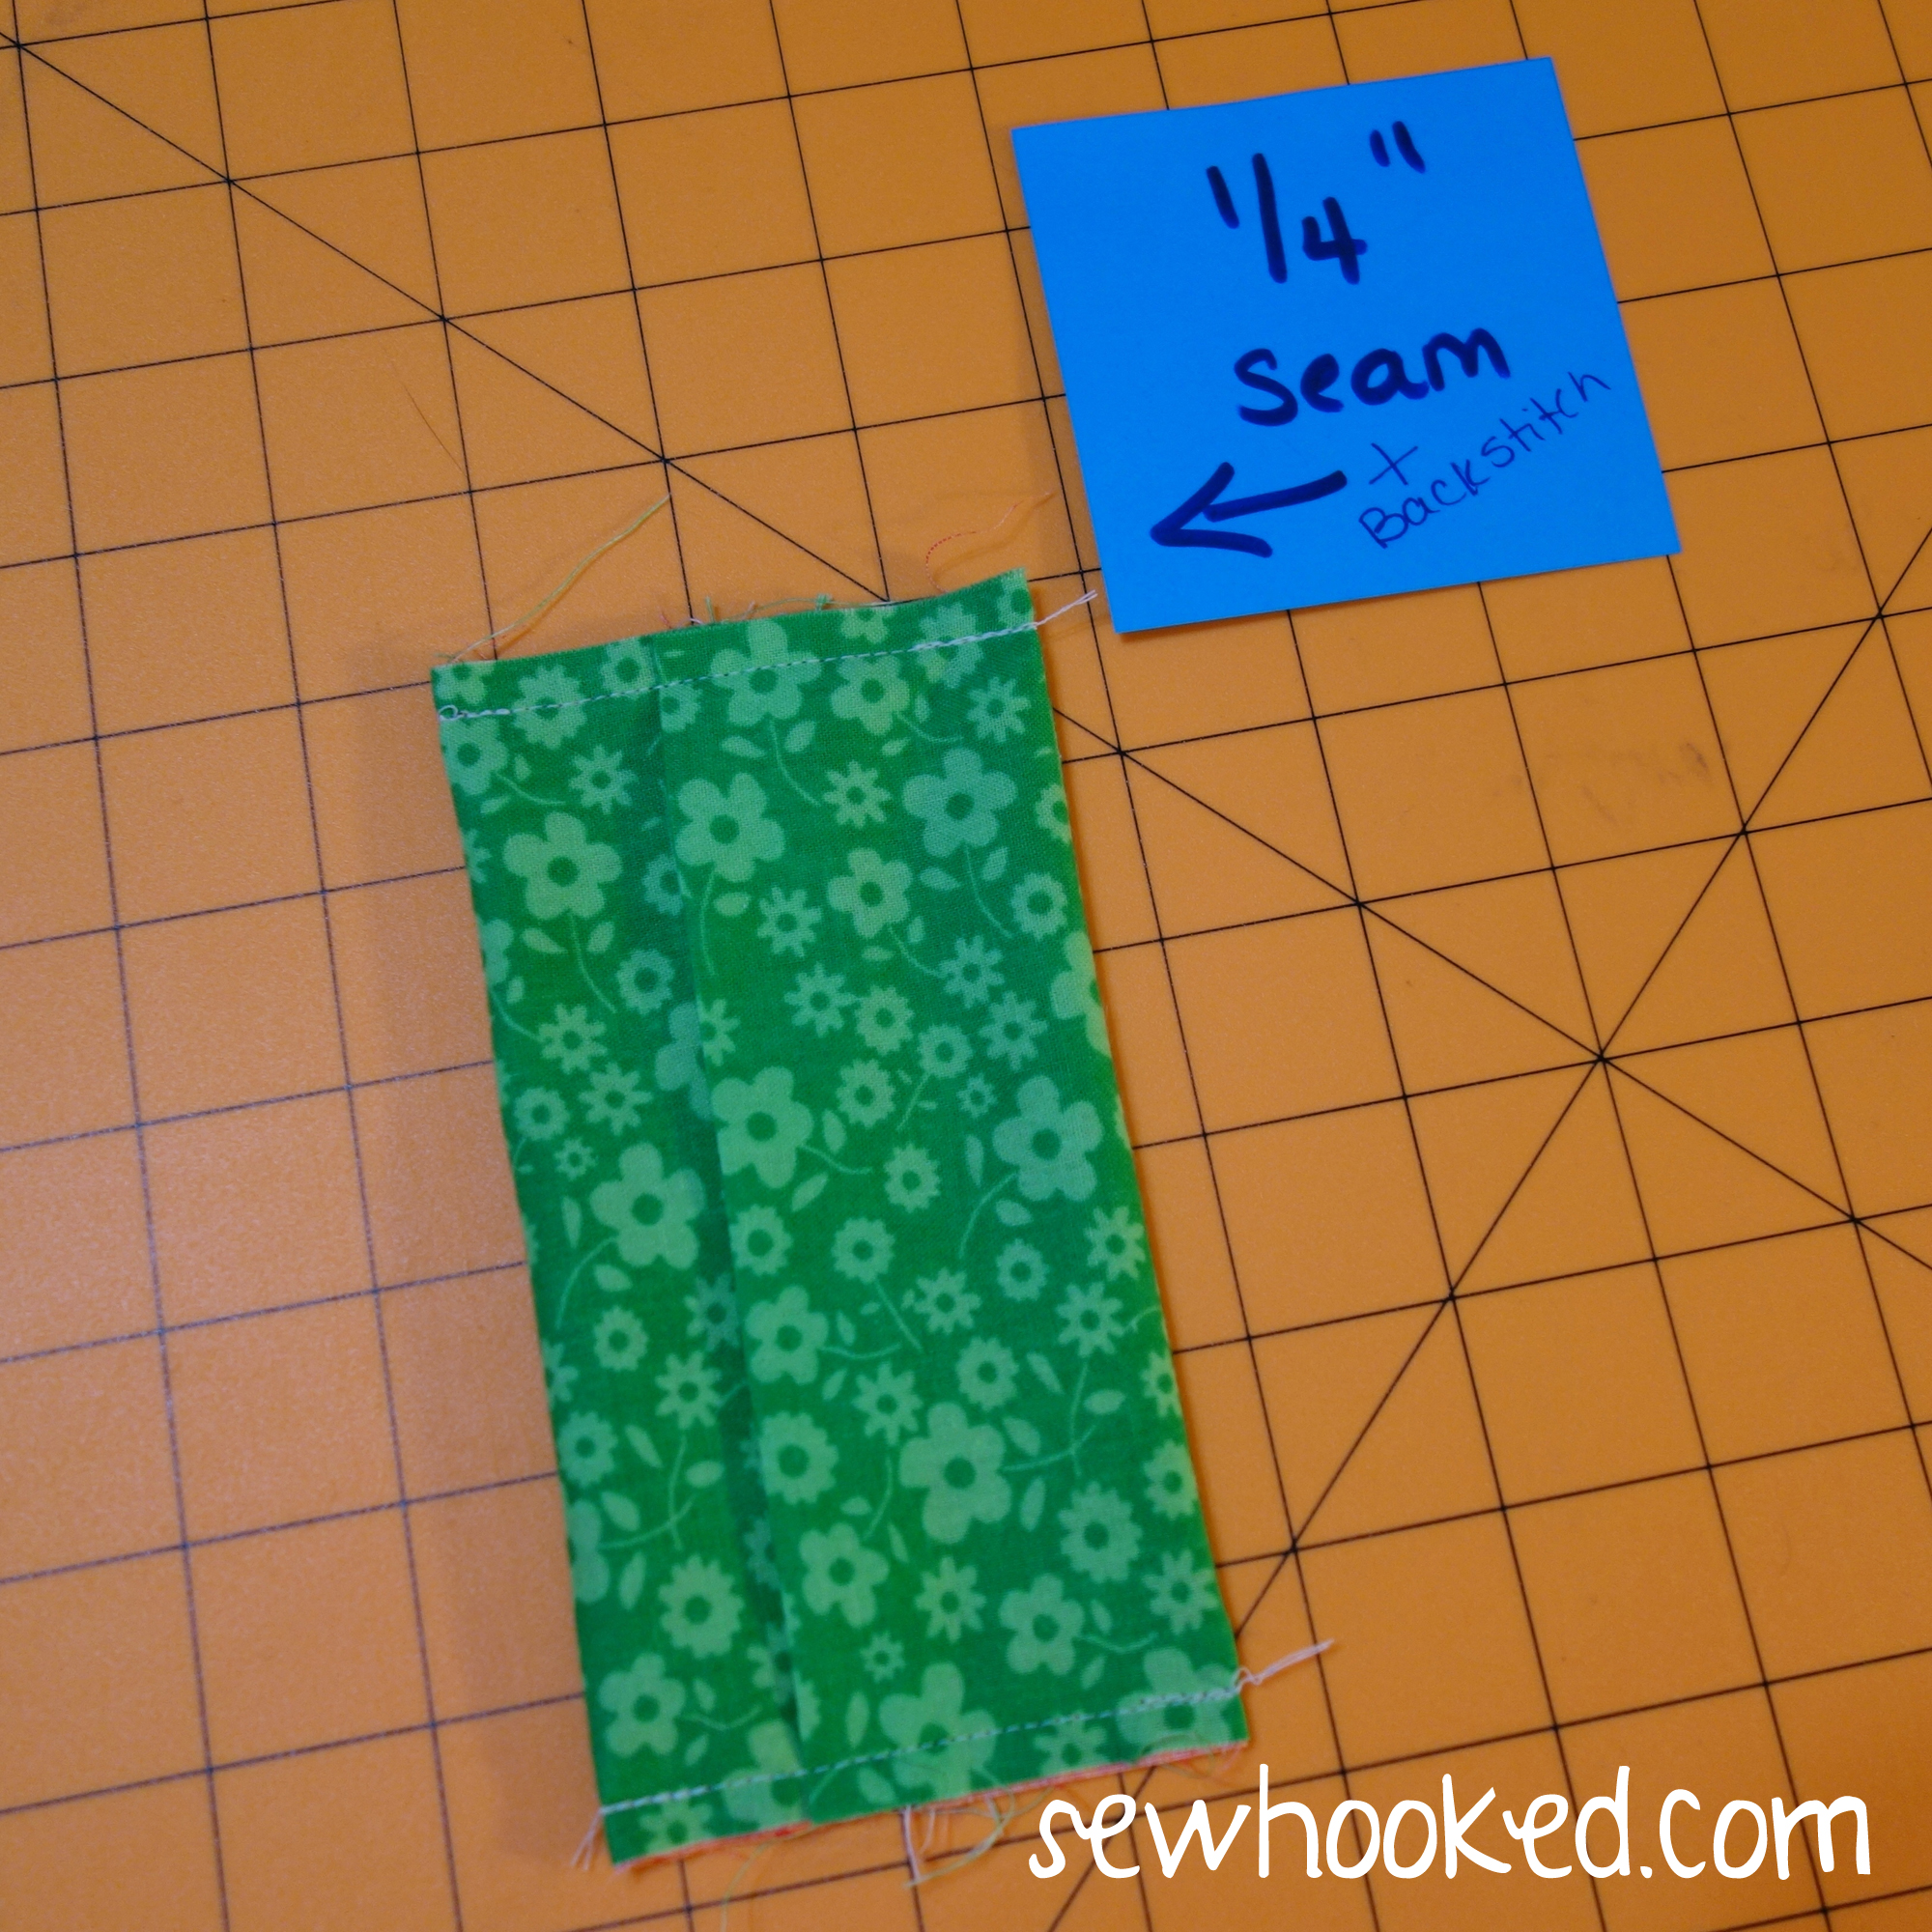
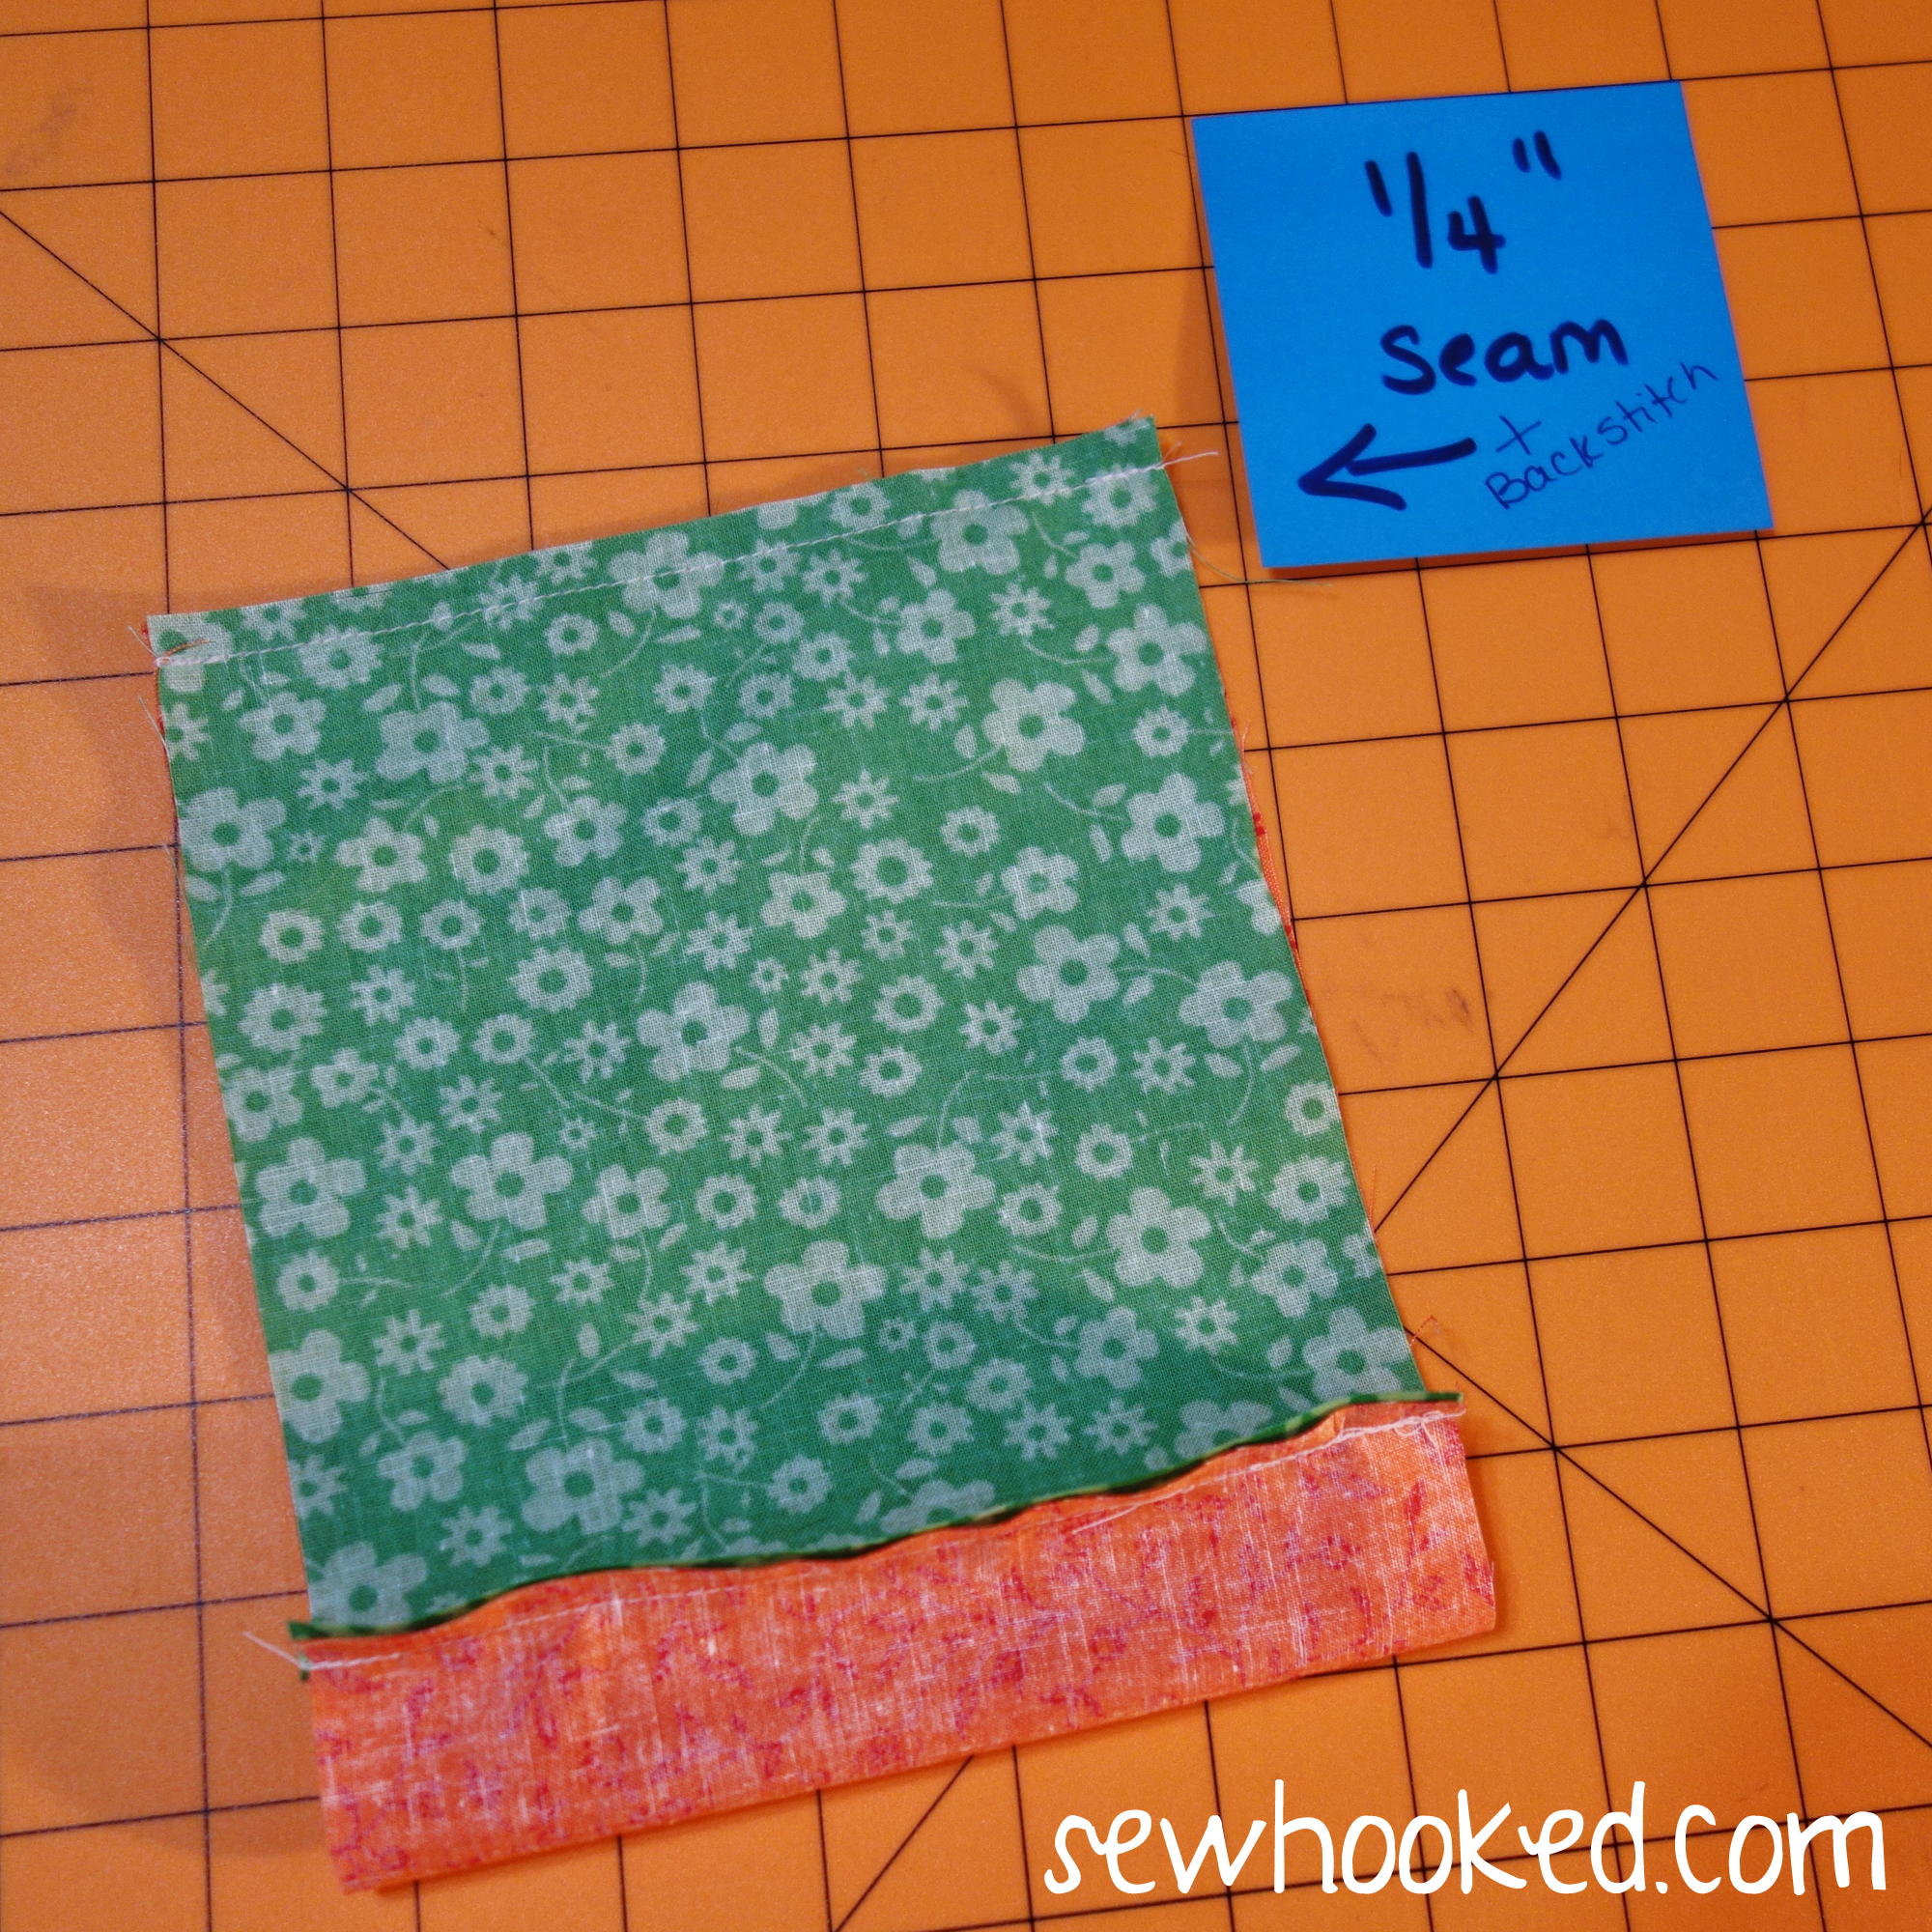
For TRIMMED Cover:
Lining/Trim – 5 3/4″ x 8 1/2″
Outside – 5 3/4″ x 6 1/2″
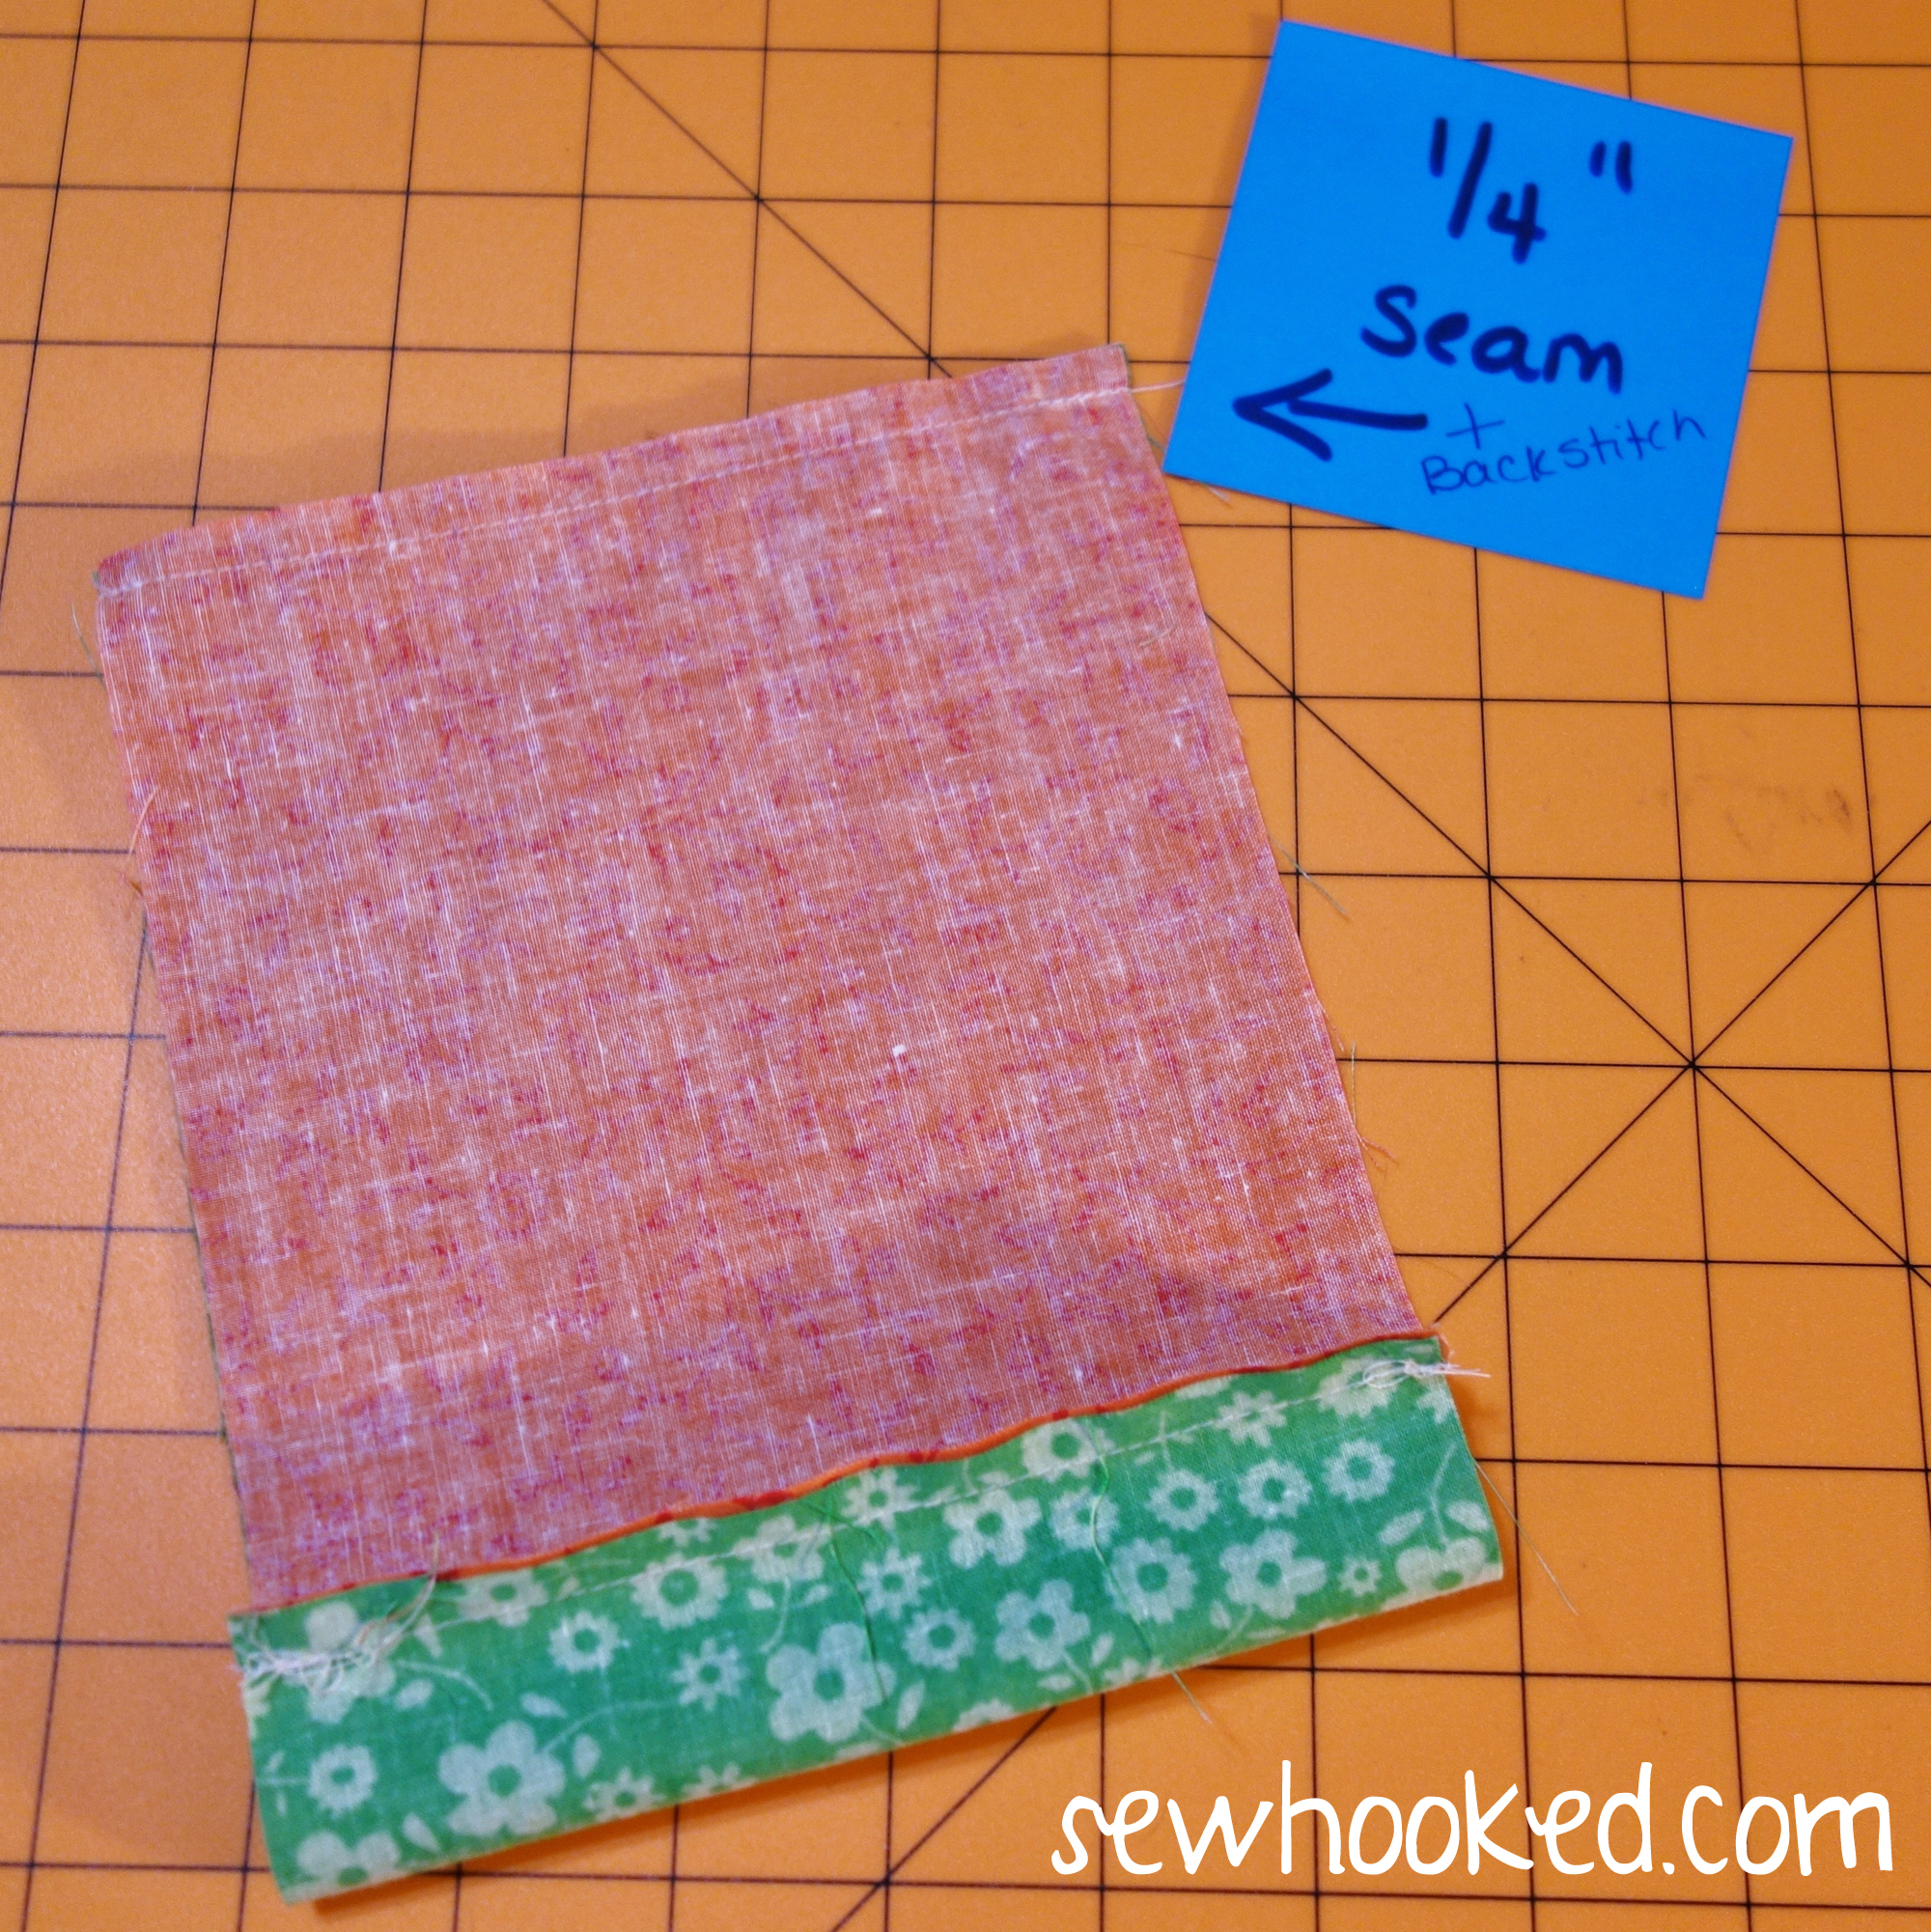
With right sides together, line one end of OUTSIDE to one end of LINING/TRIM on the side that measures 5 3/4″.
Stitch a 1/4″ seam with backstitching at both ends.
Line up opposite ends and repeat the 1/4″ seam with backstitching along the other 5 3/4″ side.
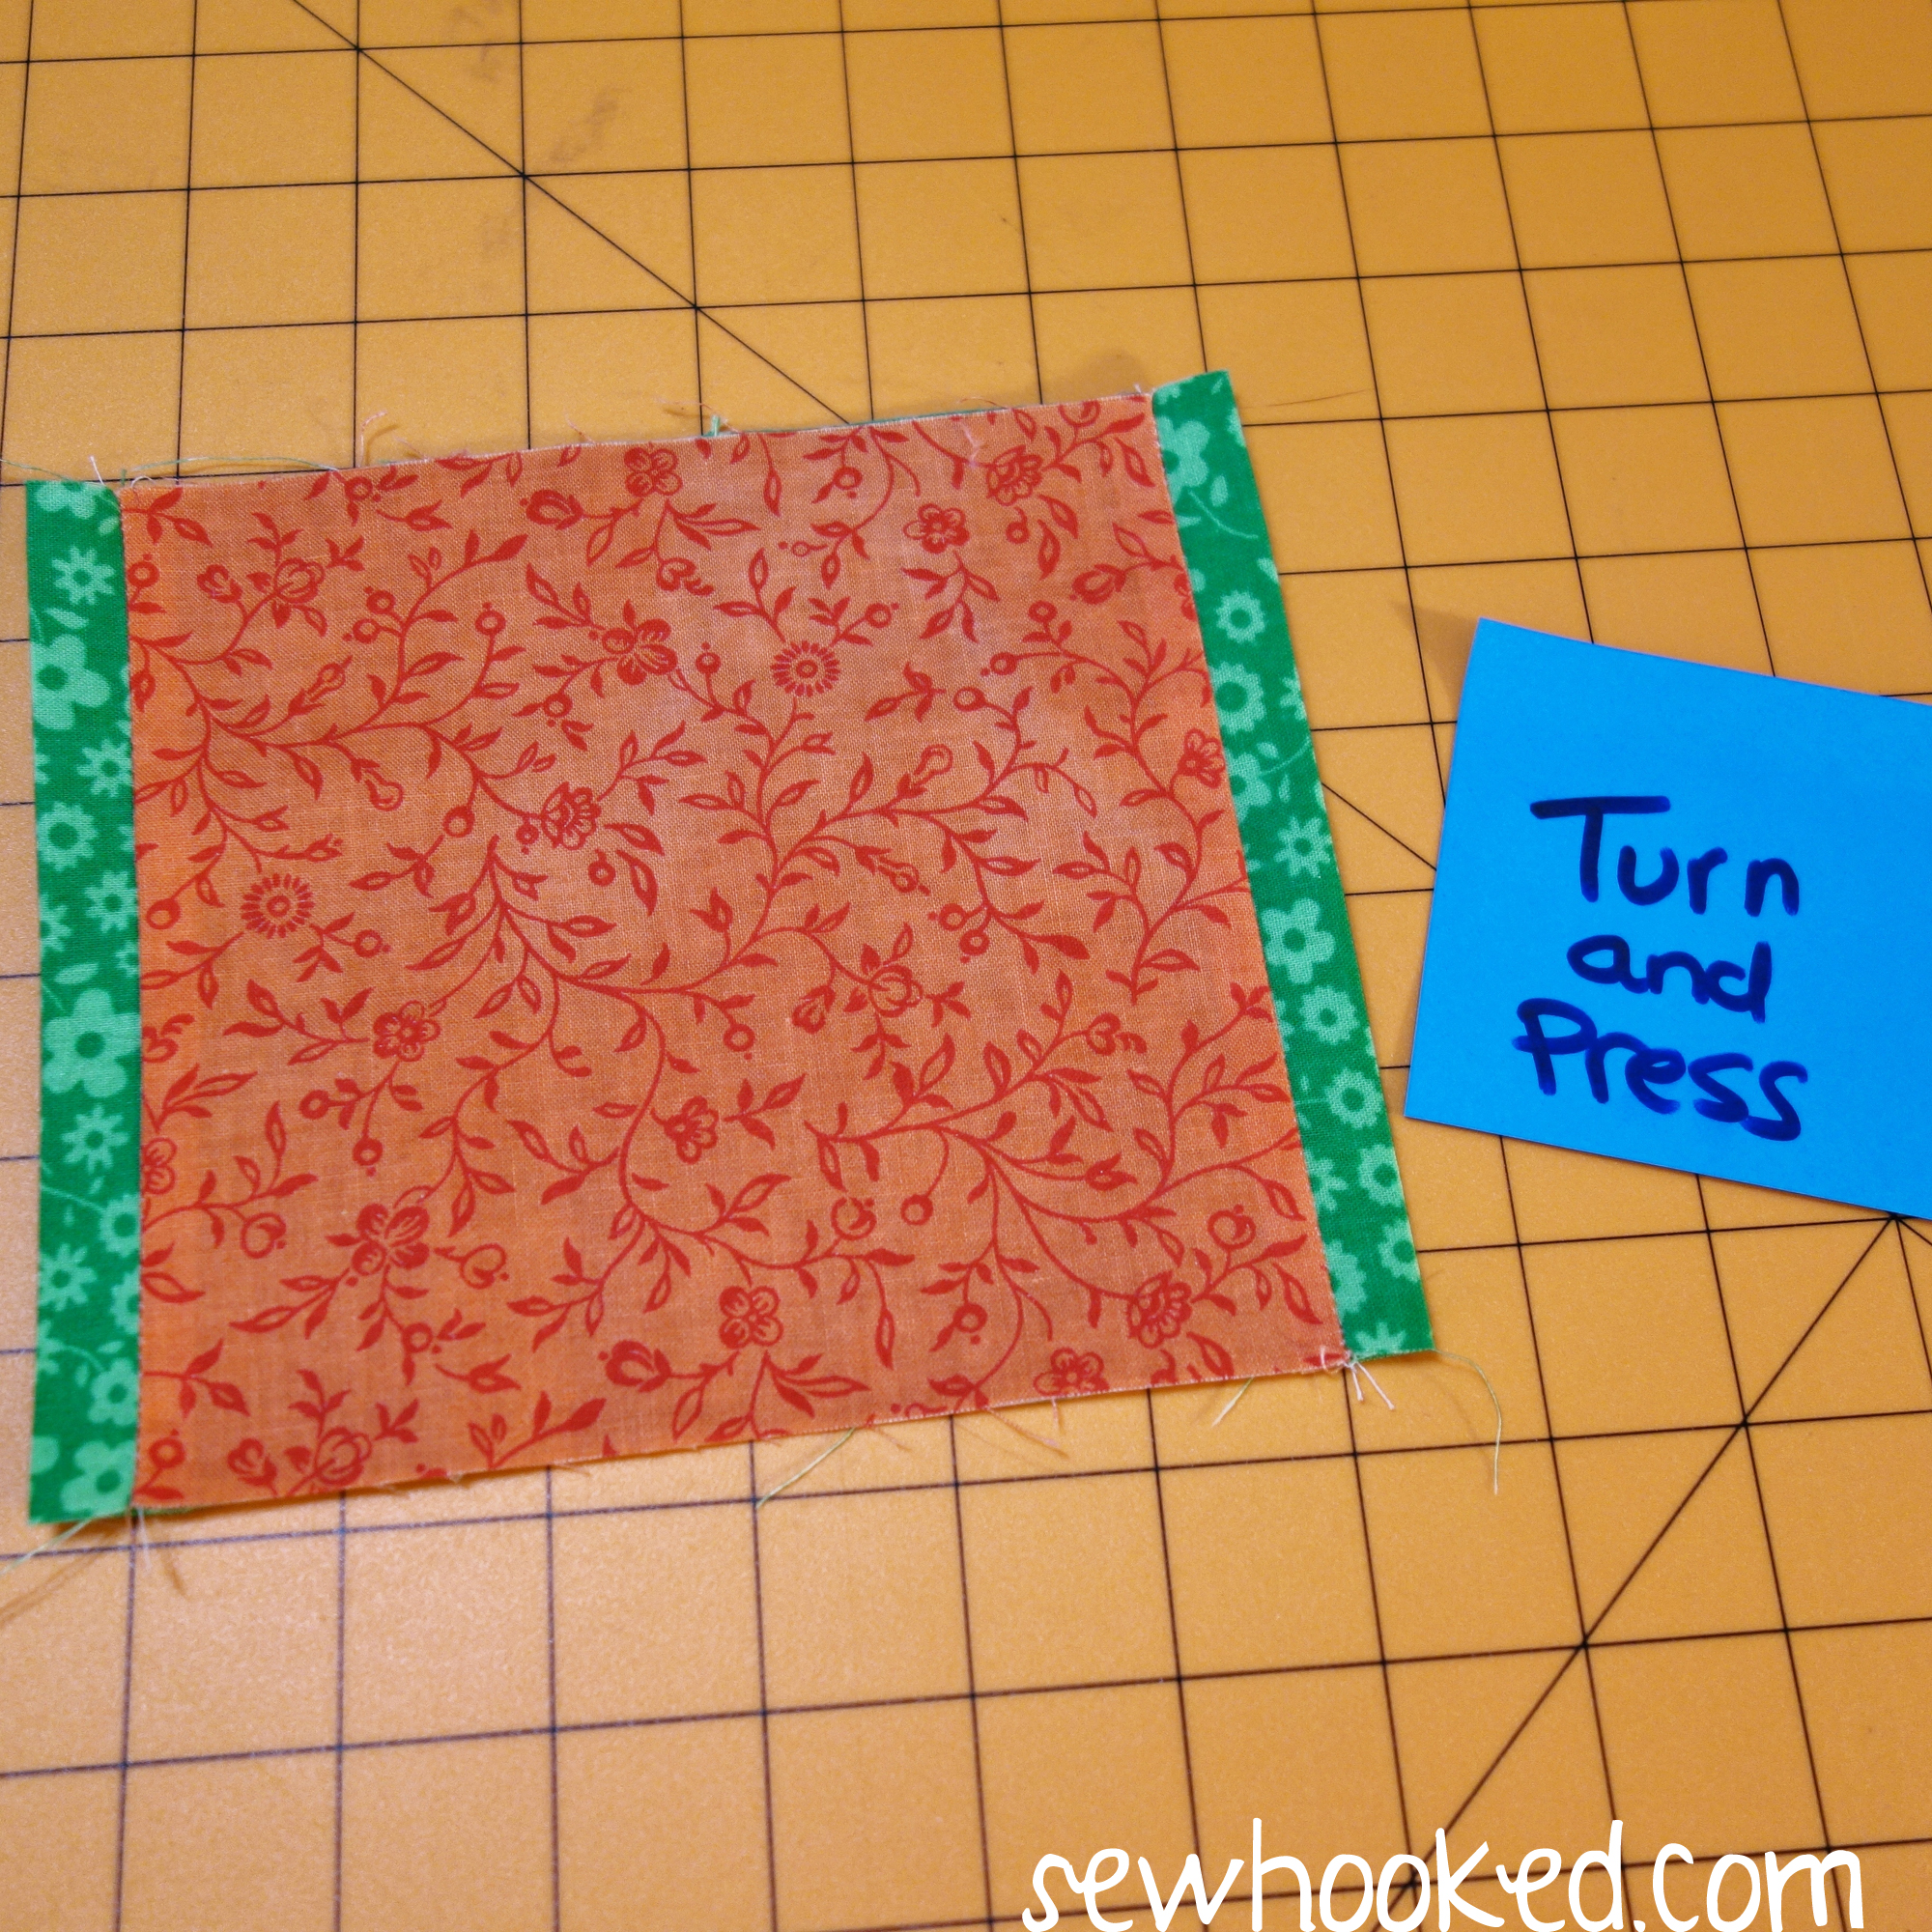
Turn so that wrong sides of the fabric are together. Adjust so that each end of TRIM is approximately the same size.
Press.
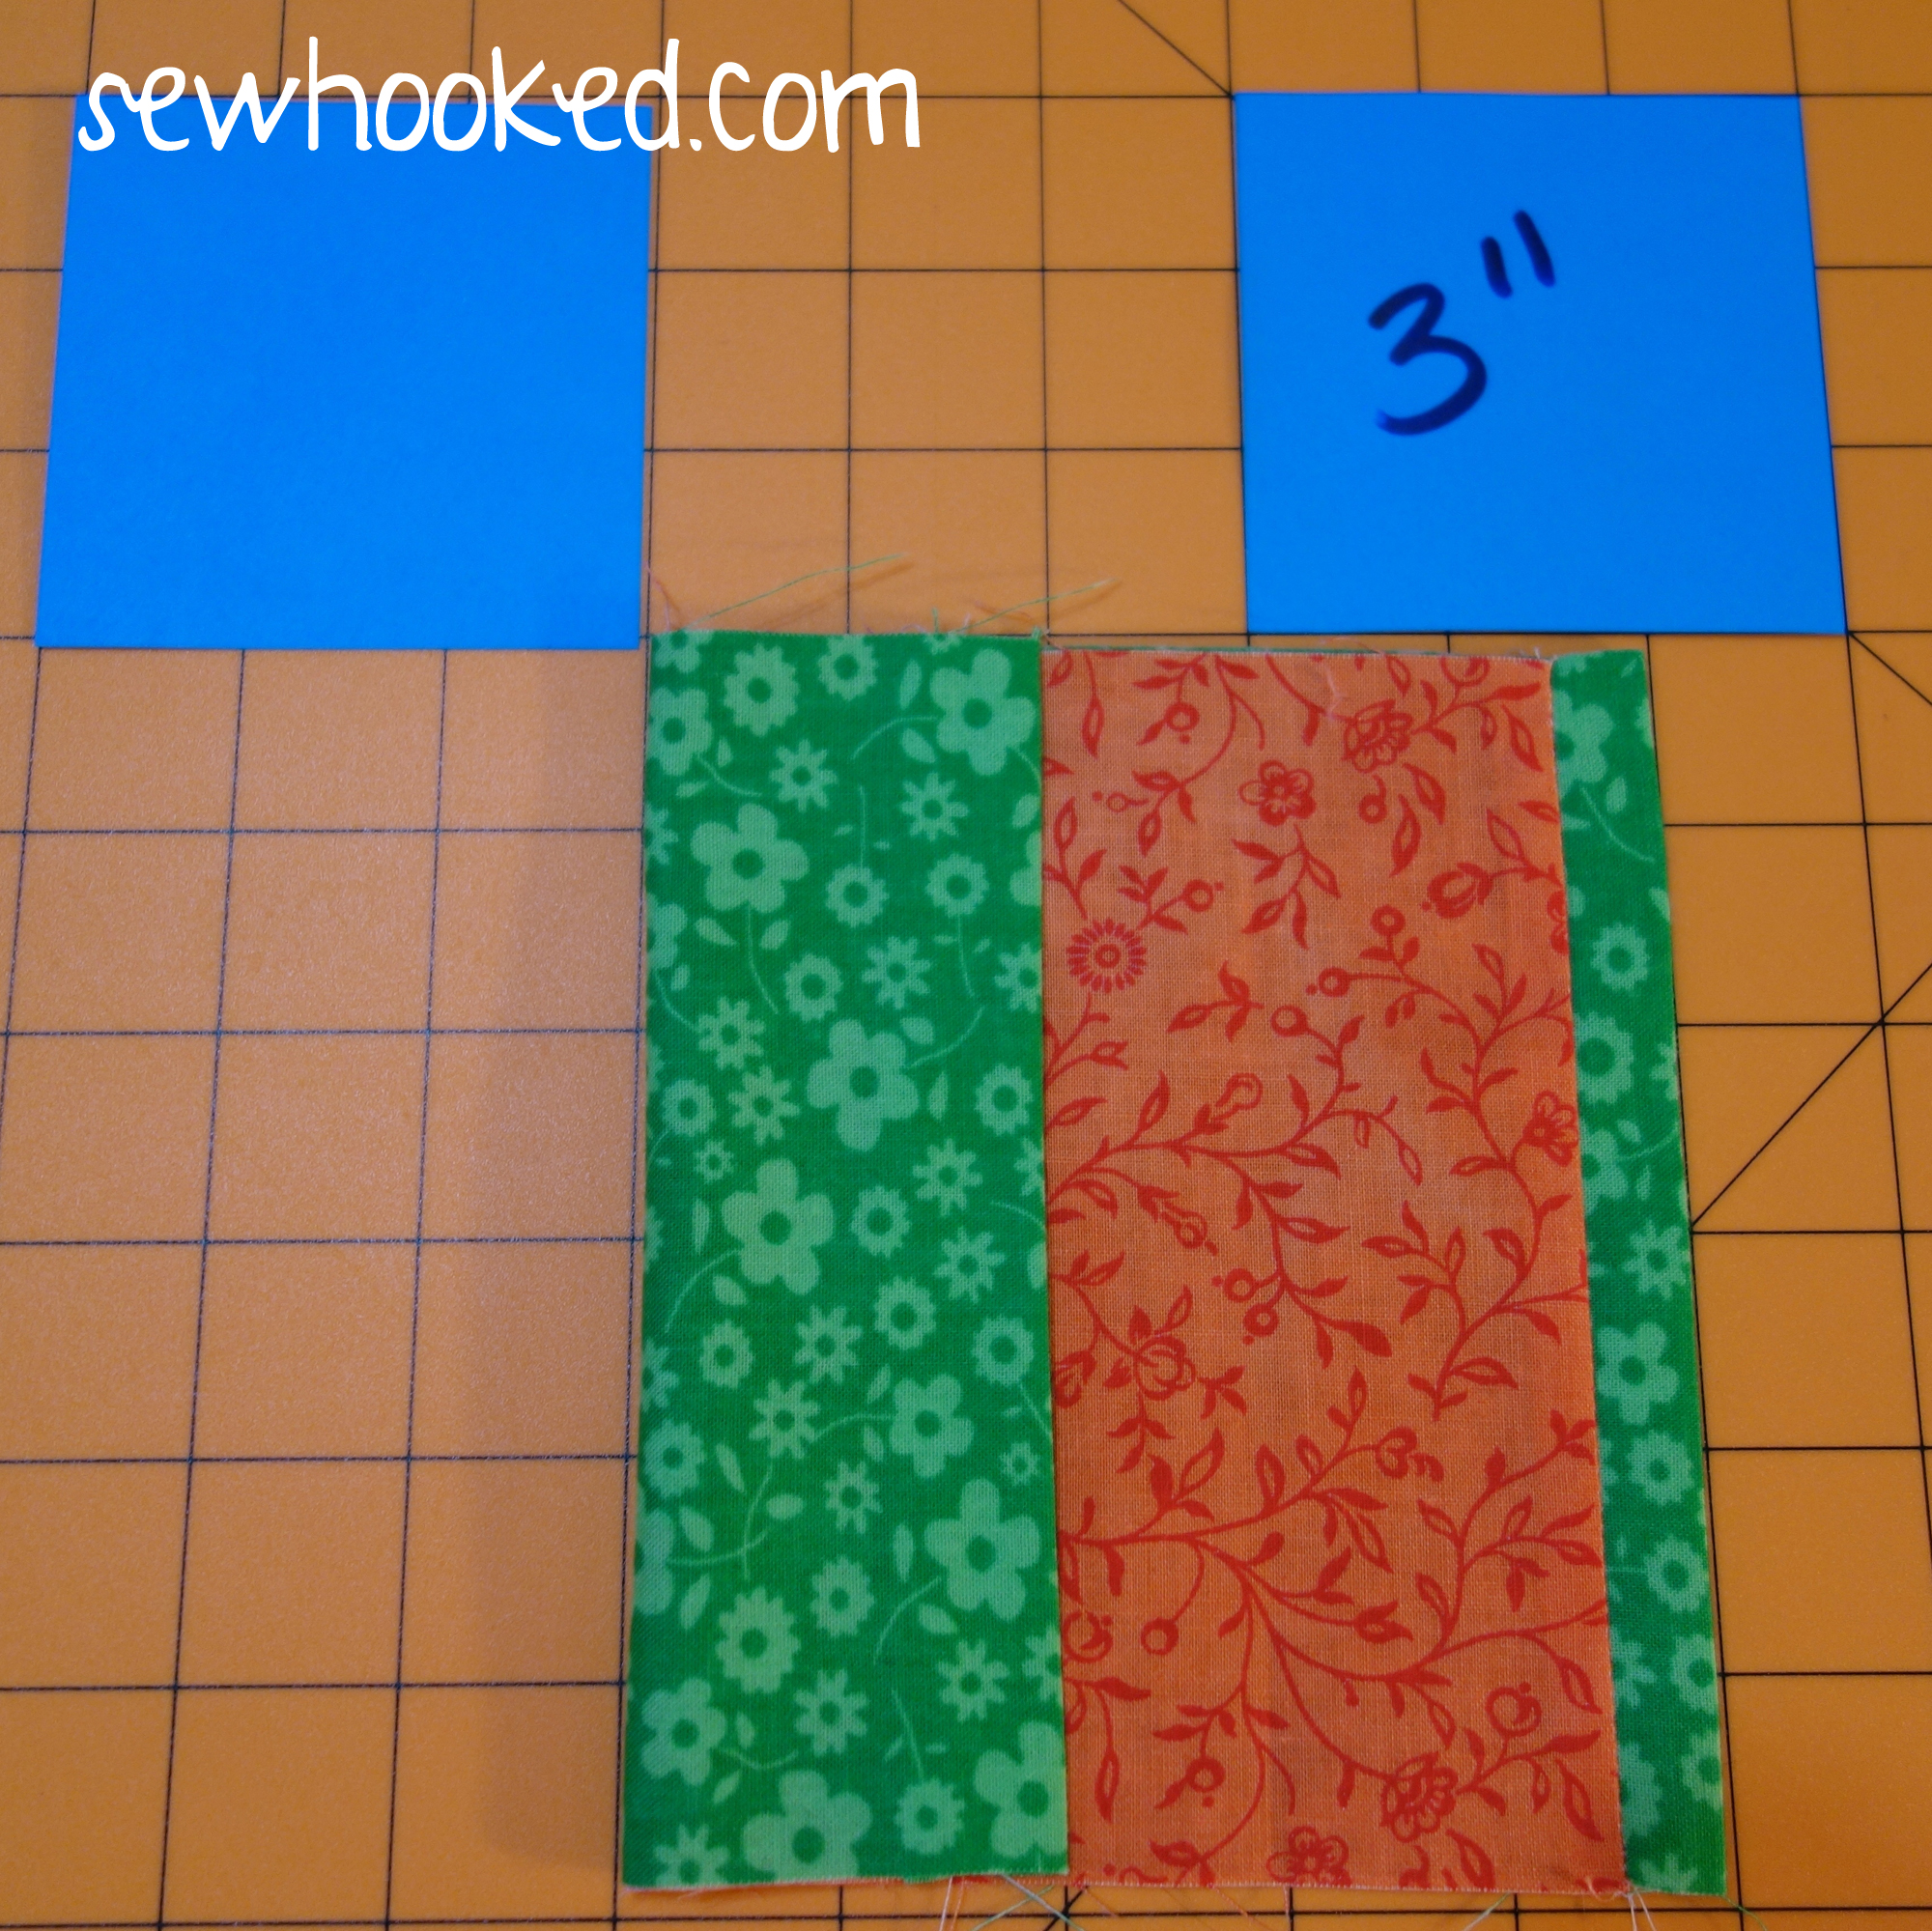
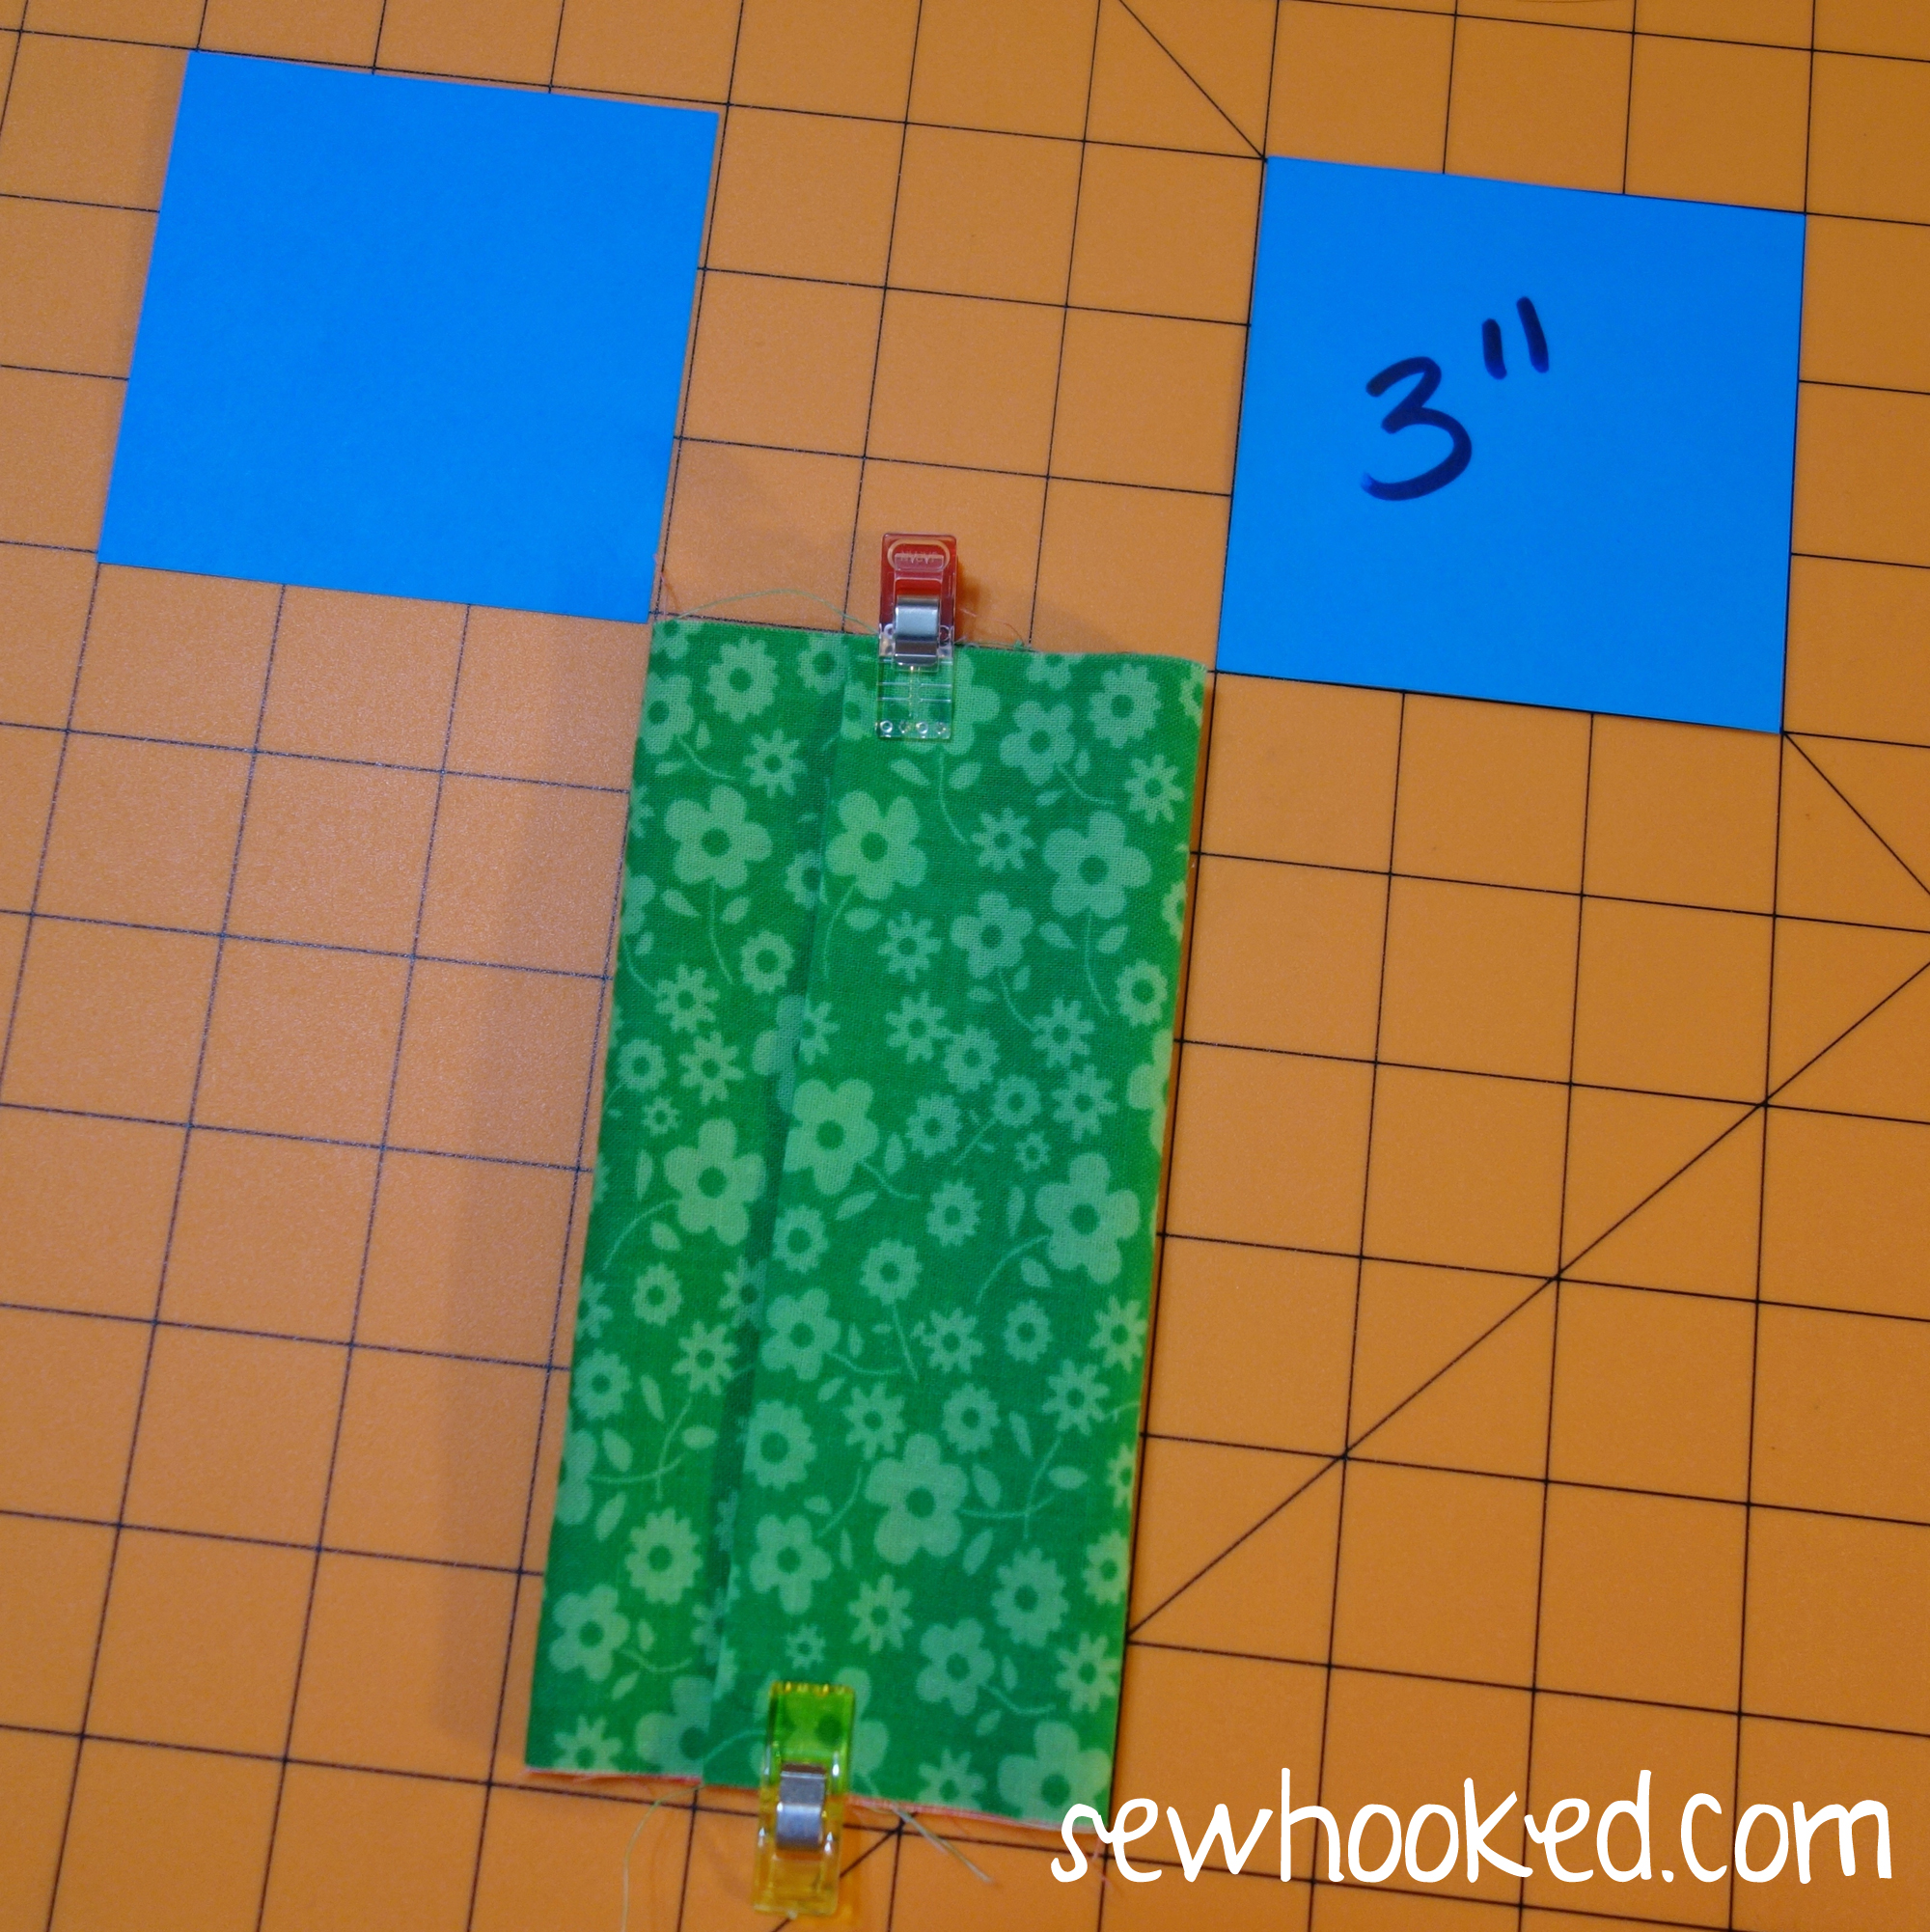
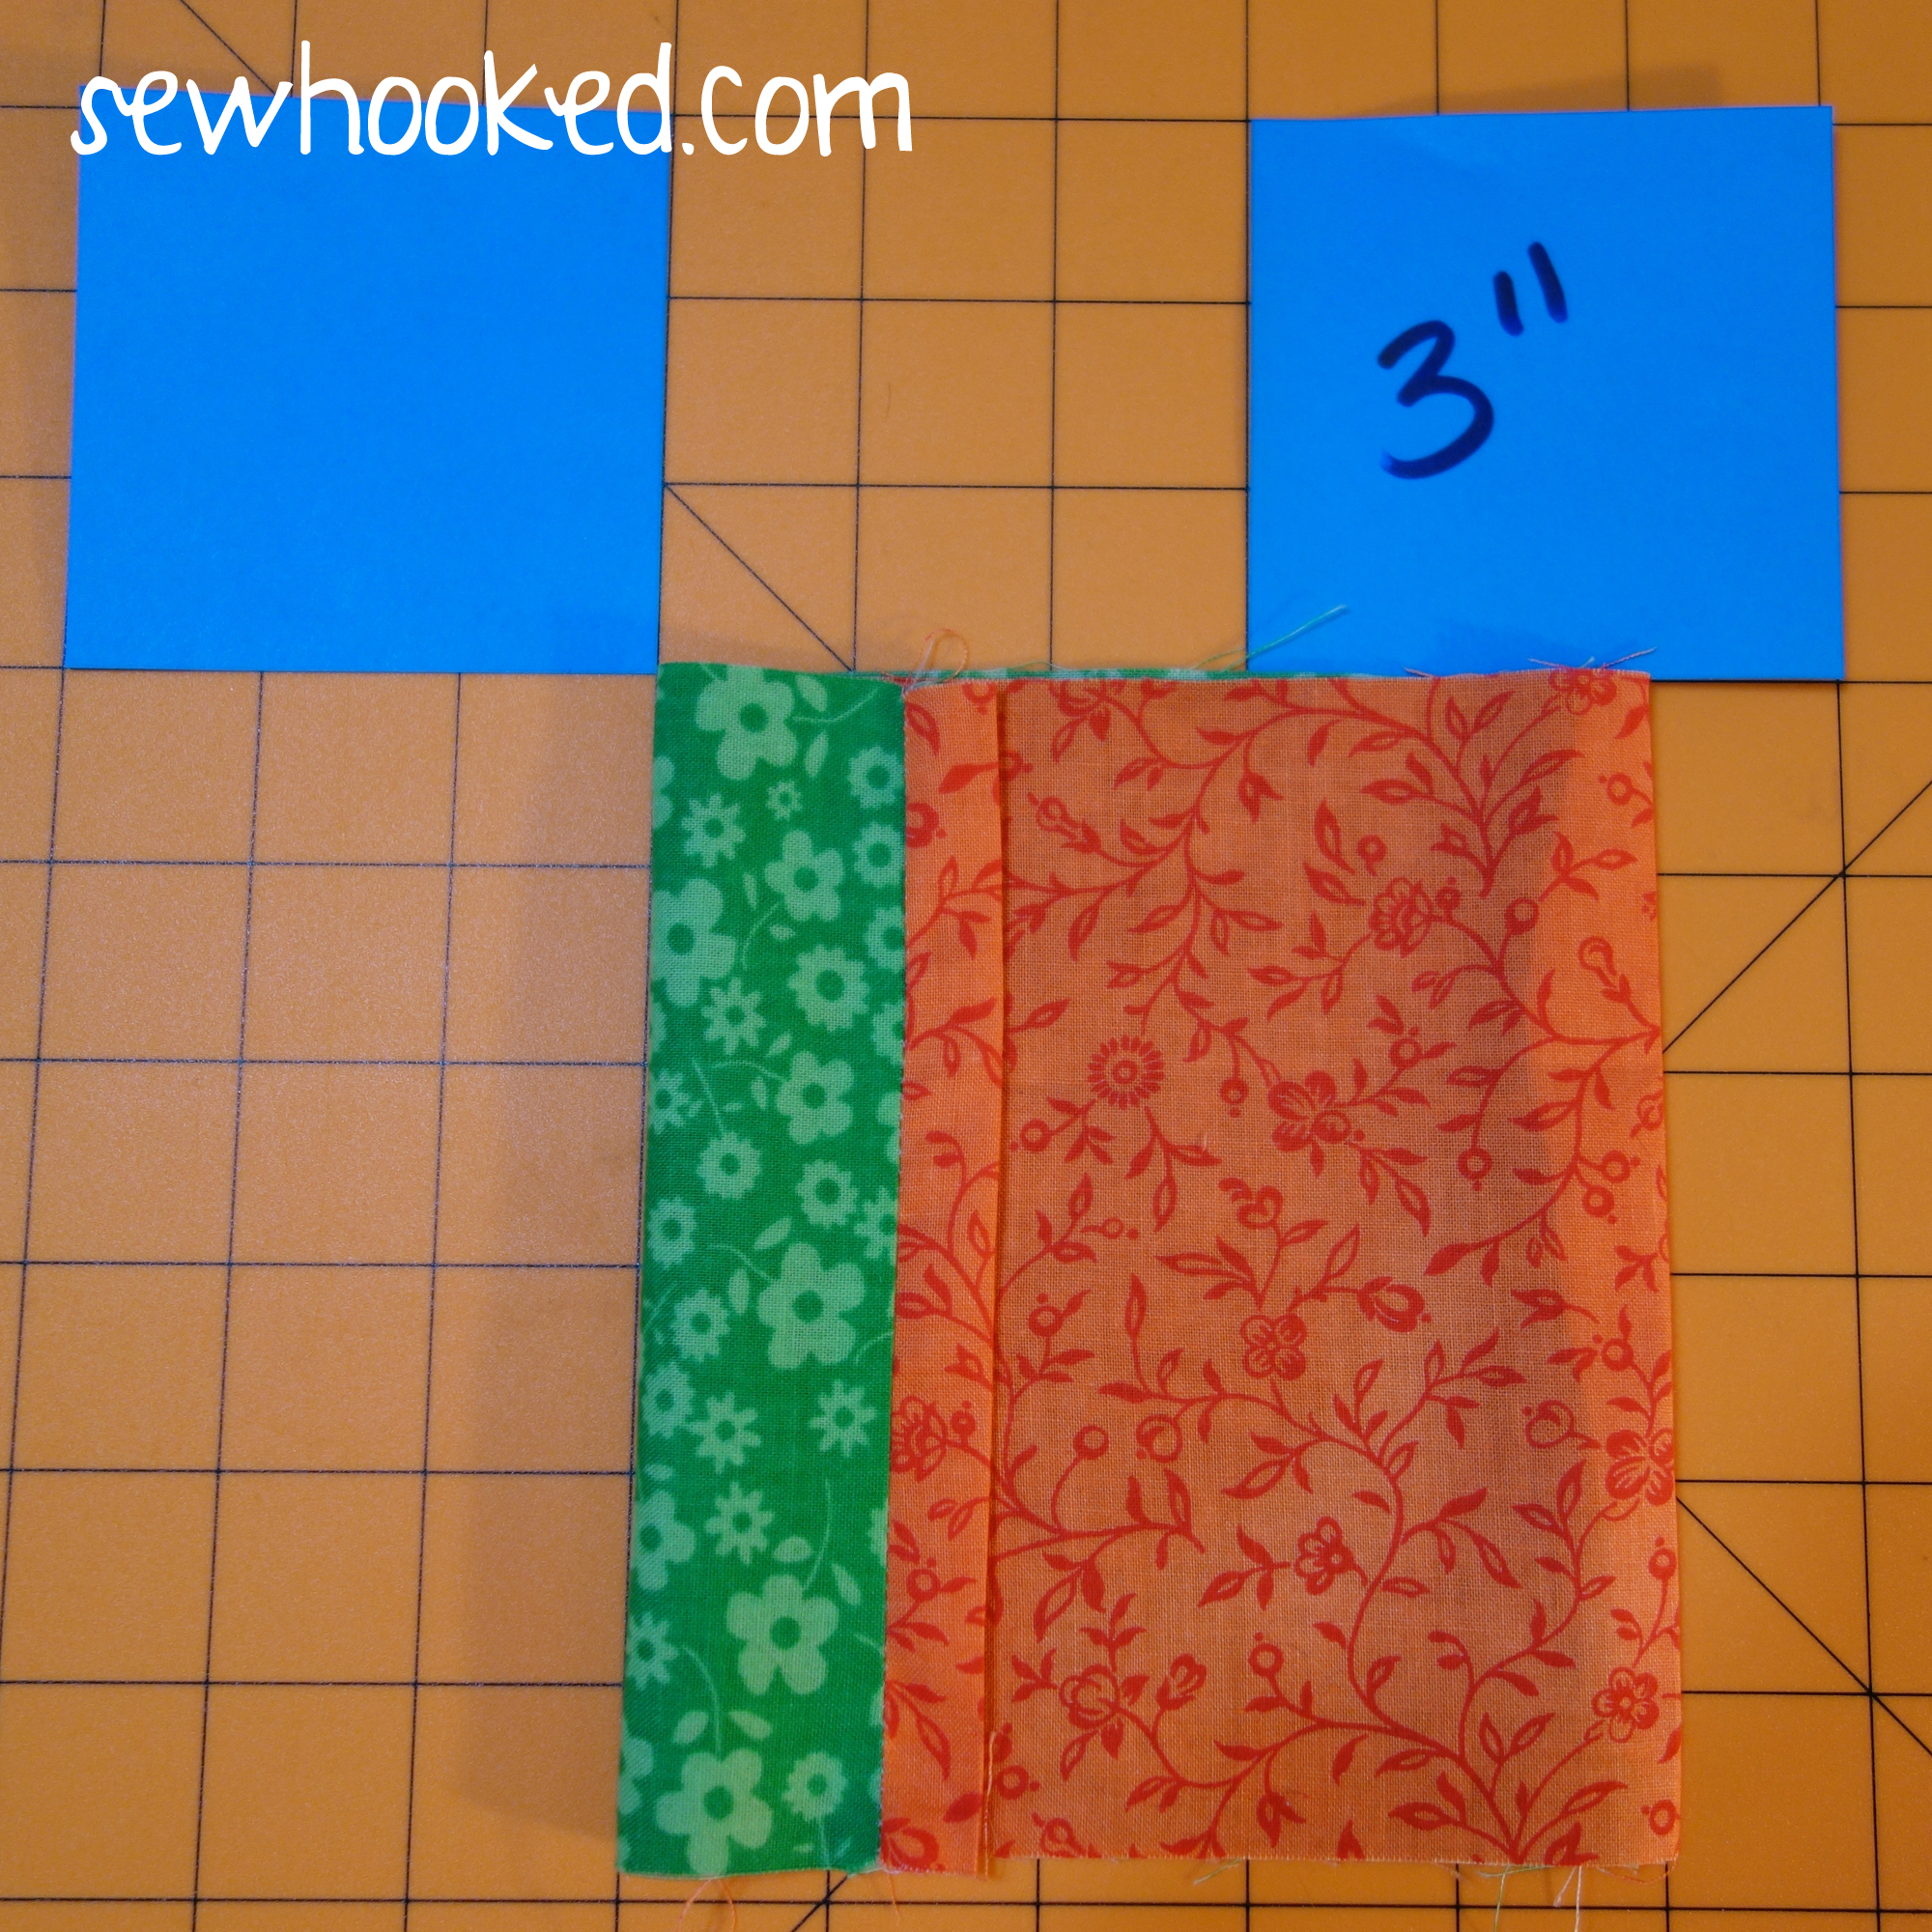
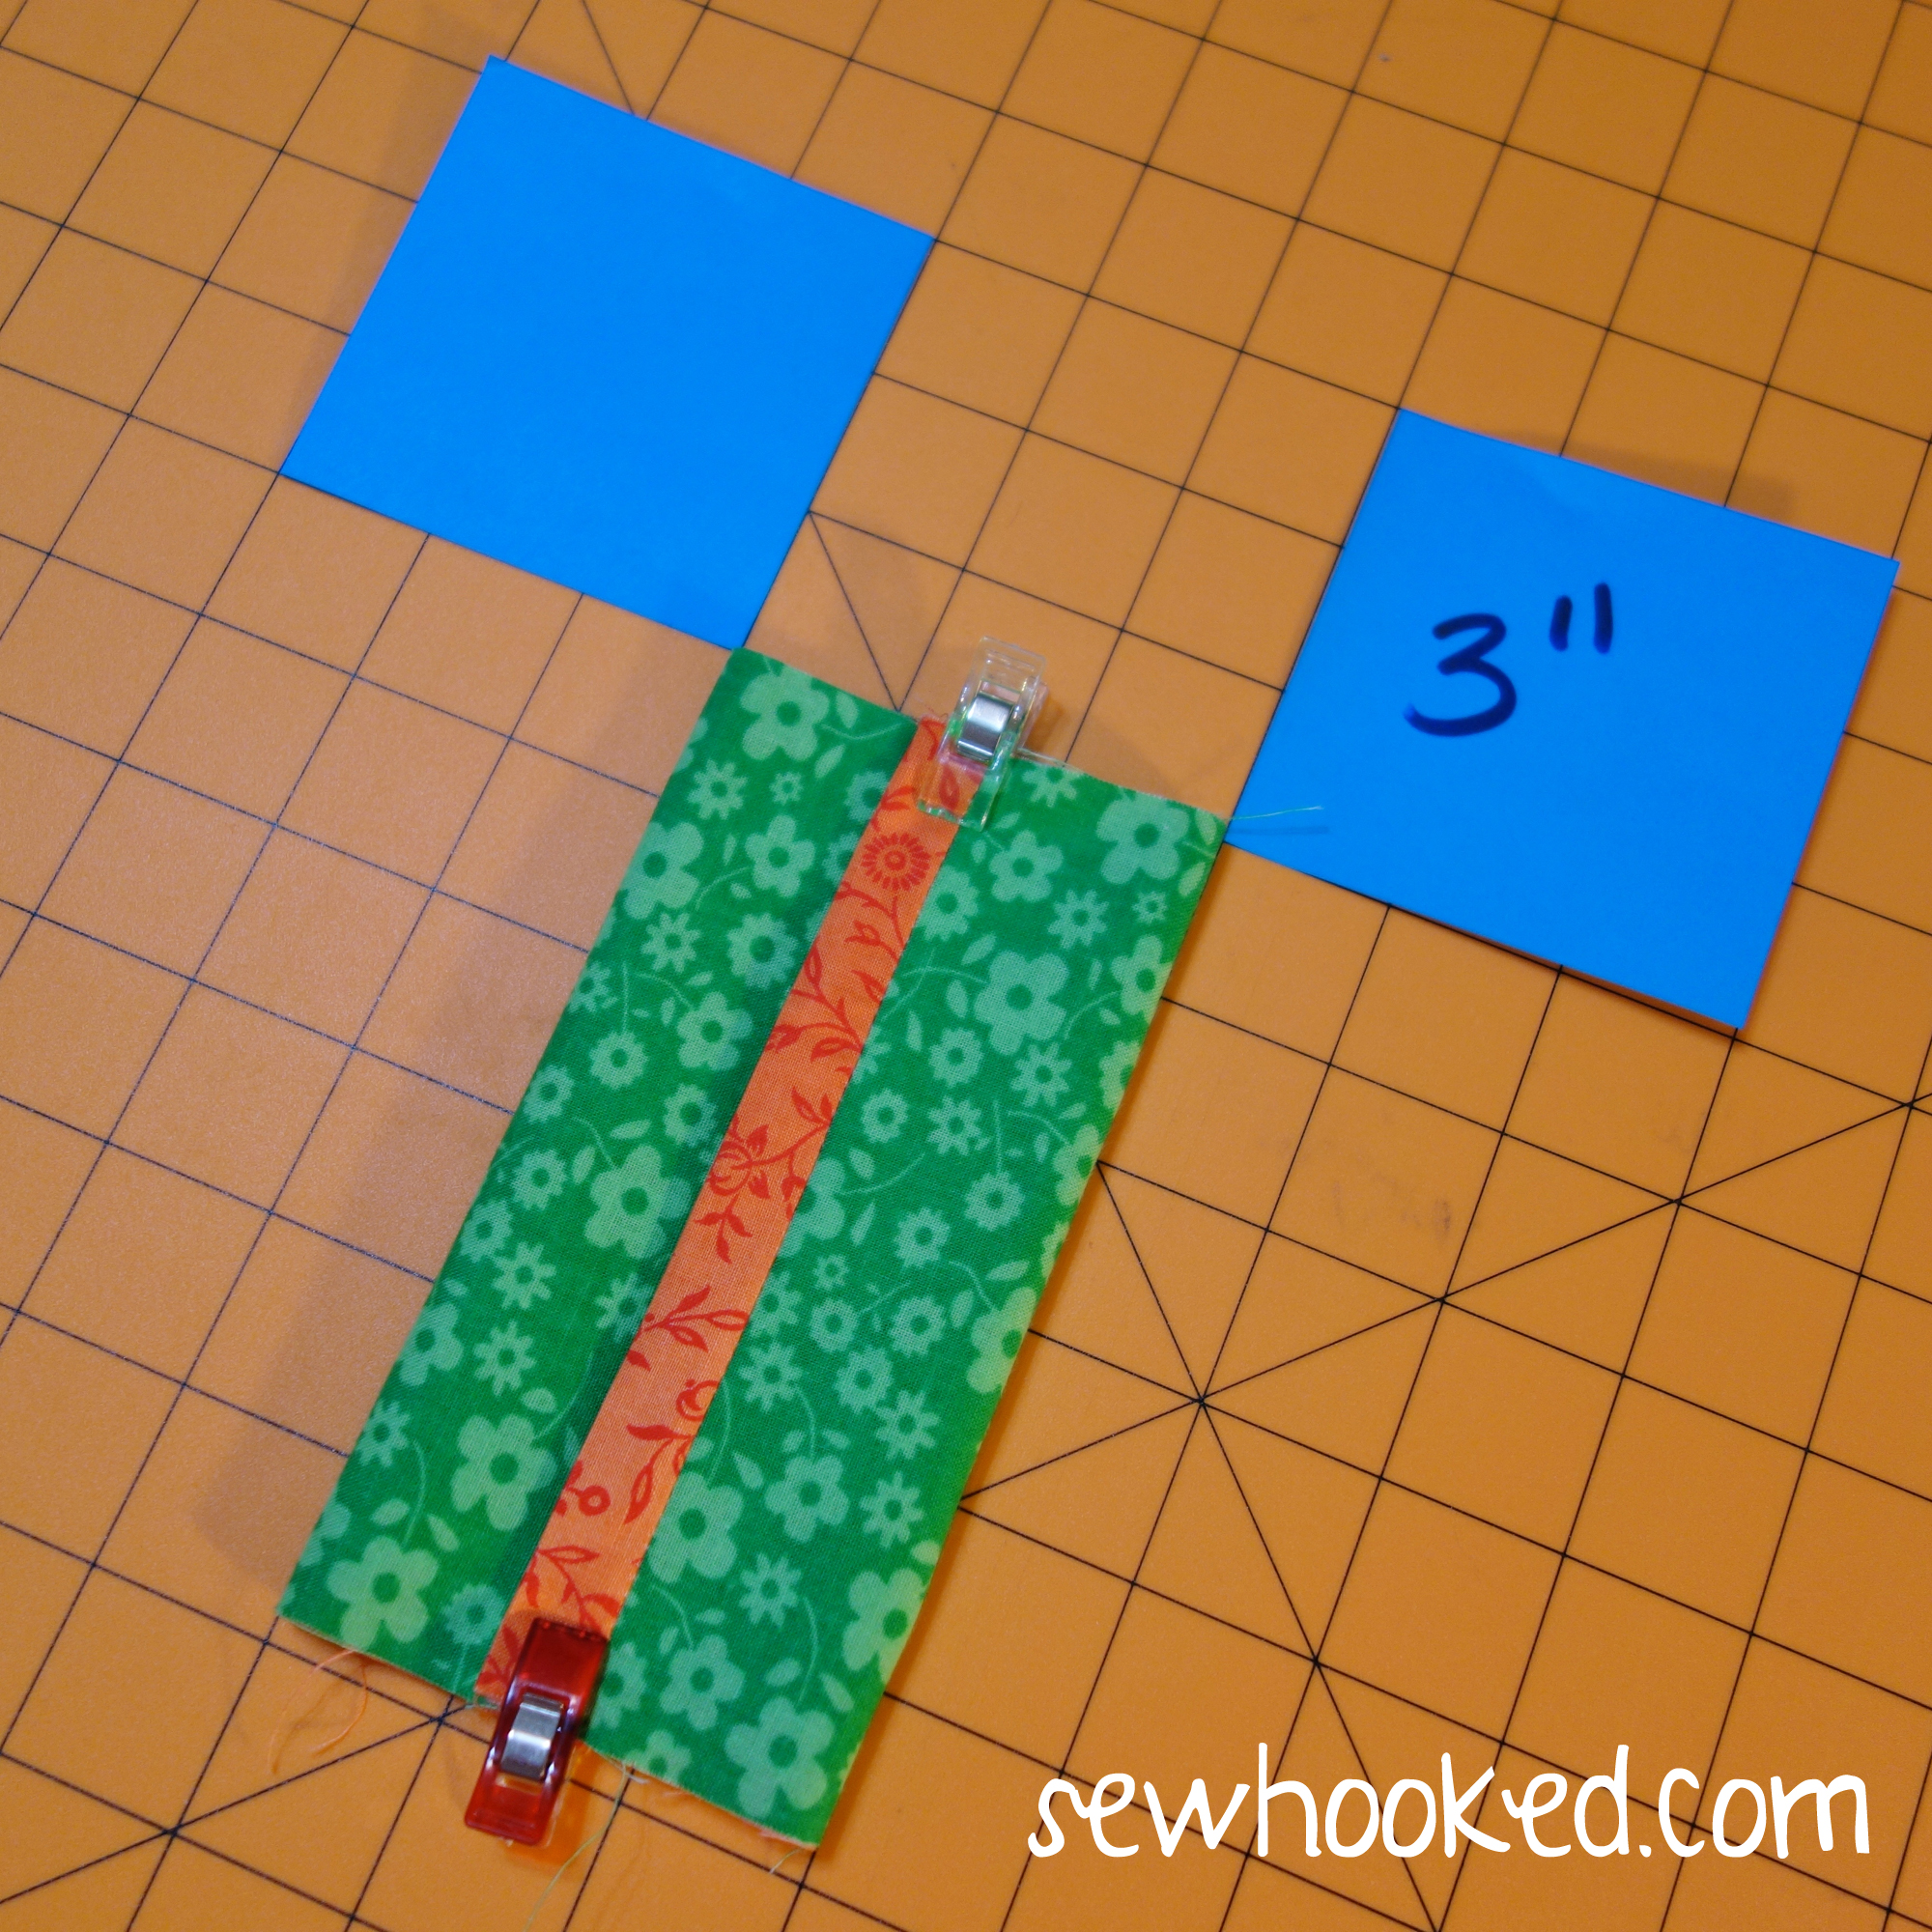
Using a ruler or rotary mat, fold right sides of the OUTSIDE together so that it is 3″ wide. If you’re using a rotary mat, you can align easily use the markings on your mat for this part. Edges should overlap in the approximate center.
Once adjustments have been made to your liking and the width is 3″, pin or clip with sewing clips. Wonder Clips or Magic Clips work great. (I have both.)
Because this version has TRIM, you will not see the overturned edge during this step.
Sew each end with a 1/4″ seam allowance, backstitching at the beginning and end.
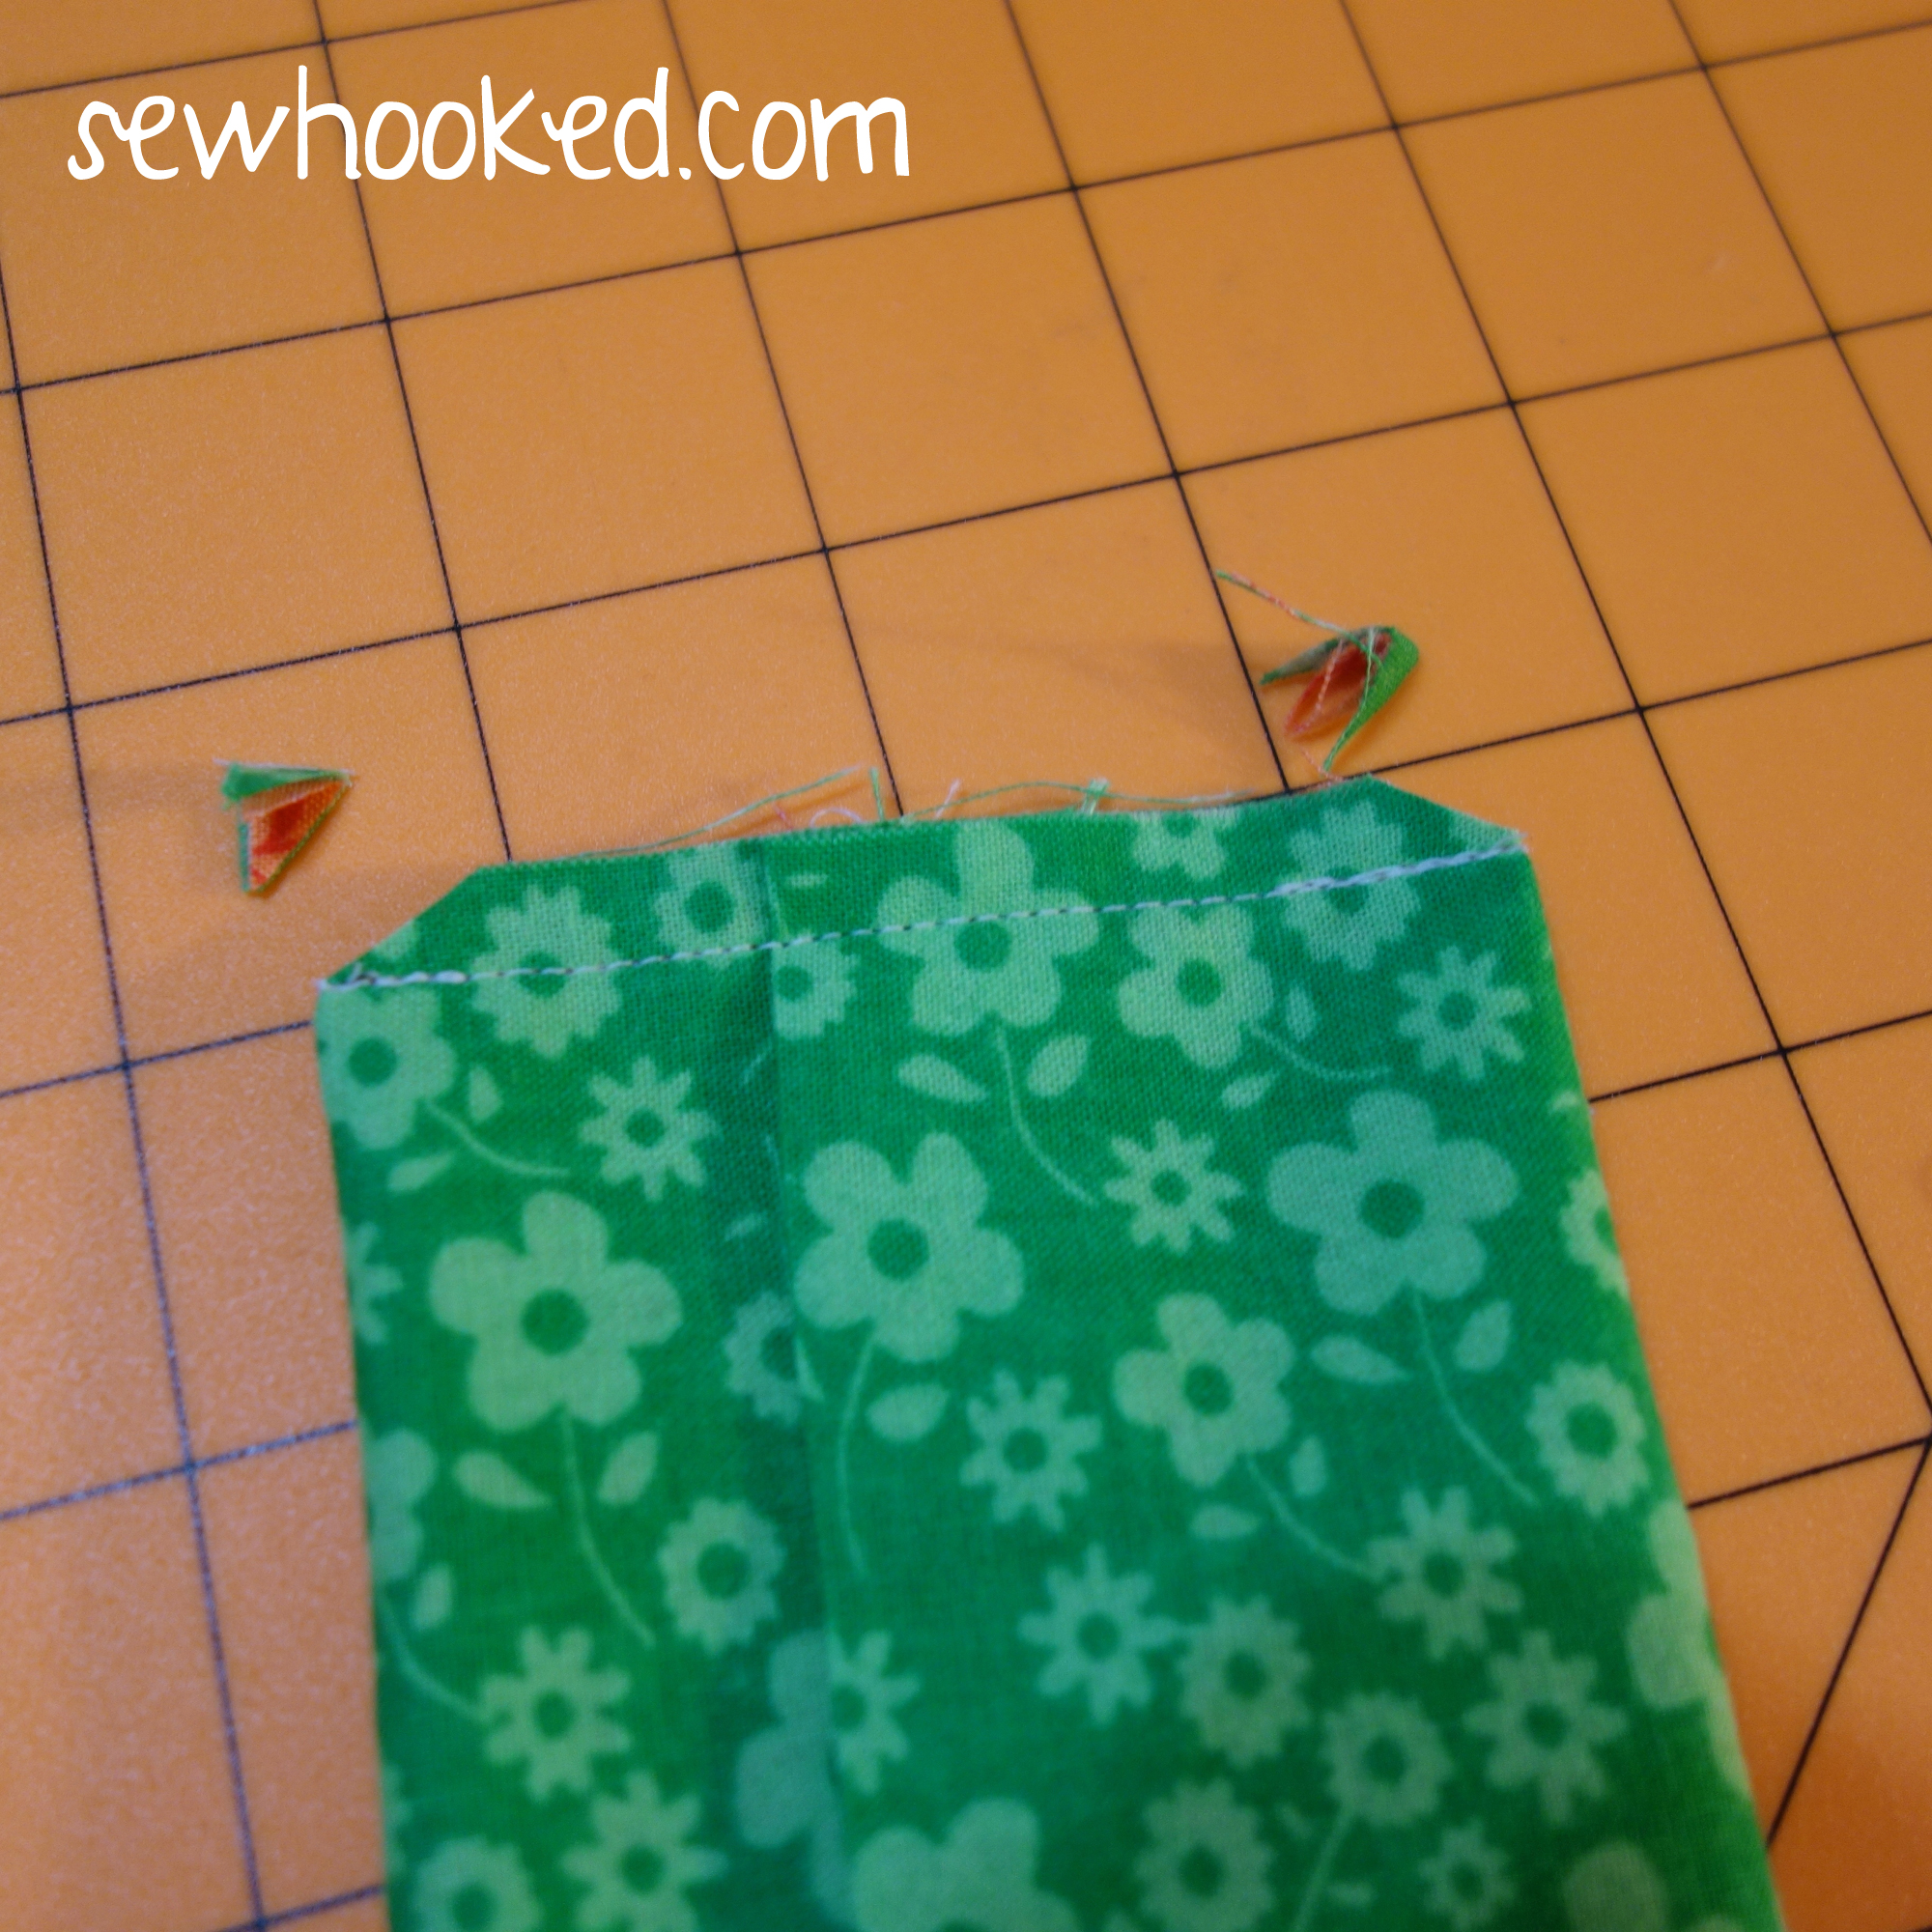
Clip corners & turn.
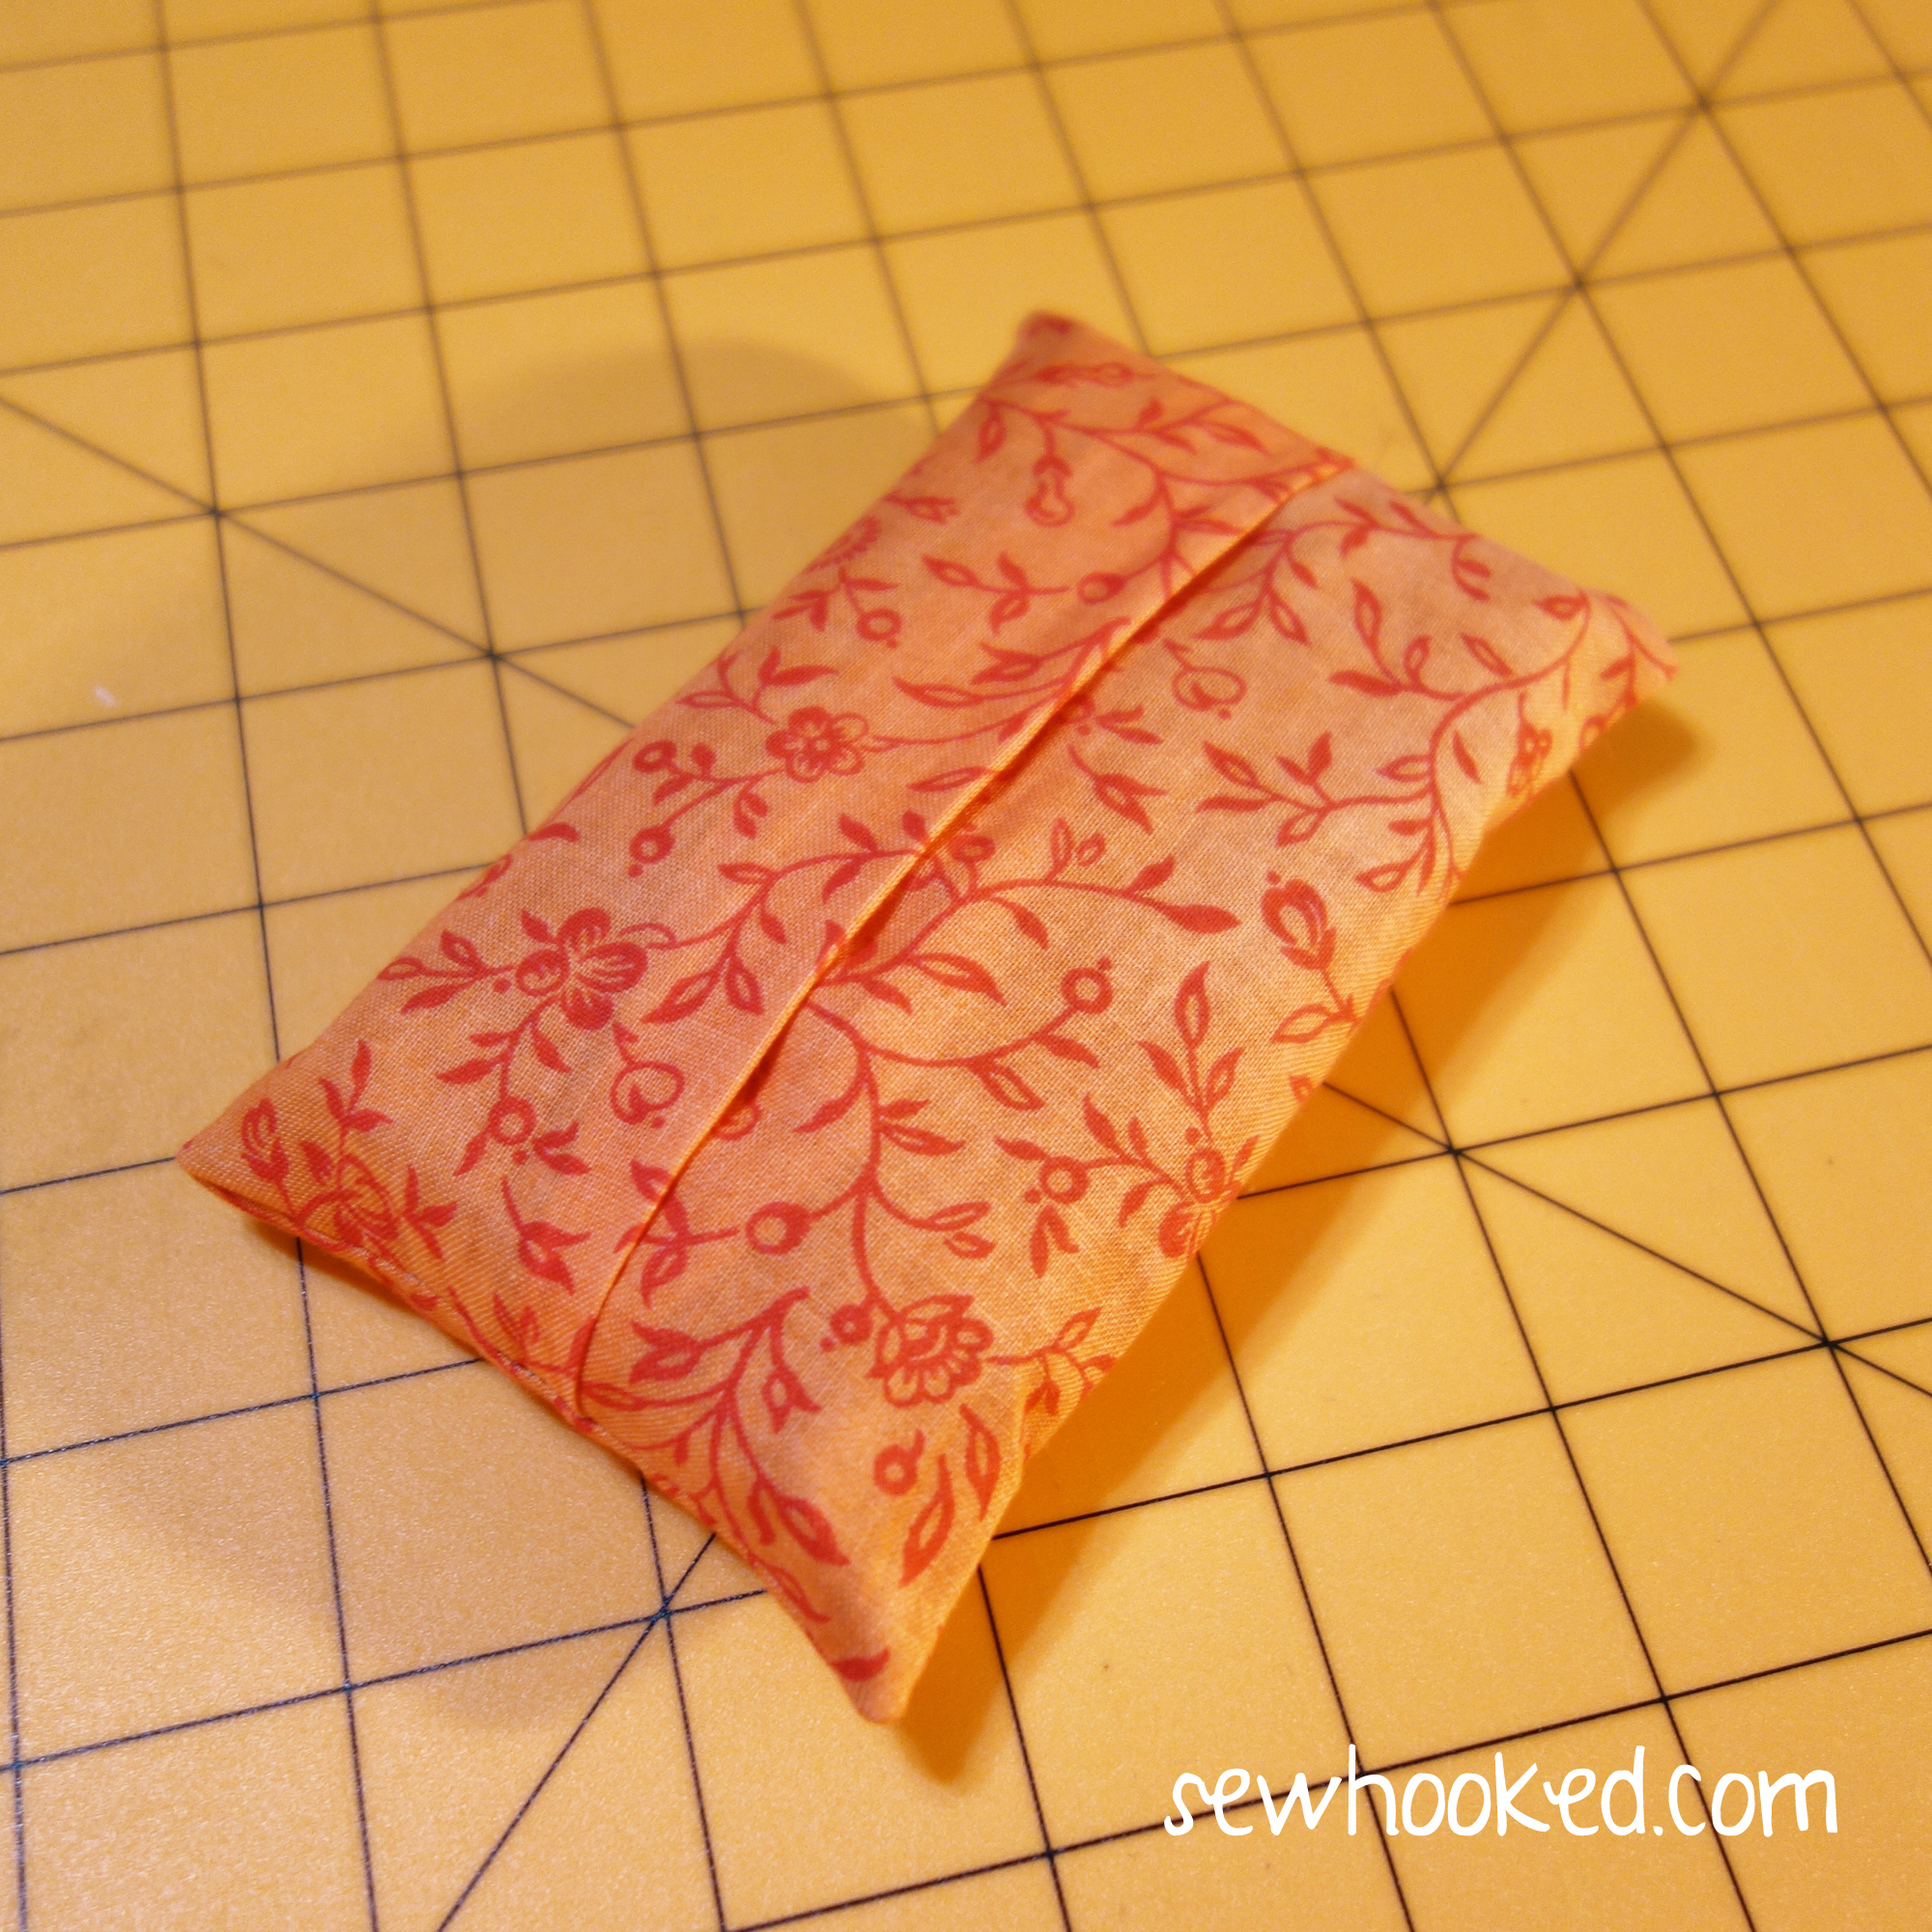
Done!
See how the Lining/Trim makes a lovely accent? You can have fun playing with stripes, dots or other fun fabrics.
Now, let’s make one that isn’t trimmed. We’ll use the same technique, but the fabric sizes will be reversed.
You’ll need fabric in two colors. Just as before, the orange fabric is the OUTSIDE.
For UN-TRIMMED Cover:
Outside – 5 3/4″ x 8 1/2″
Lining – 5 3/4″ x 6 1/2″
With right sides together, line one end of LINING to one end of OUTSIDE on the side that measures 5 3/4″.
Stitch a 1/4″ seam with backstitching at both ends.
Line up opposite ends and repeat the 1/4″ seam with backstitching along the other 5 3/4″ side.
Turn so that wrong sides of the fabric are together. Adjust so that each end is approximately the same width.
Press.
Using a ruler or rotary mat, fold right sides of the OUTSIDE together so that it is 3″ wide. If you’re using a rotary mat, you can align easily use the markings on your mat for this part. Edges should overlap in the approximate center
Once adjustments have been made to your liking and the width is 3″, pin or clip with sewing clips.
Because this version doesn’t have TRIM, you’ll see the overturned edge during this step.
Sew each end with a 1/4″ seam allowance, backstitching at the beginning and end.
Clip Corners & Turn.
Done!
Stop by tomorrow for Free Pattern Friday for my weekly featured FREE quilt pattern!
PPV was my 2014 Block of the Month. This project was inspired by old-fashioned, hand-pieced quilt blocks. Because I LOVE paper piecing, I couldn’t help but create my own versions of traditional patterns I love using my favorite technique.
Quilting along with us is easy! The Paper Piecing Vintage quilt pattern already exists, so you don’t have to anxiously await each pattern to be released.
We’re making this quilt together, one block at a time, as a group. We’ll be making two blocks a month. I’ll prompt you on the second and fourth Monday to remind you which block to work on next. With a little work and a little luck, we’ll have a finished quilt top by the end of June!
Get the completed quilt pattern (more info below) from CRAFTSYor ETSY for $10 (previously $12). If you already own this pattern, you are ready to go!
Individual blocks available by popular demand! If you want to make just one or two blocks from the set, I am releasing these patterns individually as we go. (Link to purchase Block 4 below.)
The following is the April 2014 block (Block 4 for us) made for my 1930’s vintage fabric-inspired version of this quilt (above).
Today’s pattern, Block 4 (April 2014), is Rambling Maid. You can find it beginning on page 16 in Paper Piecing Vintage, or you can purchase JUST this block pattern here.
All patterns for PPV are 6″ & 12″ (w/o seam allowance). The size you make is up to you.
The vintage version (above) is from my 2014 PPV.
My 2017 PPV Halloween Quilt Block
My Halloween version started with an awesome fat quarter from the “Not so Spooky” line by In the Beginning Fabrics’ that I found at Thousands of Bolts.* I just love the silhouettes!
*This is not a paid endorsement. I just love the fabric and ToB is a great resource for inexpensive, good quality 100% cotton quilting fabrics!
This is my color inspiration, created in EQ (subject to change as I quilt along!).
Since I’m using a lot of Halloween scraps, I’m also cutting the piano keys as I go from the leftover fabrics from each block. It will be a huge time saver at the end!
If you’d like to do a little planning, too, there is a coloring page included in the complete pattern on page 64.
Get the complete Paper Piecing Vintage pattern for $10 from…
3/4 yards (total) of multiple fabrics for optional piano key border (divide the amount across the number of fabrics you wish to use)
♥
Want to connect with other quilters working on Paper Piecing Vintage? Join the Sewhooked Facebook Group for community, support & prizes!I’ll be there, as will my awesome pattern tester Amber and many friends of Sewhooked. We’ll answer your questions and nudge you along if you need it. Joining the group is not required to quilt along.
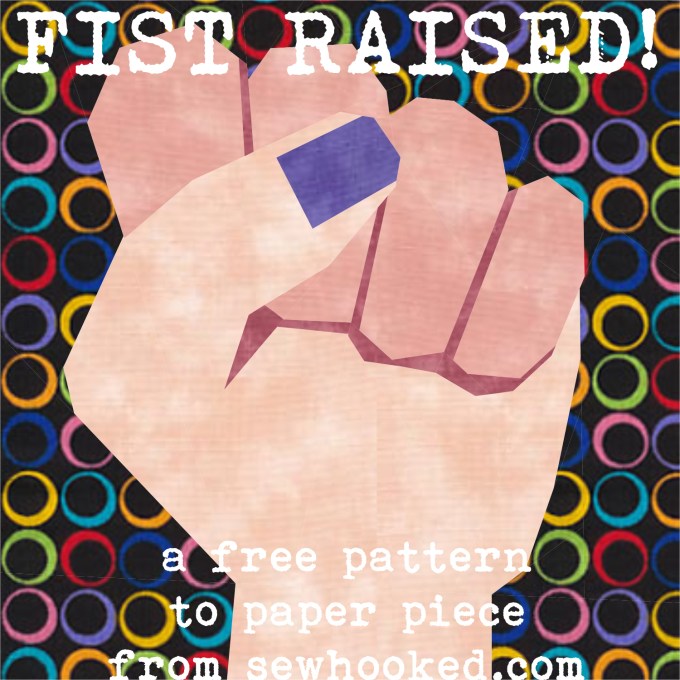
If you’ve ever met me in “real life” or watched my Talk to Me Tuesday videos, you’ll know that I express myself with my hands. I’ve been known to accidentally smack unsuspecting passers by with my exuberant communications. Oops!
Last week, a request took my fancy (something that doesn’t happen very often) and I decided to give it a try. The result is a new hand-themed design, but it certainly isn’t my first!
First up is this 5″ paper pieced Hand. It’s a fairly simple design with a very simple name. I’ve seen it adapted for many, many quilts, including some fun fandom-themed ones! Somewhere out there is a four-fingered version that was added to a Lord of the Rings quilt. If you anyone knows where I can find that photo, please leave the link in comments. 😛
Like most things fandom, I LOVE Star Trek. I asked Vanda Chittenden if I could share this awesome 10″ pattern today because it just makes sense to include it in a post all about hands! Find it on Fandom in Stitches under Star Trek, on Vanda’s website, Quilt in Piece, or go directly to the pattern with the link below.
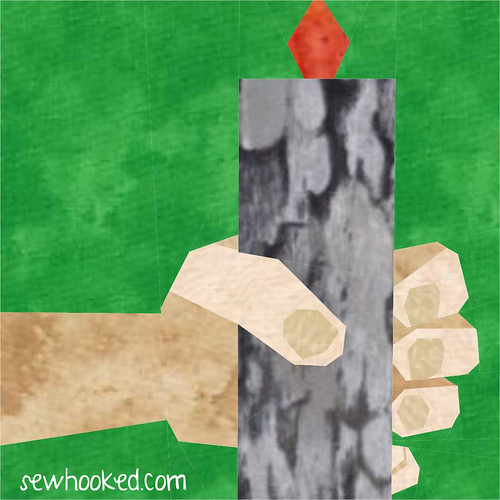
Last but not least, is one of my own patterns from Fandom in Stitches, the Hand of Glory. Adapted as an option for my Harry Potter Bookcase Quilt, The Project of Doom, this is a 5″ pattern to paper piece.