After an April that was all about ME, I wanted to share some fun charity projects in May!
First up is a child-sized quilt pattern I designed inspired by the heart logo of my favorite blanket making charity, The Linus Connection.
Made of 5 1/2″ squares and half square triangles, this is an easy peasy quilt to chain piece. Make it for a wee one you love or for your favorite blanket charity.
This is a quick to watch tutorial on chain piecing from Shiny Happy World.
♥
Are you quilting along with Paper Piecing Vintage? Share a Signature Block for the PPV Signature Quilt! This special project is a for a commemorative signature quilt that I will keep after Paper Piecing Vintage has concluded. Find this block on page 21 of Paper Piecing Vintage. If you’re only making a few blocks, you can also find the Signature Block Pattern right here.
♥
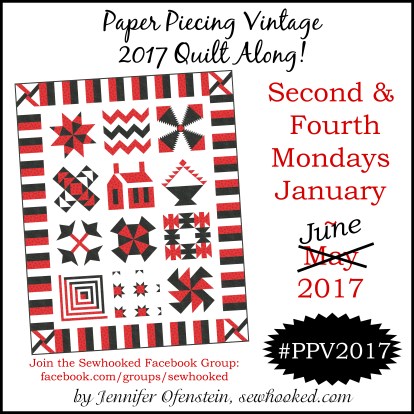
Stop by Sewhooked on the second and fourth Mondays of every month through June for the Paper Piecing Vintage Quilt Along (PPV2017)!
I recently spent a whole lot of time cleaning up the hard drive on my computer. During this adventure in bytes, I found tons of unfinished patterns, sketches, doodles, and whatnot, all of which I’d never shared.
At some point it the distant past, I sat and doodled a slew of cupcakes with personality for hand embroidery. Why? Not a clue, but when I rediscovered these designs, it occurred to me that nothing could be more perfect for my birthday post!
I hope you enjoy these personality-filled cupcakes to hand embroider. Happy birthday to me!
Pro-Tip: I use Sulky Sticky Fabri-Solvy for all of my hand embroidery projects. Print designs on this water soluble fabric using your printer, stick it on your fabric and stitch! It rinses away cleanly when you’re done. Easy, peasy perfect transfer every time. This isn’t a paid endorsement, but the above is an affiliate link. I really do use this stuff all the time! 😉 Check your local quilt store or order online.
Are you quilting along with Paper Piecing Vintage? Share a Signature Block for the PPV Signature Quilt! This special project is a for a commemorative signature quilt that I will keep after Paper Piecing Vintage has concluded. Find this block on page 21 of Paper Piecing Vintage. If you’re only making a few blocks, you can also find the Signature Block Pattern right here.
♥
Stop by Sewhooked on the second and fourth Mondays of every month through June for the Paper Piecing Vintage Quilt Along (PPV2017)!
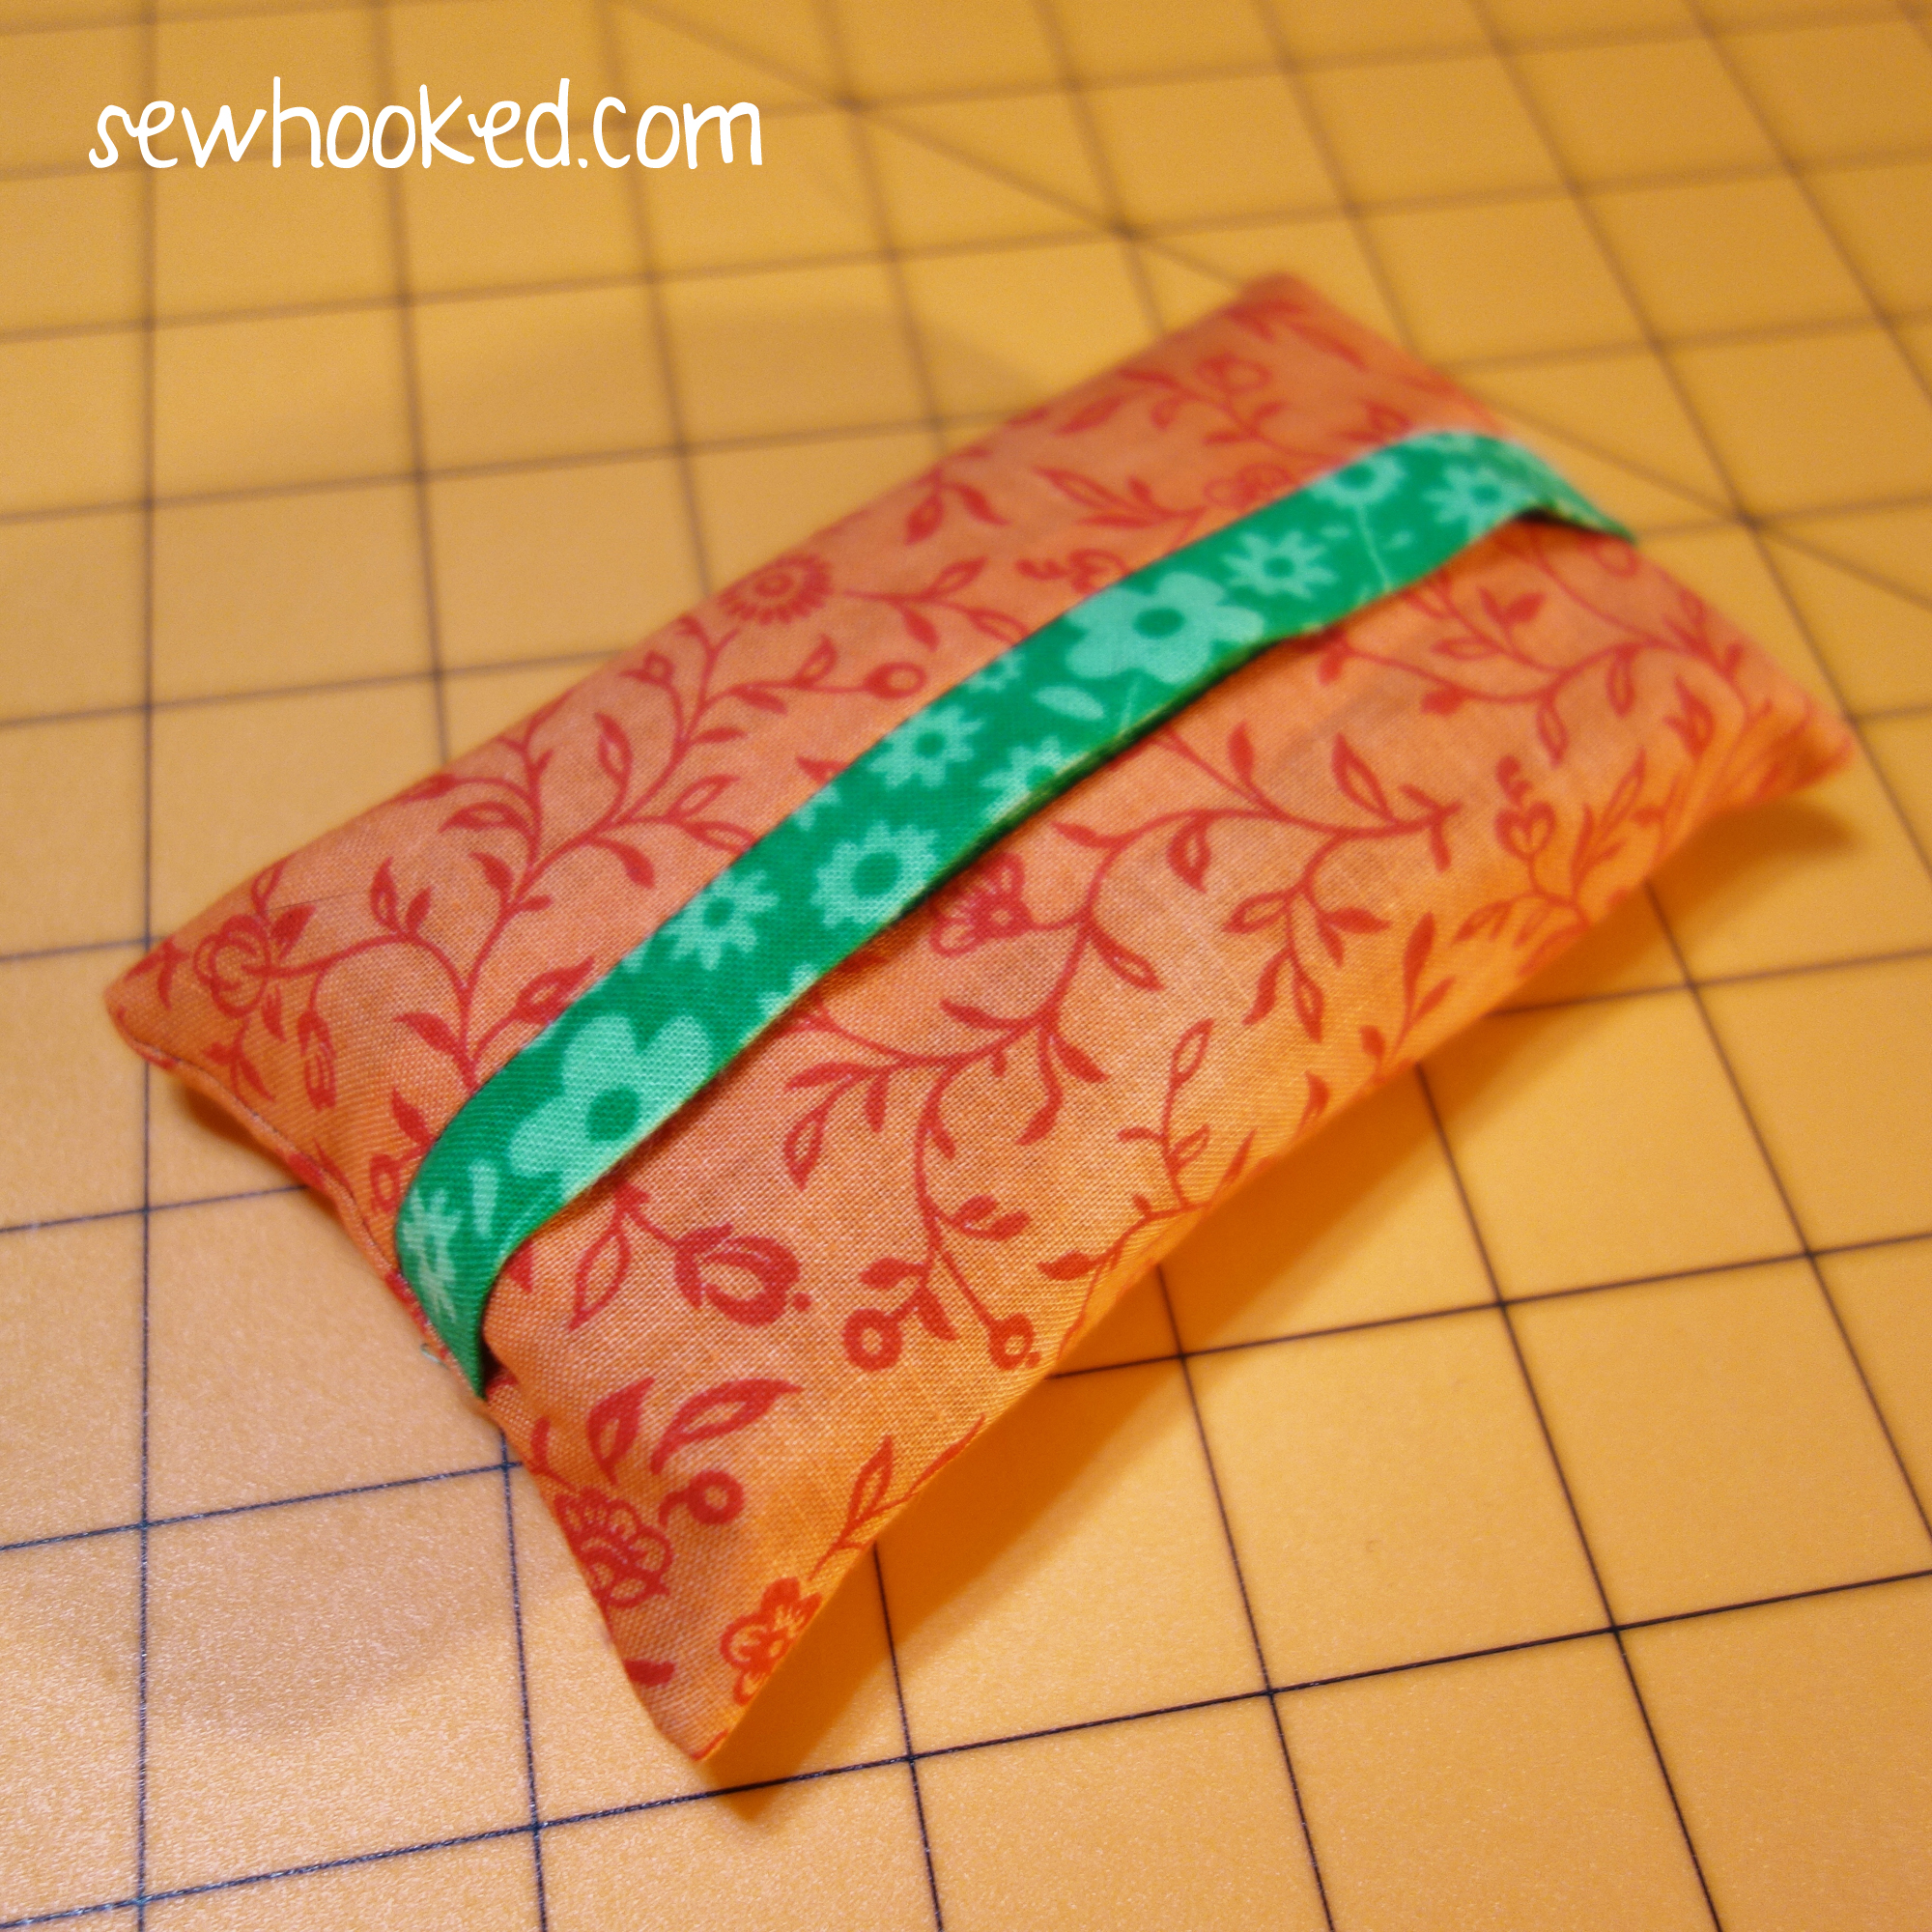
As promised several Talk to Me Tuesdays ago, we have a super simple tutorial to make a self-trimmed tissue packet cover.
Don’t want trim? I have instructions for that, too!
Please note that this tissue cover is sized to fit Kleenex Facial Tissues. Mine are a generic version but are the same size as the Kleenex. Use the brand works for you.
Adjust the dimensions if needed. You can also play with quilt blocks and directional fabric as desired.
These little packets make great gifts, swap additions, and are perfect for keeping your tissues clean and safe in your bag or purse.
First up! Self-Trimming Tissue Cover…
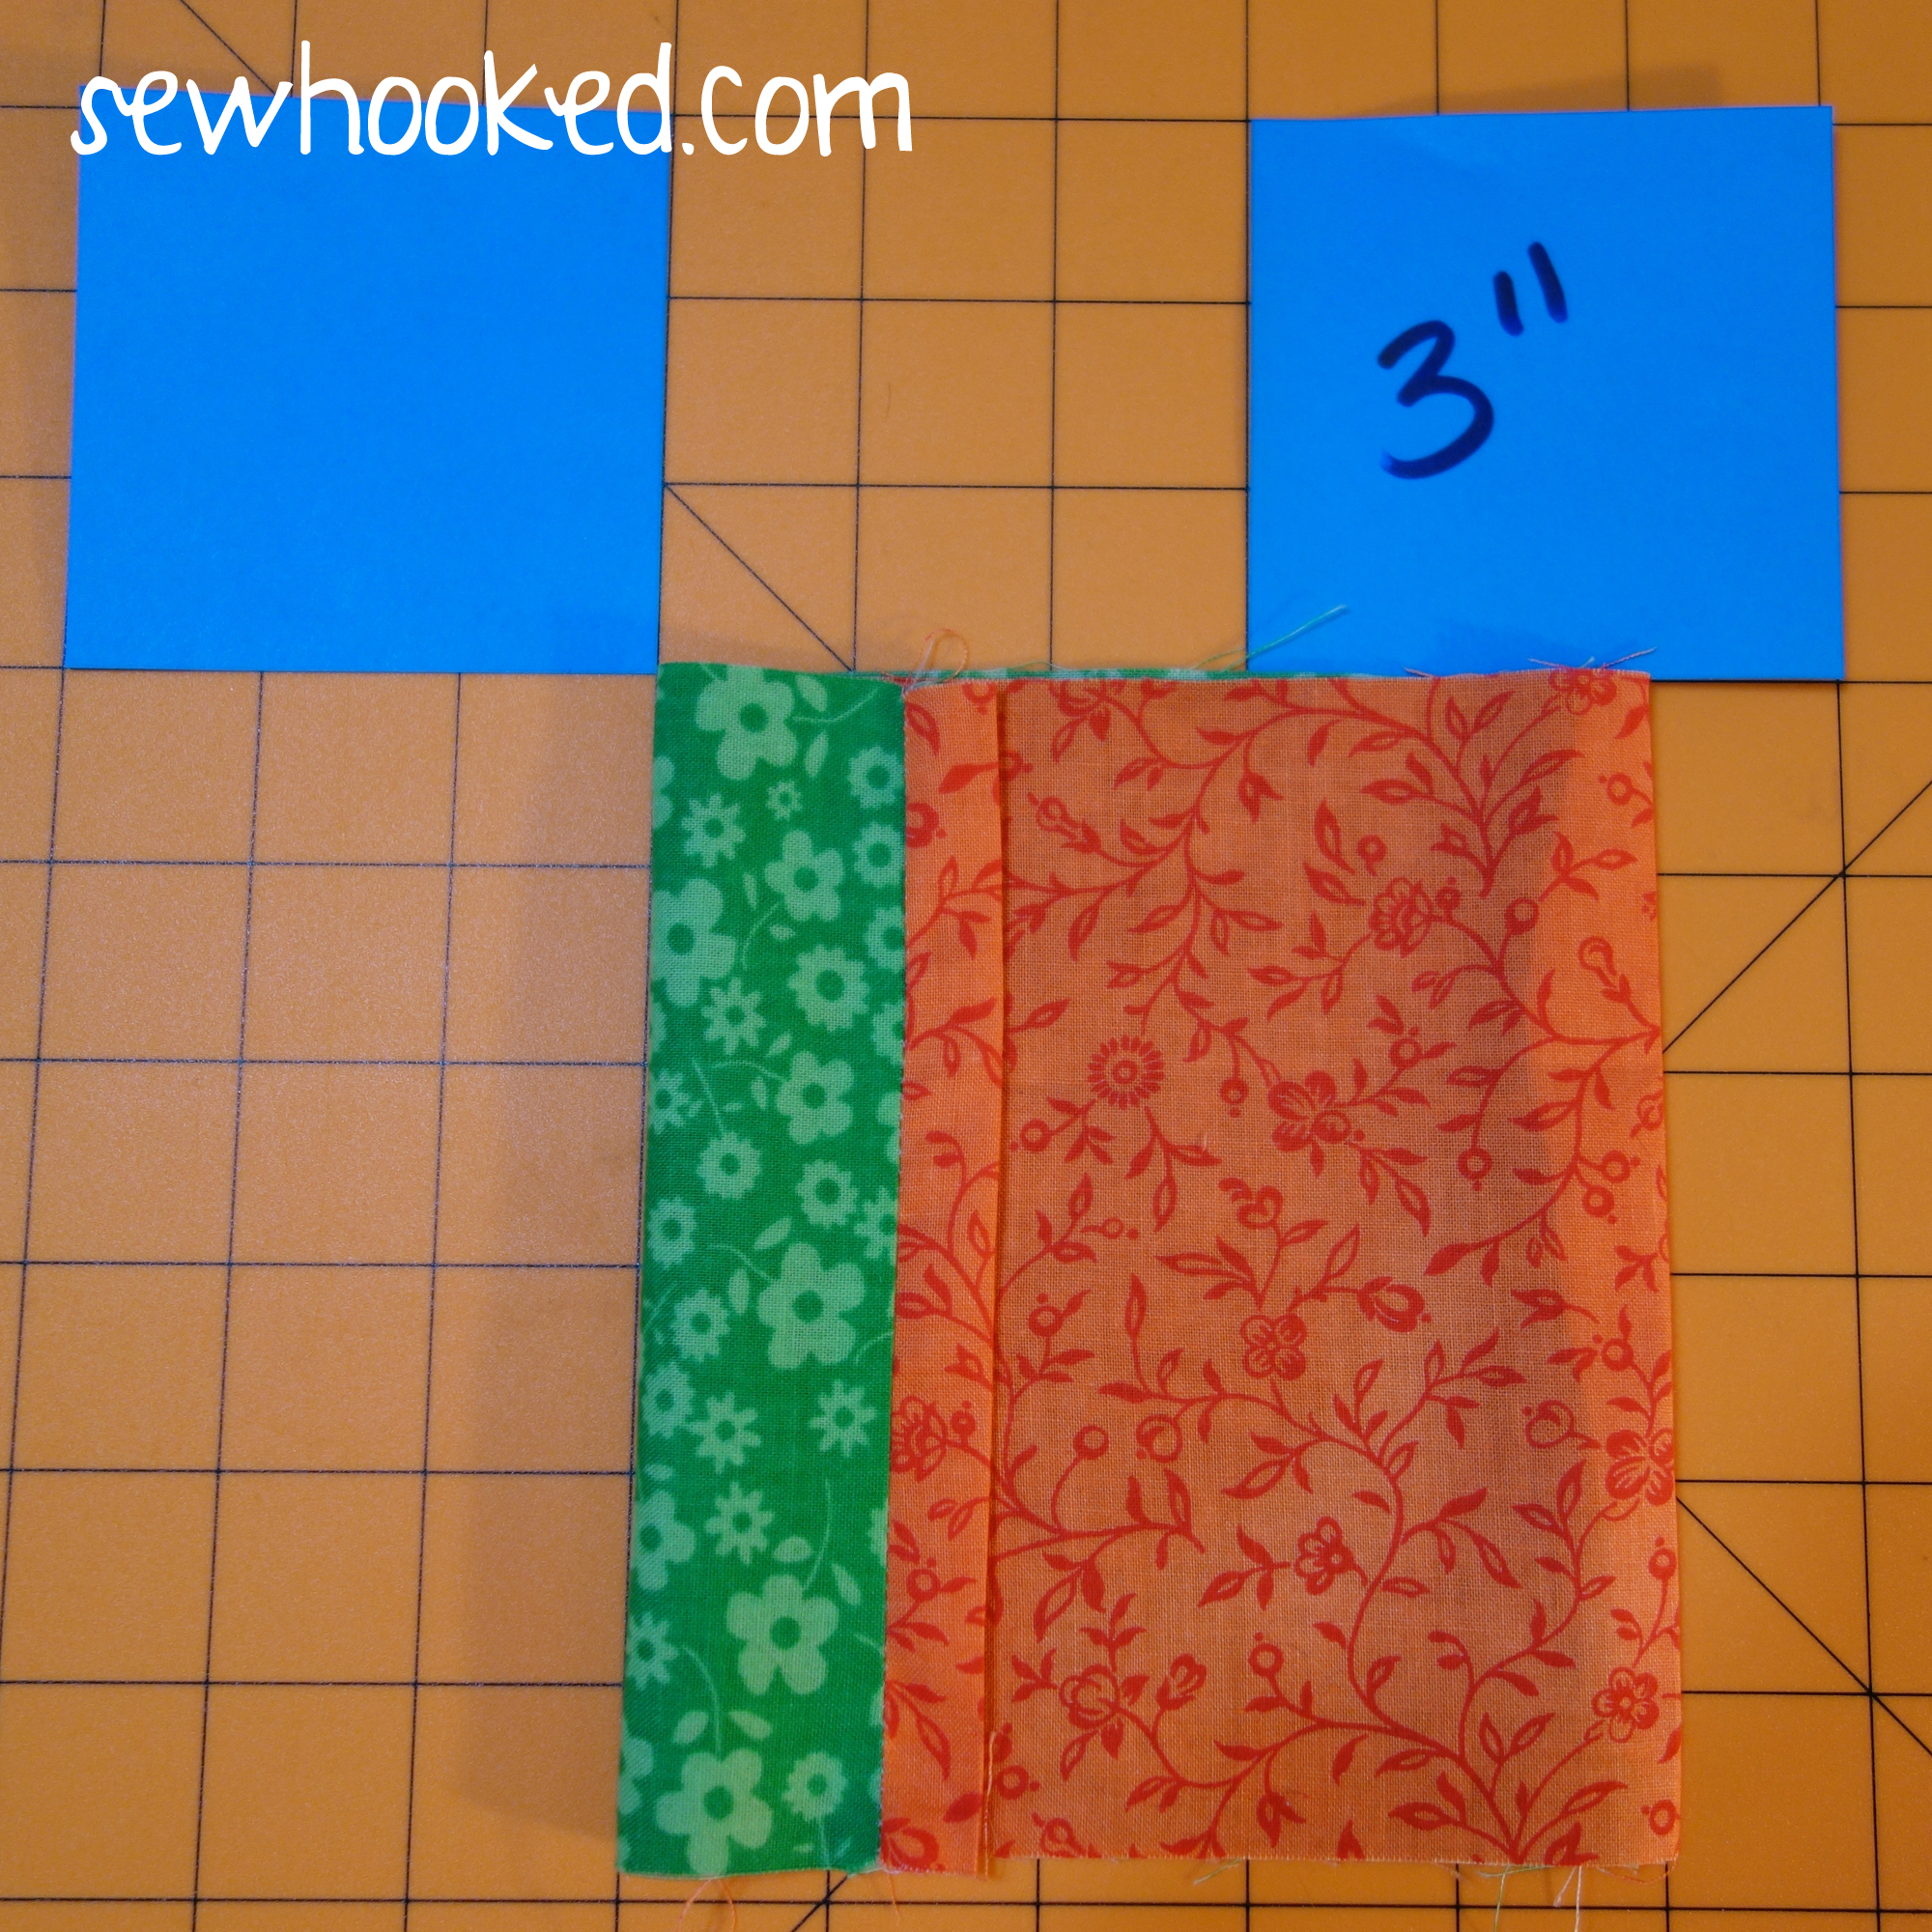
You’ll need fabric in two colors. I’m using contrasting colors to make the lining and outside very obvious. For both the trimmed and non-trimmed version, the outside will be orange.
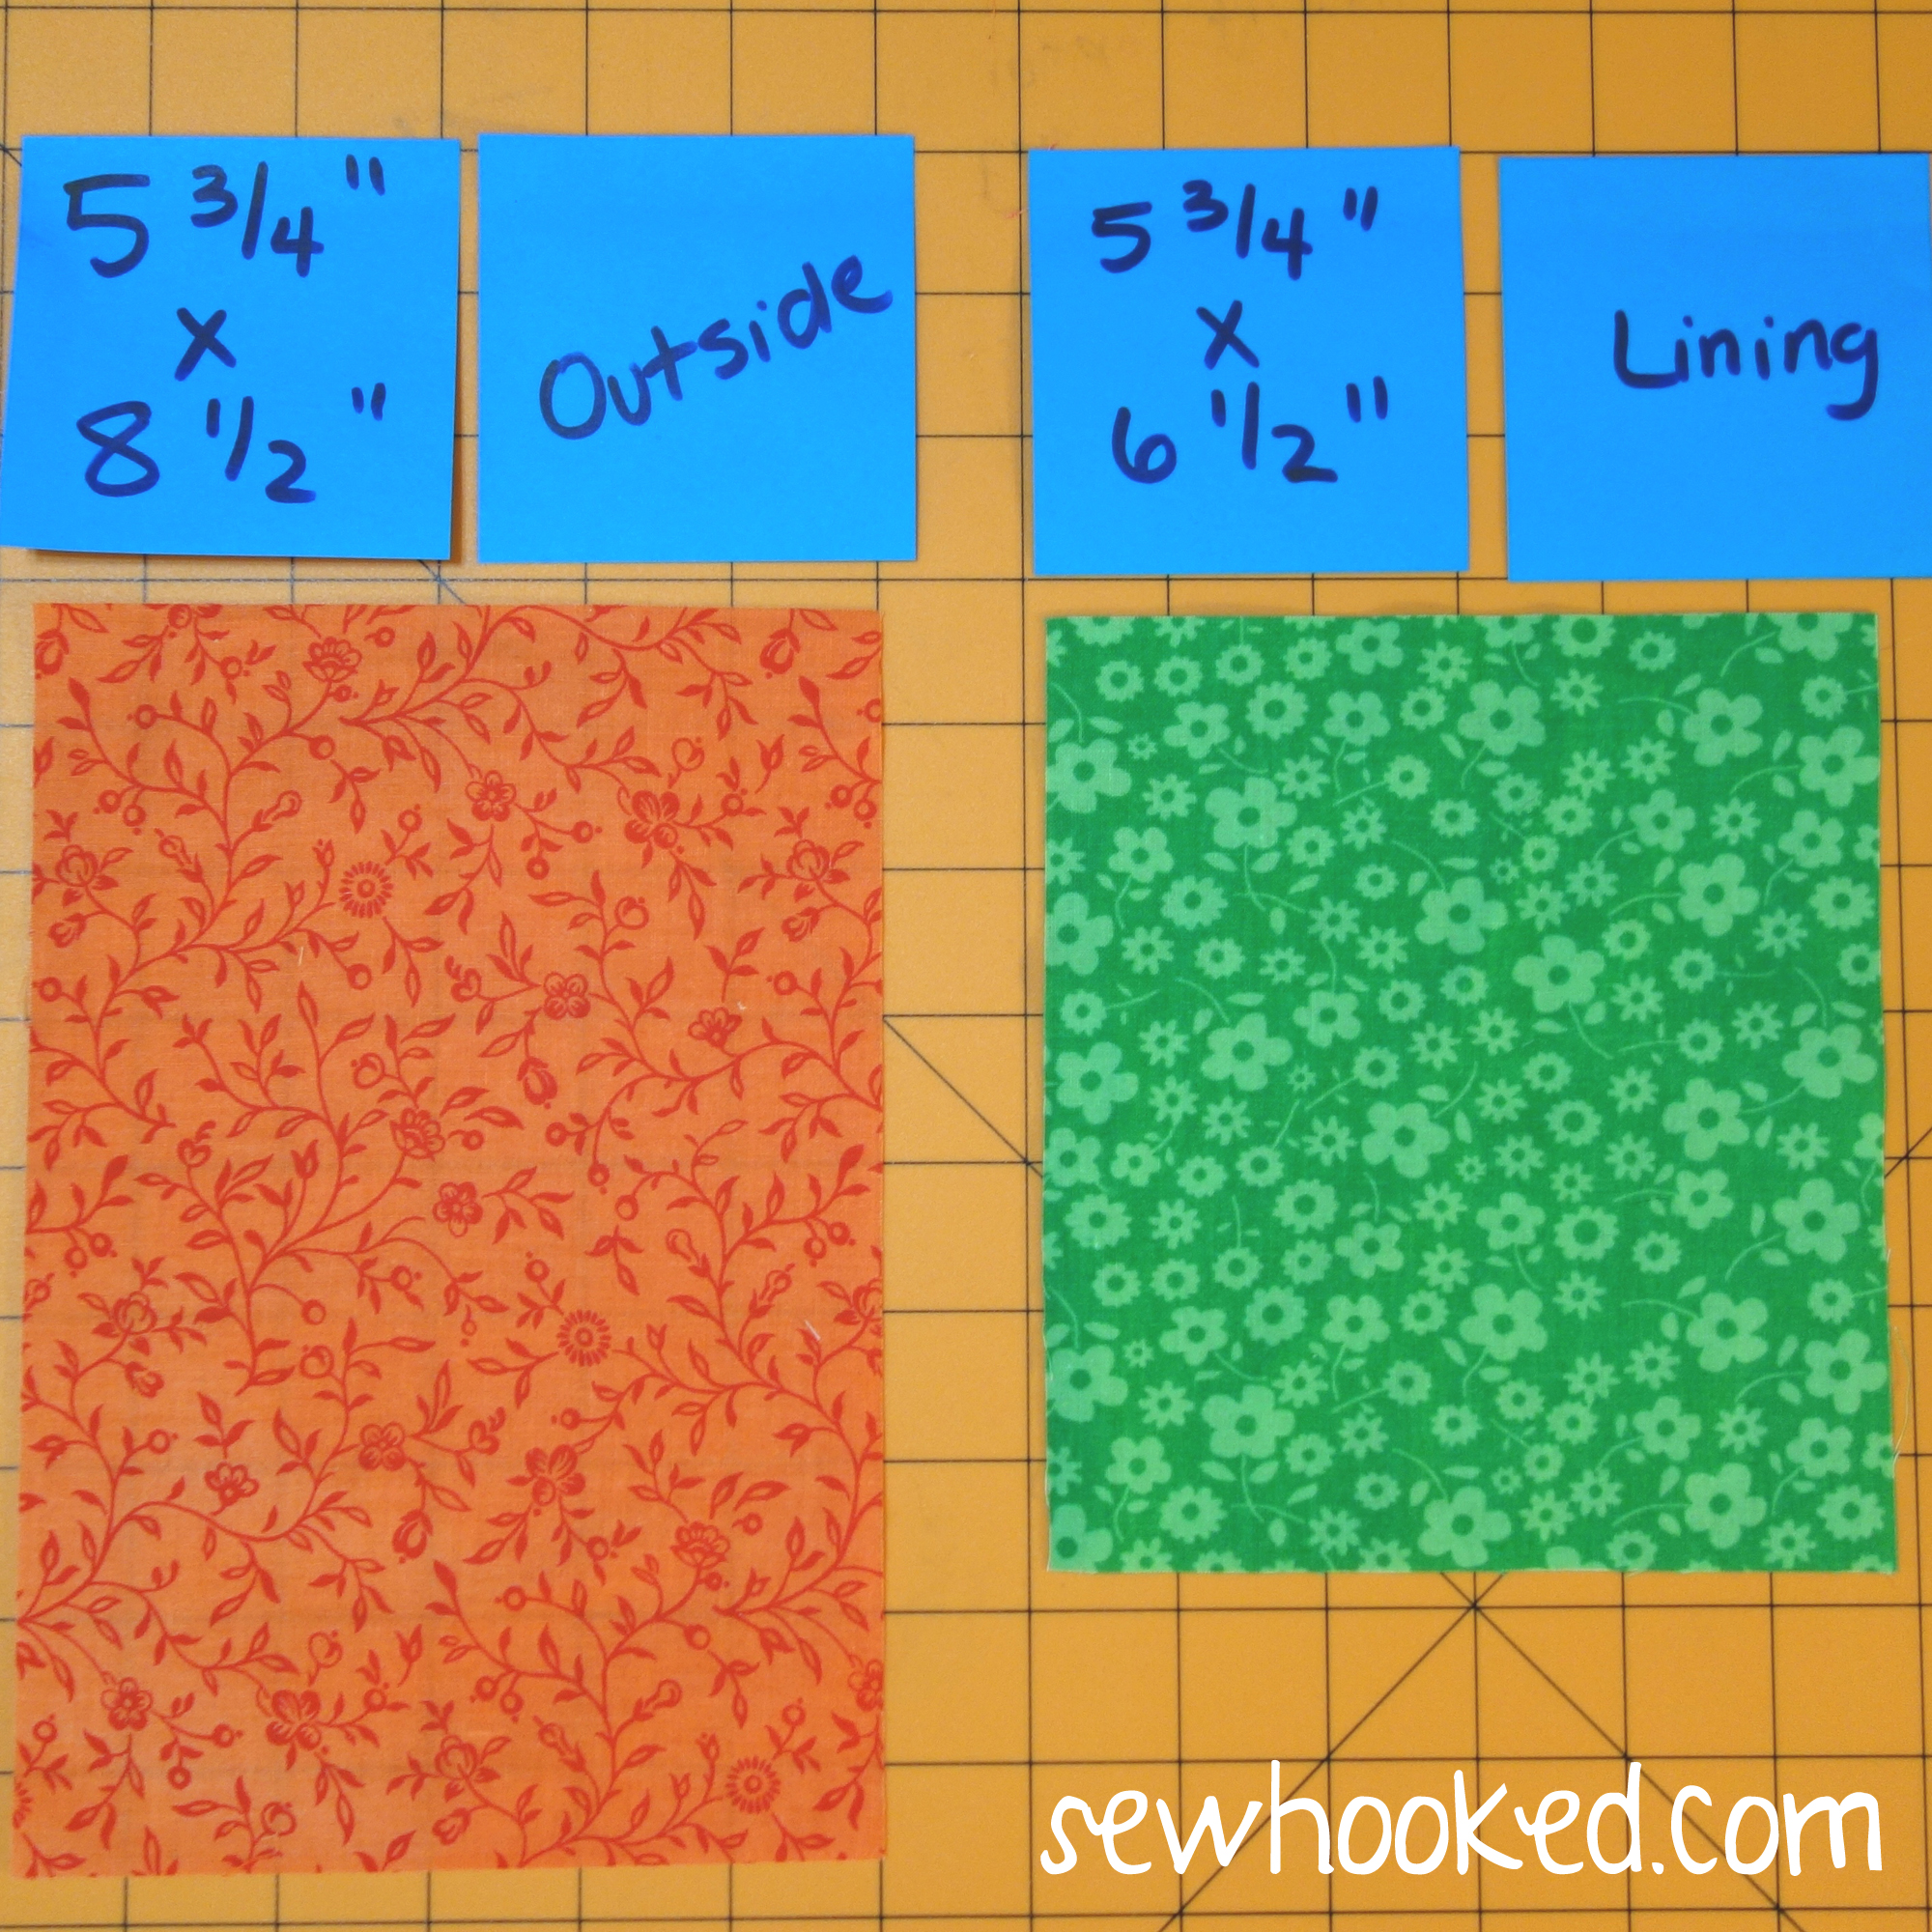
For TRIMMED Cover:
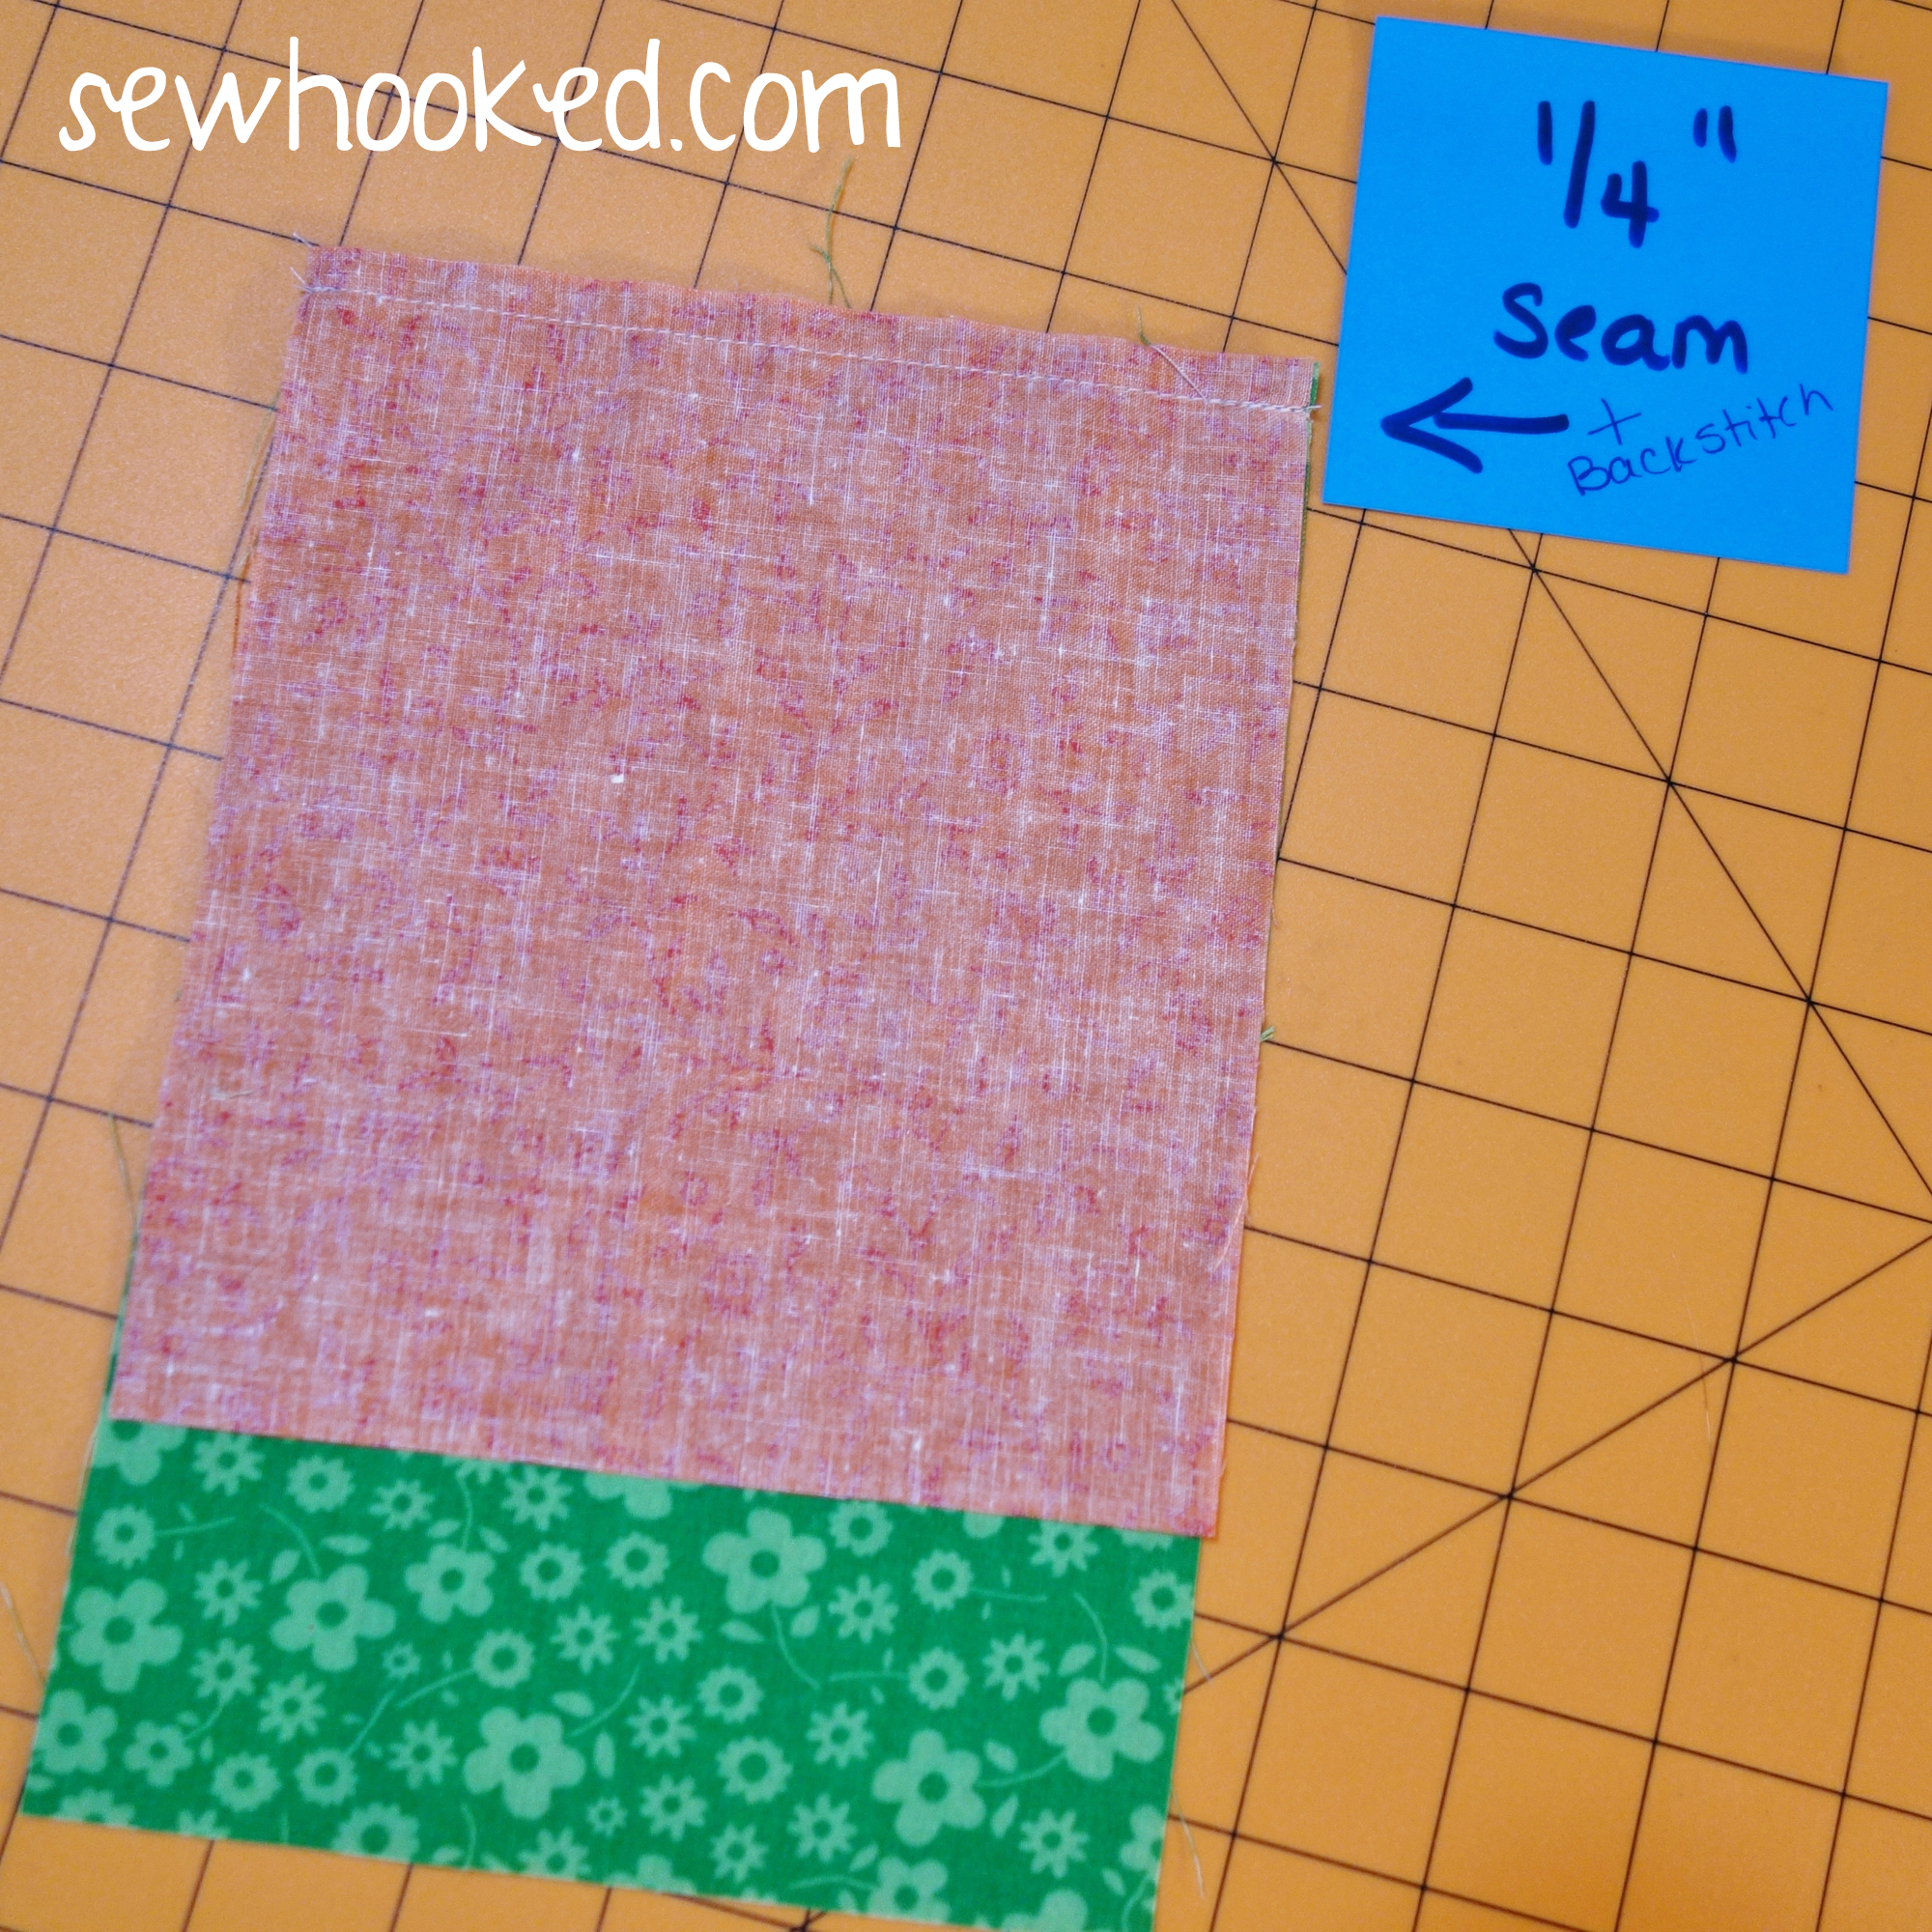
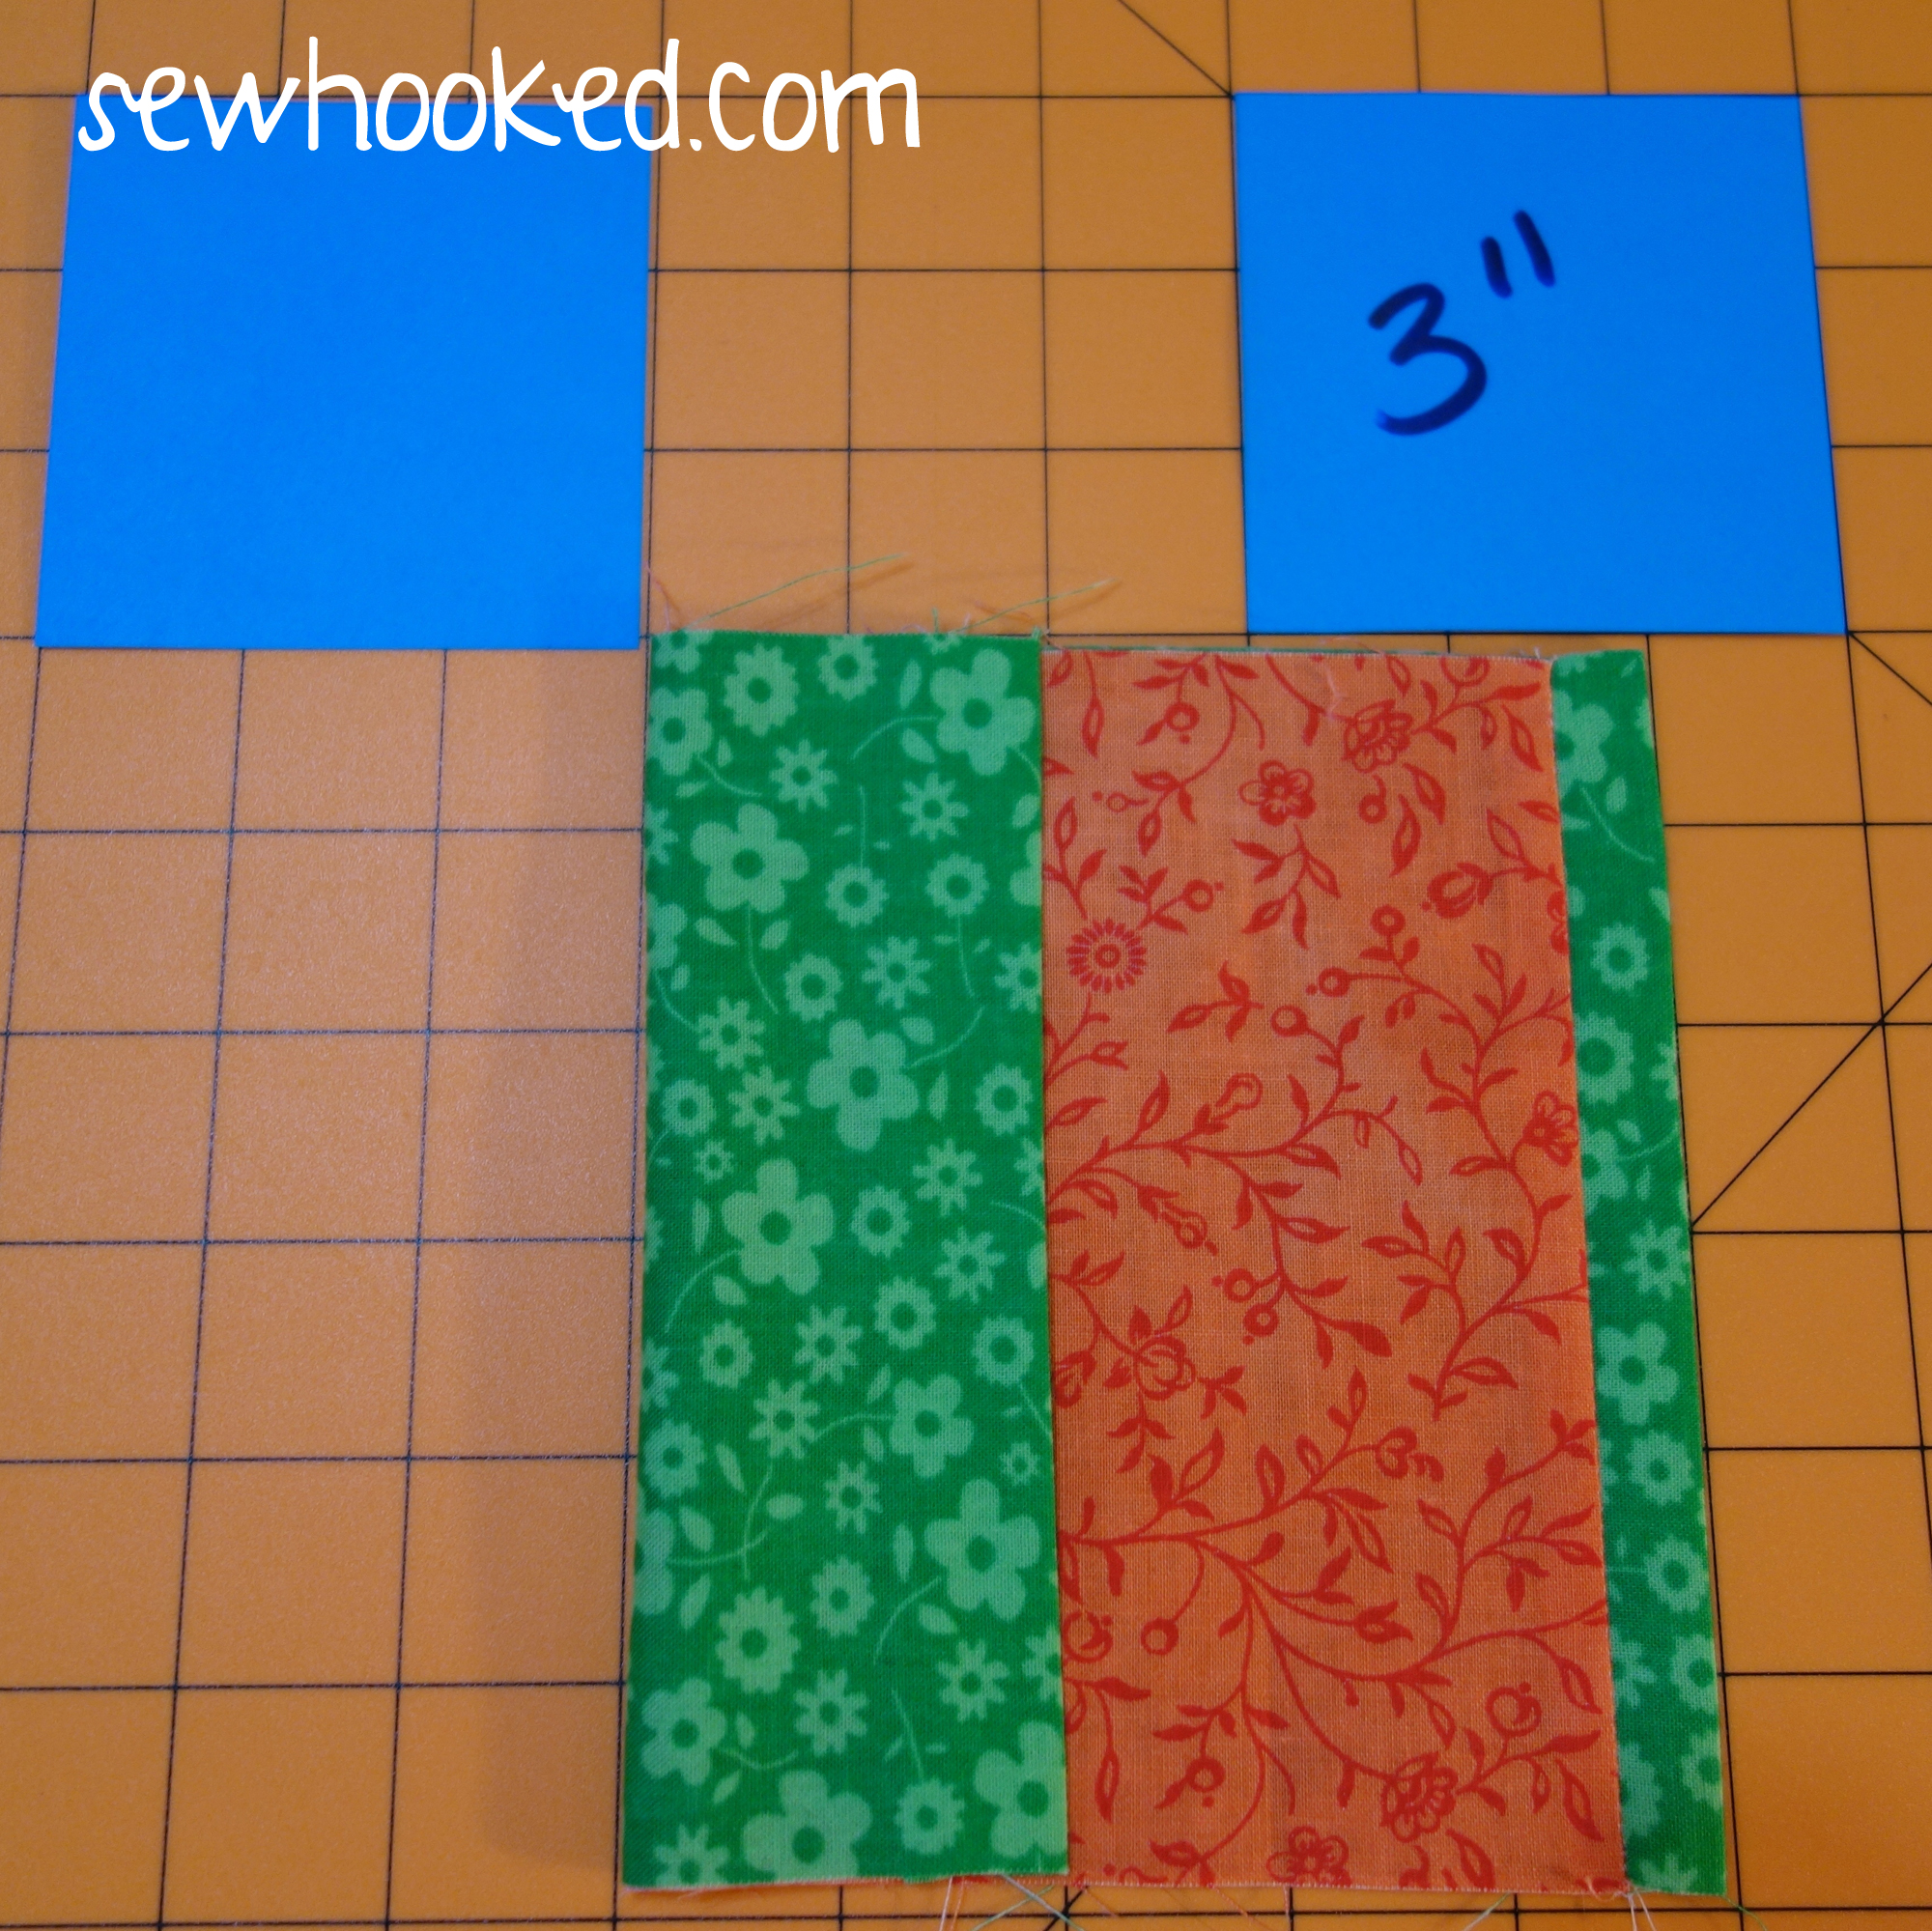
Lining/Trim – 5 3/4″ x 8 1/2″
Outside – 5 3/4″ x 6 1/2″
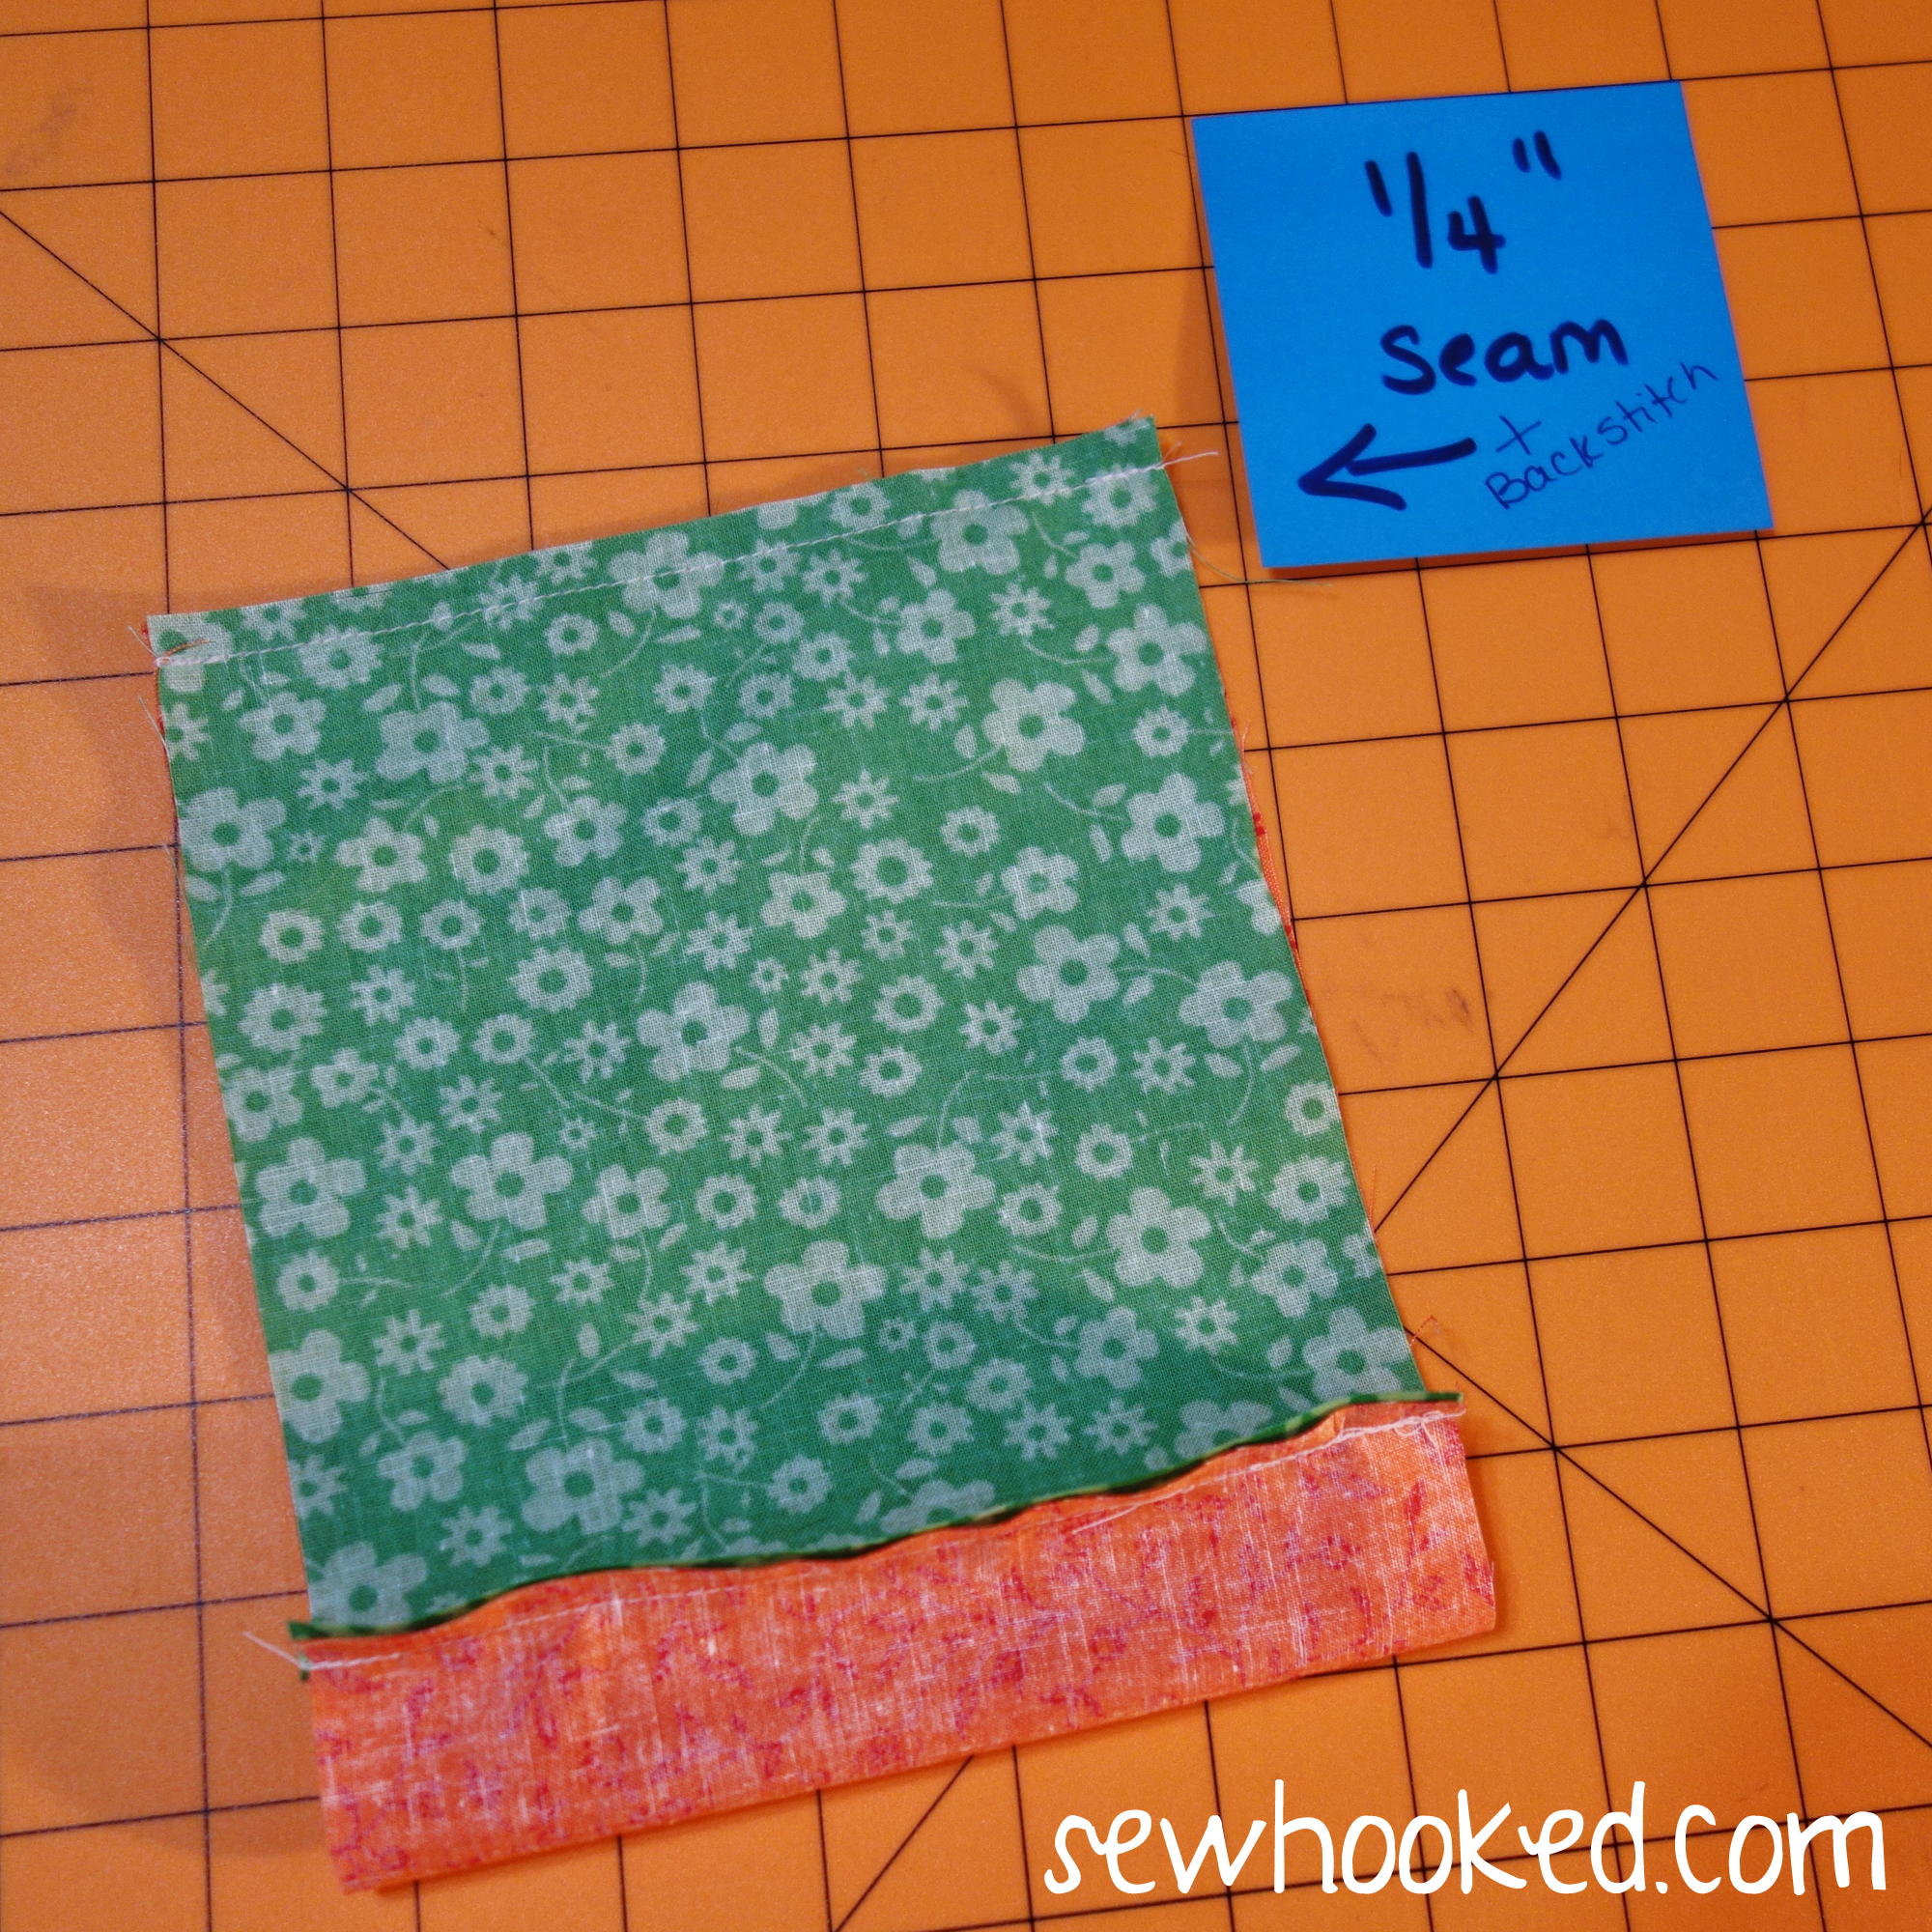
With right sides together, line one end of OUTSIDE to one end of LINING/TRIM on the side that measures 5 3/4″.
Stitch a 1/4″ seam with backstitching at both ends.
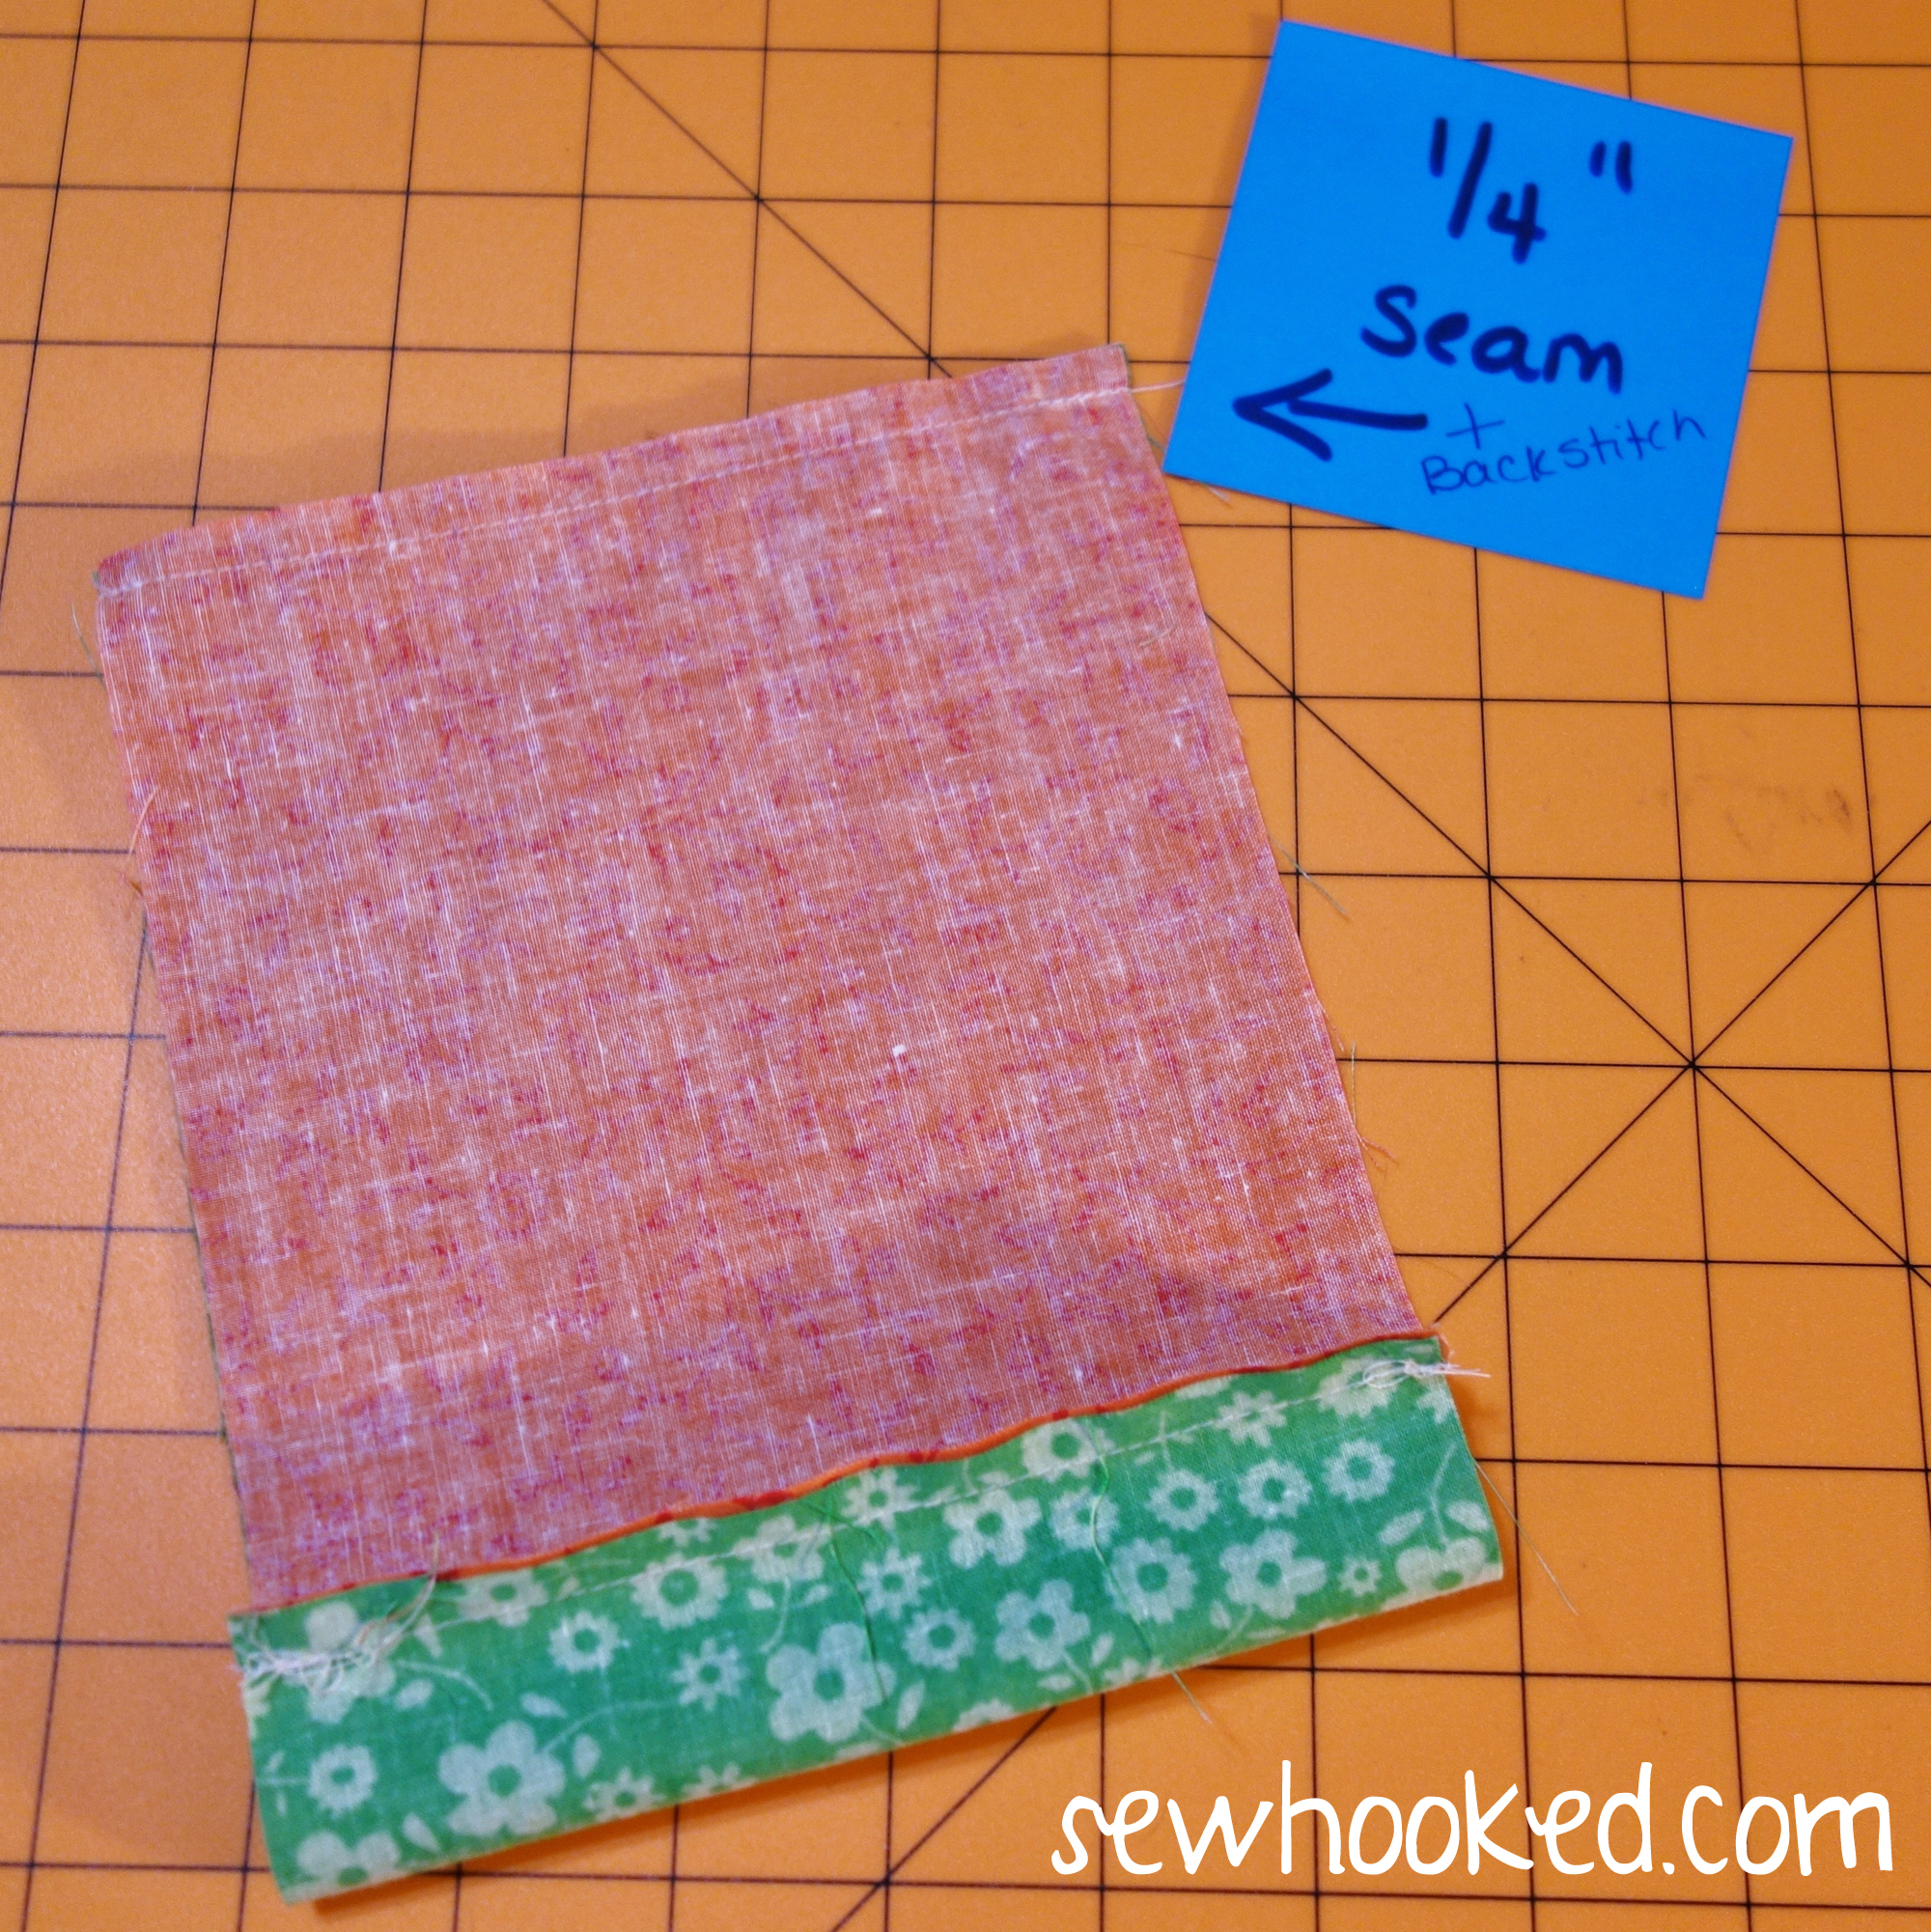
Line up opposite ends and repeat the 1/4″ seam with backstitching along the other 5 3/4″ side.
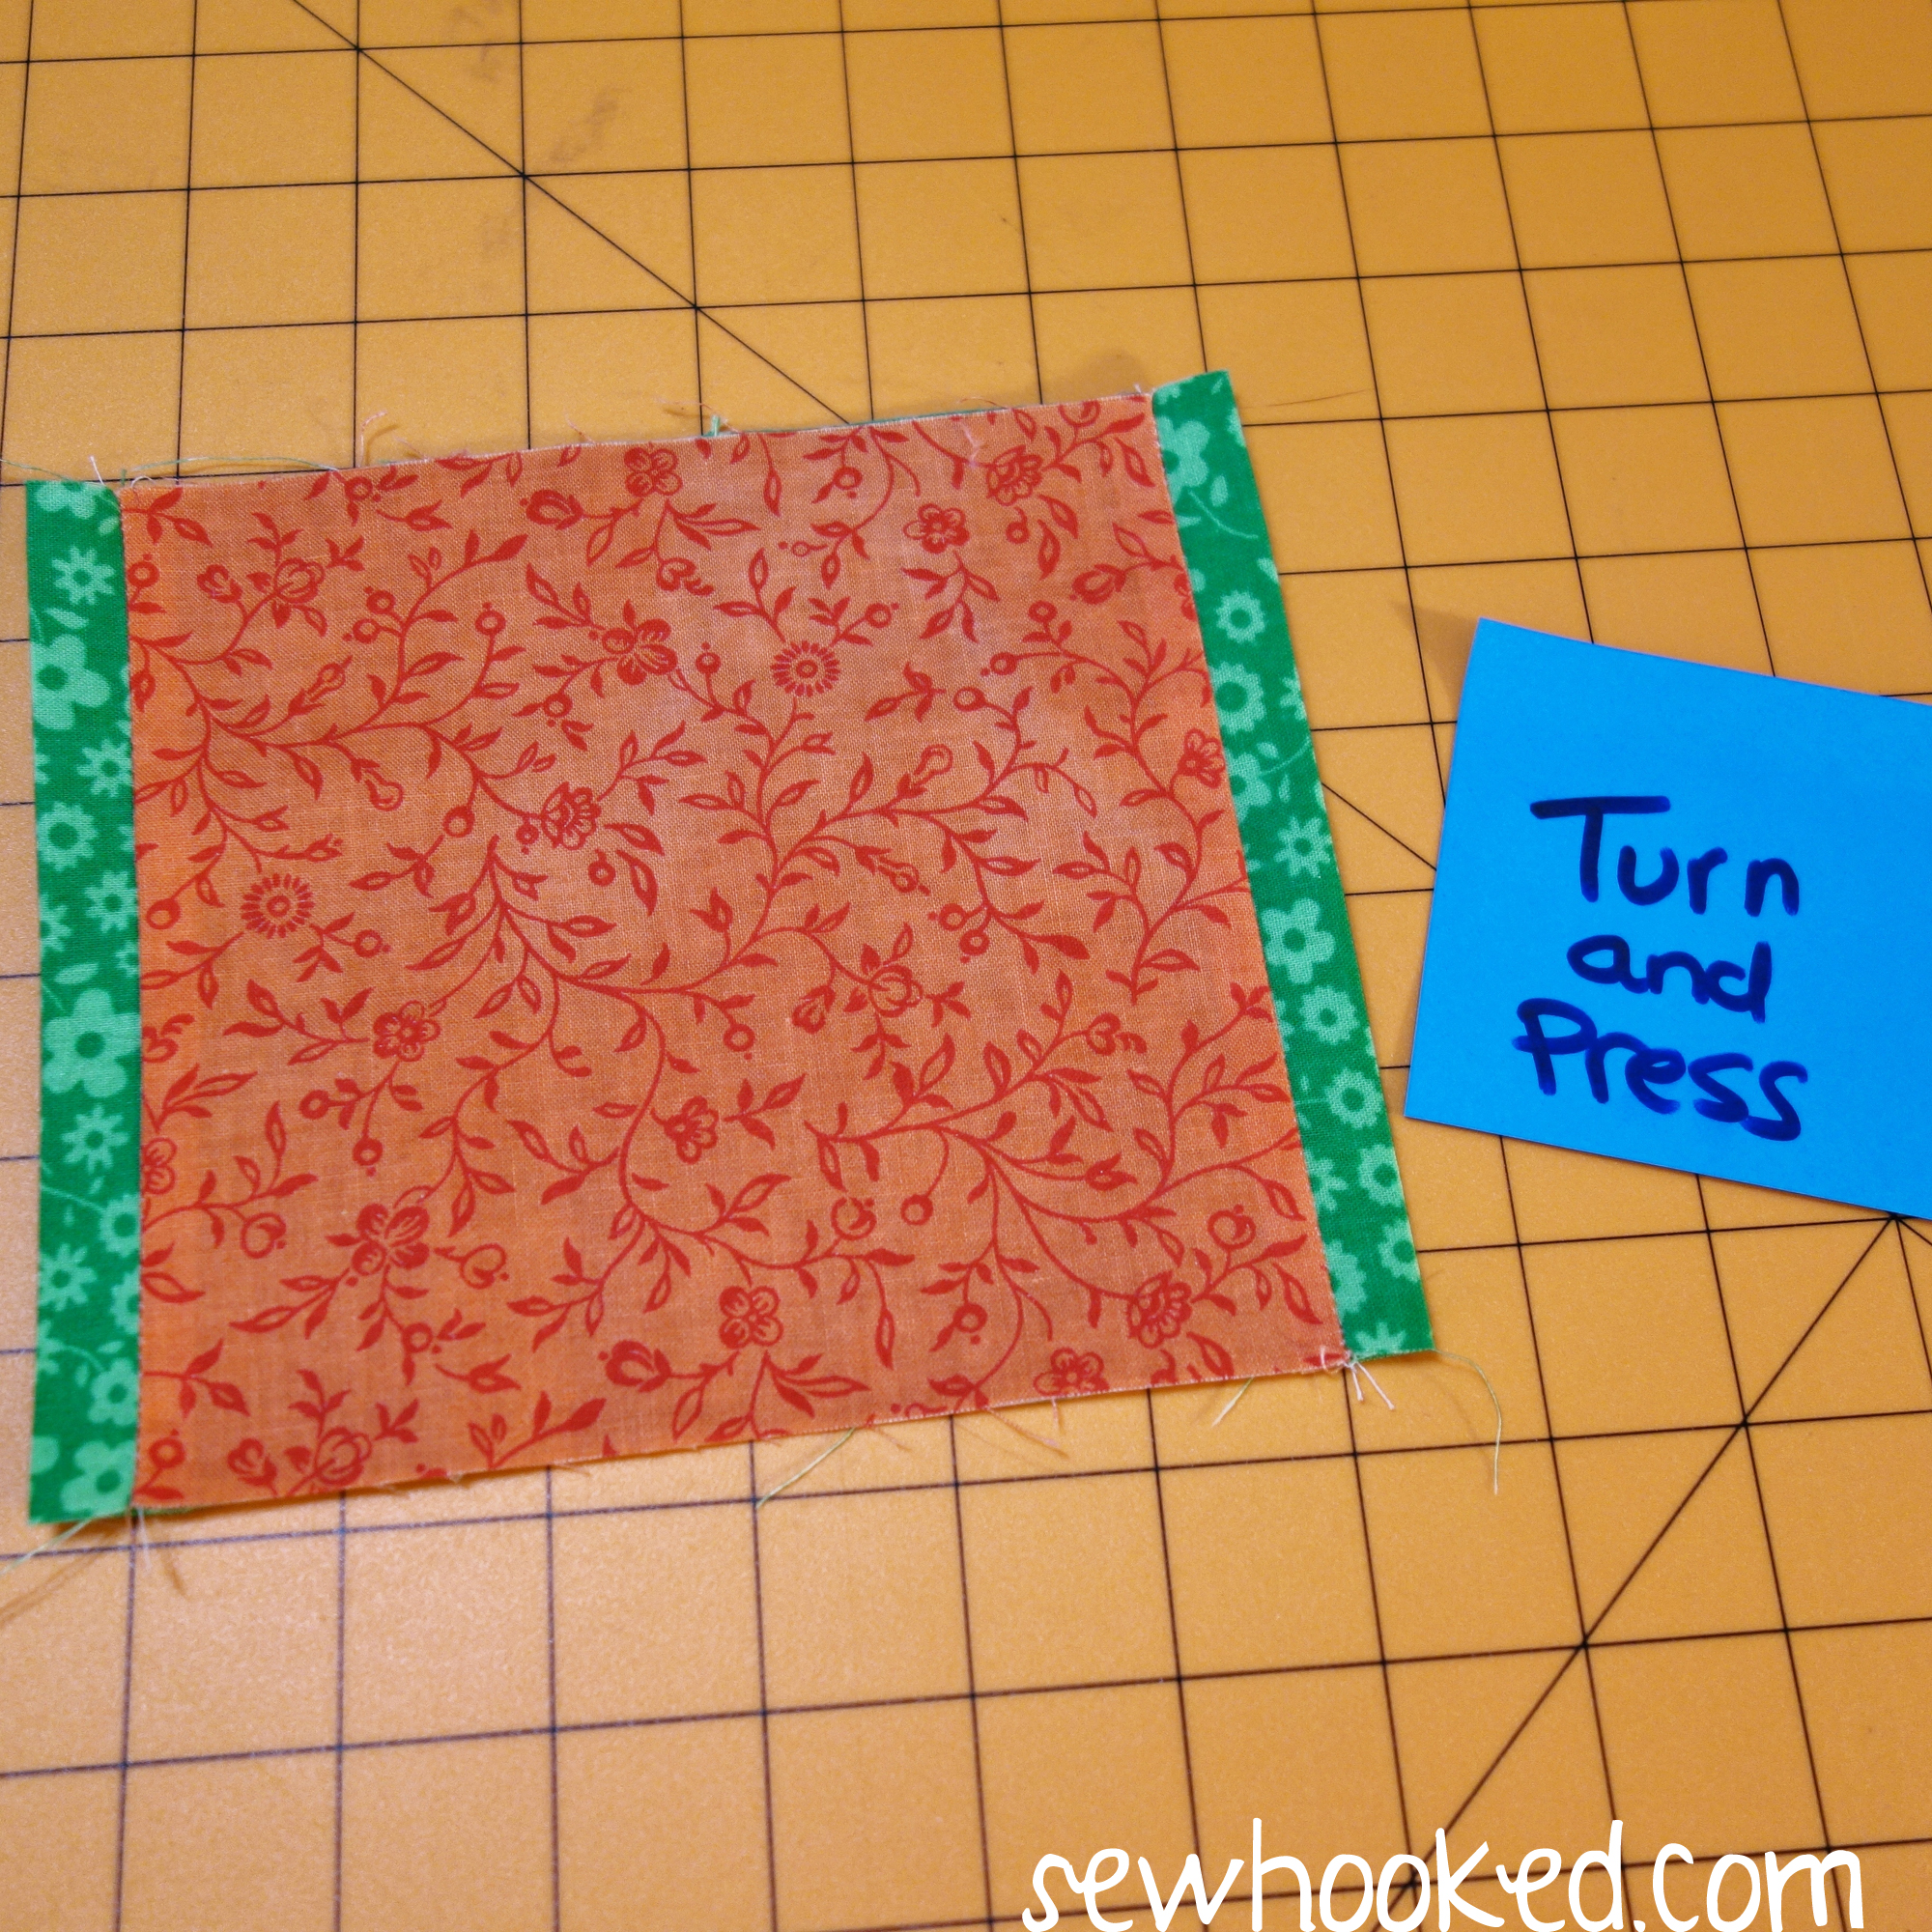
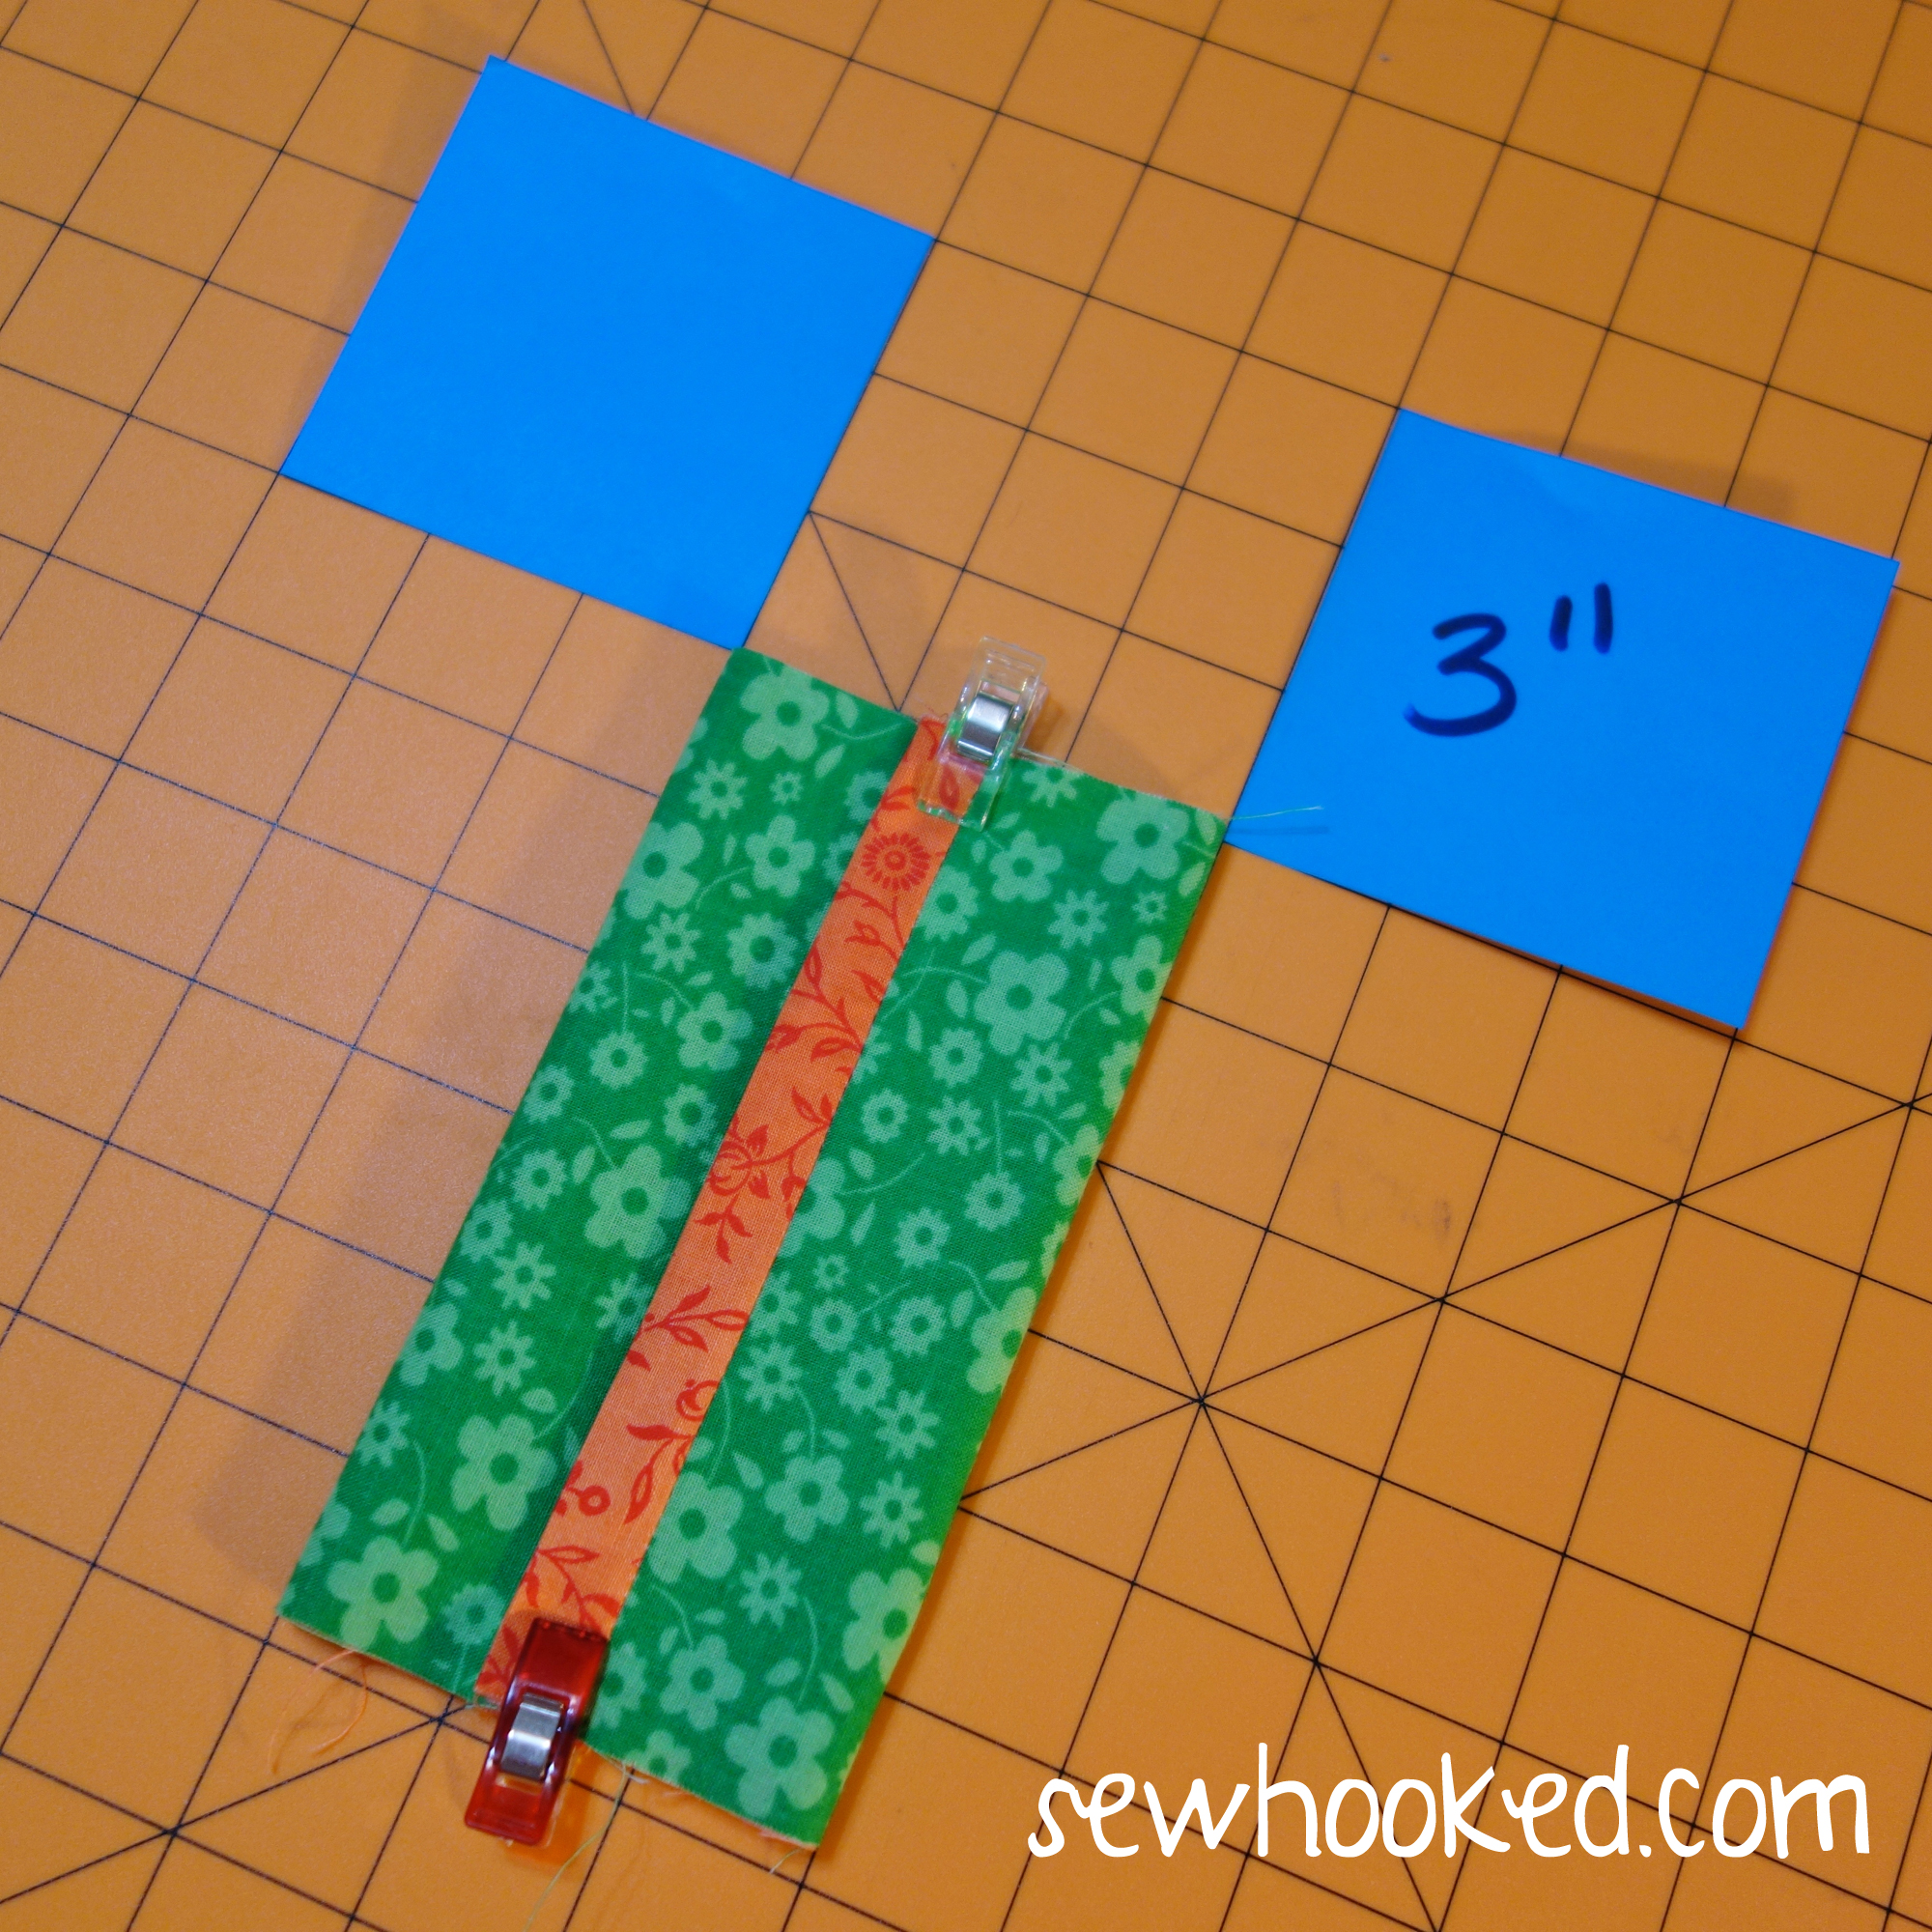
Turn so that wrong sides of the fabric are together. Adjust so that each end of TRIM is approximately the same size.
Press.
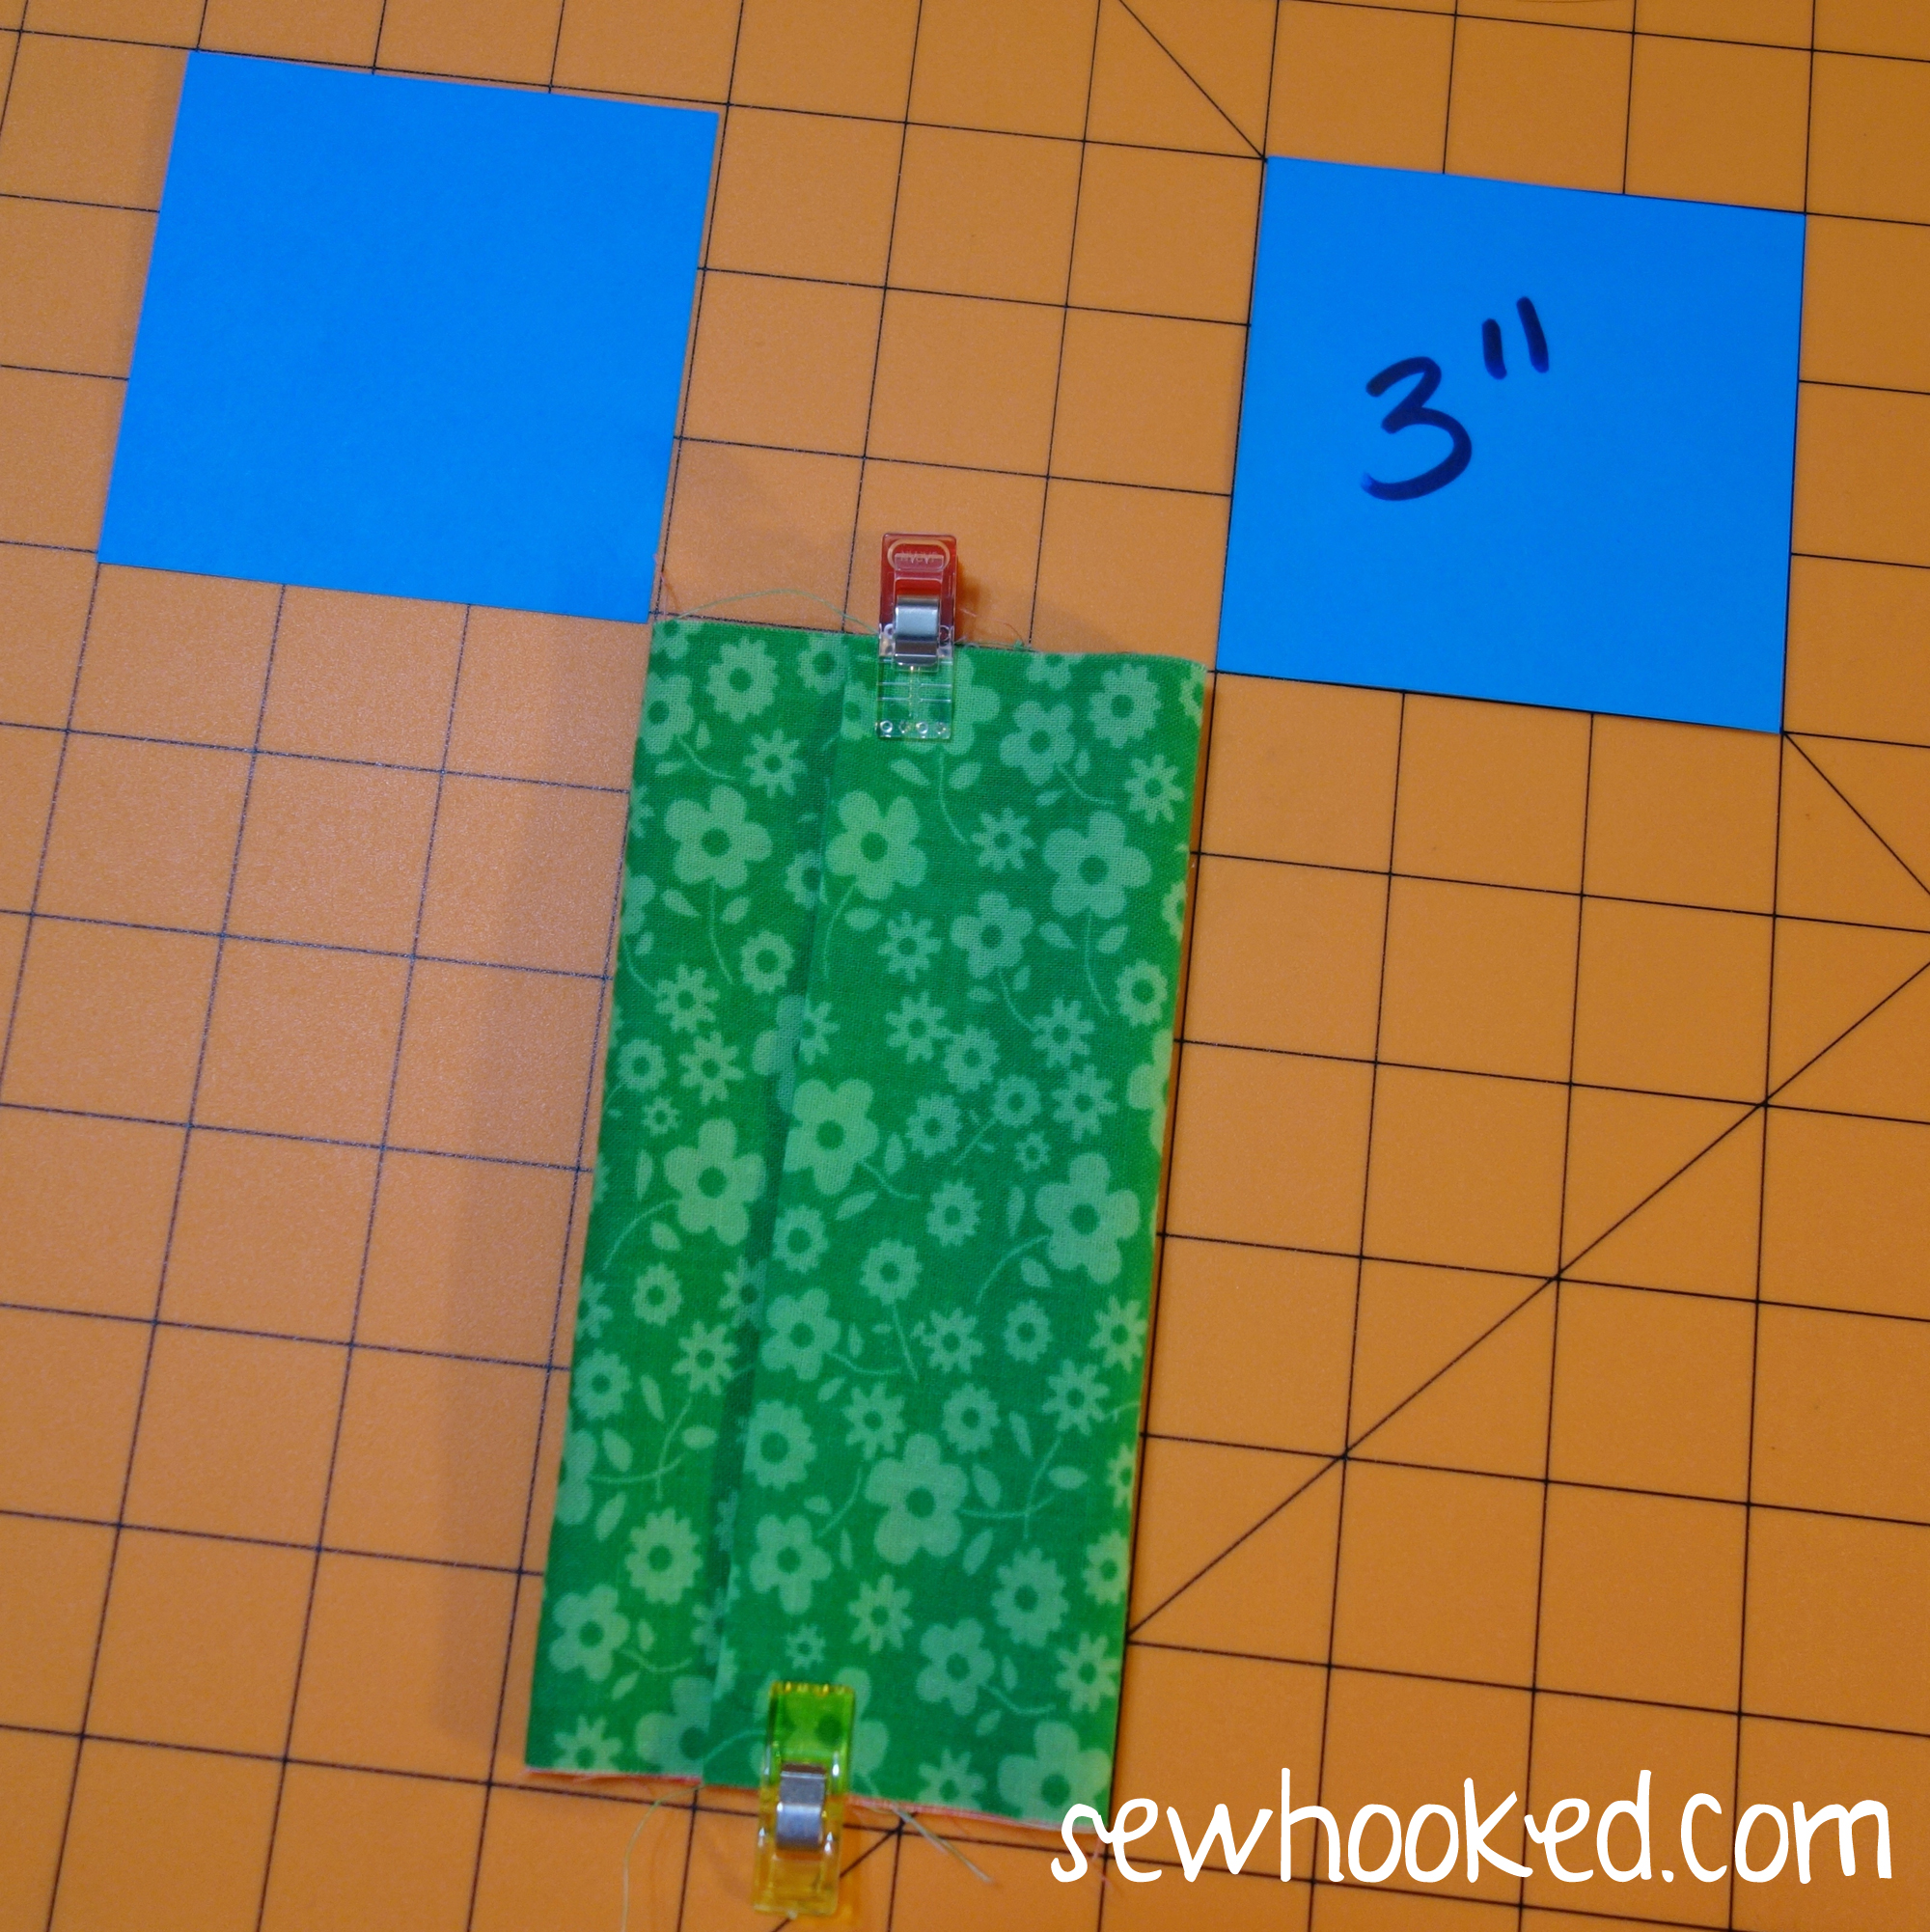
Using a ruler or rotary mat, fold right sides of the OUTSIDE together so that it is 3″ wide. If you’re using a rotary mat, you can align easily use the markings on your mat for this part. Edges should overlap in the approximate center.
Once adjustments have been made to your liking and the width is 3″, pin or clip with sewing clips. Wonder Clips or Magic Clips work great. (I have both.)
Because this version has TRIM, you will not see the overturned edge during this step.
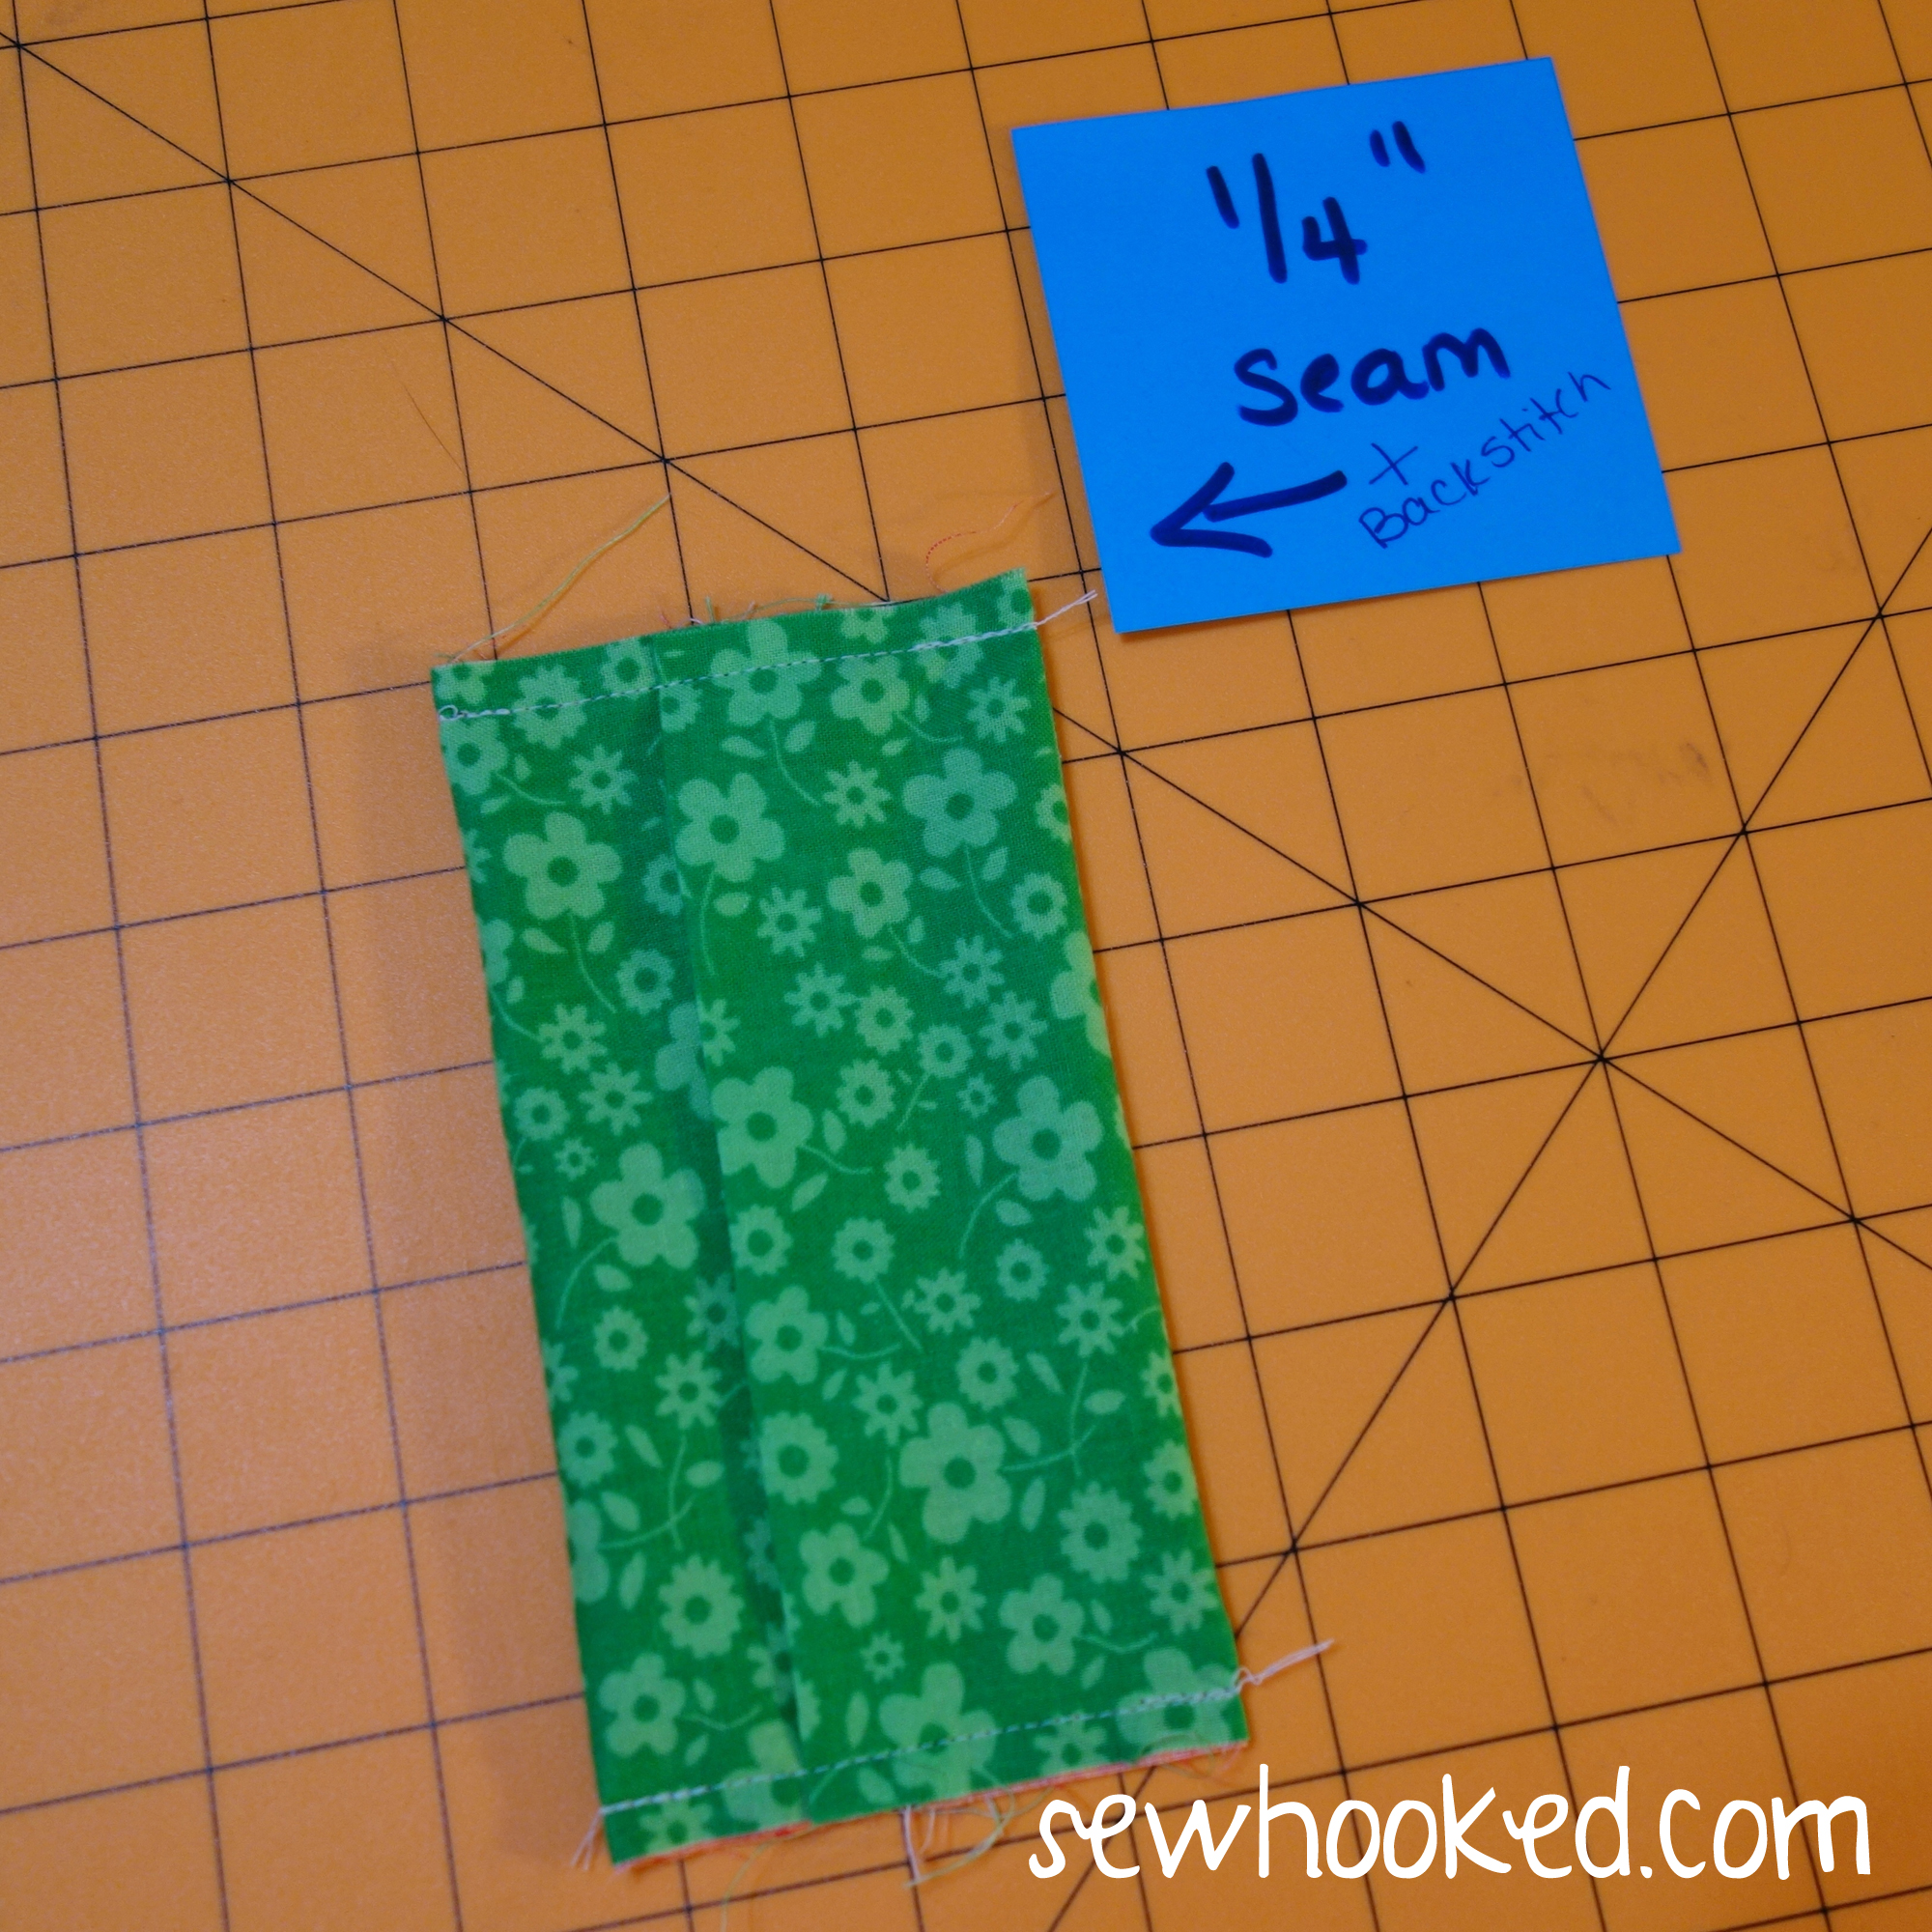
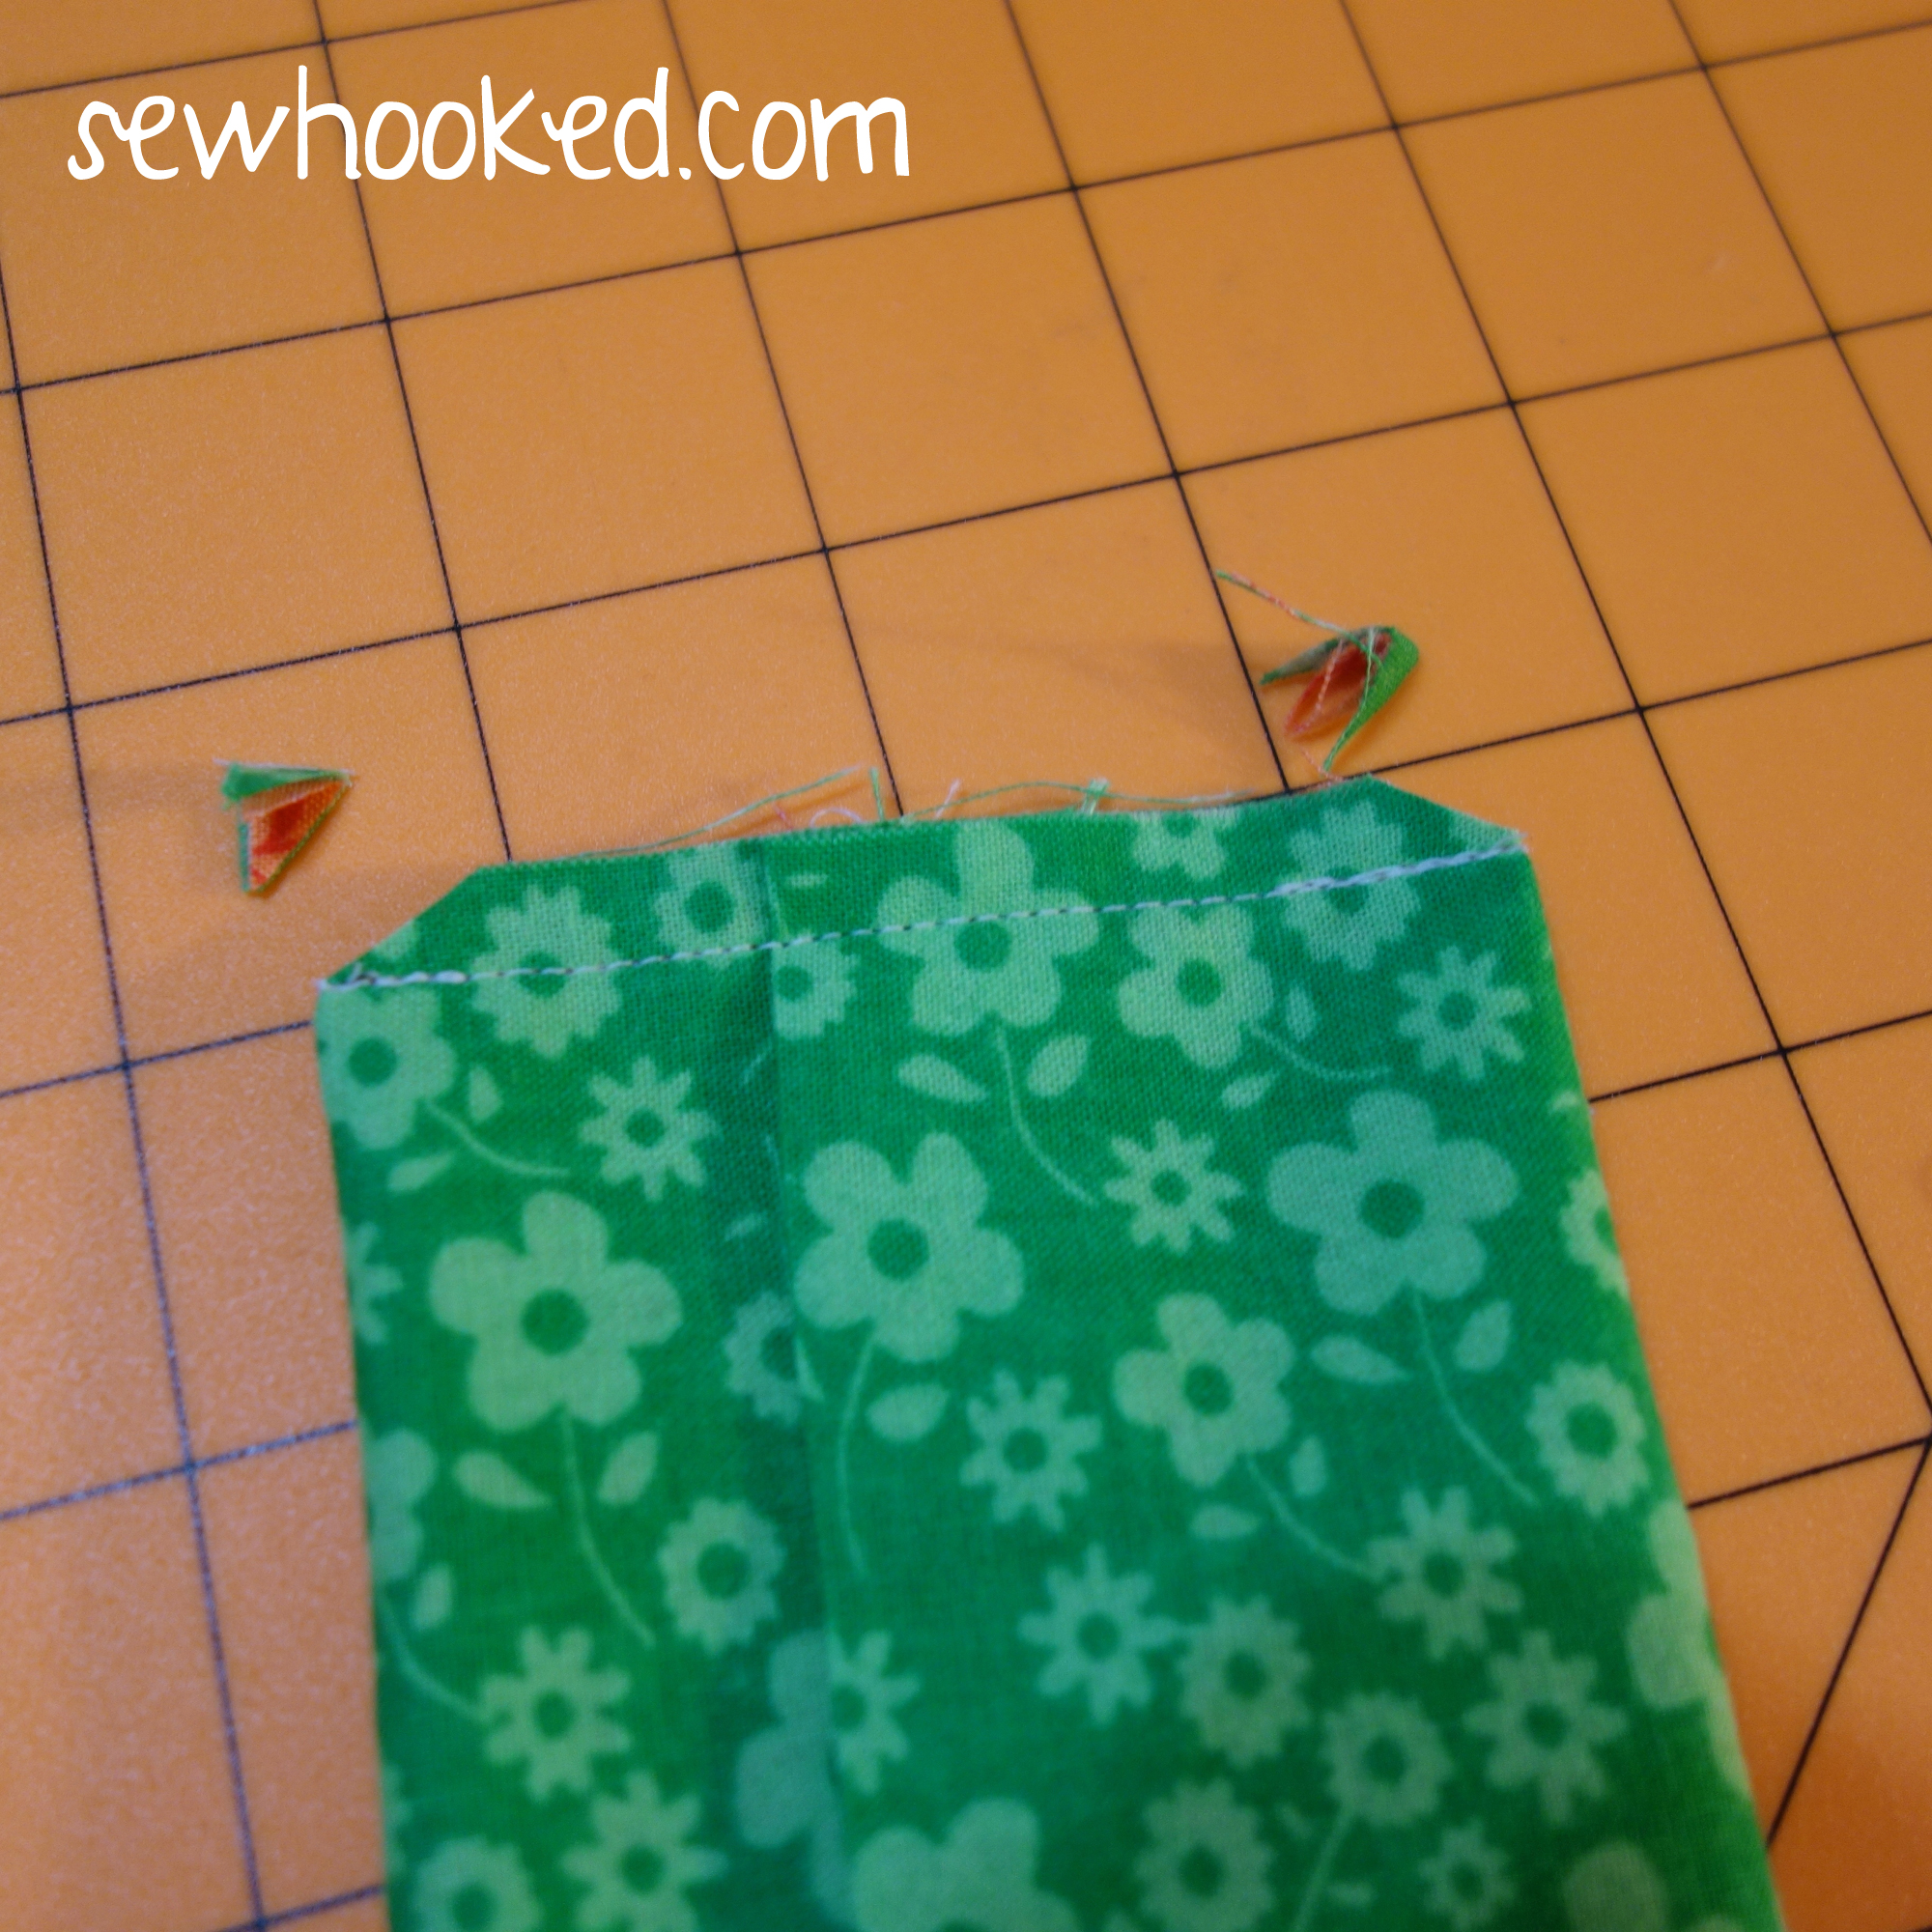
Sew each end with a 1/4″ seam allowance, backstitching at the beginning and end.
Clip corners & turn.
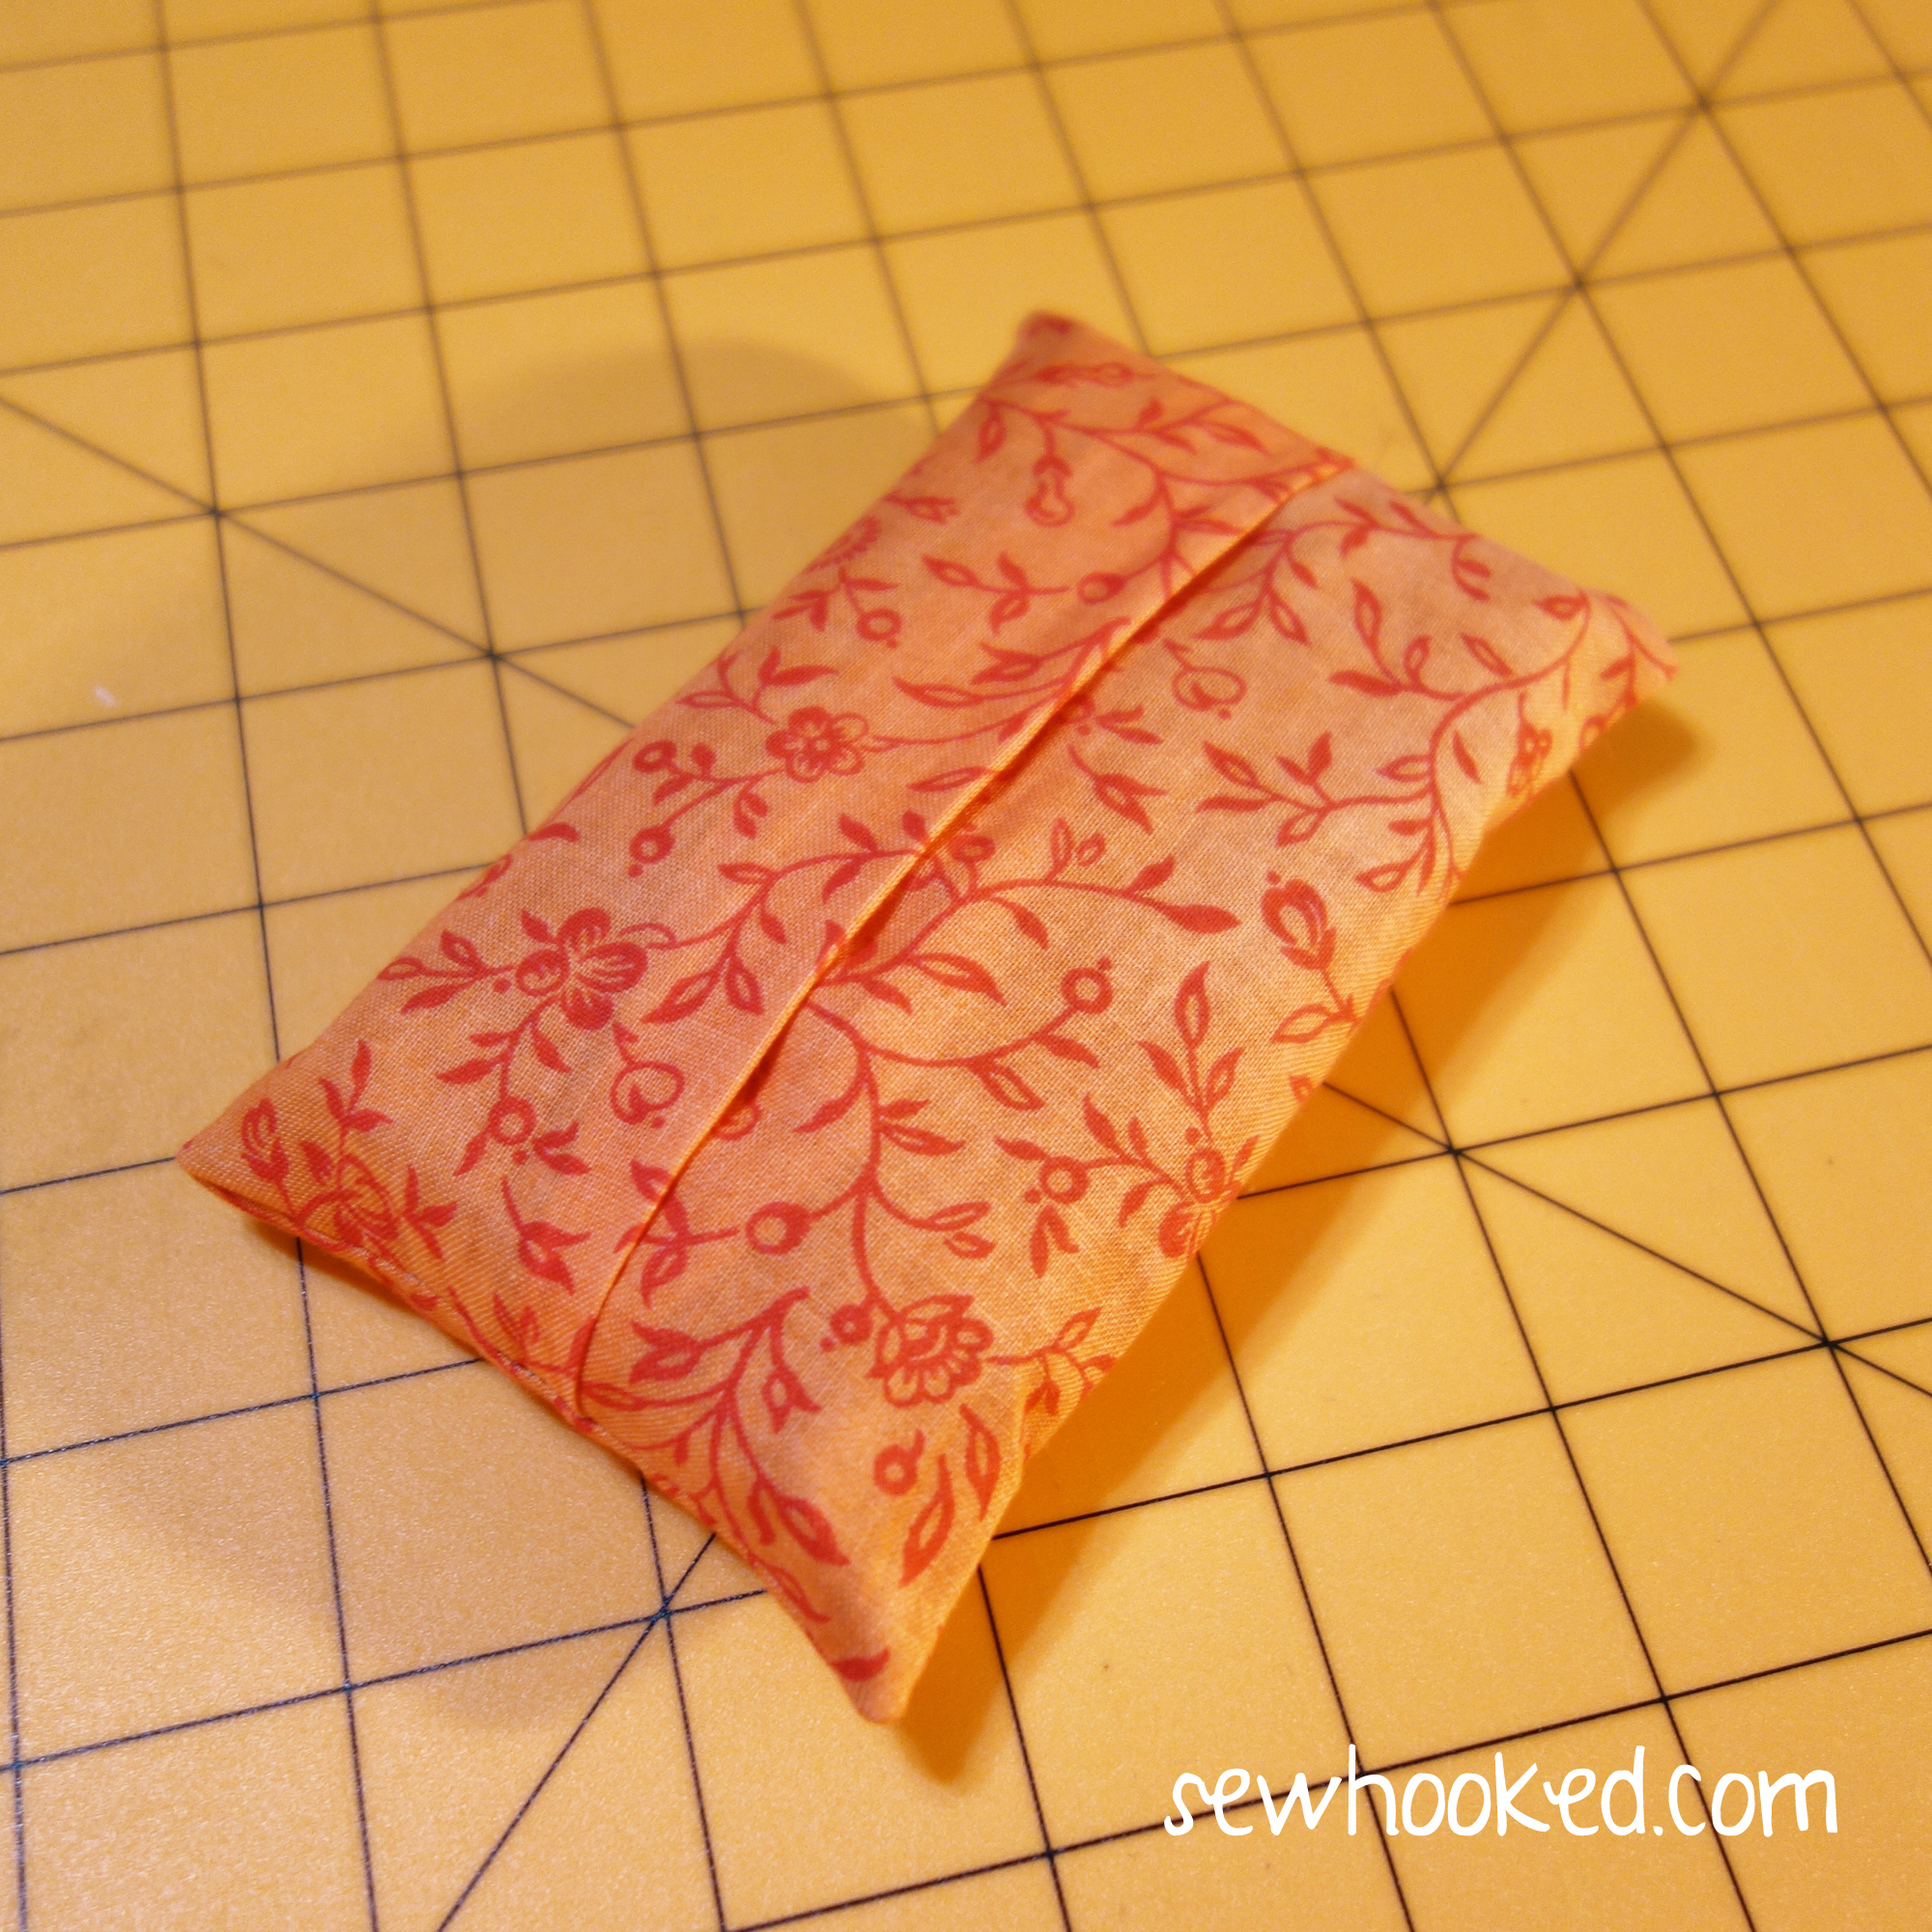
Done!
See how the Lining/Trim makes a lovely accent? You can have fun playing with stripes, dots or other fun fabrics.
Now, let’s make one that isn’t trimmed. We’ll use the same technique, but the fabric sizes will be reversed.
You’ll need fabric in two colors. Just as before, the orange fabric is the OUTSIDE.
For UN-TRIMMED Cover:
Outside – 5 3/4″ x 8 1/2″
Lining – 5 3/4″ x 6 1/2″
With right sides together, line one end of LINING to one end of OUTSIDE on the side that measures 5 3/4″.
Stitch a 1/4″ seam with backstitching at both ends.
Line up opposite ends and repeat the 1/4″ seam with backstitching along the other 5 3/4″ side.
Turn so that wrong sides of the fabric are together. Adjust so that each end is approximately the same width.
Press.
Using a ruler or rotary mat, fold right sides of the OUTSIDE together so that it is 3″ wide. If you’re using a rotary mat, you can align easily use the markings on your mat for this part. Edges should overlap in the approximate center
Once adjustments have been made to your liking and the width is 3″, pin or clip with sewing clips.
Because this version doesn’t have TRIM, you’ll see the overturned edge during this step.
Sew each end with a 1/4″ seam allowance, backstitching at the beginning and end.
Clip Corners & Turn.
Done!
Stop by tomorrow for Free Pattern Friday for my weekly featured FREE quilt pattern!
I drew Curly Swirly Butterfly a couple of weeks back when I was sick and didn’t feel like doing much but doodle. In this case, my doodle turned into something so fun, that I even made it available as a t-shirt and bought myself one, too!
This fun pattern can be backstitched, stem stitched, or finished using your favorite embroidery stitch.
GREAT BIG THANKS to Robin & Rainey for stitching this sweet design up for me. (Click the links to check them out on Instagram!)
Our March drawing is for a fun set of fabric from the fabulous Vanda, all the way from South Africa!
The prize includes 20 cotton fabric pieces ranging in size from 5.5″ x 8″ to 10″ x 11″.
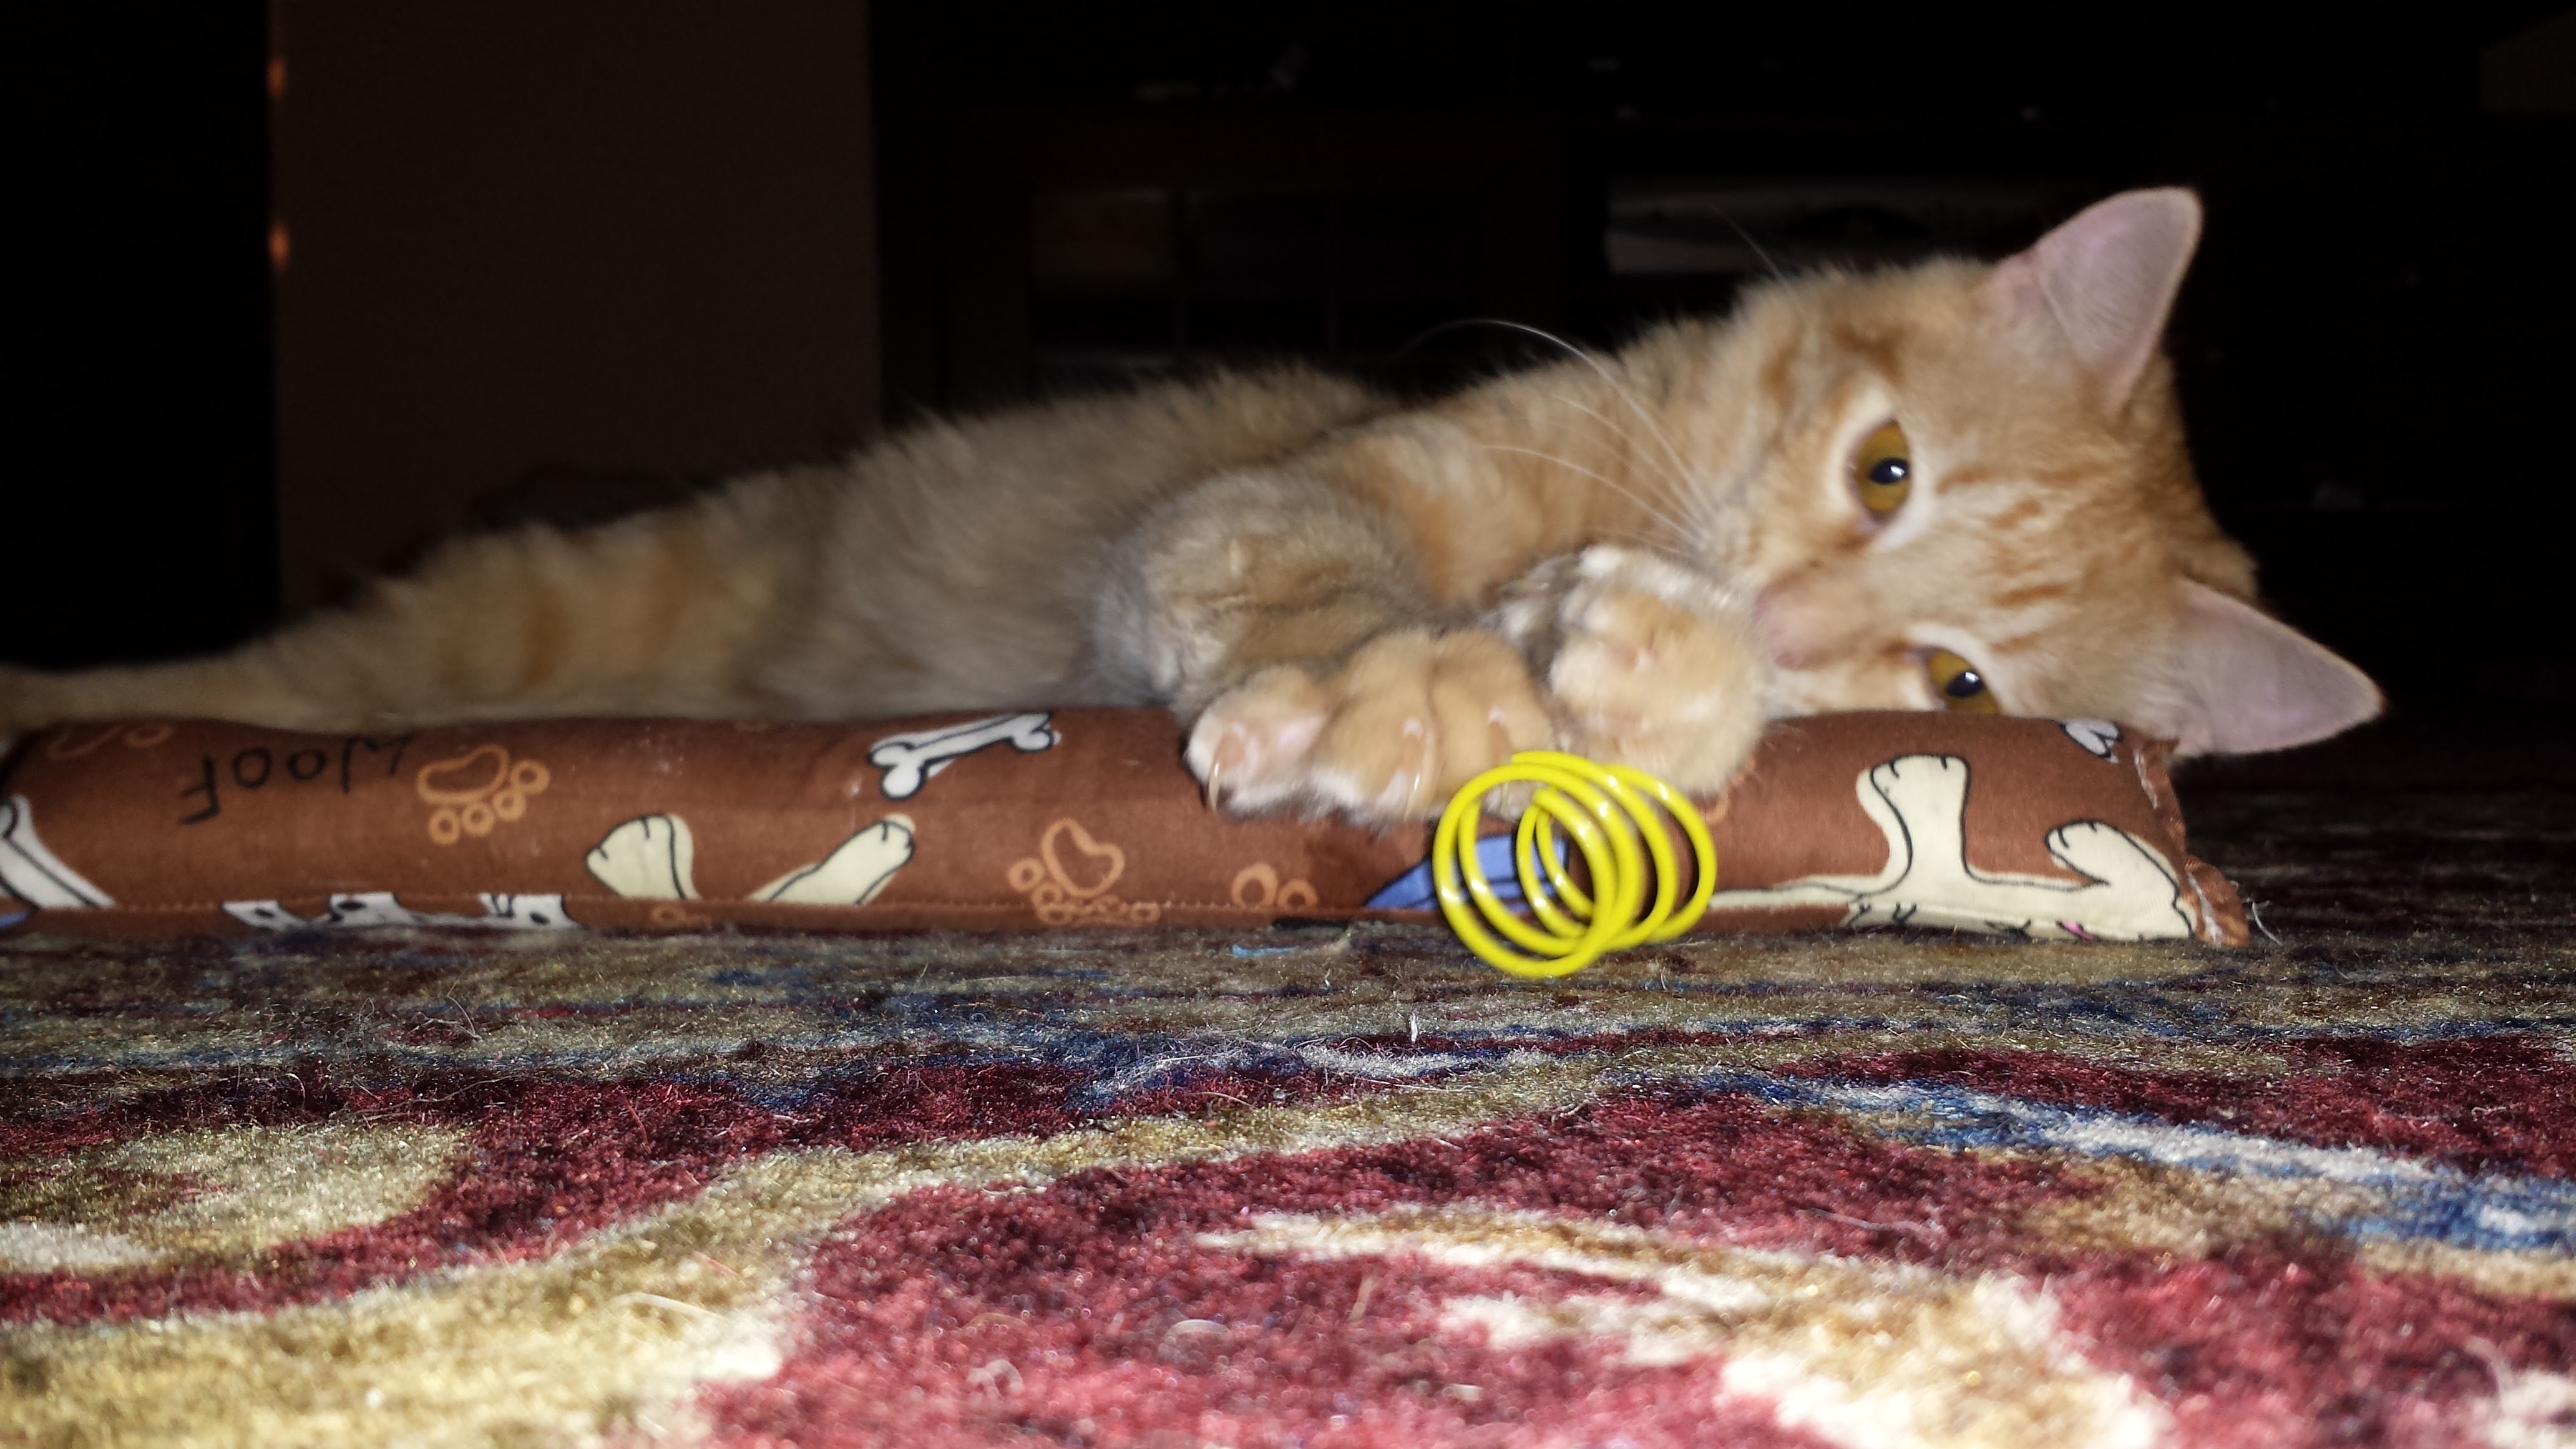
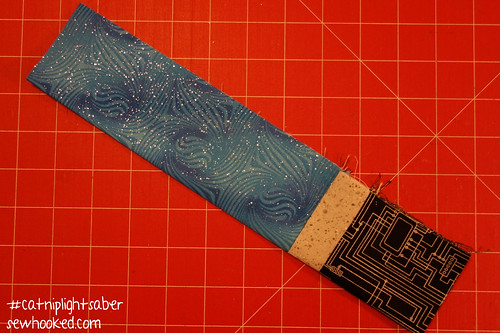
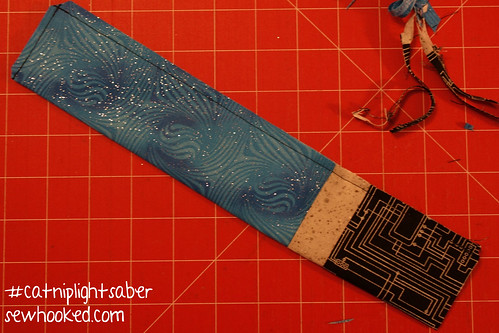
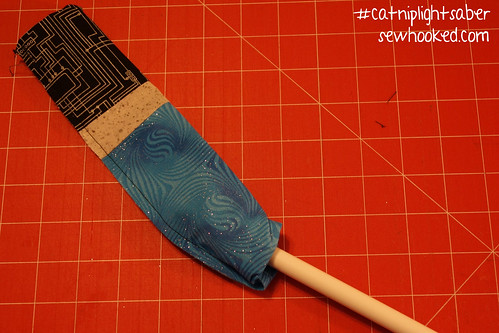
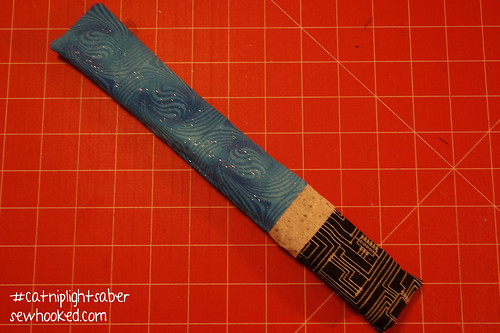
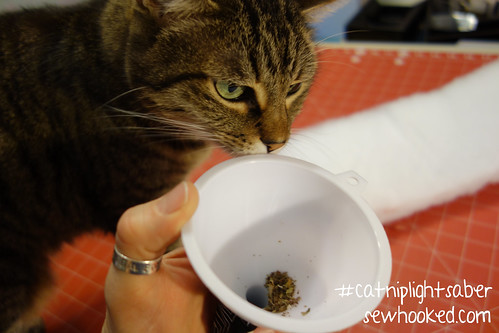
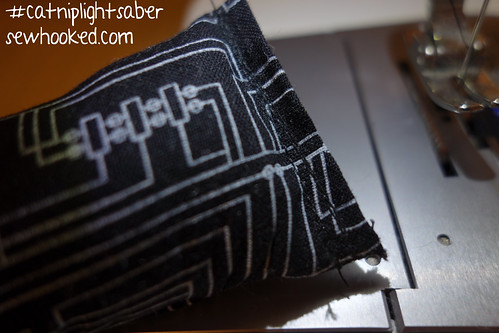
In between Much More Important Things, I’ve been making kitty toys here and there for our cat family members.
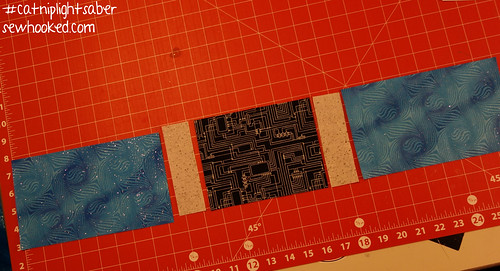
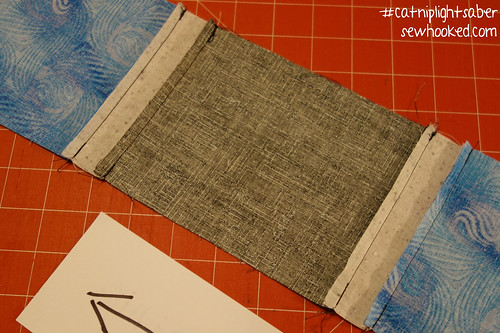
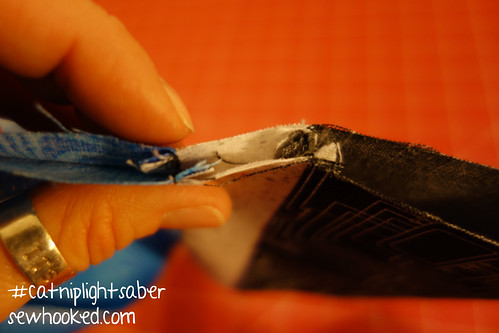
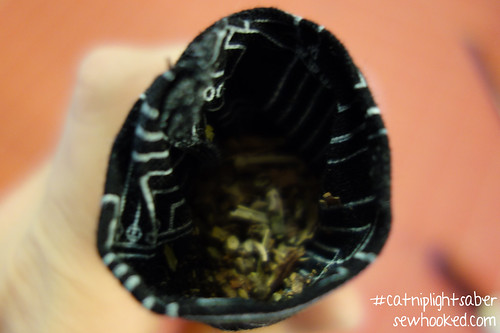
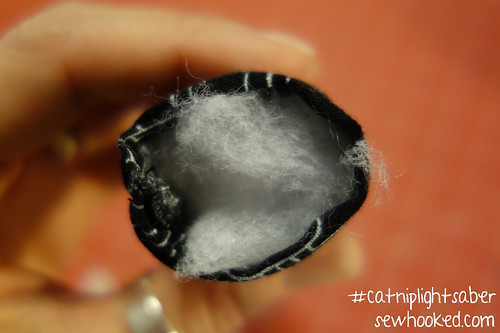
Last weekend, I made something new, tubes of fabric filled with Poly-fil & catnip. They were easy to make and the cats love them.
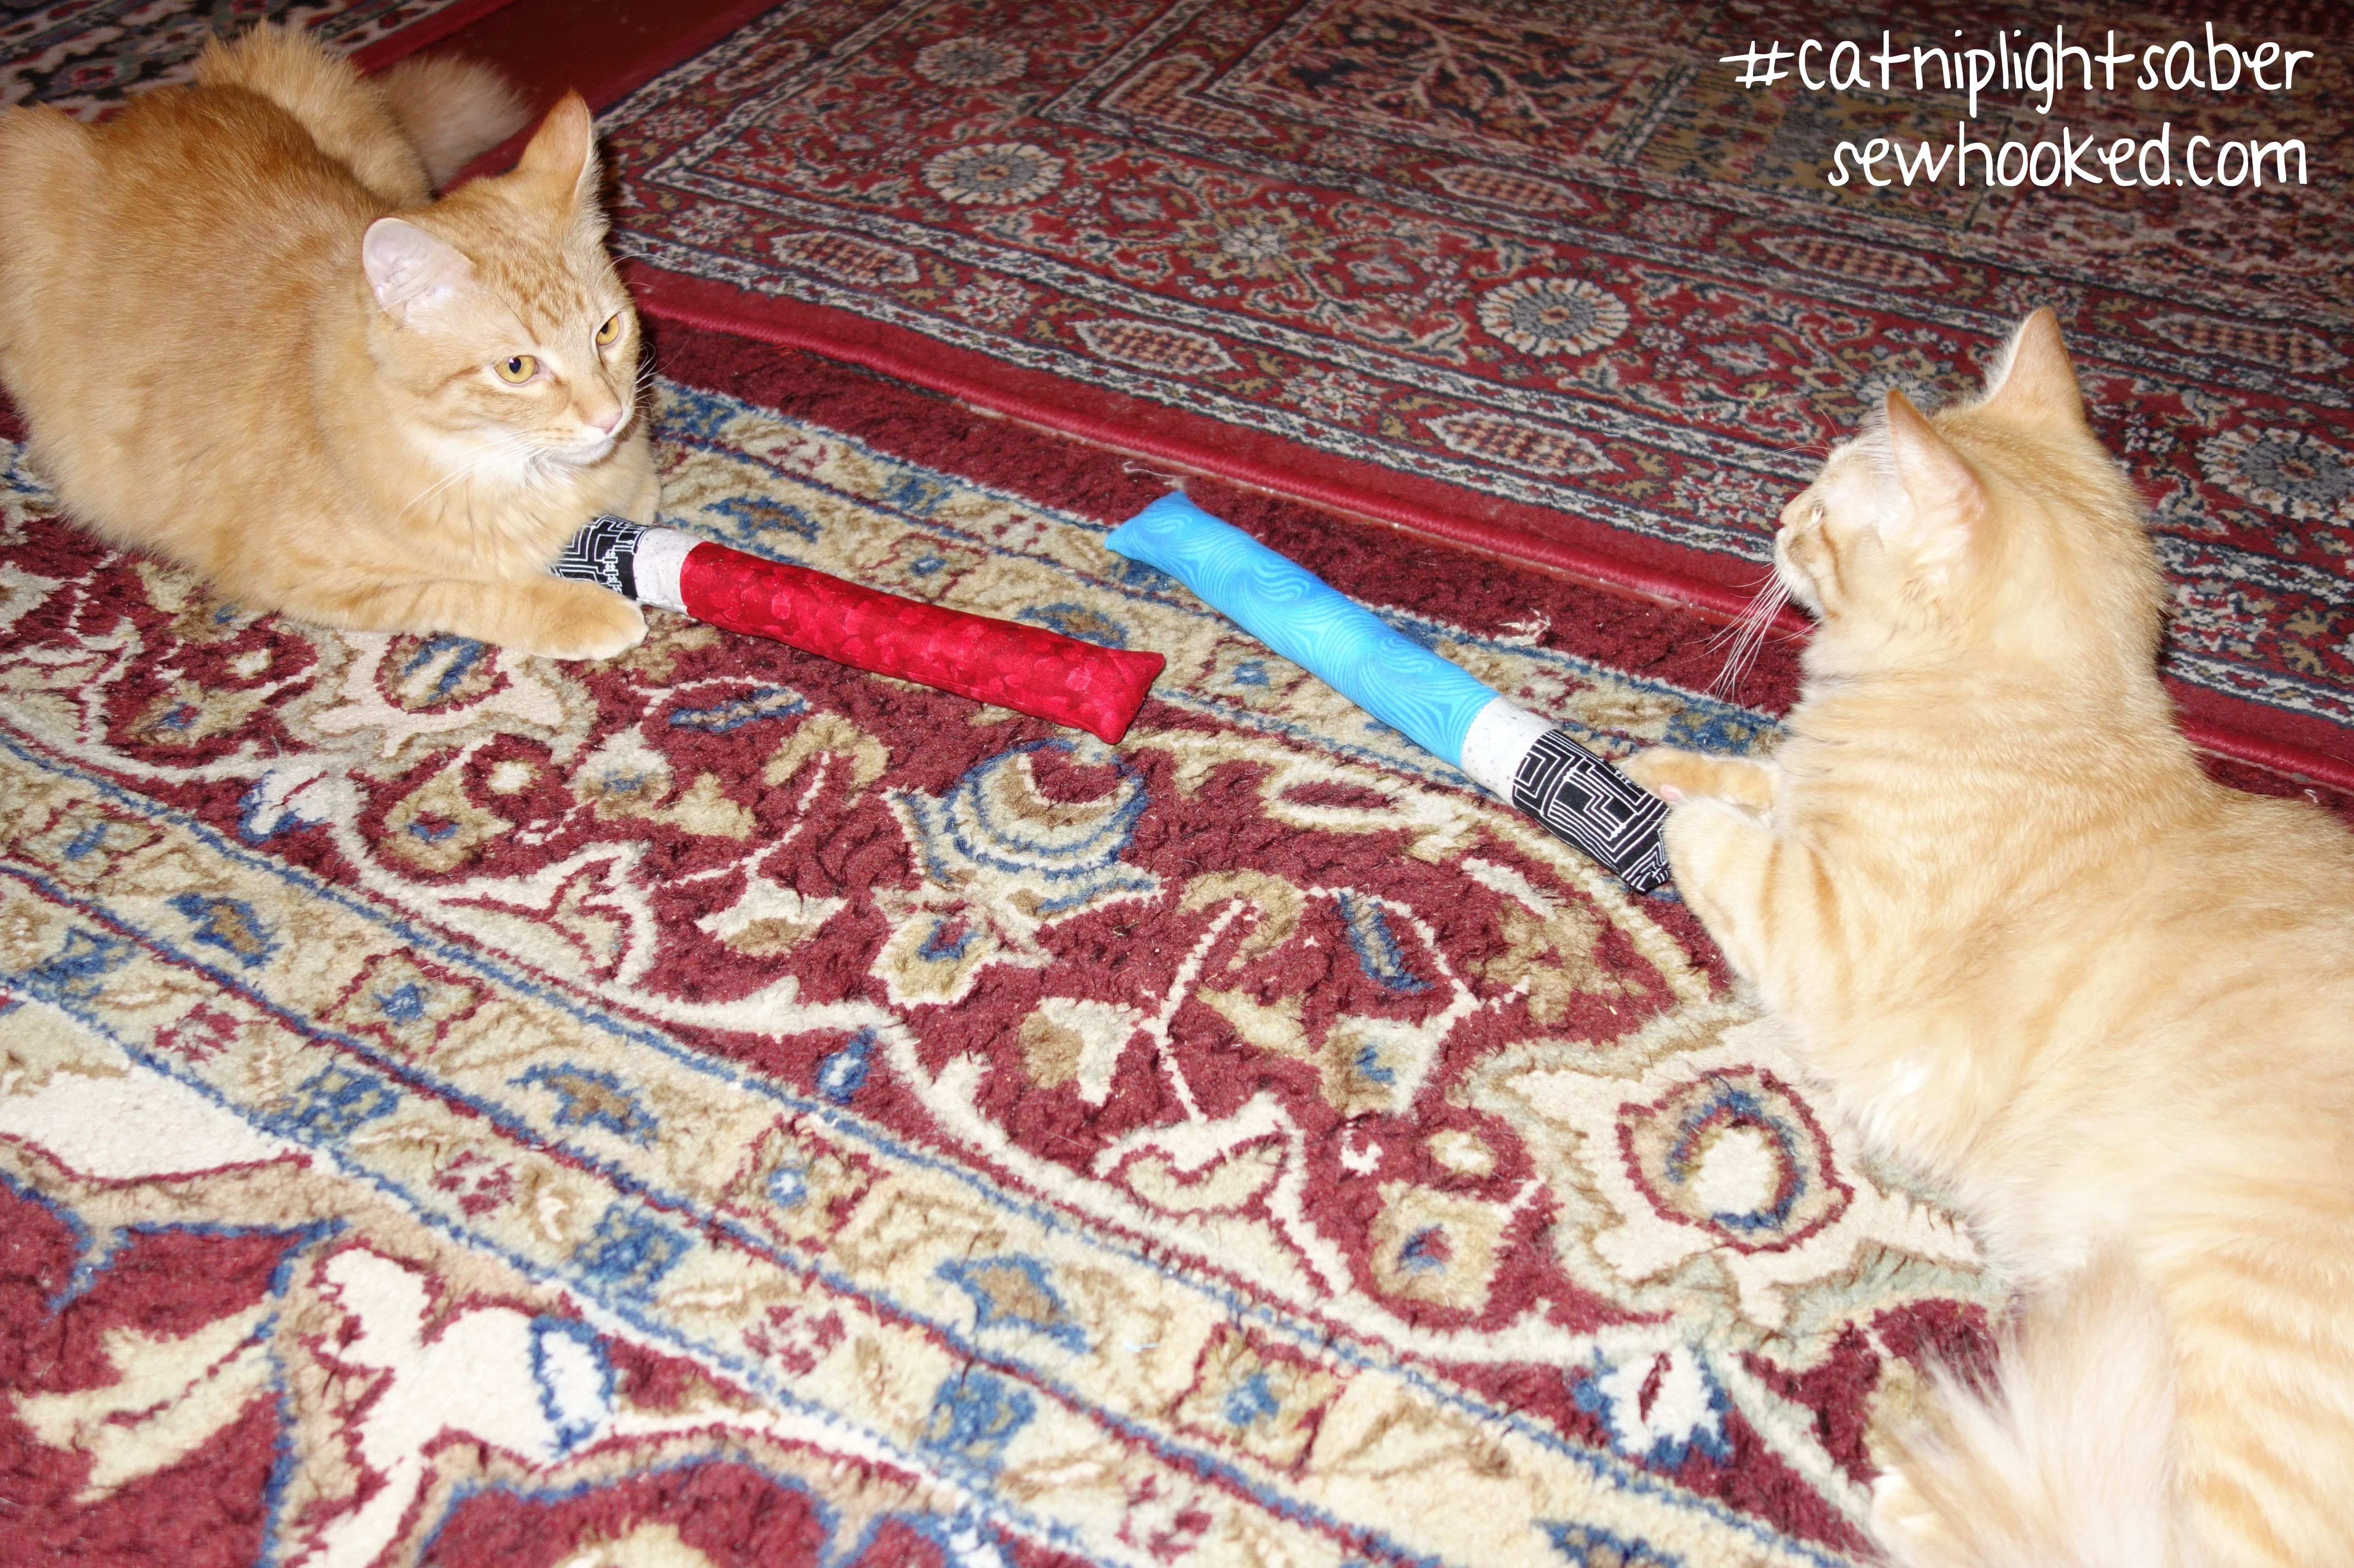
While watching 8 month old Iliad and his brother Ramses play with their catnip tubes, it occurred to me that they could be much, much more fun to watch!
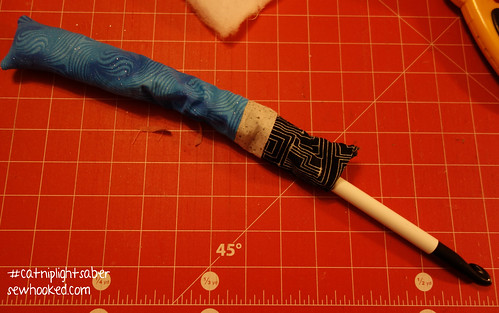
Enter, CATNIP LIGHTSABERS!
Have I seen The Force Awakens recently?
Yes, twice. Why do you ask? 😉
These aren’t much more complicated to make than the original single piece of fabric version. I made both shown here in about an hour, and that includes stopping to take pictures. Easy peasy!
As usual, this tutorial is for your personal & non-profit use. I would LOVE for you to make these both for your own kitties and your local shelter!
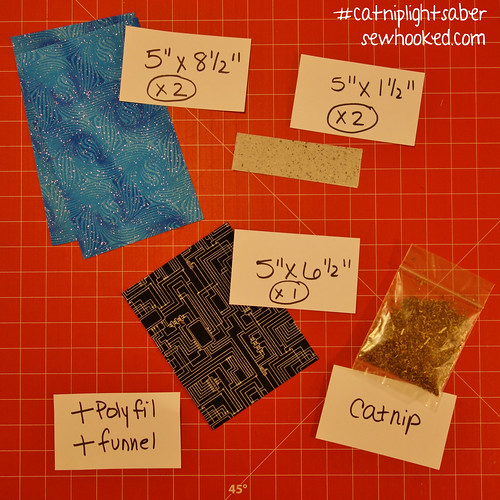
You’ll need:
2 – 5″ x 8 1/2″ pieces of fabric in blue, red, or the lightsaber color of your choice
2 – 5″ x 1 1/2″ pieces of grey or silver fabric
1 – 5″ x 6 1/2″ piece of black or black printed fabric
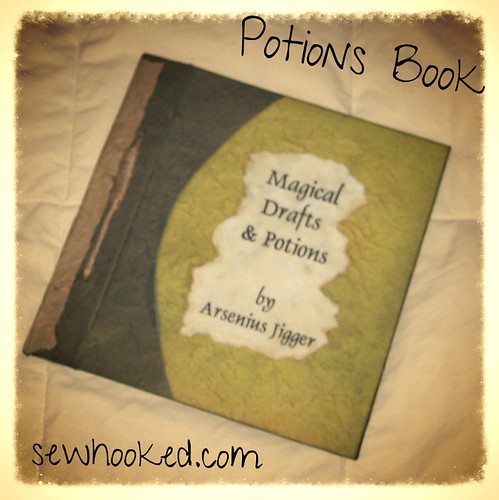
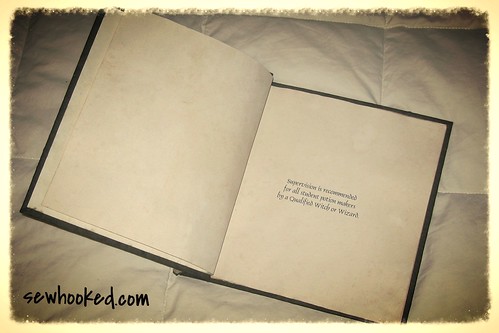
To create your own copy, you’ll need a notebook or journal with removable pages small enough to run through your printer. The book I used had a tie that kept all the pages in and was close to standard printer paper size, making it easier to print the pages. Print the recipes on your pages (either one to a page or front and back, depending on how many sheets you have), insert them back in the book and you’re ready to go!
For a fancy touch, tear the outside cover sheet (shown, above) and decoupage on the front of the book.
Want something easier? Try printing, punching holes and popping in a binder or tying the pages together with raffia or twine.
You can also print the pages, and cut them down for a smaller version or you can get fancy pants and try Book Binding videos for more fun ideas.
Of course, my potions book has a Harry Potter theme. I mean, it be would, right?
Are you making projects from 31 Days of Halloween? Share your photos with my flickr group! There will be a fun surprise after Halloween for one lucky winner!
3 oz chunky/bulky weight yarn (or two strands of worsted)
Size K Hook
Note: fptr = Front Post Triple Crochet; bptr = Back Post Triple Crochet
Ch 4, join with sl st.
Round 1: Ch 1, hdc 12 times in ring, working over yarn tail. Join with a sl st at top of first hdc. Pull tail to tighten circle. (12 sts)
Round 2: Ch 1, 2 hdc in joining st and in each st around. Join with a sl st to the top of first hdc. (24 sts)
Round 3: Ch 1, hdc in joining st, 2 hdc in next st, (1 hdc in next st, 2 hdc in next st); rep ( ) around. Join with a sl st to the top of first hdc. (36 sts)
Round 4. Ch 1, hdc in joining st and the next st, 2 hdc in next st, (1 hdc in each of the next 2 sts, 2 hdc in next st); rep ( ) around. Join with a sl st to the top of first hdc. (48 sts)
Round 5: Ch 4, tr in next st and in each st around. Join to top of chain 4 with a sl st. (48 sts)
Round 6* – 8: Ch 4 (counts as first tr), (fptr in next st, bptr in next st); rep ( ) around. Join to top of chain 4 with a sl st. (48 sts)
Round 9*– 12: Ch 1, hdc in first st and in each st around. Join with a sl st to the top of first hdc. (48 sts)
Finish Off.
*Note – I have a small head, and several people that have made this hat have let me know they needed to make it longer. To do so, repeat row 6 an additional round and row 9 an additional round. For more “bubble,” repeat round 5 one more time, then proceed with the instructions for round 9.
Are you making projects from 31 Days of Halloween? Share your photos with my flickr group! There will be a fun surprise after Halloween for one lucky winner!
It’s hard to believe we’ve reached the final week of sharing my favorite Halloween crafts, recipes and patterns. I hope you’ve enjoyed everything I’ve shared so far.
Today, we’re revising a fun craft that I shared right here on Sewhooked some years ago.
I originally came up with these fun pumpkin earrings for a swap I participated in some years ago. I still have my pair and wear them during October every year!
optional: business cards and decorative bags for gift giving
Separate the orange clay into enough pieces for 10 – 12 pairs of earrings. Roll each piece into a rough ball shape.
Using the round nose pliers, twist the eye pins into a curly shape, making sure each is approximately the same length. Make the same amount as the orange balls in the last step.
Squish the curly part of the eye pin into the orange ball. Cover wire completely with clay, rounding with your fingers as you go.
Add a small amount of green clay, gently pressing it around the wire into a stem shape. Make sure to leave the “eye” in the pin visible. If necessary, use a toothpick or skewer to clean out the hole.
Use the toothpick to gently roll creases into the orange ball.
Wallah! A tiny pumpkin! Repeat steps for each earring.
Place earrings on parchment lined tray and bake according to manufacturer’s instructions.
Pumpkin charms, all baked. They look a little dull, so…
Place earrings eye pin side down in Styrofoam. Gently brush on Sculpey Glaze. Allow to dry upside down. Once they’re turned over, add a little more Glaze around the top if needed.
If making enough to share with your friends, poke holes in a business card with a pin, then slide the ear wire through. Fold the top end of the business card down and place in a cute little bag.
Are you making projects from 31 Days of Halloween? Share your photos with my flickr group! There will be a fun surprise after Halloween for one lucky winner!
Don’t want to applique? You can also hand embroider or even stencil this pattern!
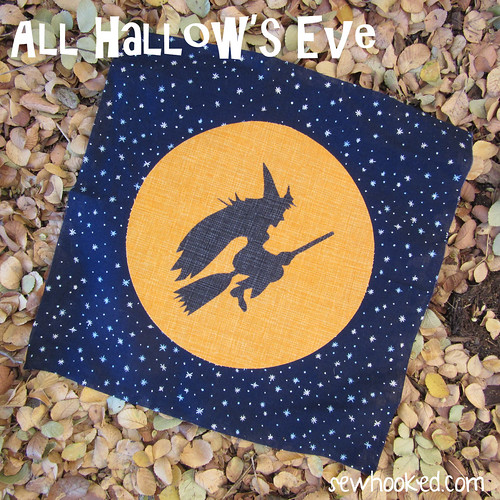
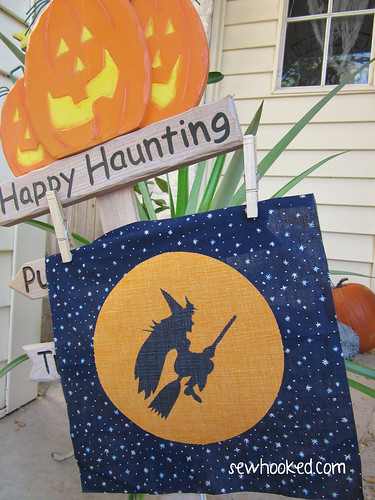
My opinion of the traditional Halloween witch has changed greatly since 1997, so our new friend here is much cuter and definitely curvier. I imagine she’s wearing her Halloween best as she rides her trusty broomstick to a fun party, perhaps in Hogsmeade!
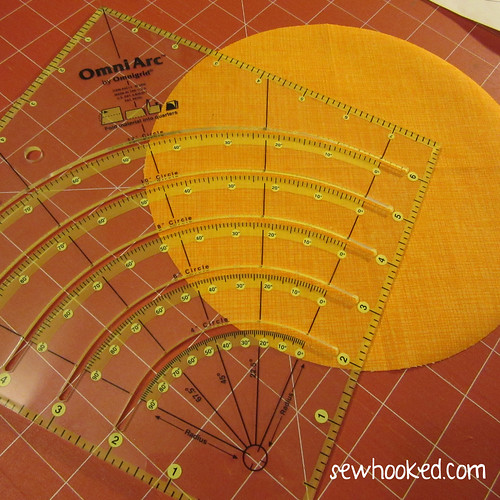
If you are lucky enough to have an OmniArc Ruler, try using the 8″ circle guide to create your moon.
I ironed my fusible webbing in place first and then folded the orange fabric before cutting with my rotary cutter. Follow the instructions as printed on the ruler.
Your moon will be about 1/2″ bigger than the one in the pattern, but it will still work great for, oh, say a 12″ quilt block or fun Halloween cushion!
No such luck? You can also cut around a ceramic plate with your rotary cutter!
Are you making projects from 31 Days of Halloween? Share your photos with my flickr group! There will be a fun surprise after Halloween for one lucky winner!