Category Archives: paper piecing

Guest Designer Spotlight: Shae Merritt


blocks designed by Shae Merritt
click on the image for the pattern

For the next few weeks, I’ll be putting the spotlight on the sewhooked Guest Designers.  These wonderful women create and share their paper pieced quilting patterns and graciously allow me to post them, free of charge, on sewhooked.

Each of their work can be found on the Guest Designer Page.

I’ll be posting these in the order that I received them, just to save myself from playing favorites!  I am more grateful to each and every designer for sharing her wonderful patterns than I could ever express.   Thank you, thank you, thank you!

First up is Shae Merritt.  I’ve known Shae for a couple of years now.  We met in an online Harry Potter costuming group when I fell in love with her Umbridge costume and we starting chatting back and forth.

She tackles each new craft that grabs her interest with both hands and runs with it.  The same was true for paper piecing.

Shae and I have been lucky enough to meet in real life and the rest, as they say, is history!

Photobucket

Questions were asked by me, all answers are in Shae’s own words.

First name and where you’re from: Shae – Central Florida

Website/blog/online store or other place where your patterns or photos of your work can be found? – patterns/pictures on sewhooked

How long have you been paper piecing and/or quilting?  – I started paper piecing on April 10, 2008, so almost 7 months

What do you use own your blocks for? –
I’ve made one quilted wallhanging and a few other misc. framed crafts, but other than that I’ve been saving them up until an idea comes to me.

When did you start designing? – I designed my first pattern mid-May, almost exactly a month after I started paper piecing.

Was there a particular inspiration to draw your first pattern?
– my brother was patching up a pillow and I had told him about my idea to try to make a Triforce because it could be a really easy block to make, and he asked if I would make him the block to use for his pillow.

Do you remember what your first design was? – Triforce from the Legend of Zelda series

Do you have a favorite among your own designs? I really like the Majora’s Mask pattern, but a favorite design of mine that I haven’t had a chance to piece is the ‘WooHoo’ symbol from The Sims 2.

How has the online community changed the way you craft/quilt/design, etc.? –
I wouldn’t exactly say the online community changed the way I craft, but rather it is the reason I do. I never crafted at all until 2 years ago when I started making crafty friends. If not for the community and seeing all of the awesome things people were making I would have never thought to try paper piecing. Being able to look at other people’s designs and ideas helps my own imagination work. I’m glad that there are such crafty people out there to inspire me.

What do you use to design your patterns?  Paper and pencil, a specific software, etc. – I use Paint Shop Pro 8 to design patterns

find more of Shae’s patterns on the sewhooked Guest Designer Page

Happy crafting!

“Mellocreme” Pumpkin Earrings

Mmmmm, mellowcreme pumpkins, the yummy little sugar bombs that are really just candy corn kicked up a notch!  In homage to these tasty Halloween treats, how about a fun, easy craft that is cheap and makes enough to share with your friends?

I made the cute pumpkin earrings for a Halloween swap I was recently participated in.  You can make one pair or several!

makes 10 -12 pair

  • 1 block orange polymer clay
  • small amount green polymer clay
  • toothpick or skewer
  • hook ear wires (aka French hooks) (2 for each pair)
  • eyepins (2 for each pair)
  • jump rings (size of your choice)
  • jewelry pliers (I used one round nose and one chain nose)
  • Sculpey Glaze (gloss)
  • small, soft paint brush
  • parchment paper
  • baking sheet
  • optional: business cards and decorative bags for gift giving
Pumpkin Earrings

Separate the orange clay into enough pieces for 10 – 12 pairs of earrings.  Roll each piece into a rough ball shape.

Pumpkin Earrings

Using the round nose pliers, twist the eye pins into a curly shape, making sure each is approximately the same length.  Make the same amount as the orange balls in the last step.

Pumpkin Earrings

Squish the curly part of the eye pin into the orange ball.  Cover wire completely with clay, rounding with your fingers as you go.

Pumpkin Earrings

Add a small amount of green clay, gently pressing it around the wire into a stem shape.  Make sure to leave the “eye” in the pin visible.  If necessary, use a toothpick or skewer to clean out the hole.

Pumpkin Earrings

Use the toothpick to gently roll creases into the orange ball.

Pumpkin Earrings

Wallah!  A tiny pumpkin!  Repeat steps for each earring.

Pumpkin Earrings

Place earrings on parchment paper lined tray and bake according to manufacturer’s instructions.

Pumpkin Earrings

Pumpkin charms, all baked.  They look a little dull, so…

Pumpkin Earrings

Place earrings eye pin side down in Styrofoam.  Gently brush on Sculpey Glaze.  Allow to dry upside down.   Once they’re turned over, add a little more Glaze around the top if needed.

Pumpkin Earrings

Attach the ear wire (French hook) with a jump ring and pliers.  (how to open and close a jump ring)

Repeat for each pumpkin charm.

If making enough to share with your friends, poke holes in a business card with a pin, then slide the ear wire through.  Fold the top end of the business card down and place in a cute little bag.

Happy Crafting!

♥ Jennifer O

Posts on this blog may contain affiliate links to help cover the cost of my website. I thank you for your generous support. ♥

Paper Piecing: Step By Step

Basic Paper Piecing Tutorial

I receive a lot of emails about paper piecing each week. While many of them are in reference to my Harry Potter patterns, even more of the messages are from new and experienced quilters alike, with comments about the technique itself. Most commonly, I hear one of two things. Either that the person emailing had never quilted and saw a pattern they really wanted to try and just went for it, then was surprised that it wasn’t as hard as they thought OR that they have wanted to try it for years and it looks too hard to them.

I’m always thrilled to hear from quilters of all skill levels, and any time I can help in whatever small way, it’s my great pleasure to do so.

Paper piecing can be daunting to someone that either hasn’t tried it before or tried a technique that confused them. I myself tried three separate tutorials before it stuck. It was a combination of those different tutorials that helped me understand it better, and while I do have my own How To now, I still recommend checking out several tutorials and deciding on what techniques are right for yourself.

That said, this is how I paper piece. Each pattern is the same. They all have the same basic set up and the same basic rules will always apply. Even thought designers sometimes draw their patterns differently, the technique remains the same.

How To Paper Piece
© Jennifer Ofenstein
click on tutorial images to see larger versions

paper piecing tutorial (1)

Supplies

  • pattern (Jar #3 used in this tutorial or similar pattern – NOTE: Jar #3 was updated in 2014 and looks a little different than the photos, but the lines are all in the same place)
  • quilting fabric
  • neutral thread
  • paper scissors
  • fabric scissor OR Add-A-Quarter Ruler.
  • postcard or thin straight edge
  • flathead pins
  • rotary cutter*
  • rotary ruler
  • wallpaper seam roller (available at home improvement stores)

*note – I keep two rotary cutters, one for traditional piecing and one for trimming paper pieced blocks. The “just fabric” cutter gets the new blade, and when it begins to dull, I transfer it to the “paper” rotary cutter.

Not shown above:

  • cutting mat
  • dry iron
  • sewing machine
  • open toe foot
  • light source

Start by making a copy or print out of the pattern you want to make. Use lightweight paper for your patterns, as it tears off easier. Recycled printer paper works well, as does tracing paper and some drawing papers. There are also a number of commercially available products just for paper piecing, such as Carol Doak’s Foundation Piecing Paper.

Choose fabrics you think will compliment the pattern. Always use good quality 100% cotton quilting fabric.

paper piecing tutorial (5)

Use paper scissors to trim outside the gray seam allowance of individual pieces of the pattern.

paper piecing tutorial (3).JPG

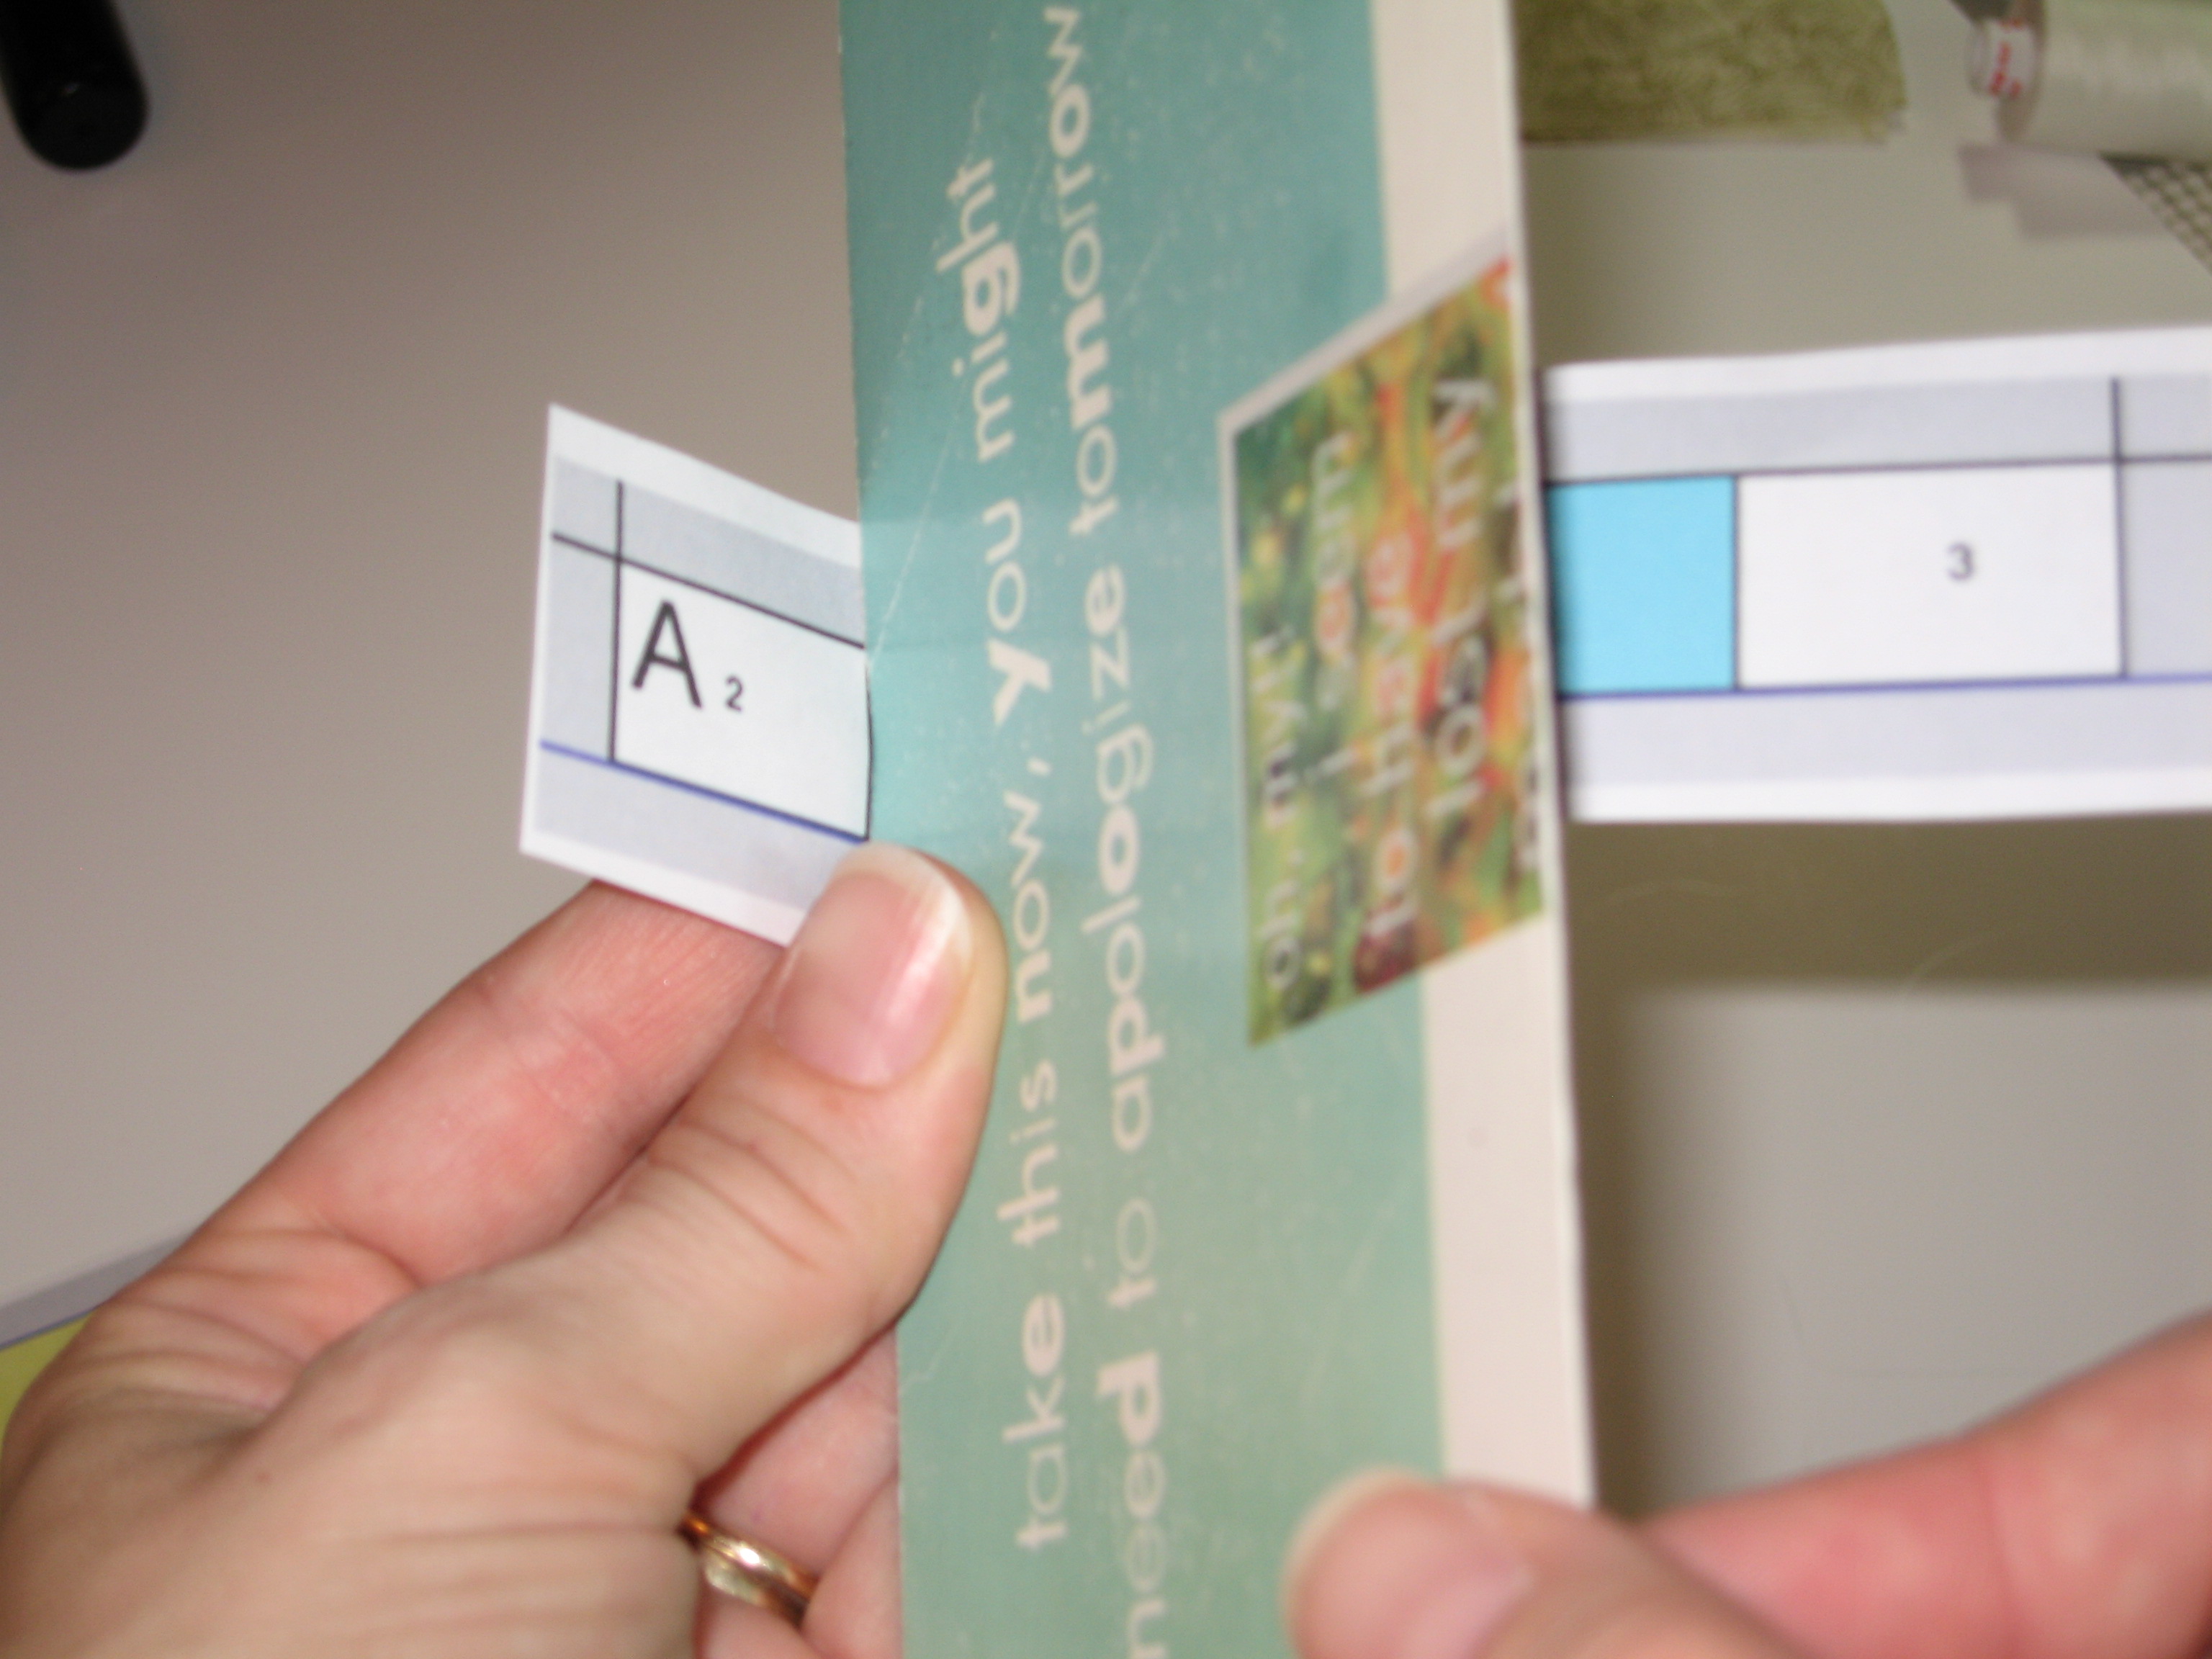
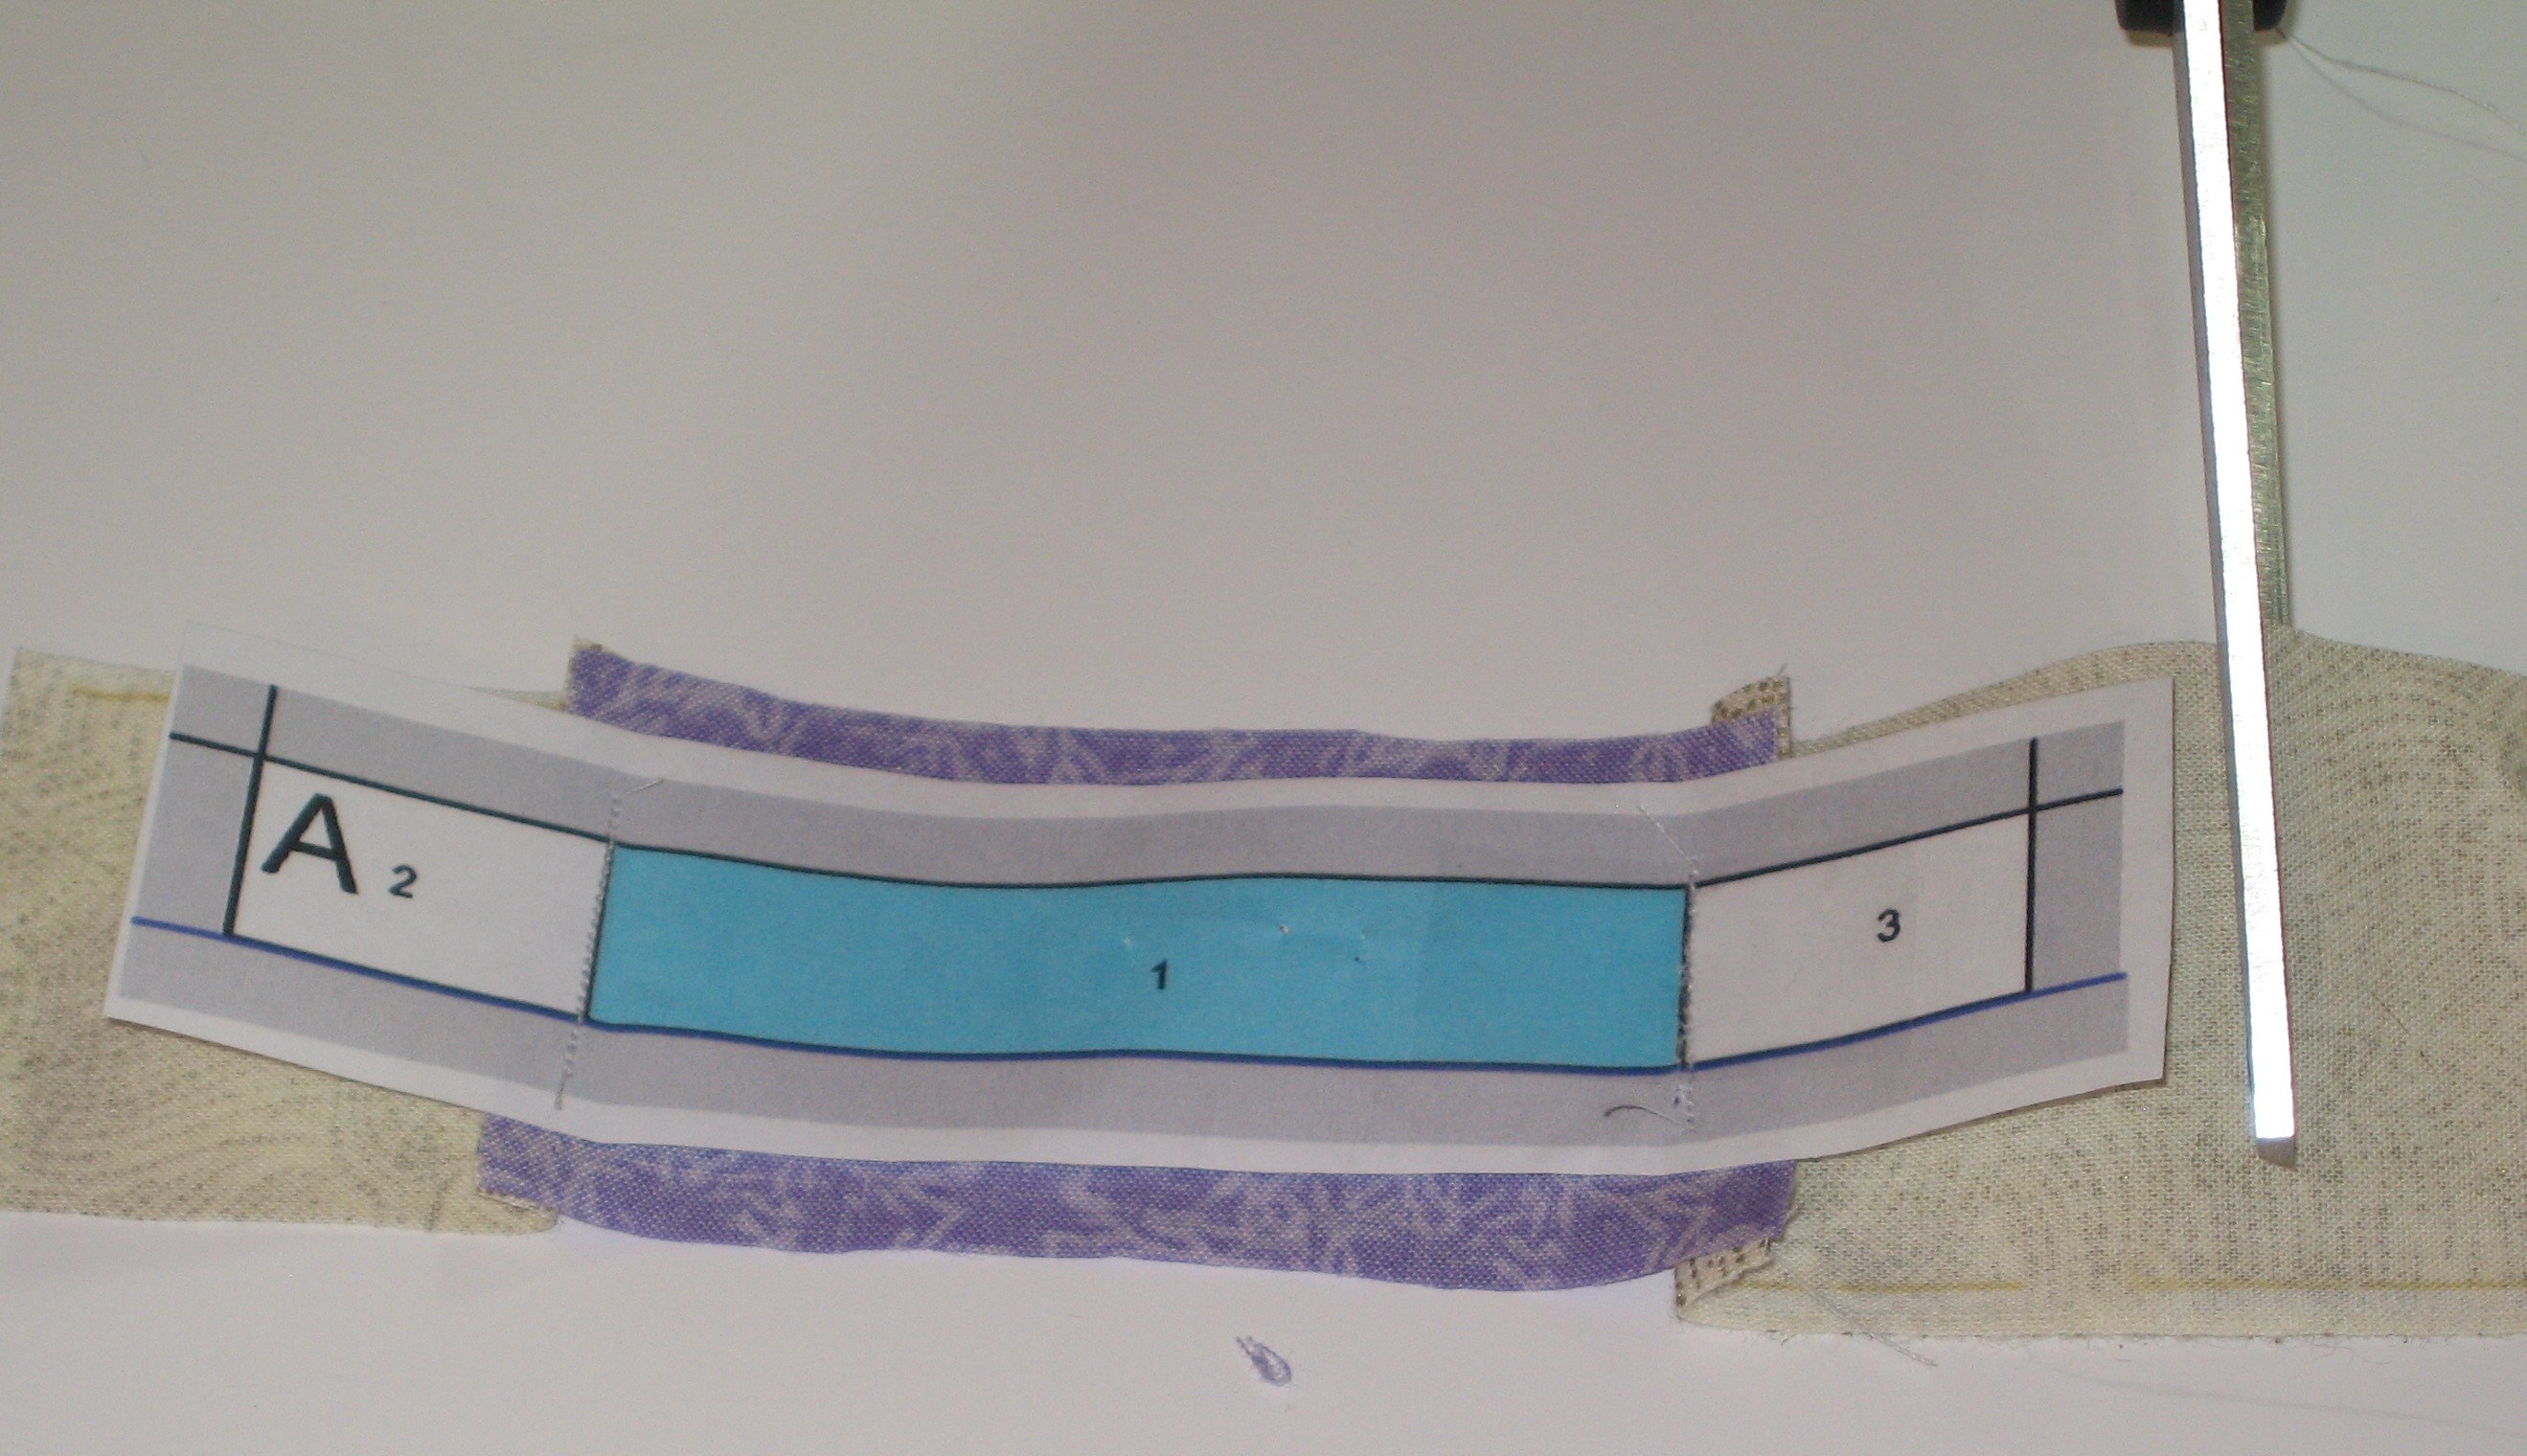
Starting with pattern piece “A,” use the postcard as a straight edge, fold the pattern piece on the line between 1 and 2. This is your stitching line.

paper piecing tutorial (4).JPG
Repeat for the line between 1 and 3.

paper piecing tutorial (6)

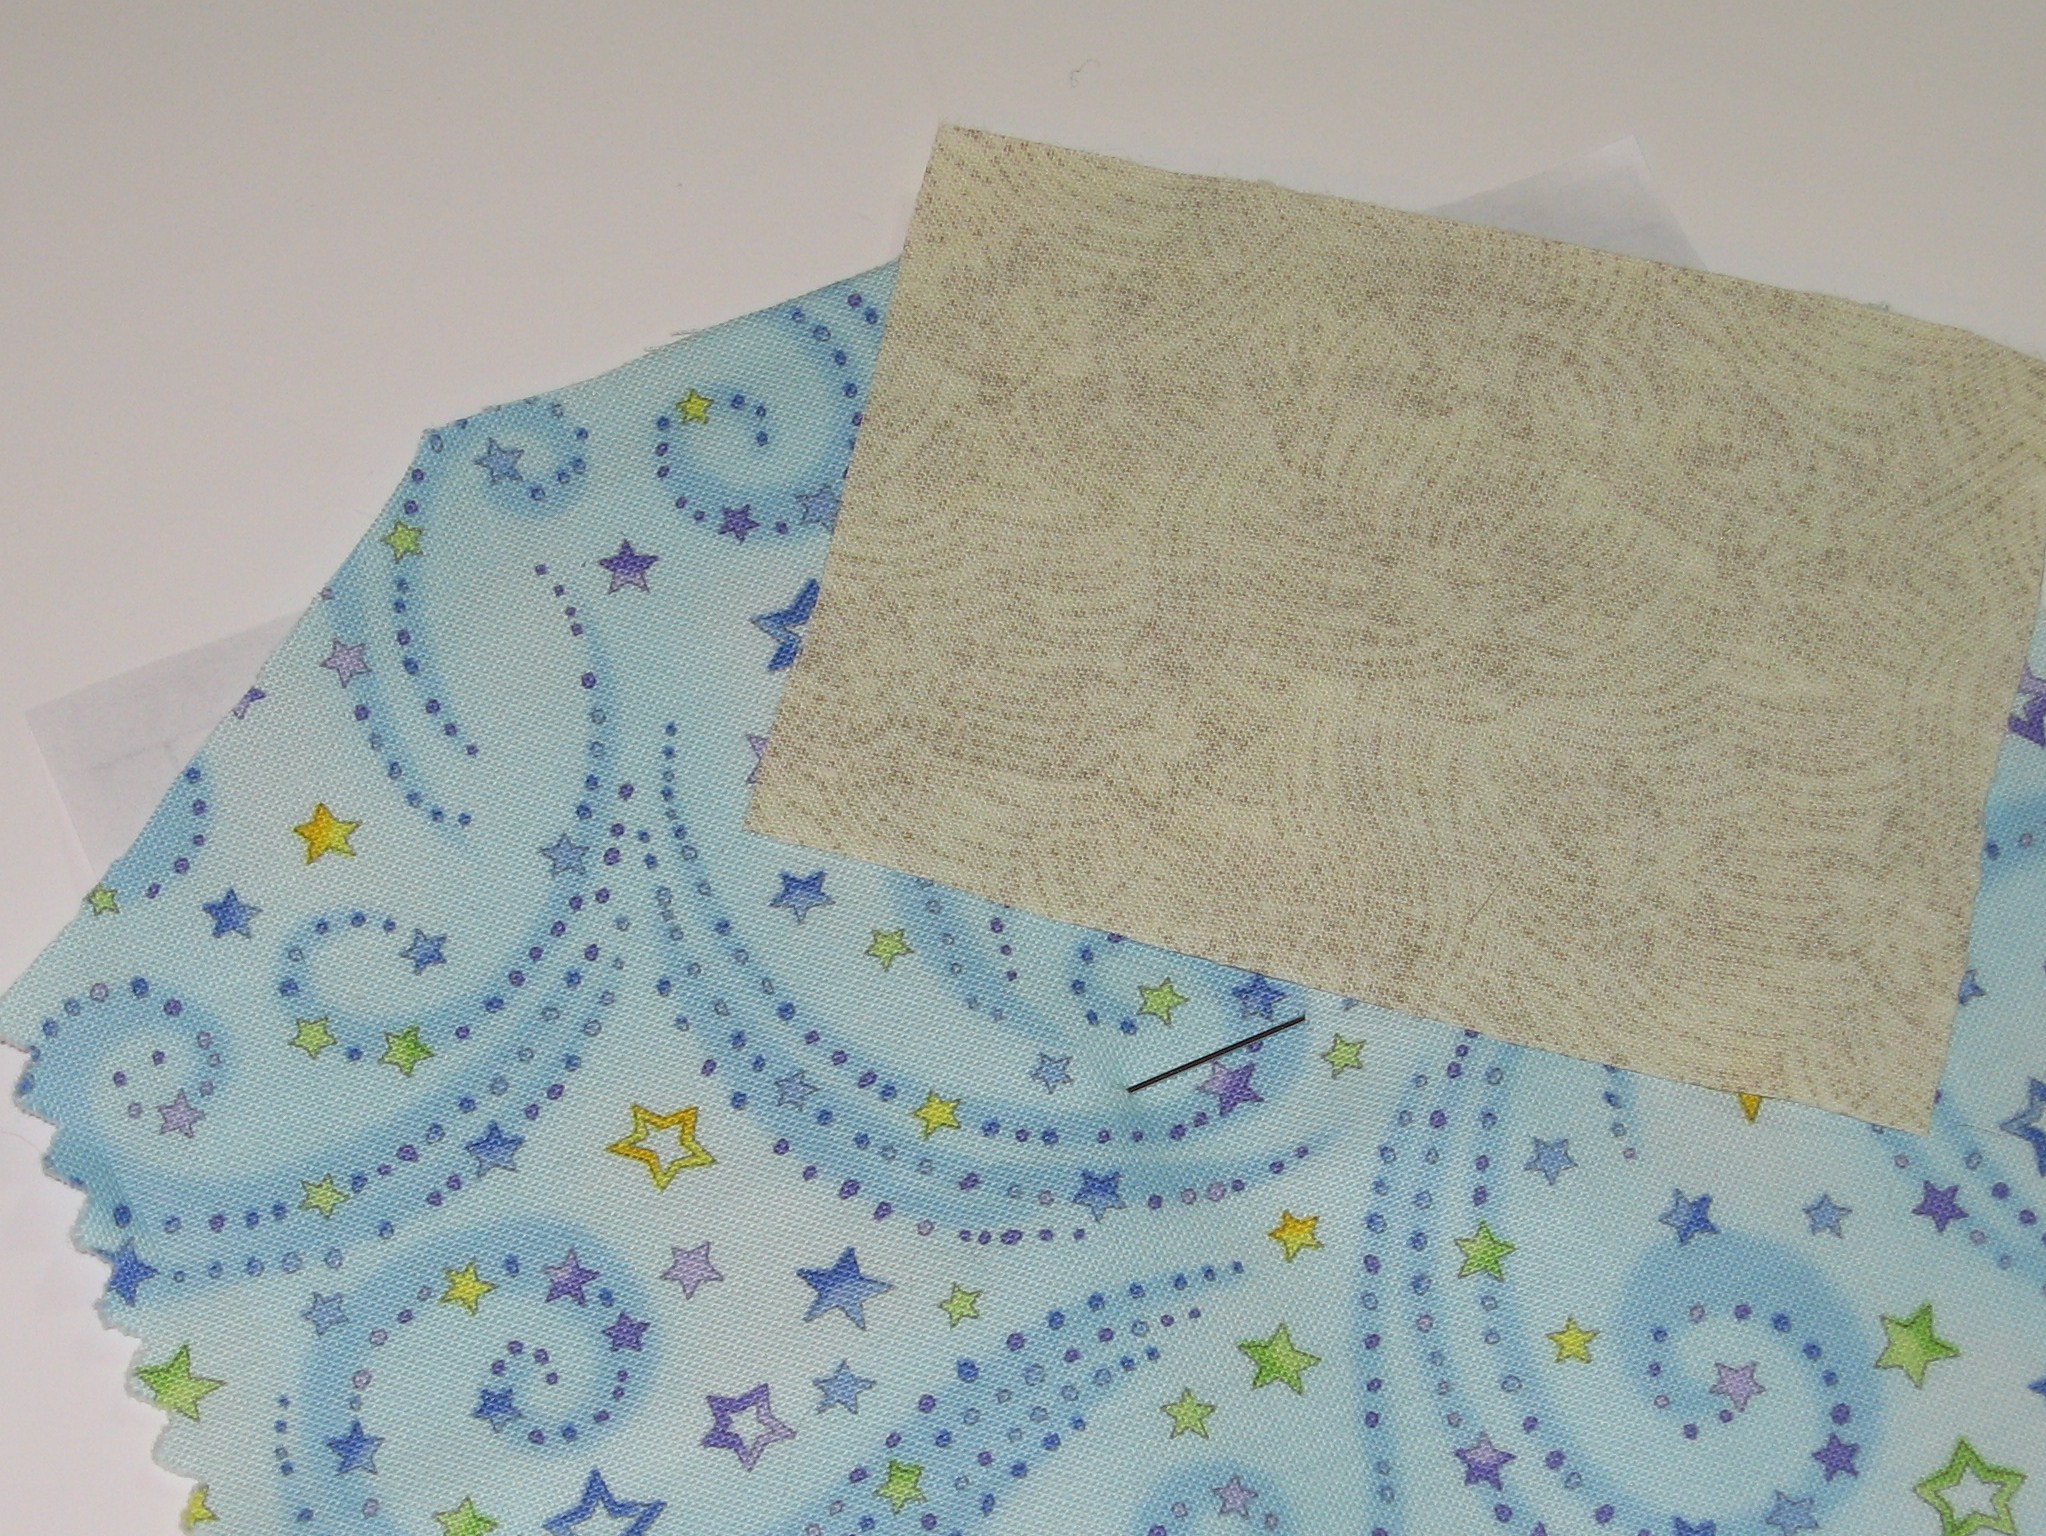
Place fabric 1 right side up on the back of the paper opposite piece 1.

Make sure you have a generous seam allowance (approximately 1/2″) all around.

Use a light source behind the pattern if you need it to make sure the fabric is big enough.

paper piecing tutorial (7)

Trim seam allowance to 1/4″. This can be done with fabric scissors or a rotary cutter.

paper piecing tutorial (9)

Place fabric 2 wrong side up on fabric 1. Make sure to slide both pieces of fabric 1/4” past the stitching line.

paper piecing tutorial (10)

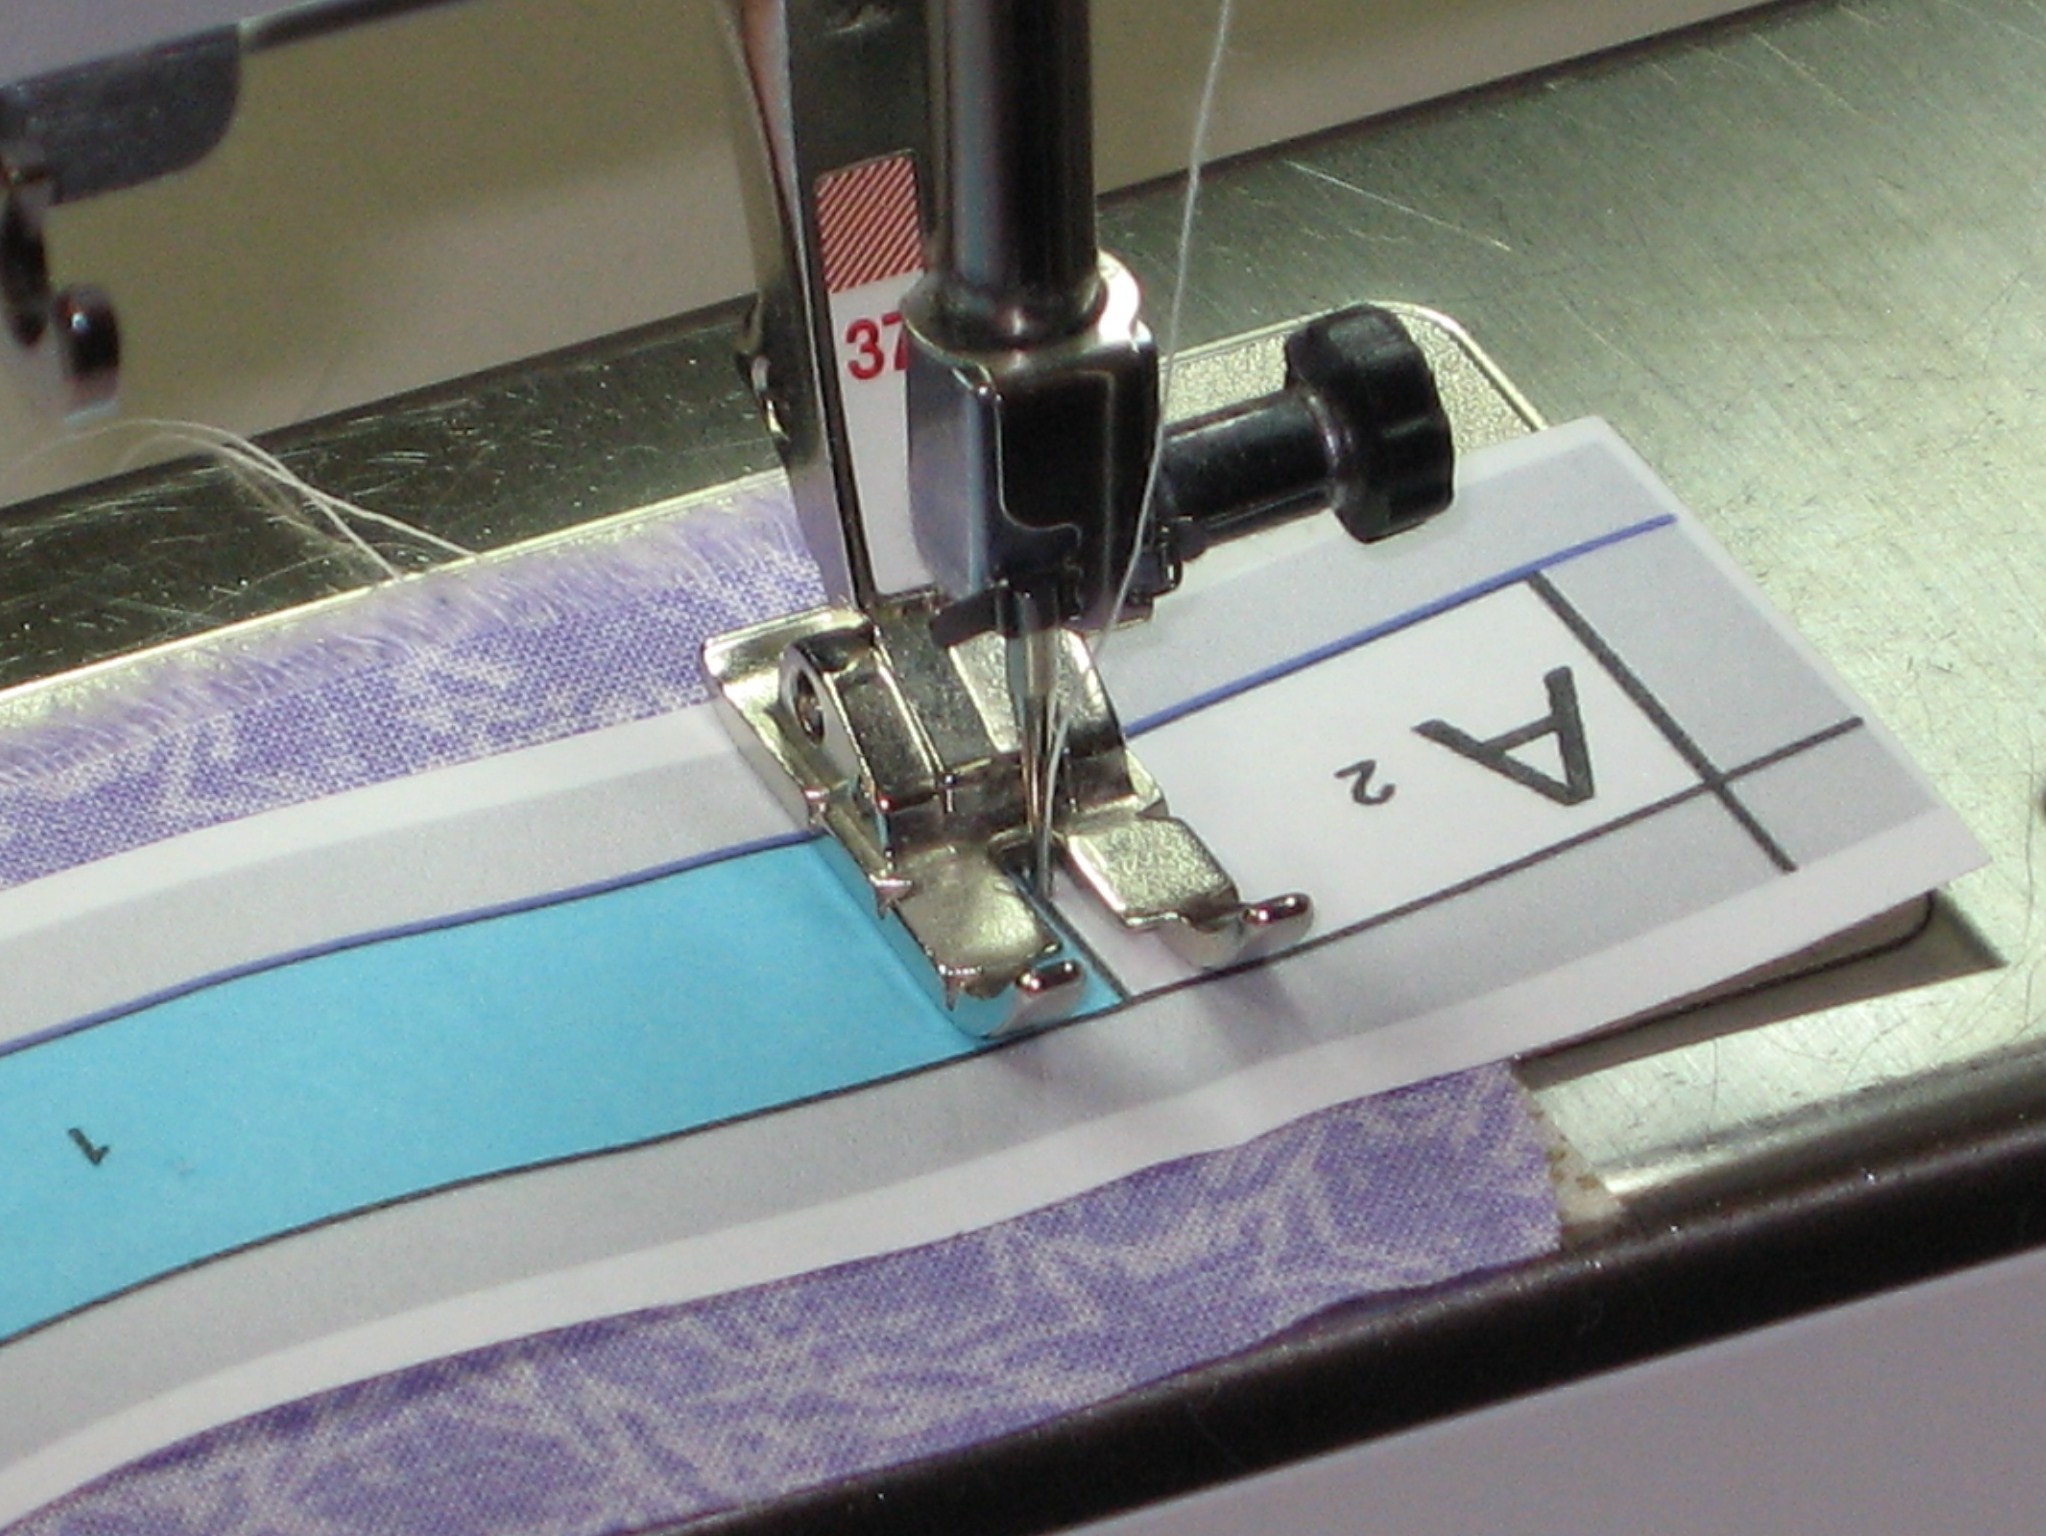
Using a small stitch (10-12 stitches per inch, a 1.5 on most domestic sewing machines), start two stitches before the stitching line, stitch along the line and take two stitches after the end. By stitching slightly pass the line, it is less likely that the ends the stitches will pull out when the paper is removed.

paper piecing tutorial (14)

Trim thread to paper.

paper piecing tutorial (11)

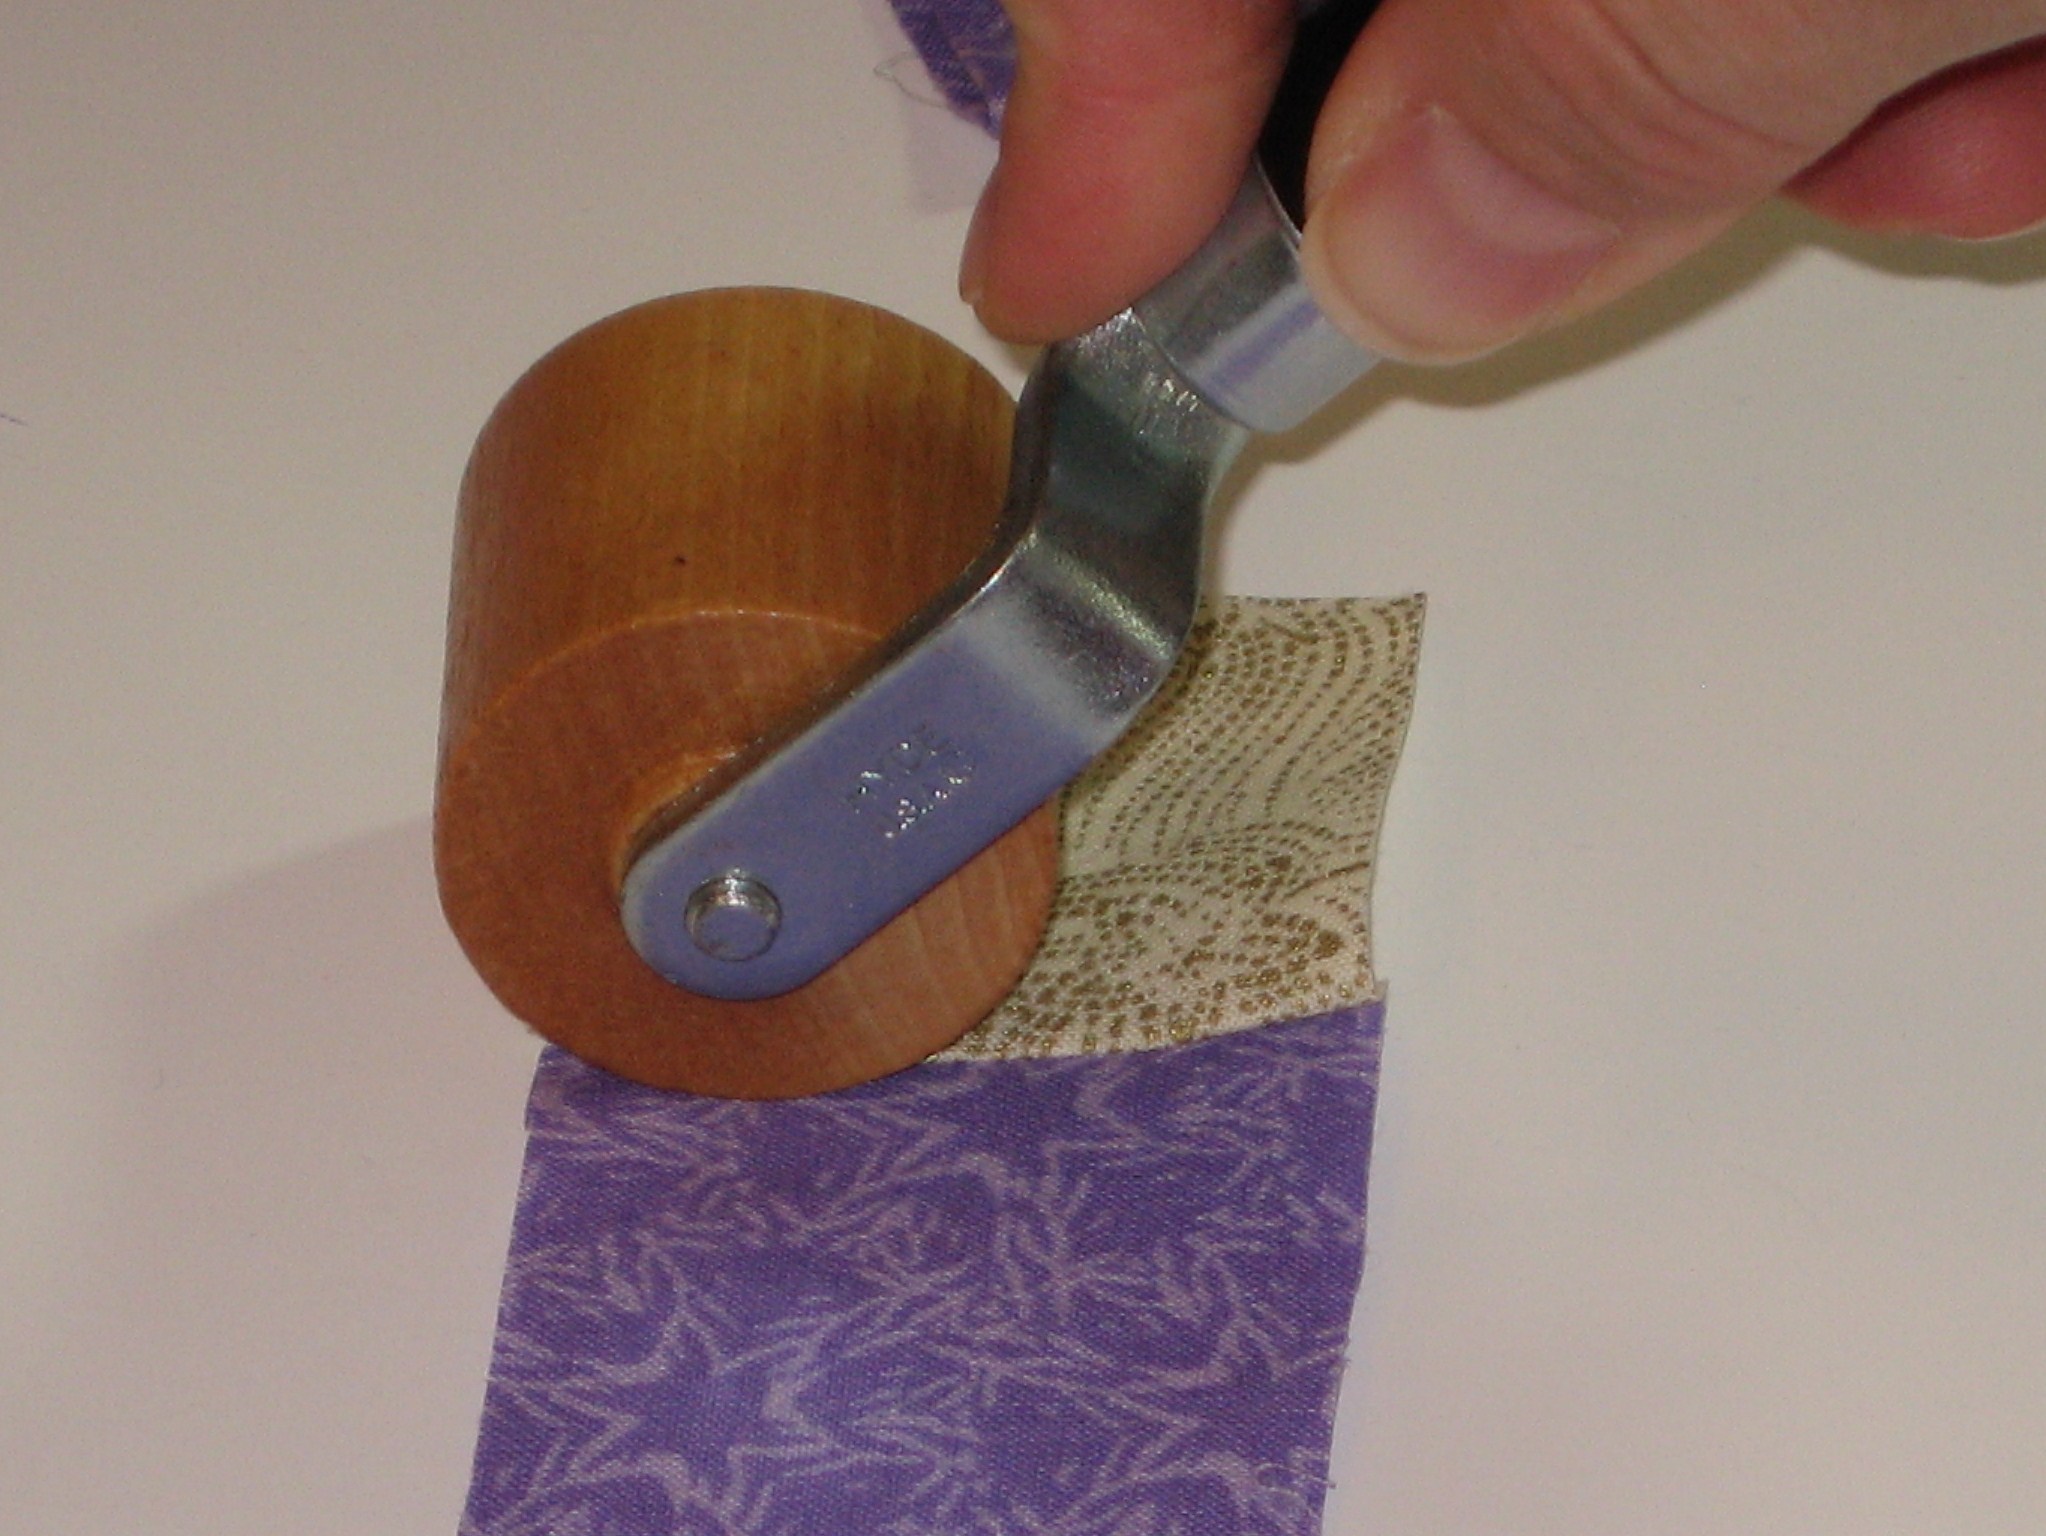
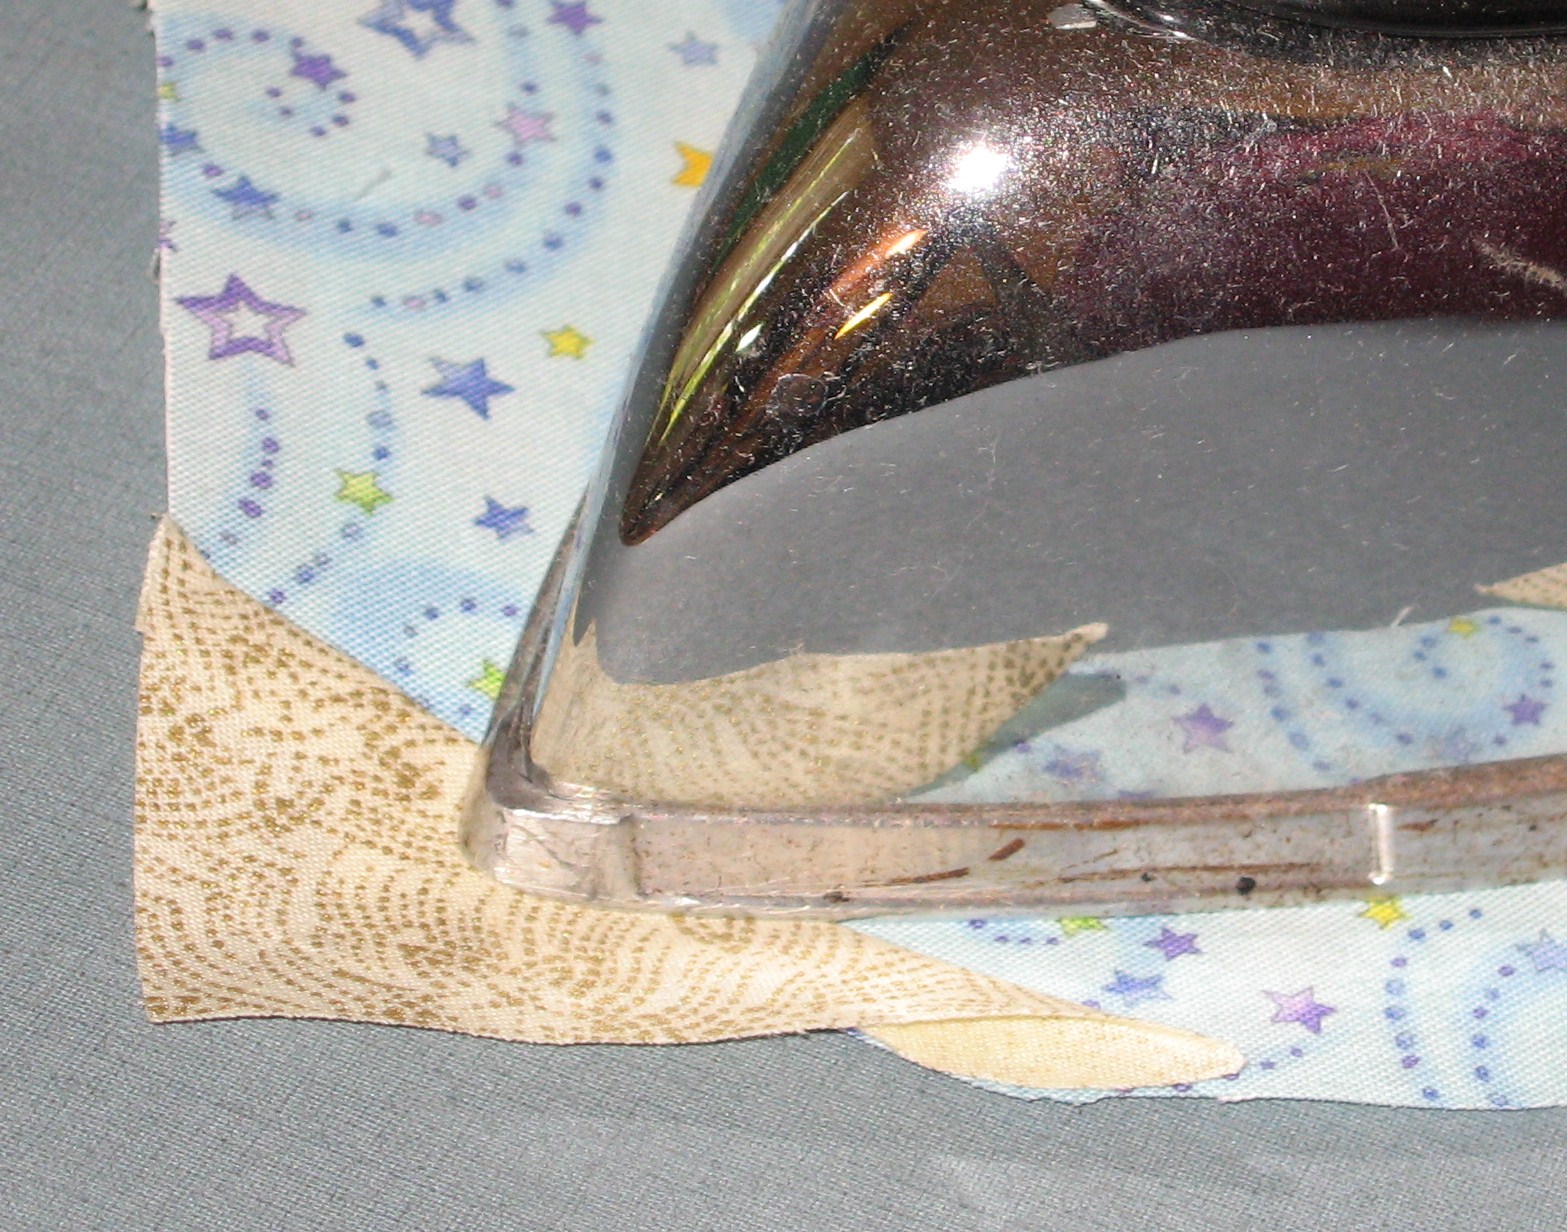
Fold fabric two out. Gently dry press with an iron OR use the wallpaper seam roller (shown) to press out the seam. Be careful not to pull or tug on the fabric.

paper piecing tutorial (12)

Fold on the 1 > 3 line. Keep the paper folded then flip the pattern over. Trim a generous 1/4″ from piece 1 either with scissors or with your Add-A-Quarter Ruler.

Unfold the paper. Place fabric 3 wrong side up on fabric 1, matching the edges, which will be 1/4″ past the stitching line after being trimmed in the previous step.

paper piecing tutorial (13)

Repeat stitching as for line 1 > 2.

paper piecing tutorial (15)
Press as before.

paper piecing tutorial (16).JPG

Trim fabric around pattern piece, leaving a generous amount for squaring up later.

paper piecing tutorial (17).JPG

Press pattern piece “A” with a gentle up and down motion using a dry iron. Do not pull or tug the fabric.

paper piecing tutorial (19)

Now for pattern piece “B.”

paper piecing tutorial (20)

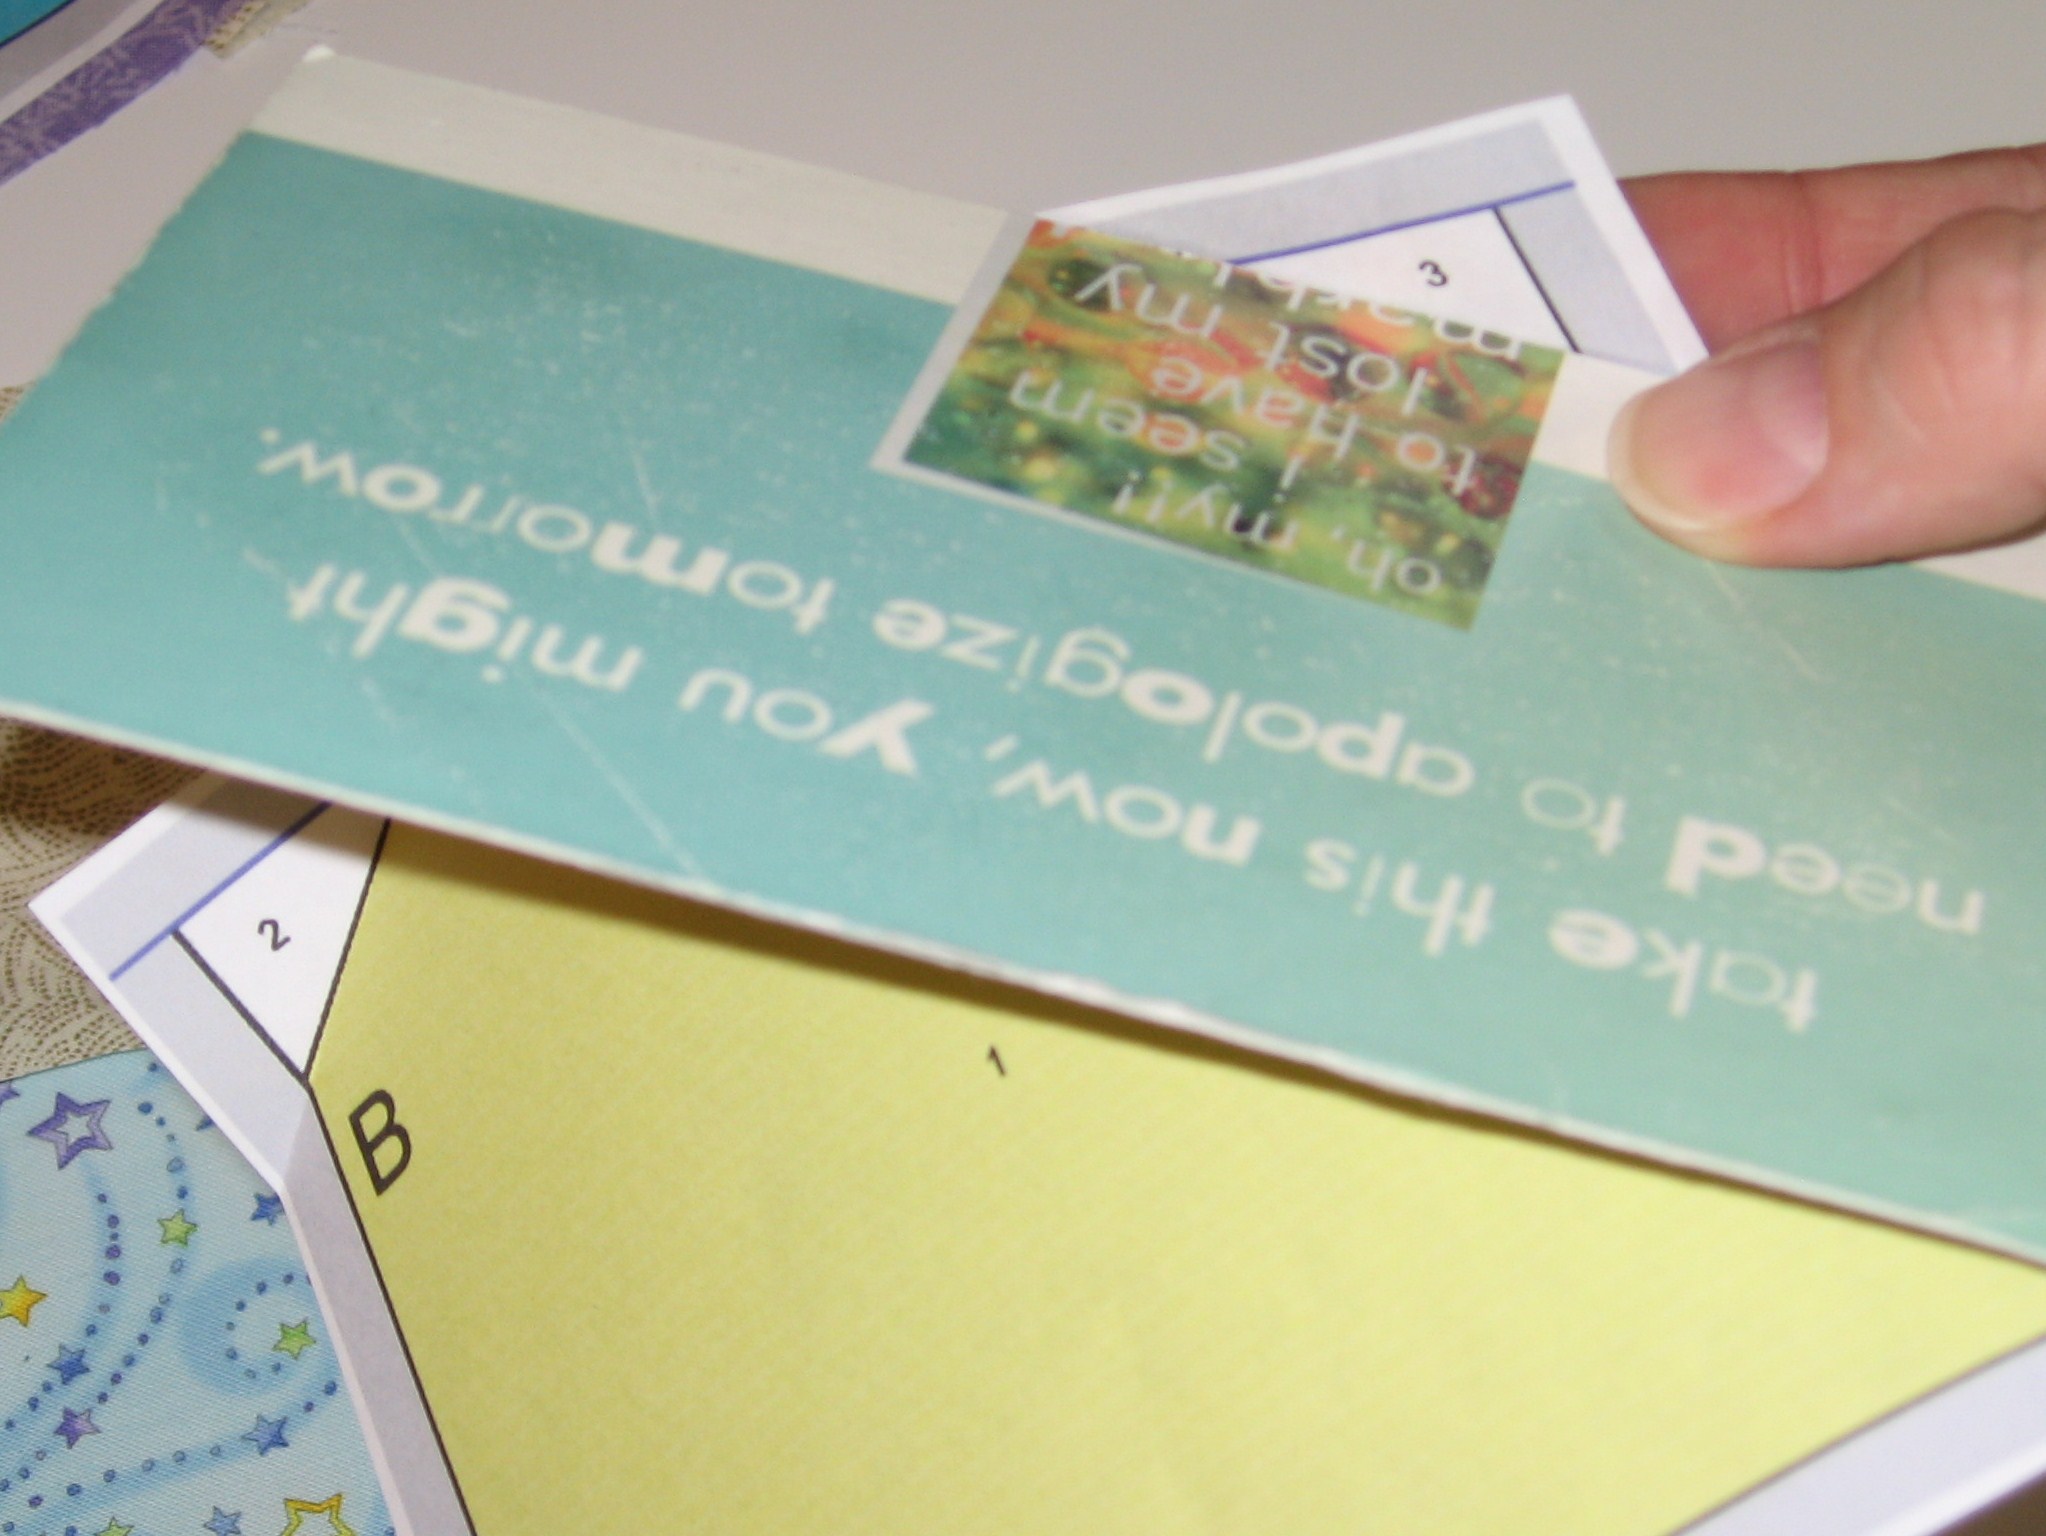
Using the postcard or straight edge, fold down the lines between section 1 > 2 and 1 > 3.

paper piecing tutorial (21)

Trim a generous 1/4″ seam allowance (with scissors or Add-A-Quarter ruler) for piece 1 >2. Repeat for 1 > 3.

paper piecing tutorial (23).JPG

Just as for pattern piece “A,” place fabric 1 right side up on the back of the paper opposite piece 1. Make sure you have a generous seam allowance (approximately 1/2″) all around.

paper piecing tutorial (24)

Stitch on the line between piece 1 > 2 as in previous steps.

Repeat for pieces 1 > 3.

paper piecing tutorial (26).JPG

Press seams as before.

paper piecing tutorial (28)

Trim fabric, leaving a generous seam allowance around the outside edges for squaring up later.

paper piecing tutorial (29).JPG

Press as before.

paper piecing tutorial (30).JPG

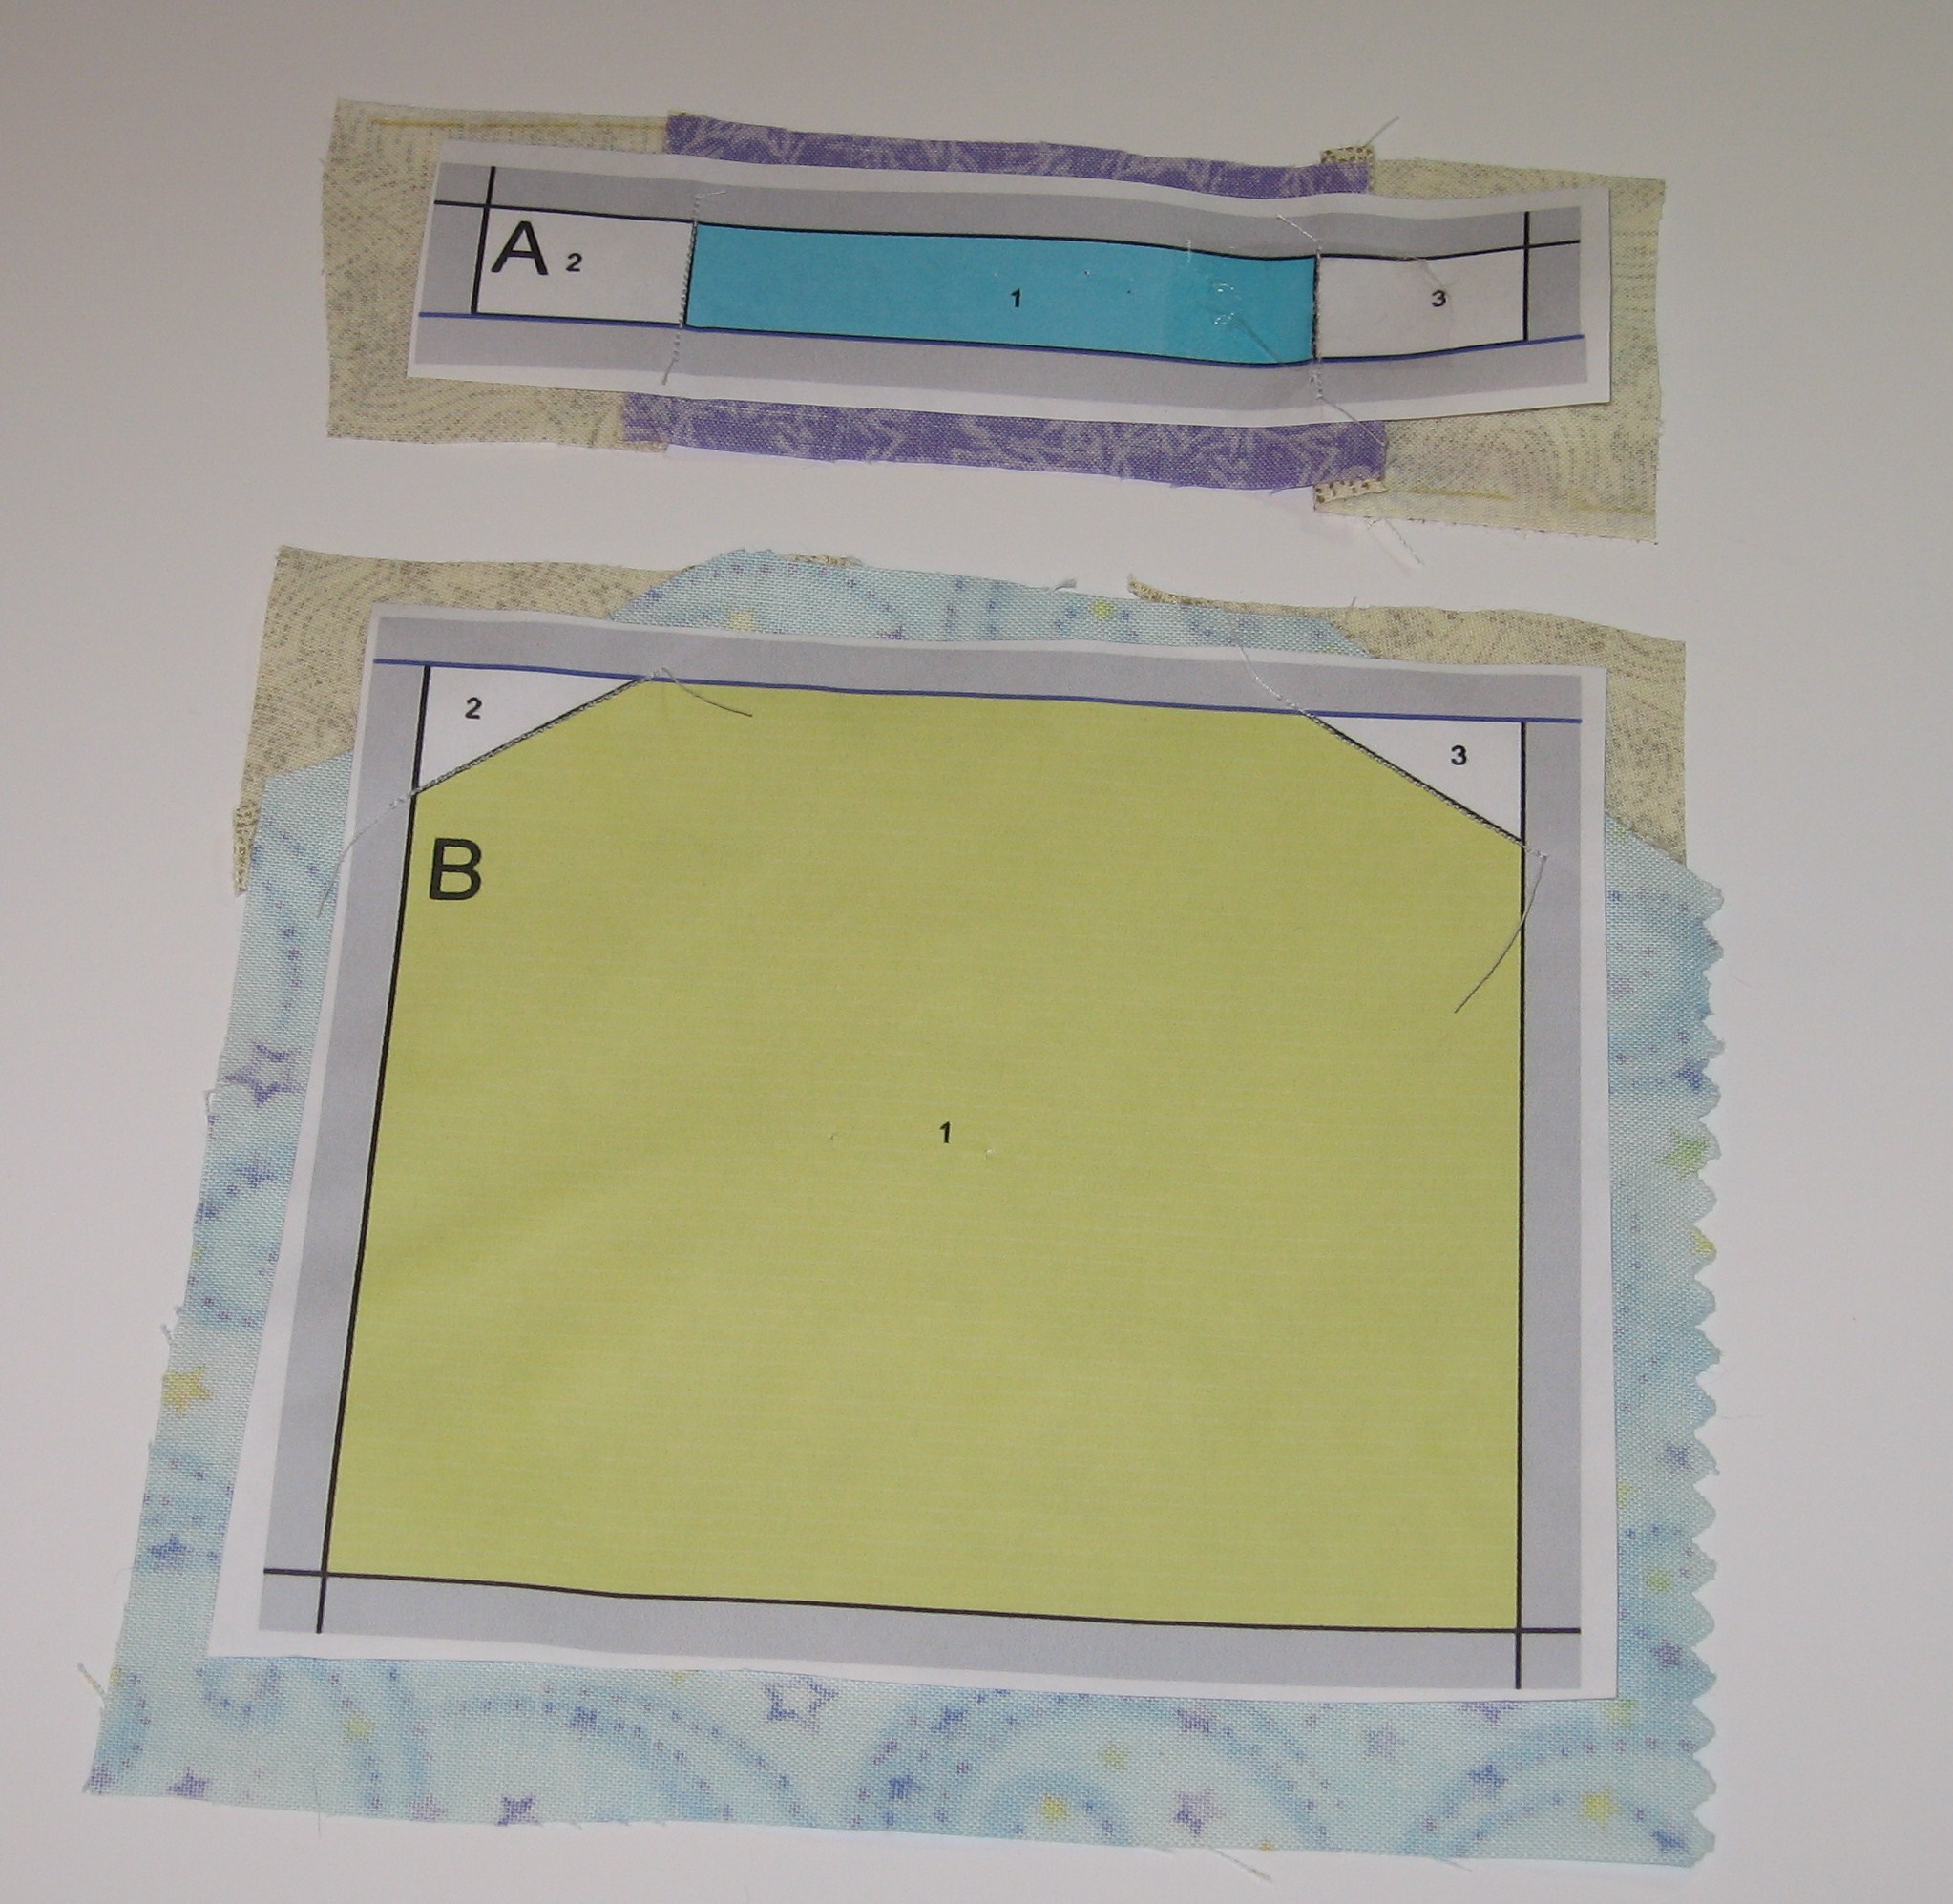
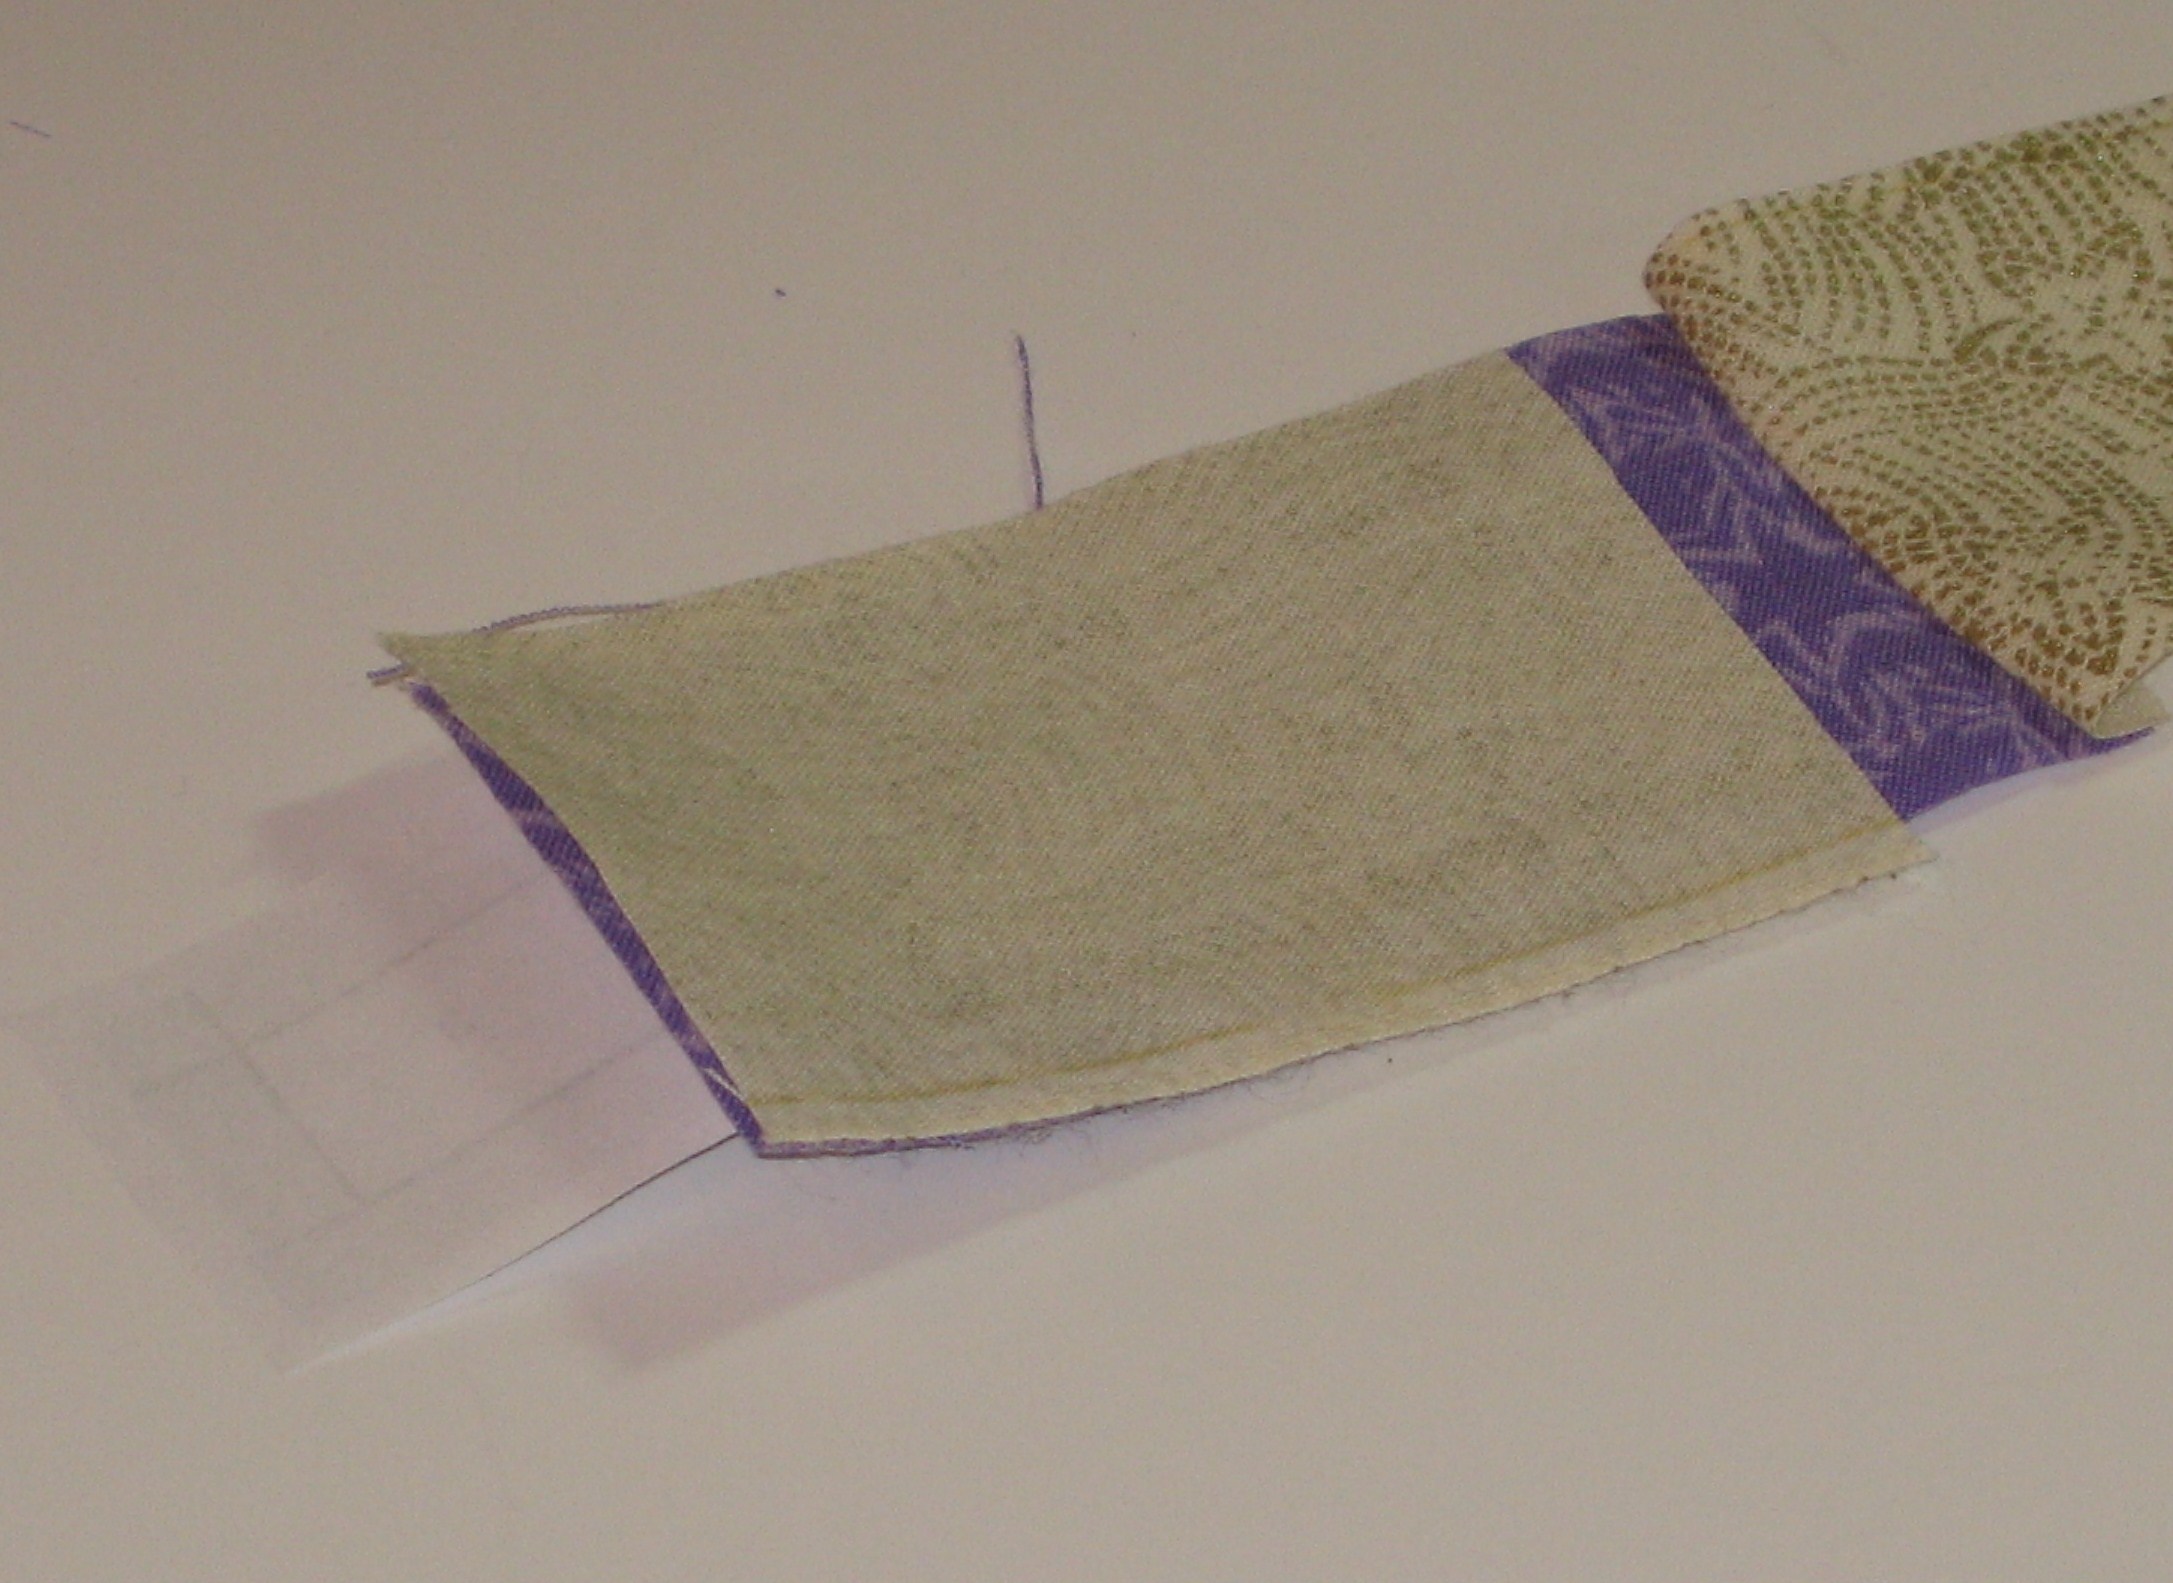
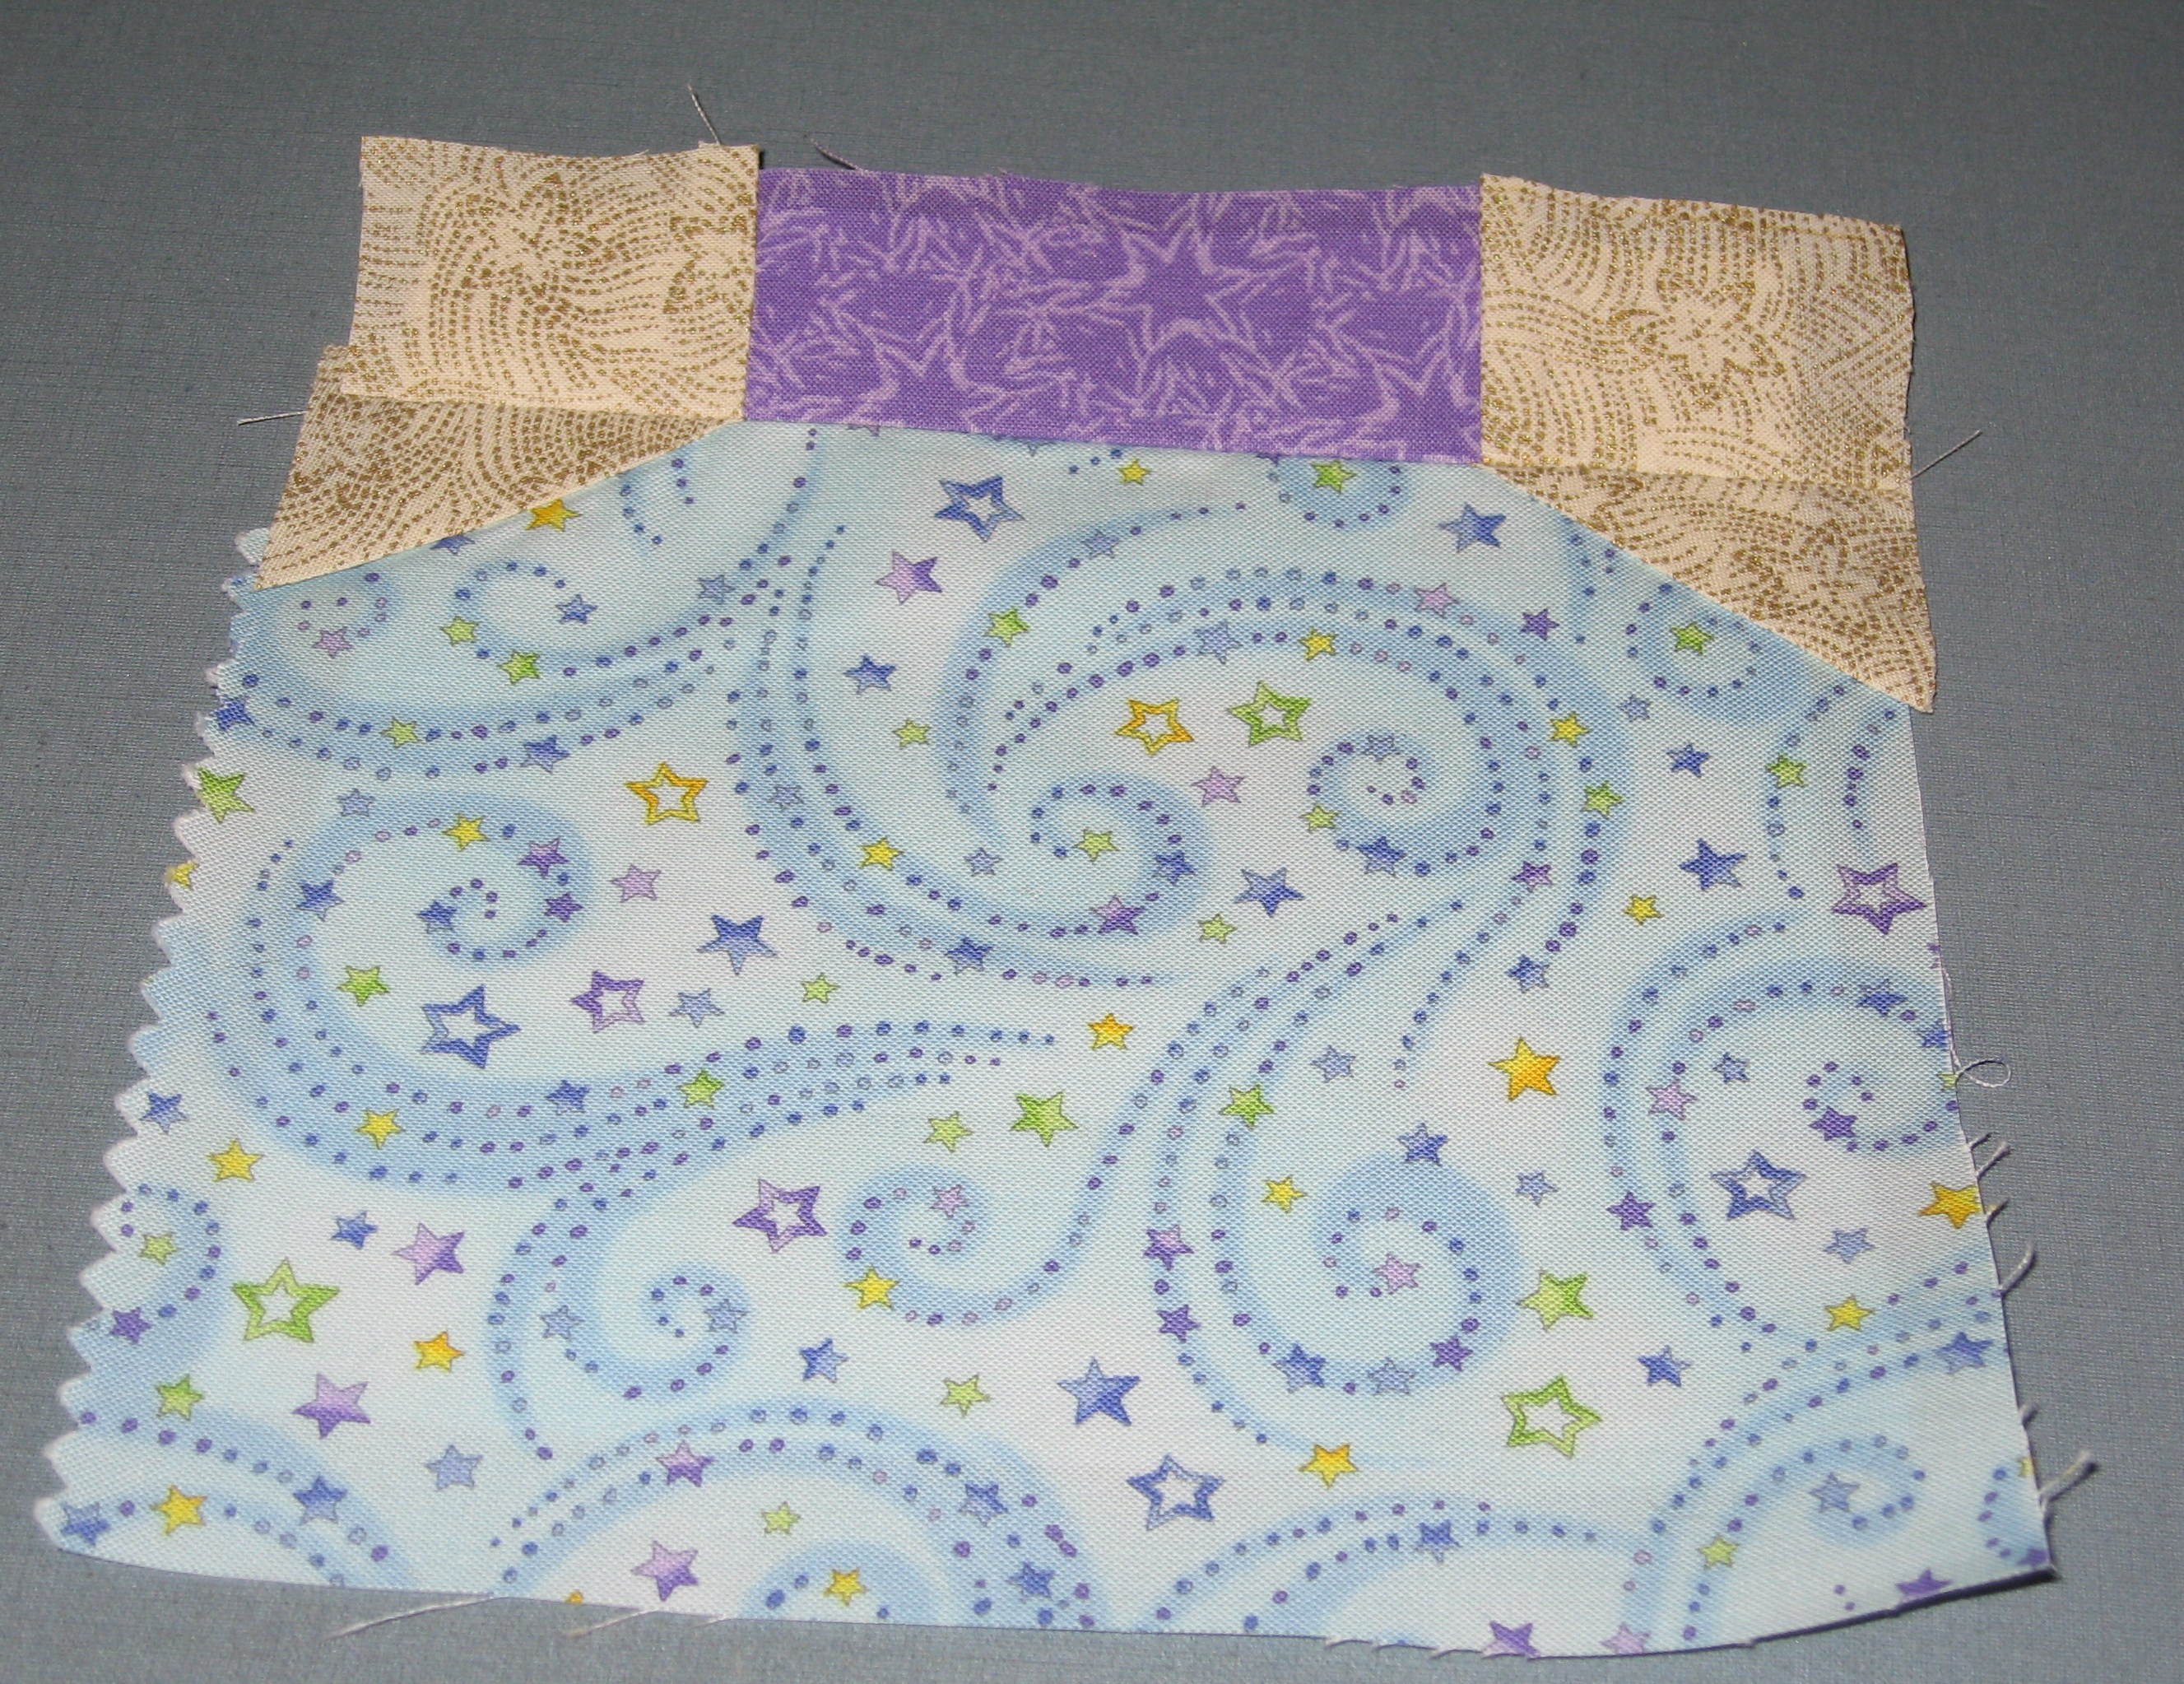
This is what you should have so far.

paper piecing tutorial (31).JPG

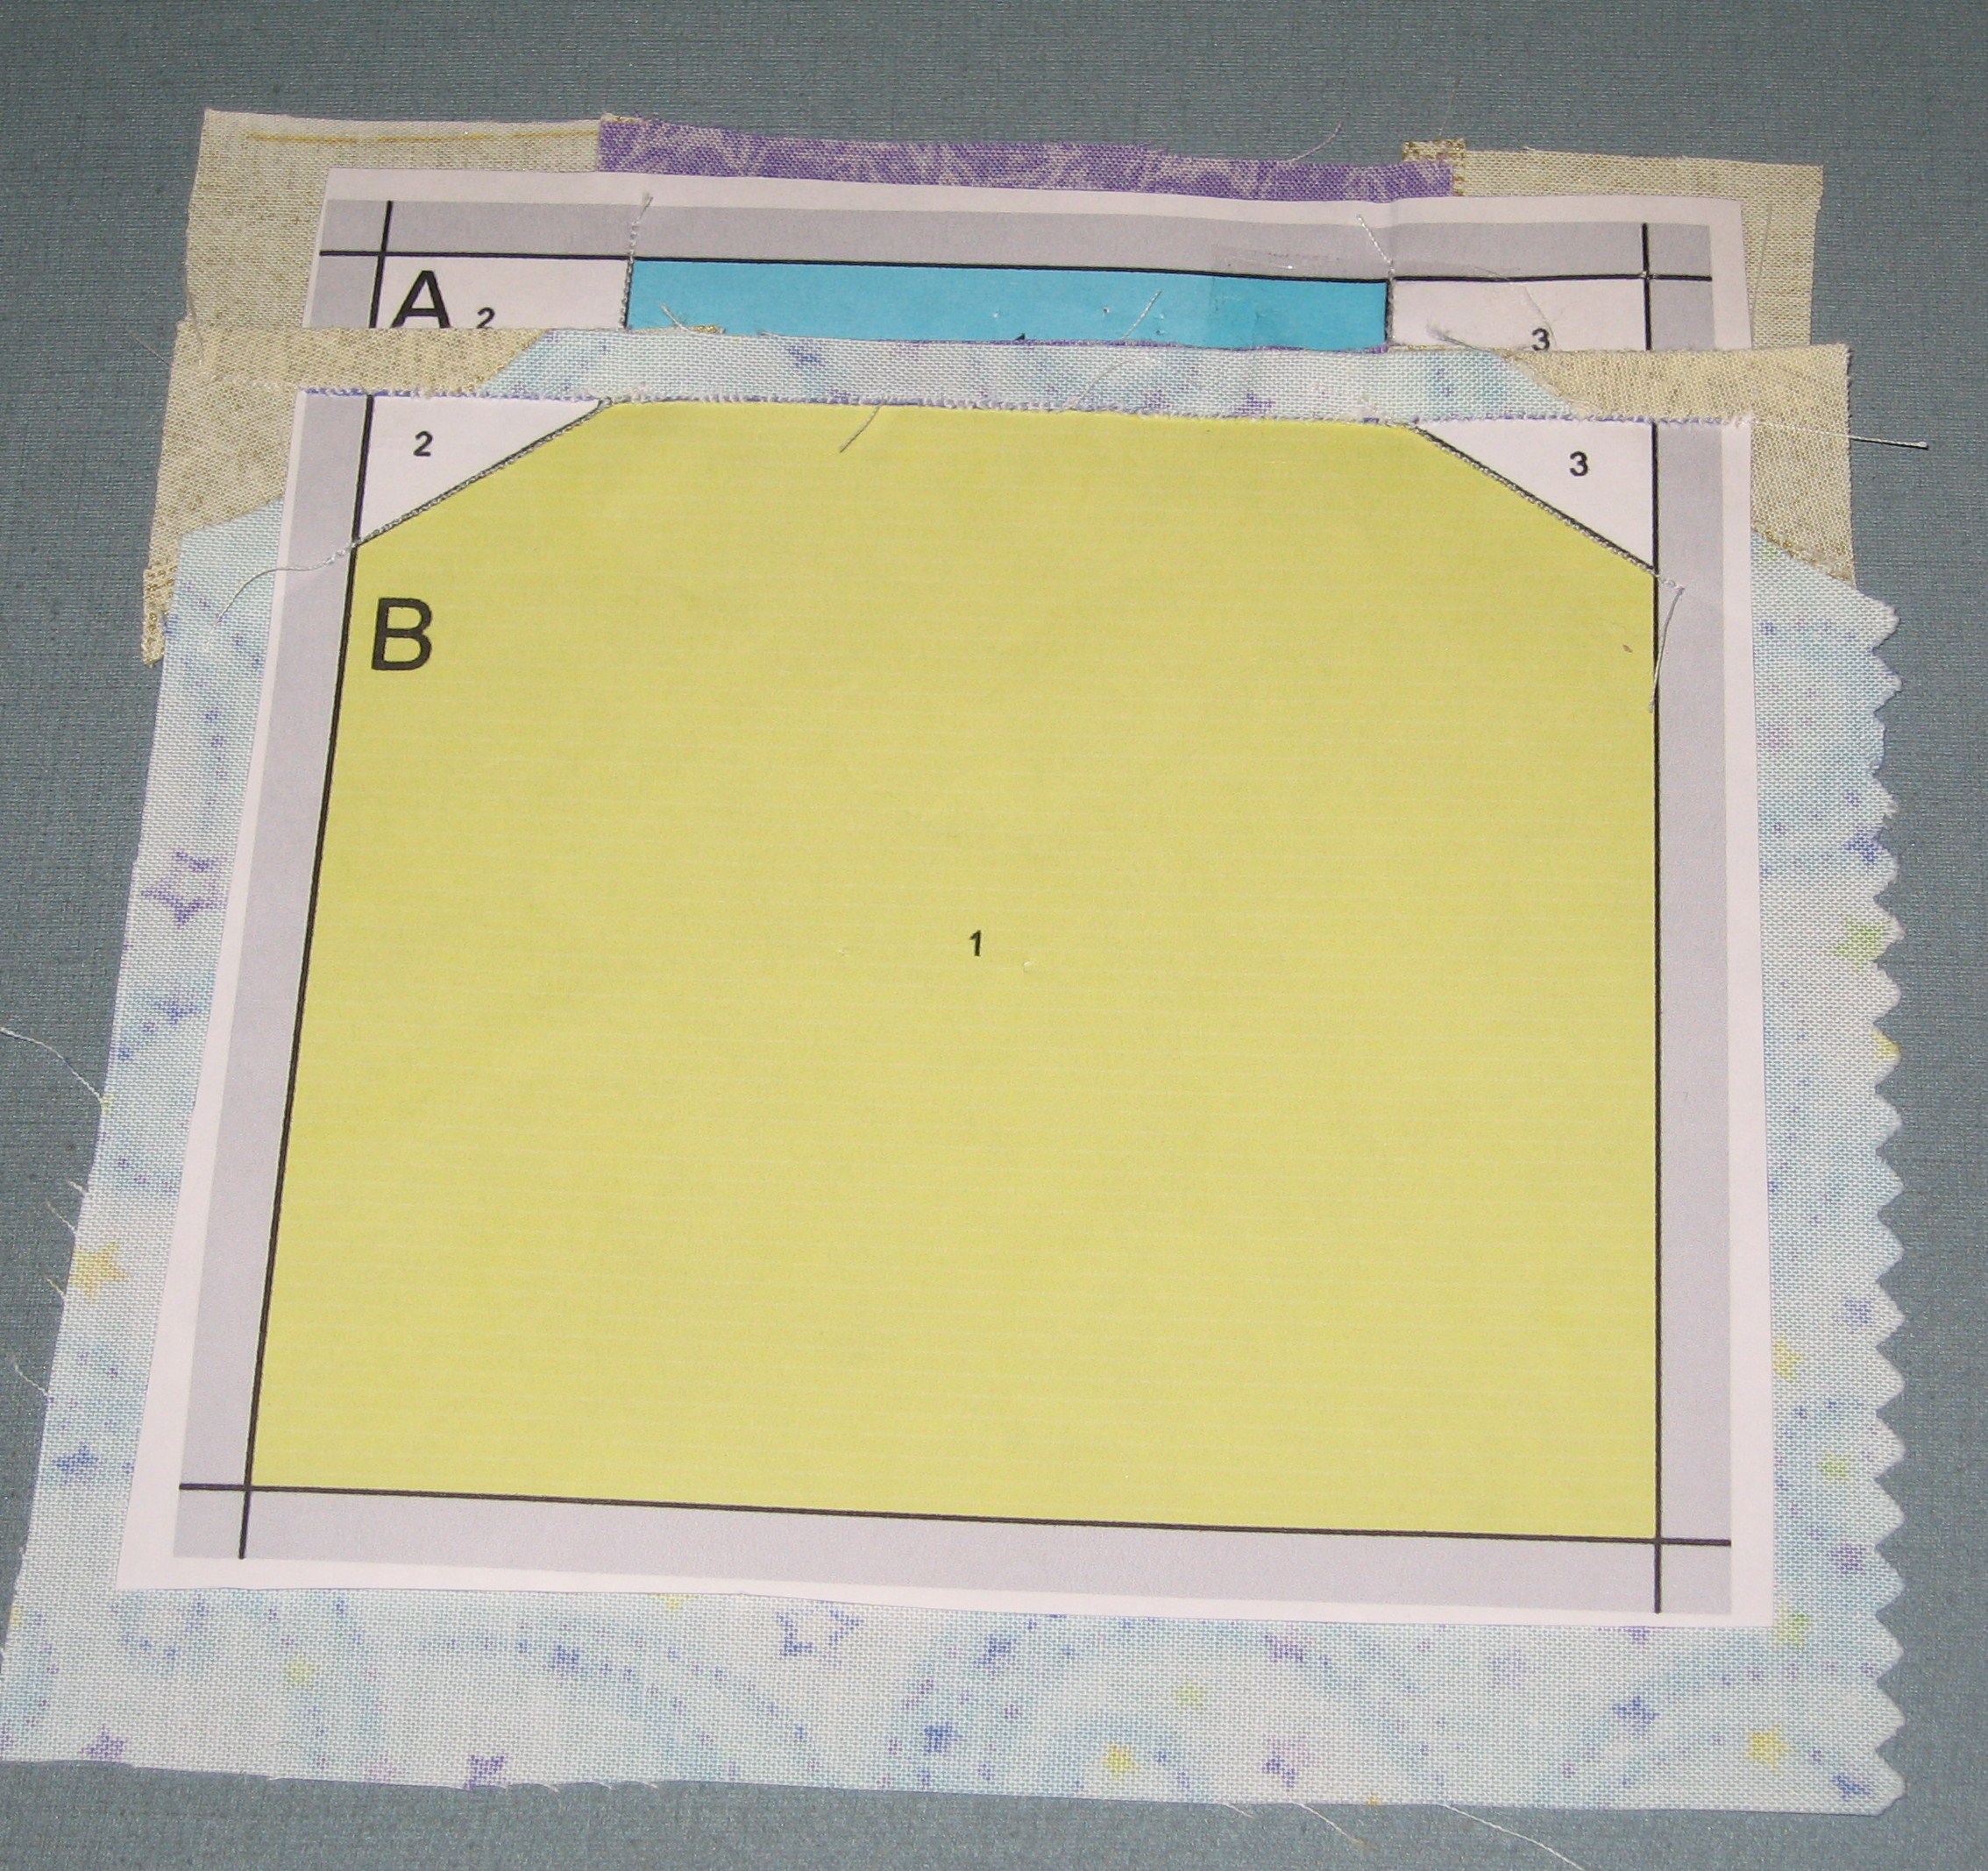
On your cutting mat and with your ruler, find the inside line at the top of unit “B”, where the jar will be stitched to the lid.

paper piecing tutorial (32).JPG

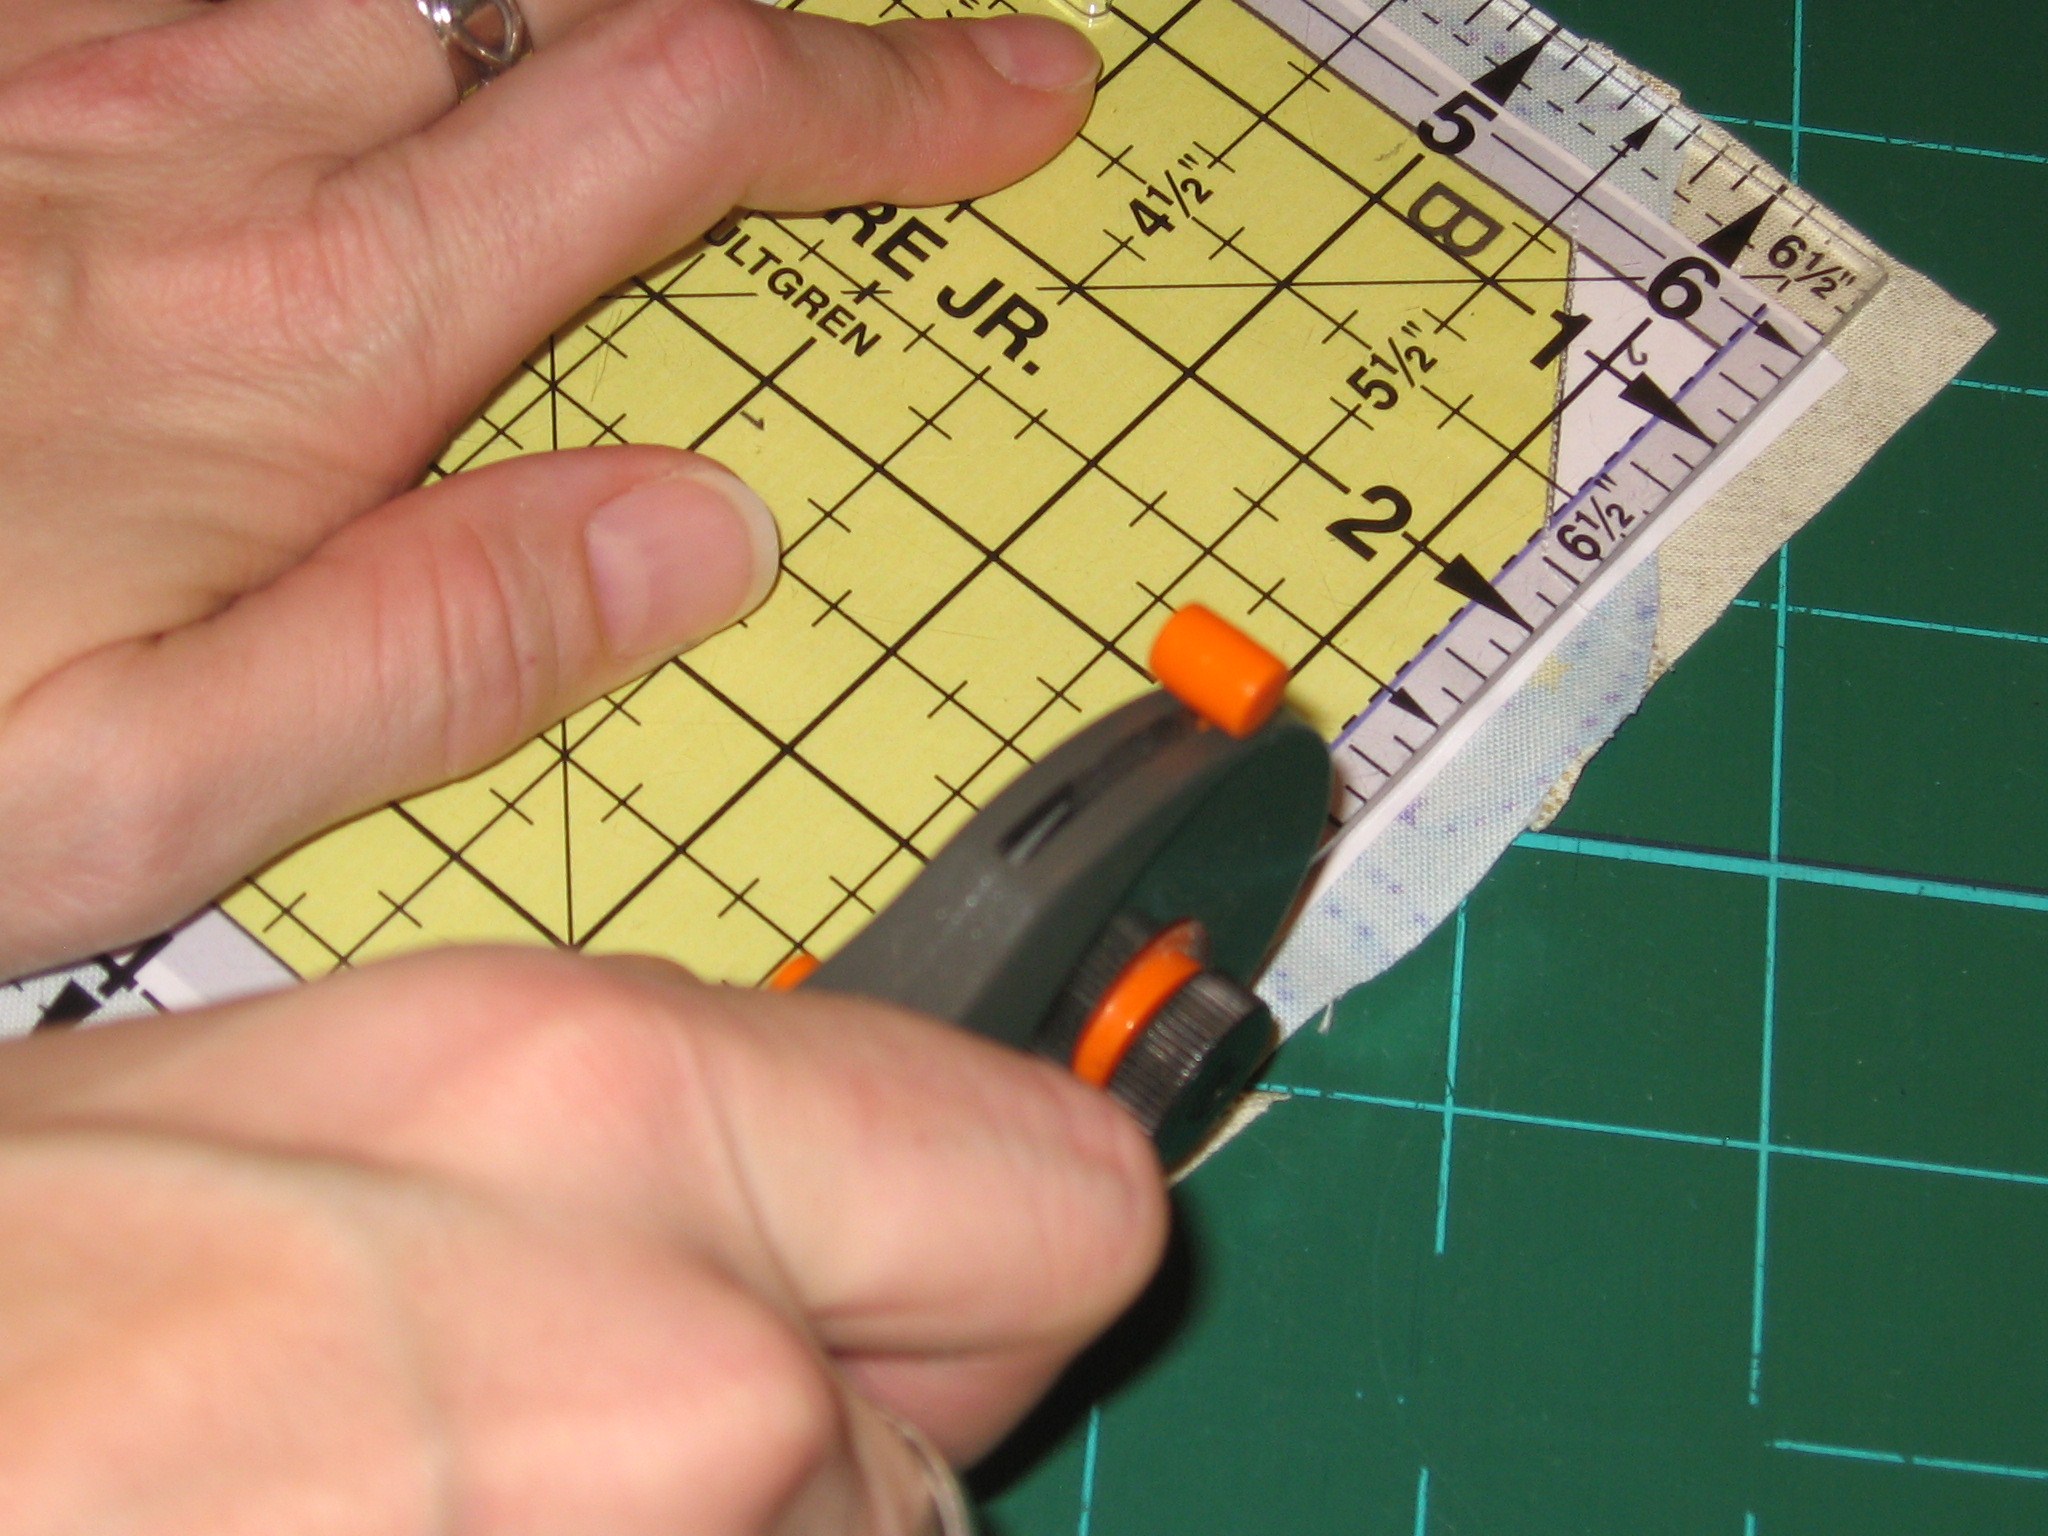
Using the pattern’s seam allowance as a guide, trim. (note: Not all paper pieced patterns include seam allowance. All of my patterns do, but if you’re ever working on a pattern without seam allowance, you can add it using this simple tutorial.)

paper piecing tutorial (34)

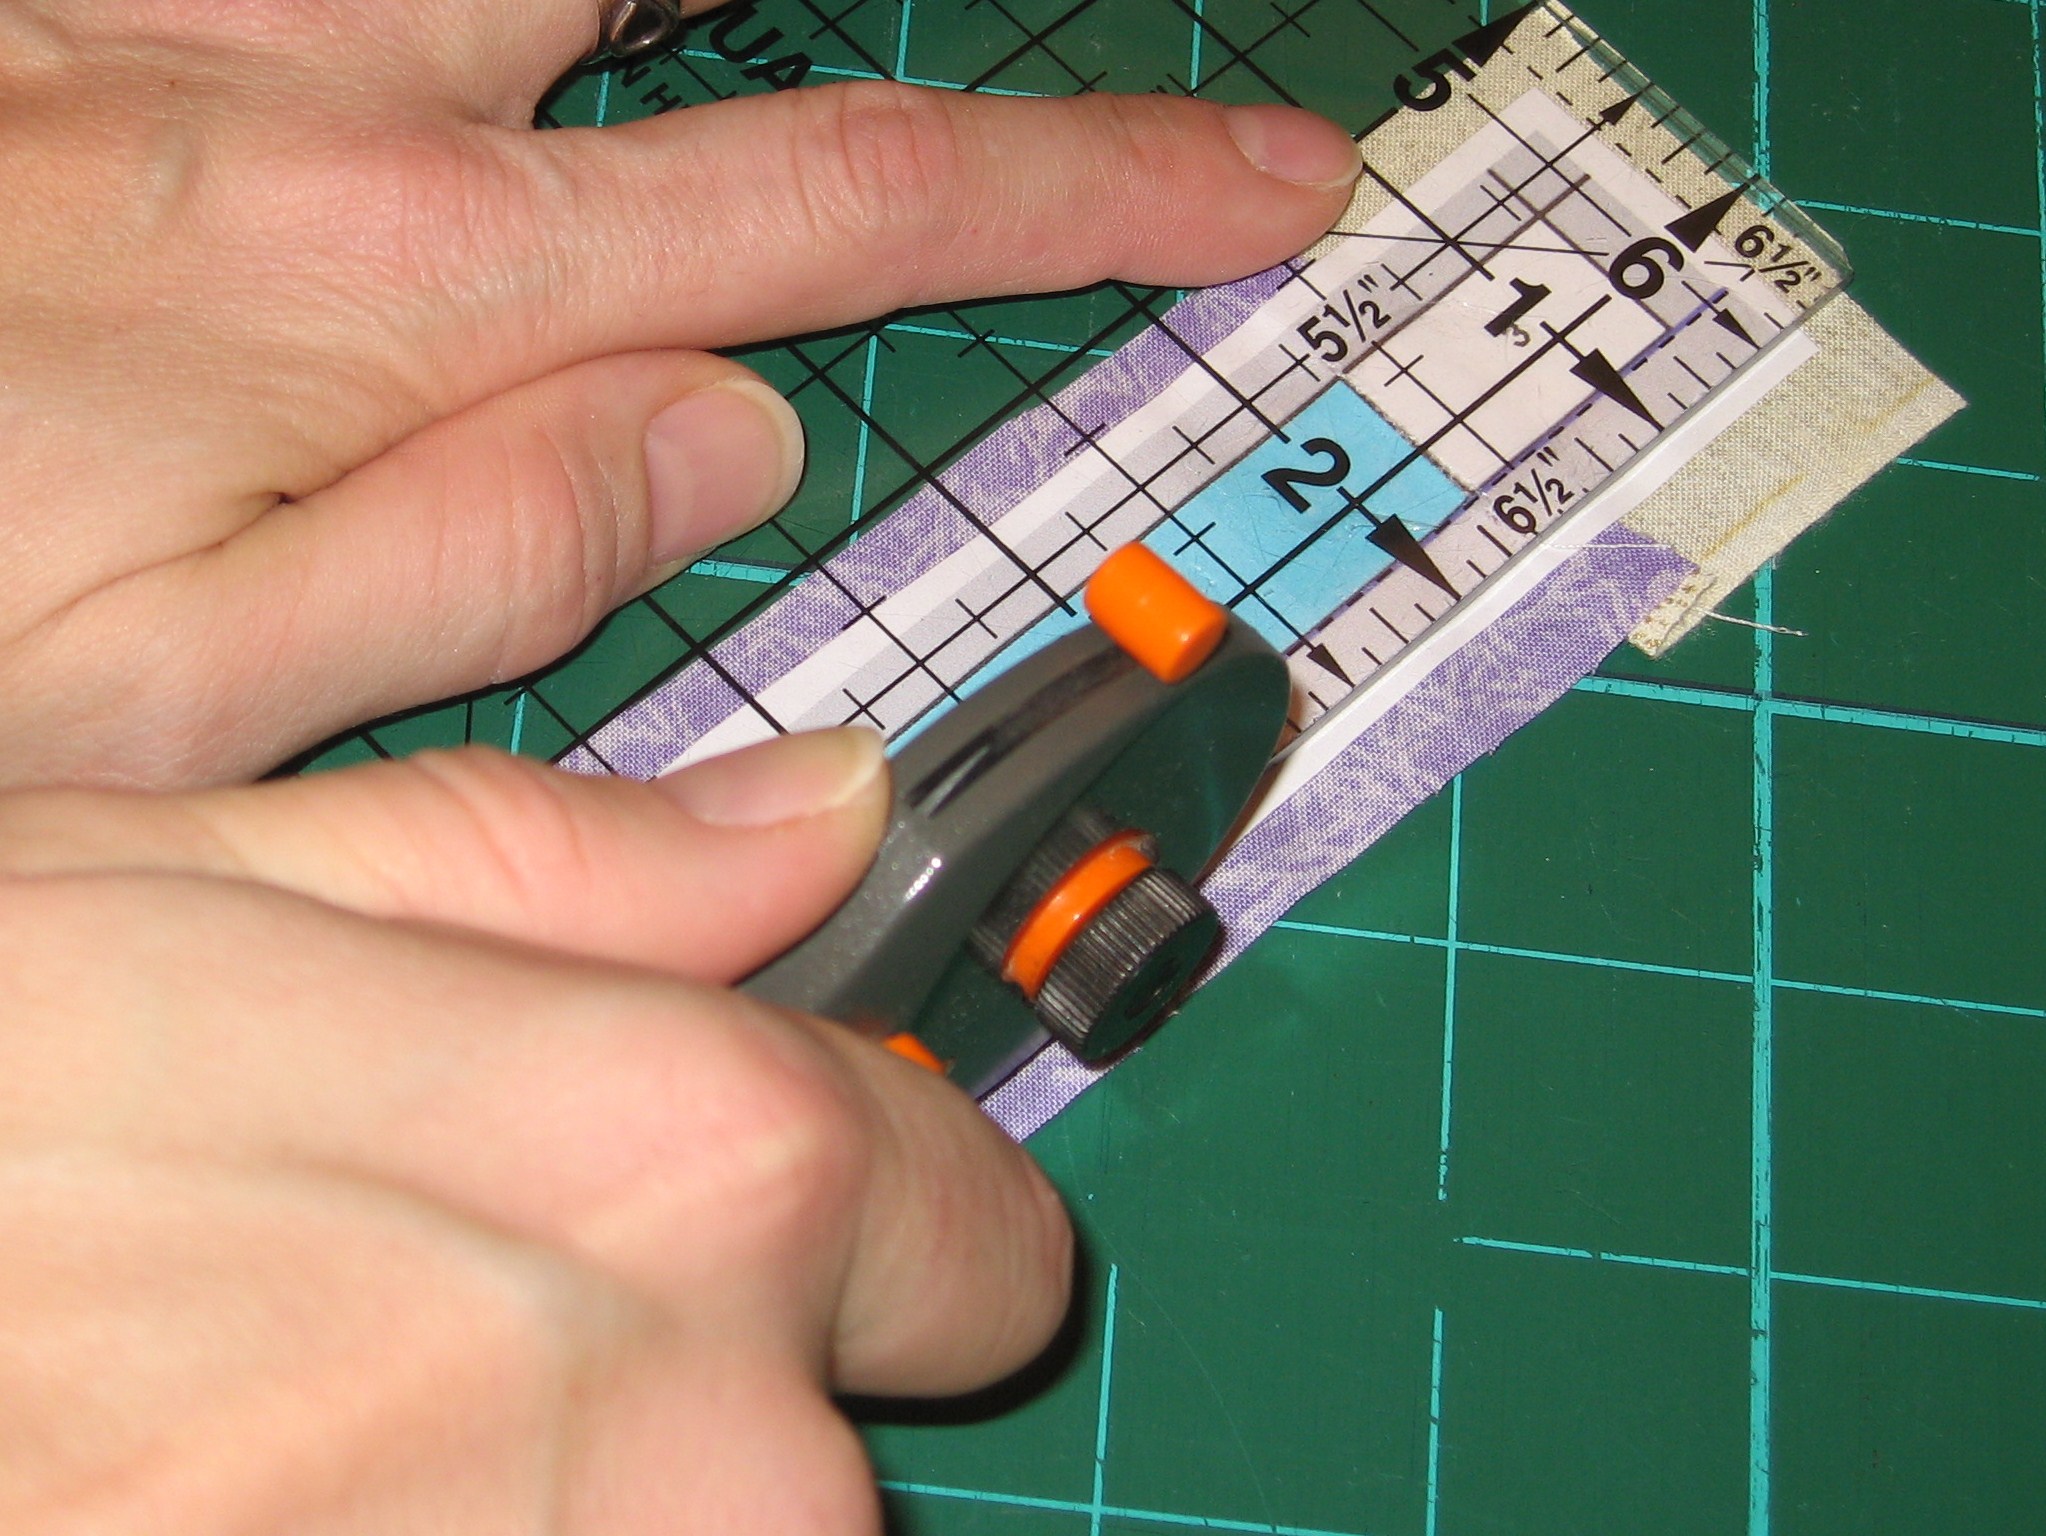
Find the corresponding seam on unit “A” and repeat the process.

paper piecing tutorial (36)

Now the “A” pattern piece is ready to join to the “B” pattern piece.

paper piecing tutorial (37)

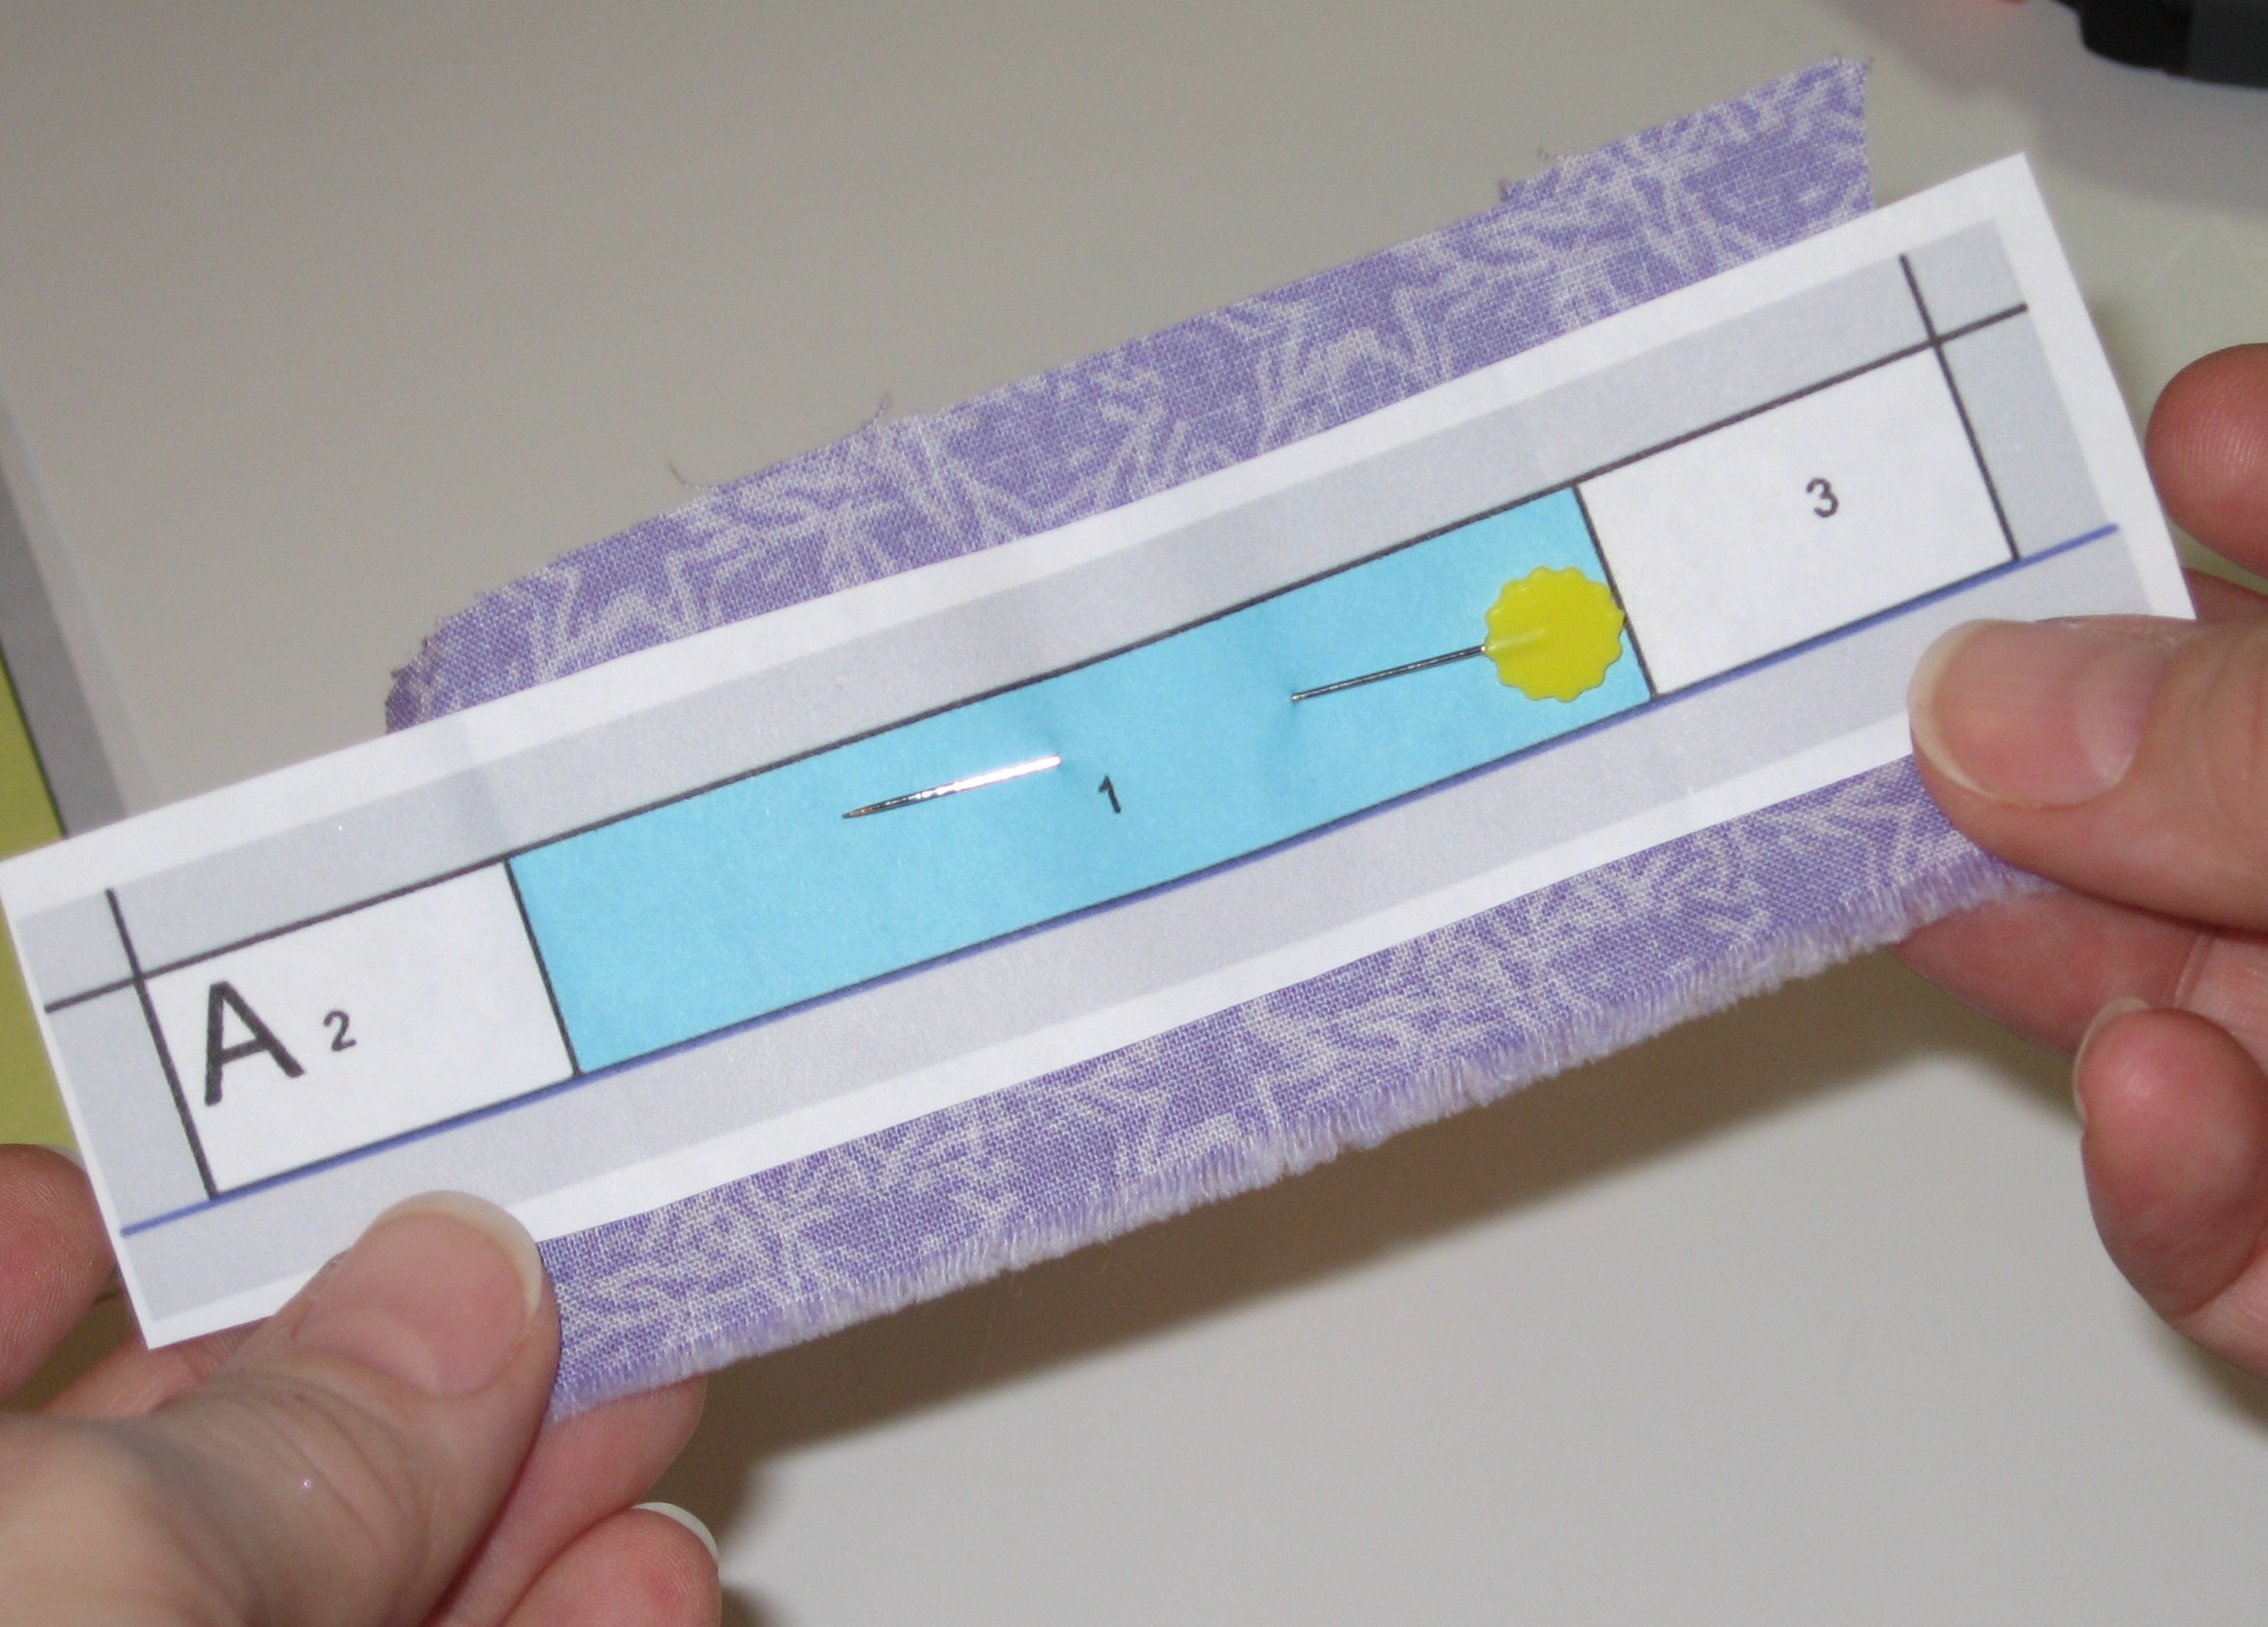
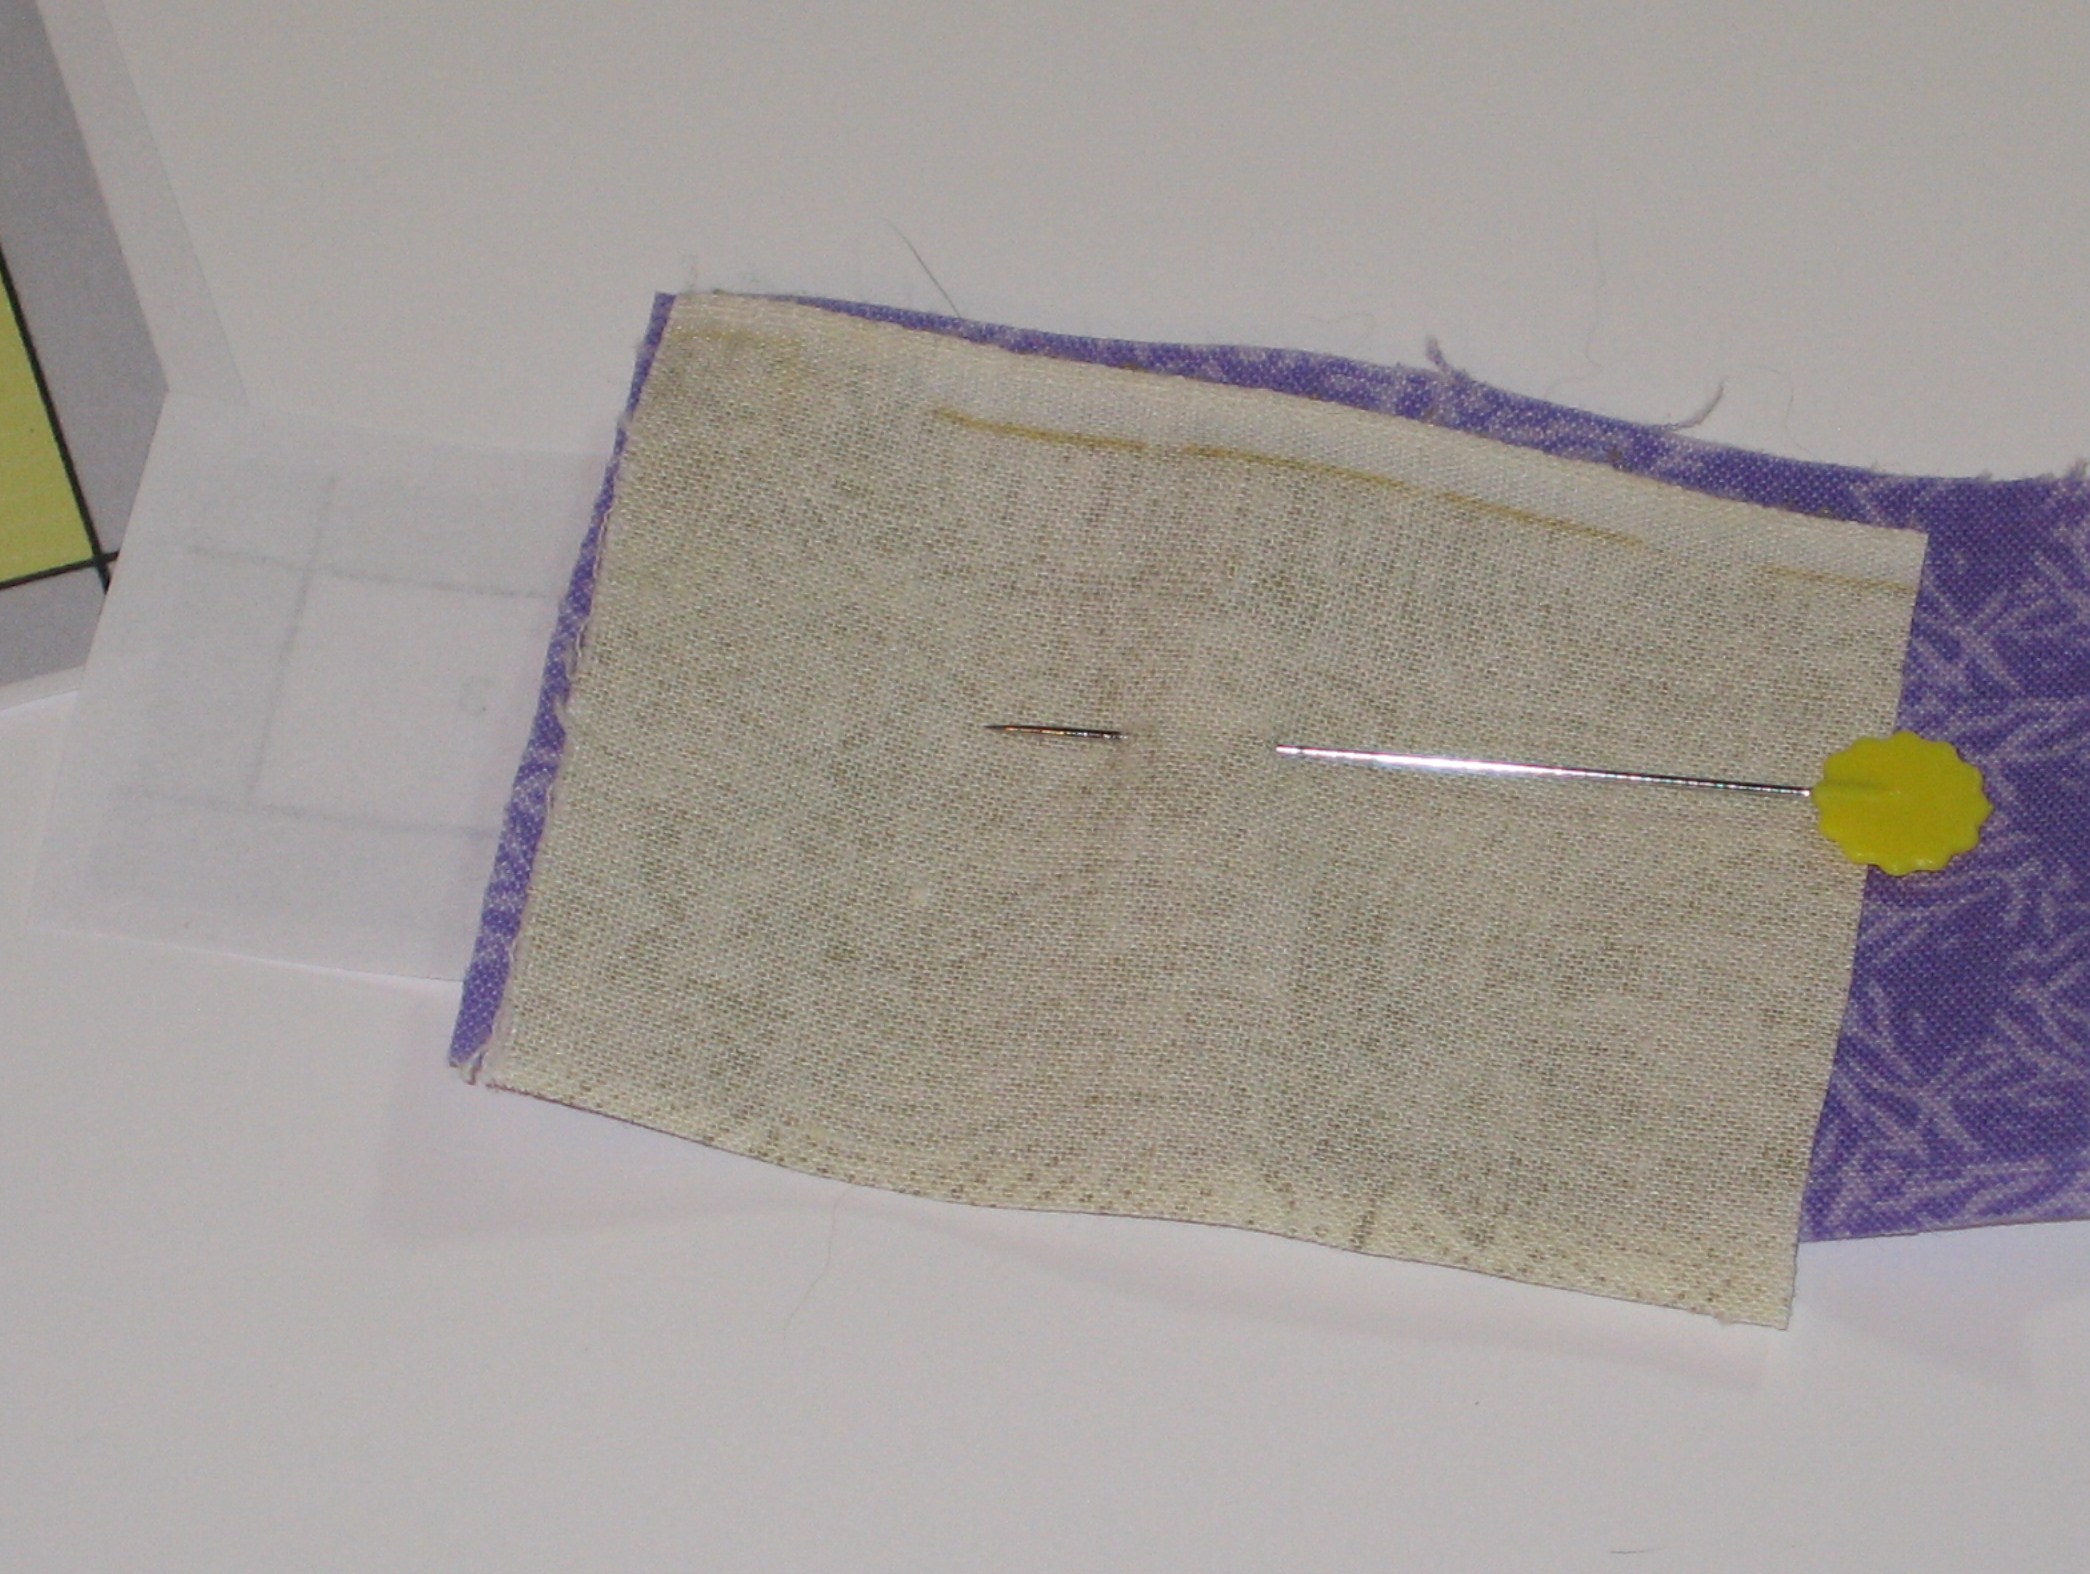
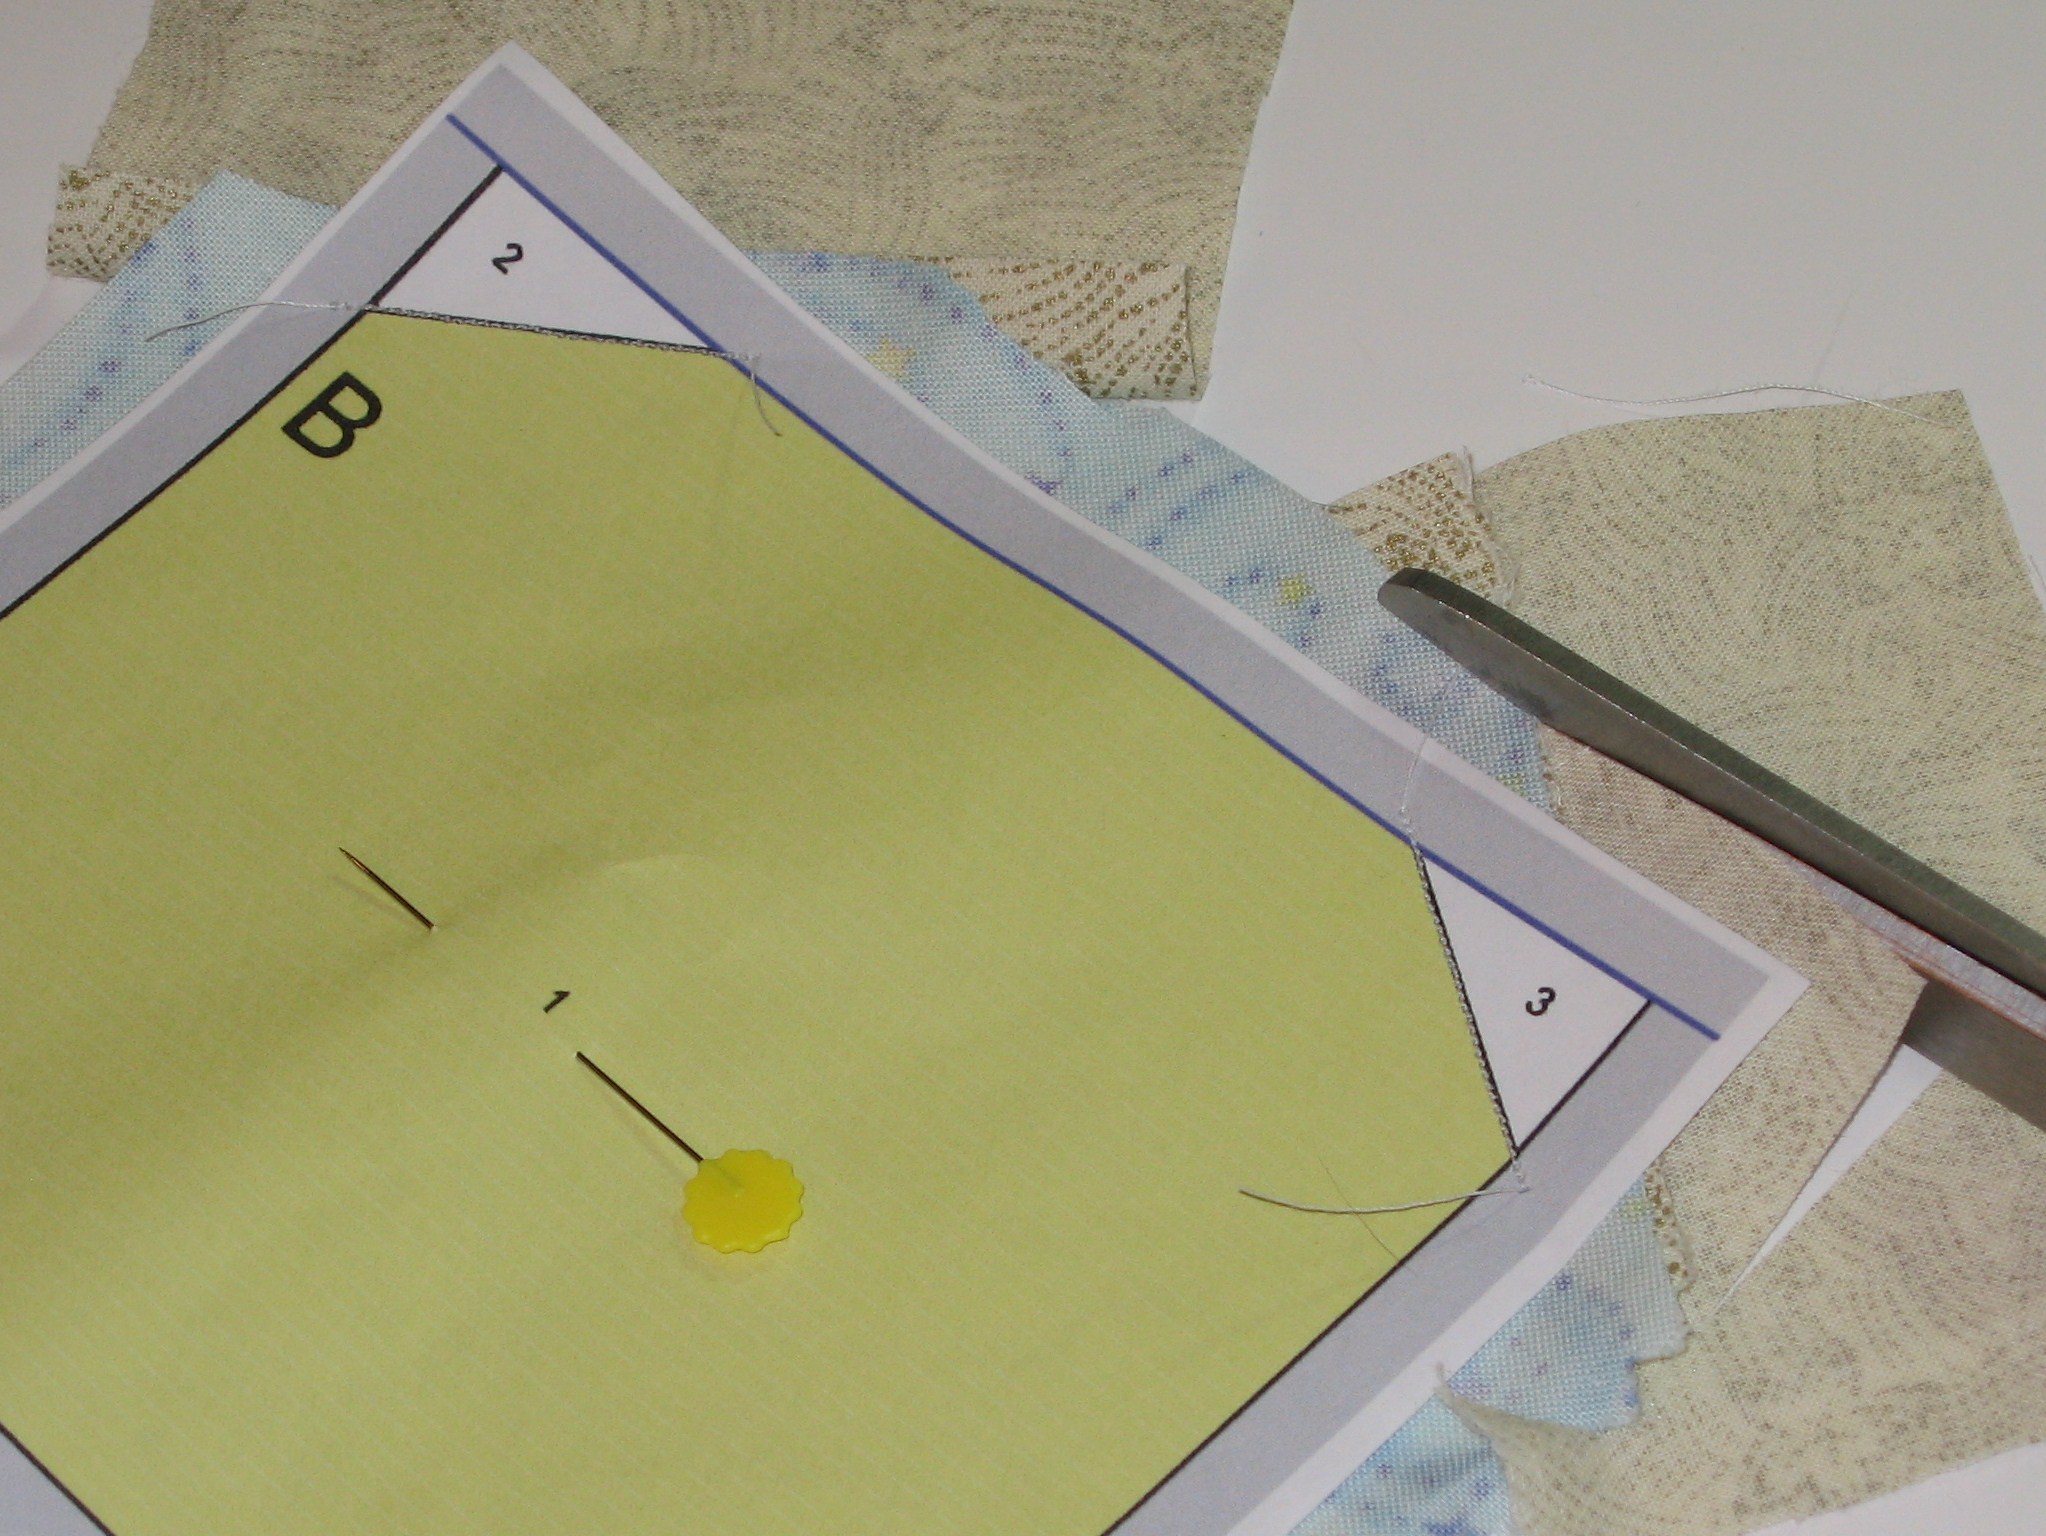
Use a pin to find the outside corner. Push the pin through this point.

paper piecing tutorial (38)

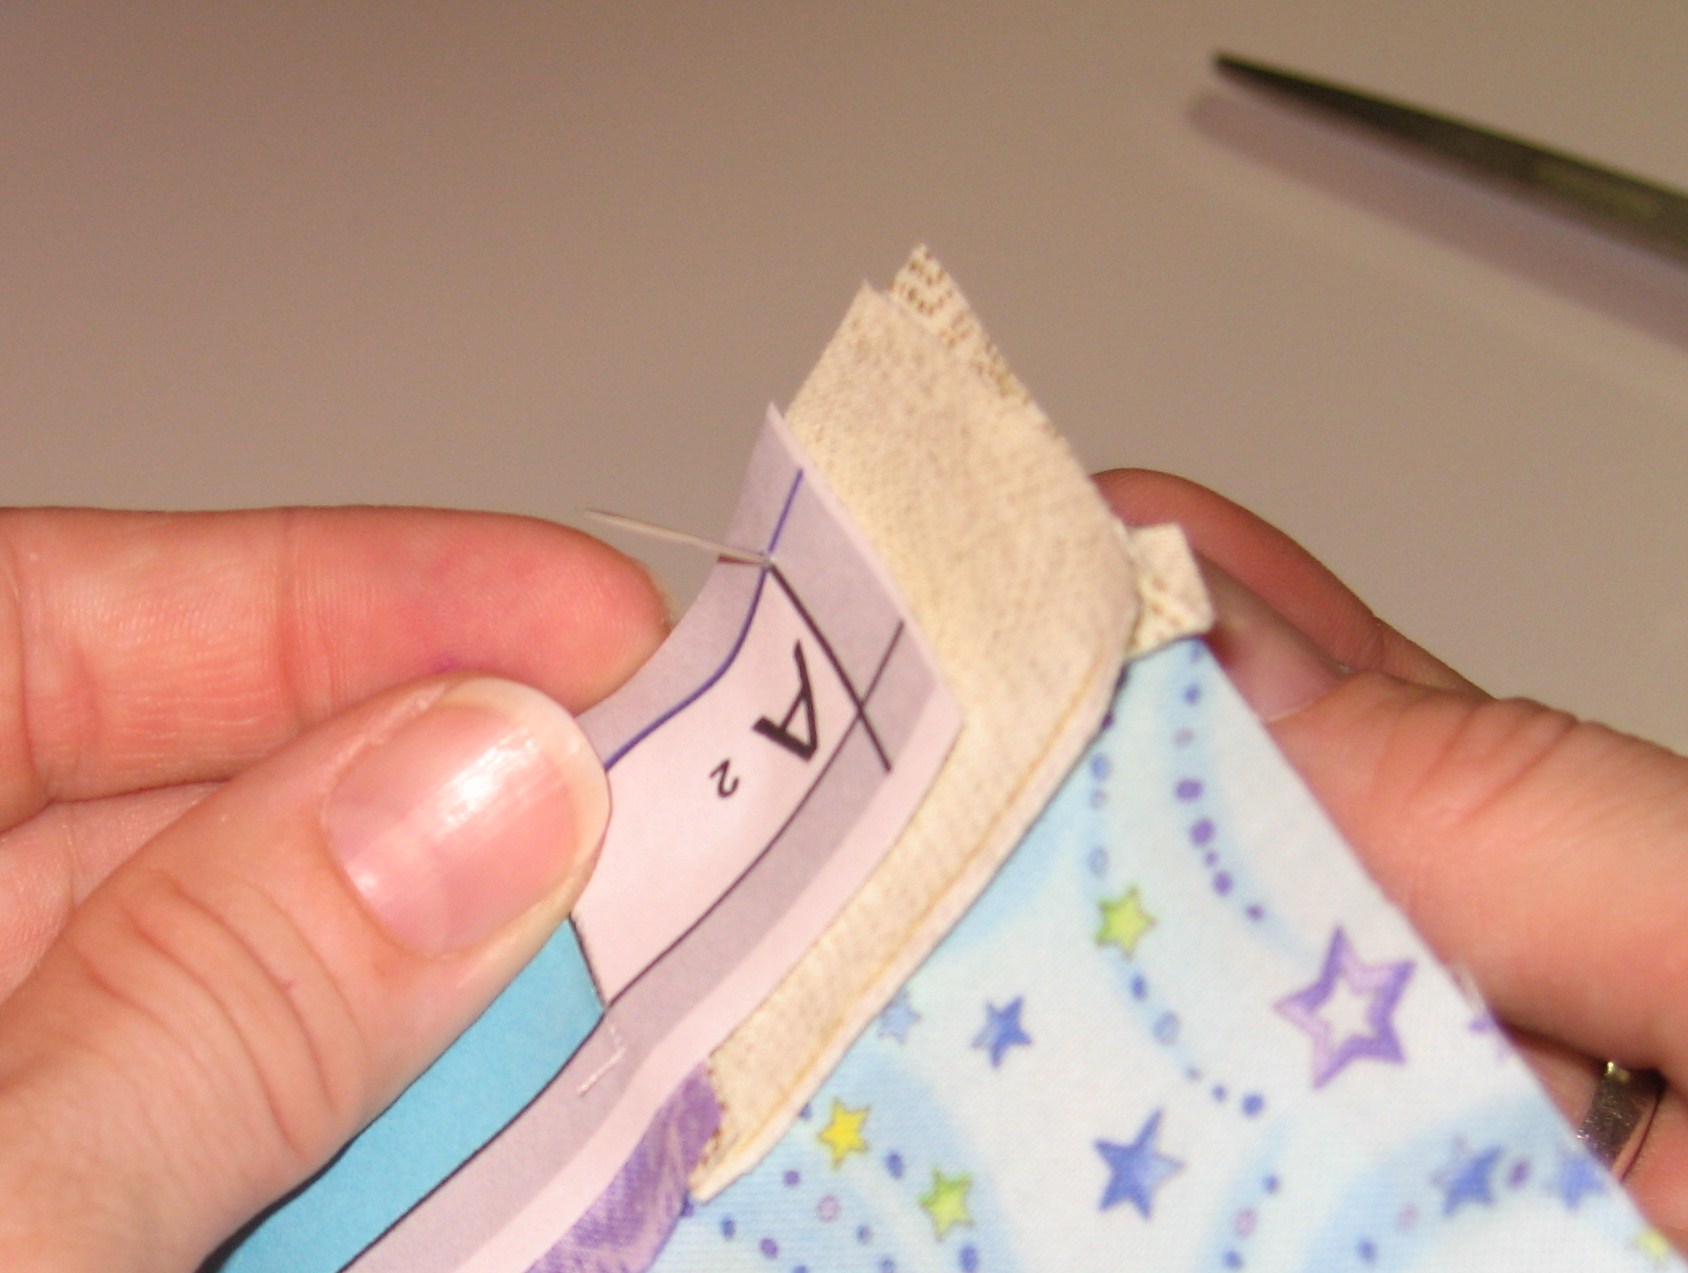
Find the corresponding point on the other pattern piece. Push the pin through.

paper piecing tutorial (39)

Push the pin all the way through to line up the pattern pieces. This will assure that your pattern pieces align correctly when stitching.

paper piecing tutorial (40)

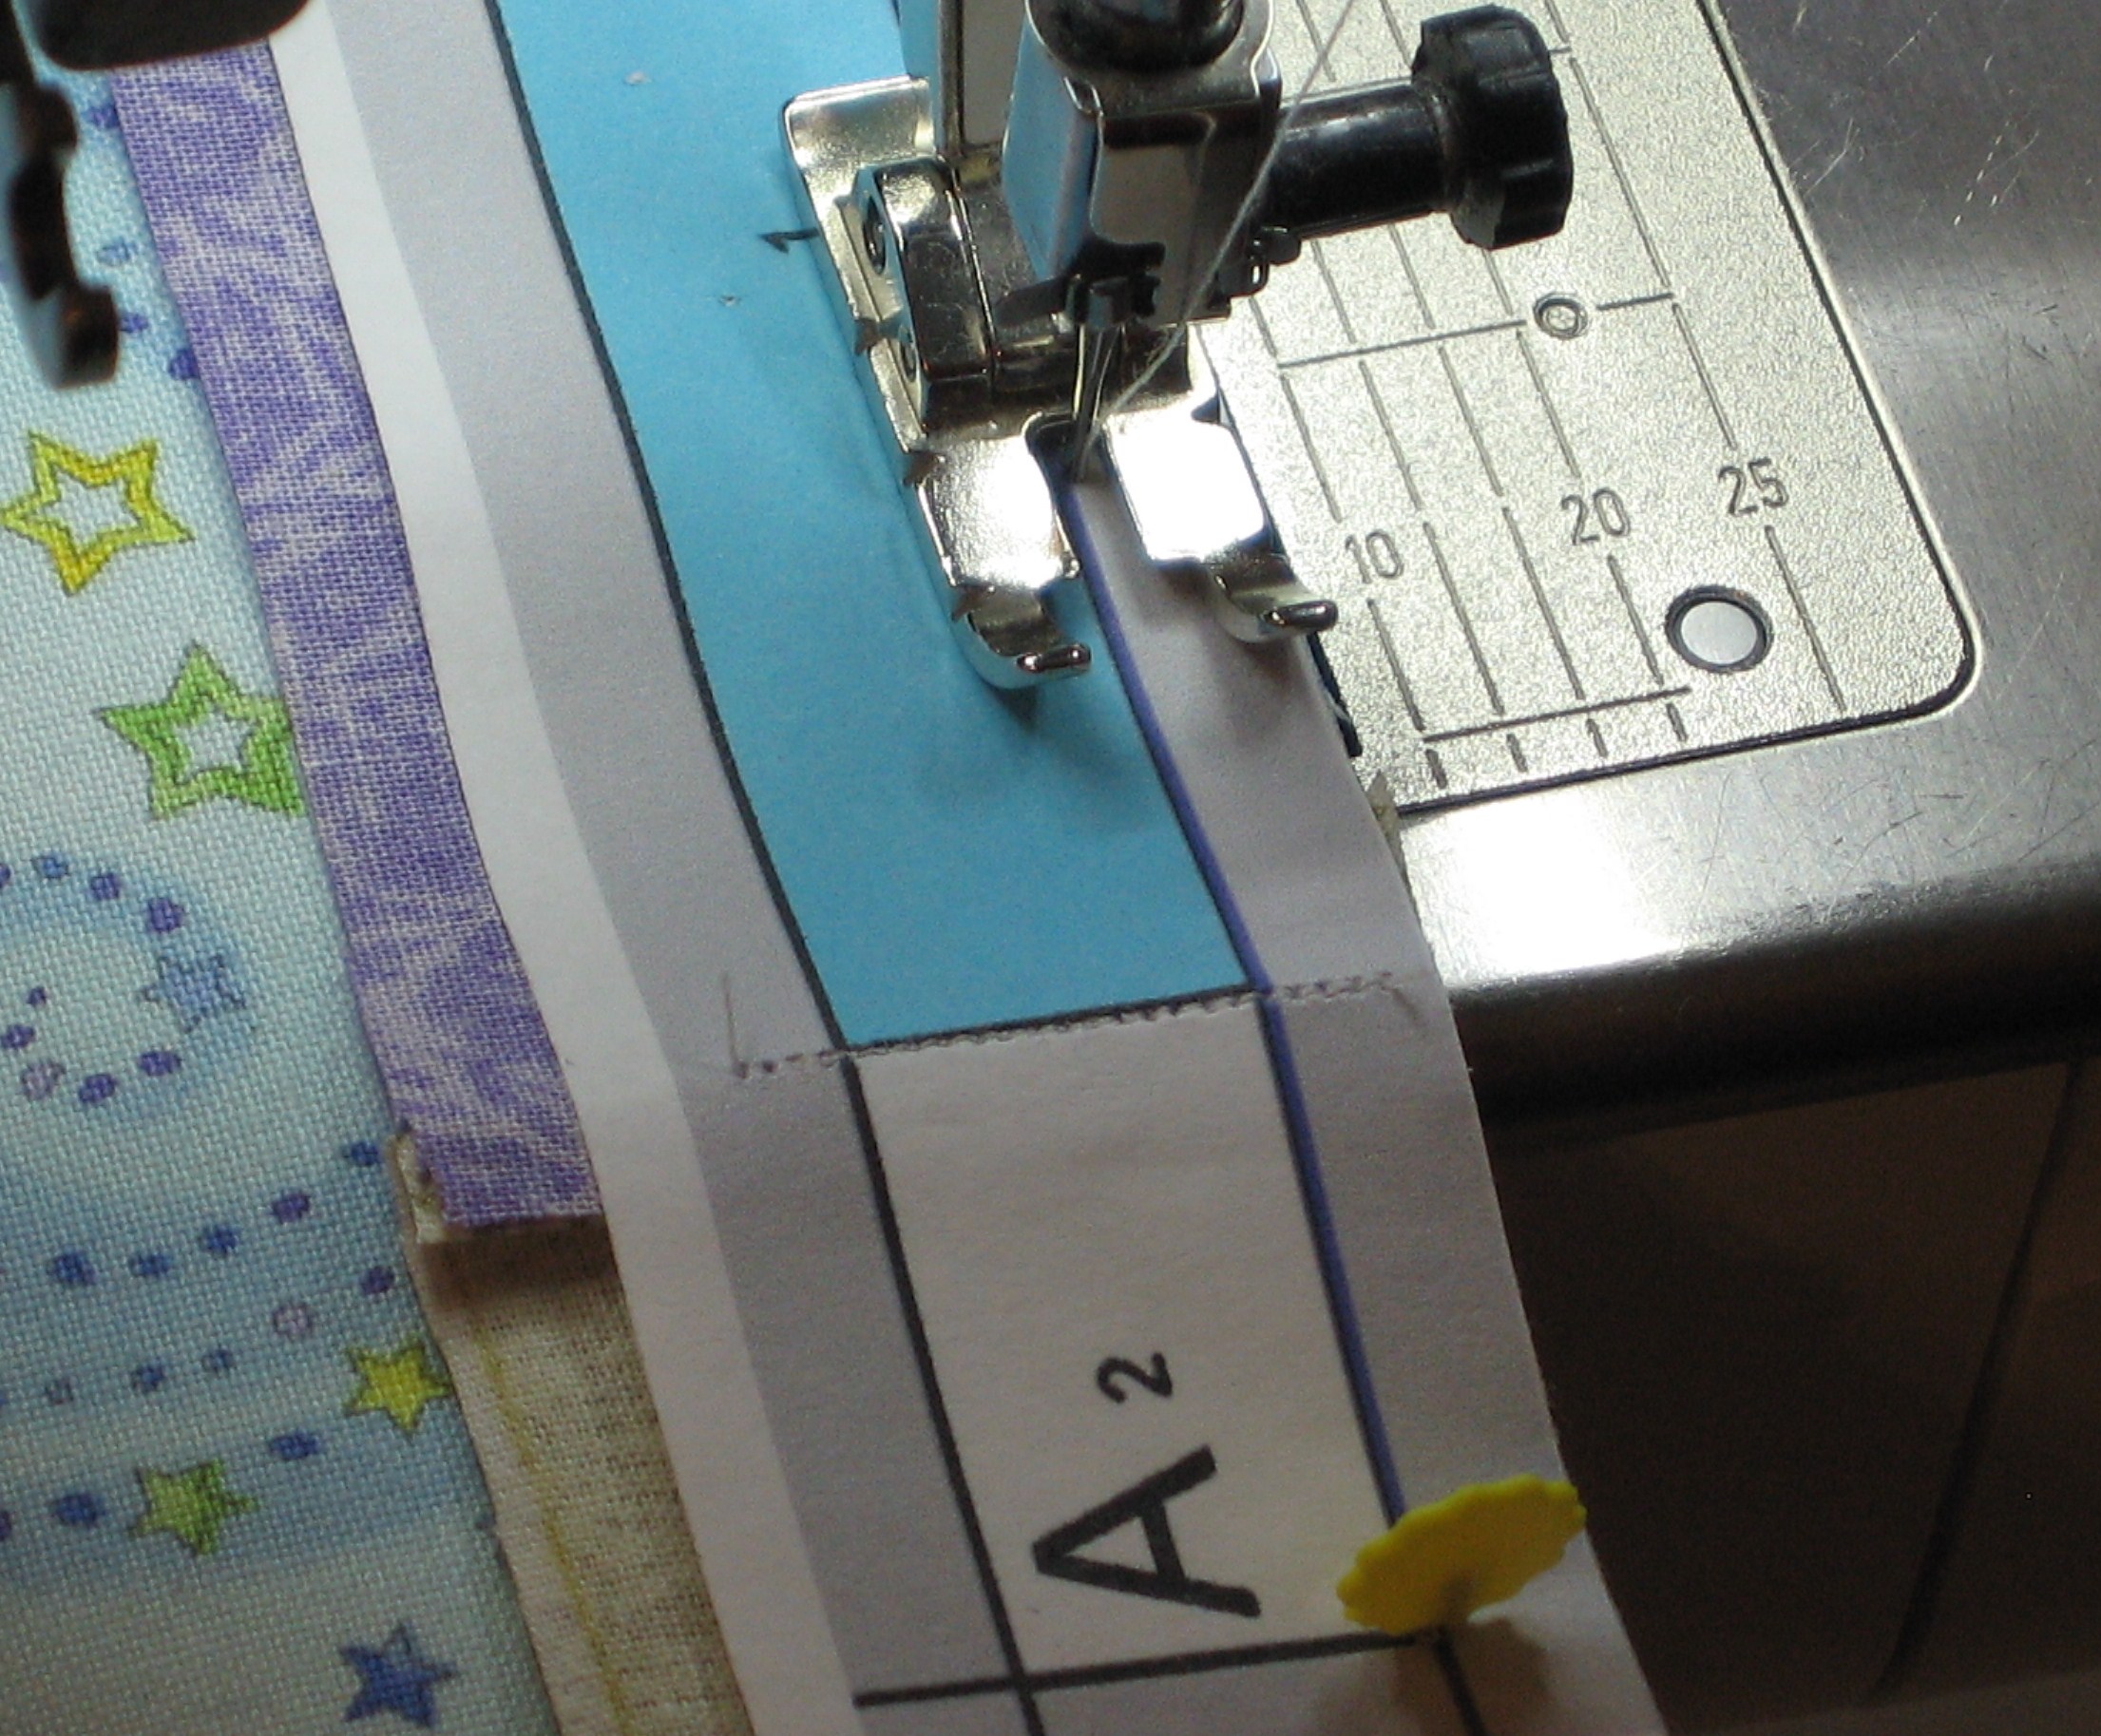
Using the pin keep the pattern aligned, stitch along the seam line.

Tip: Use Wonder Clips to hold the seam in place. (Not shown…Wonder Clips are awesome, but they came out after I originally wrote this tutorial!)

paper piecing tutorial (41)

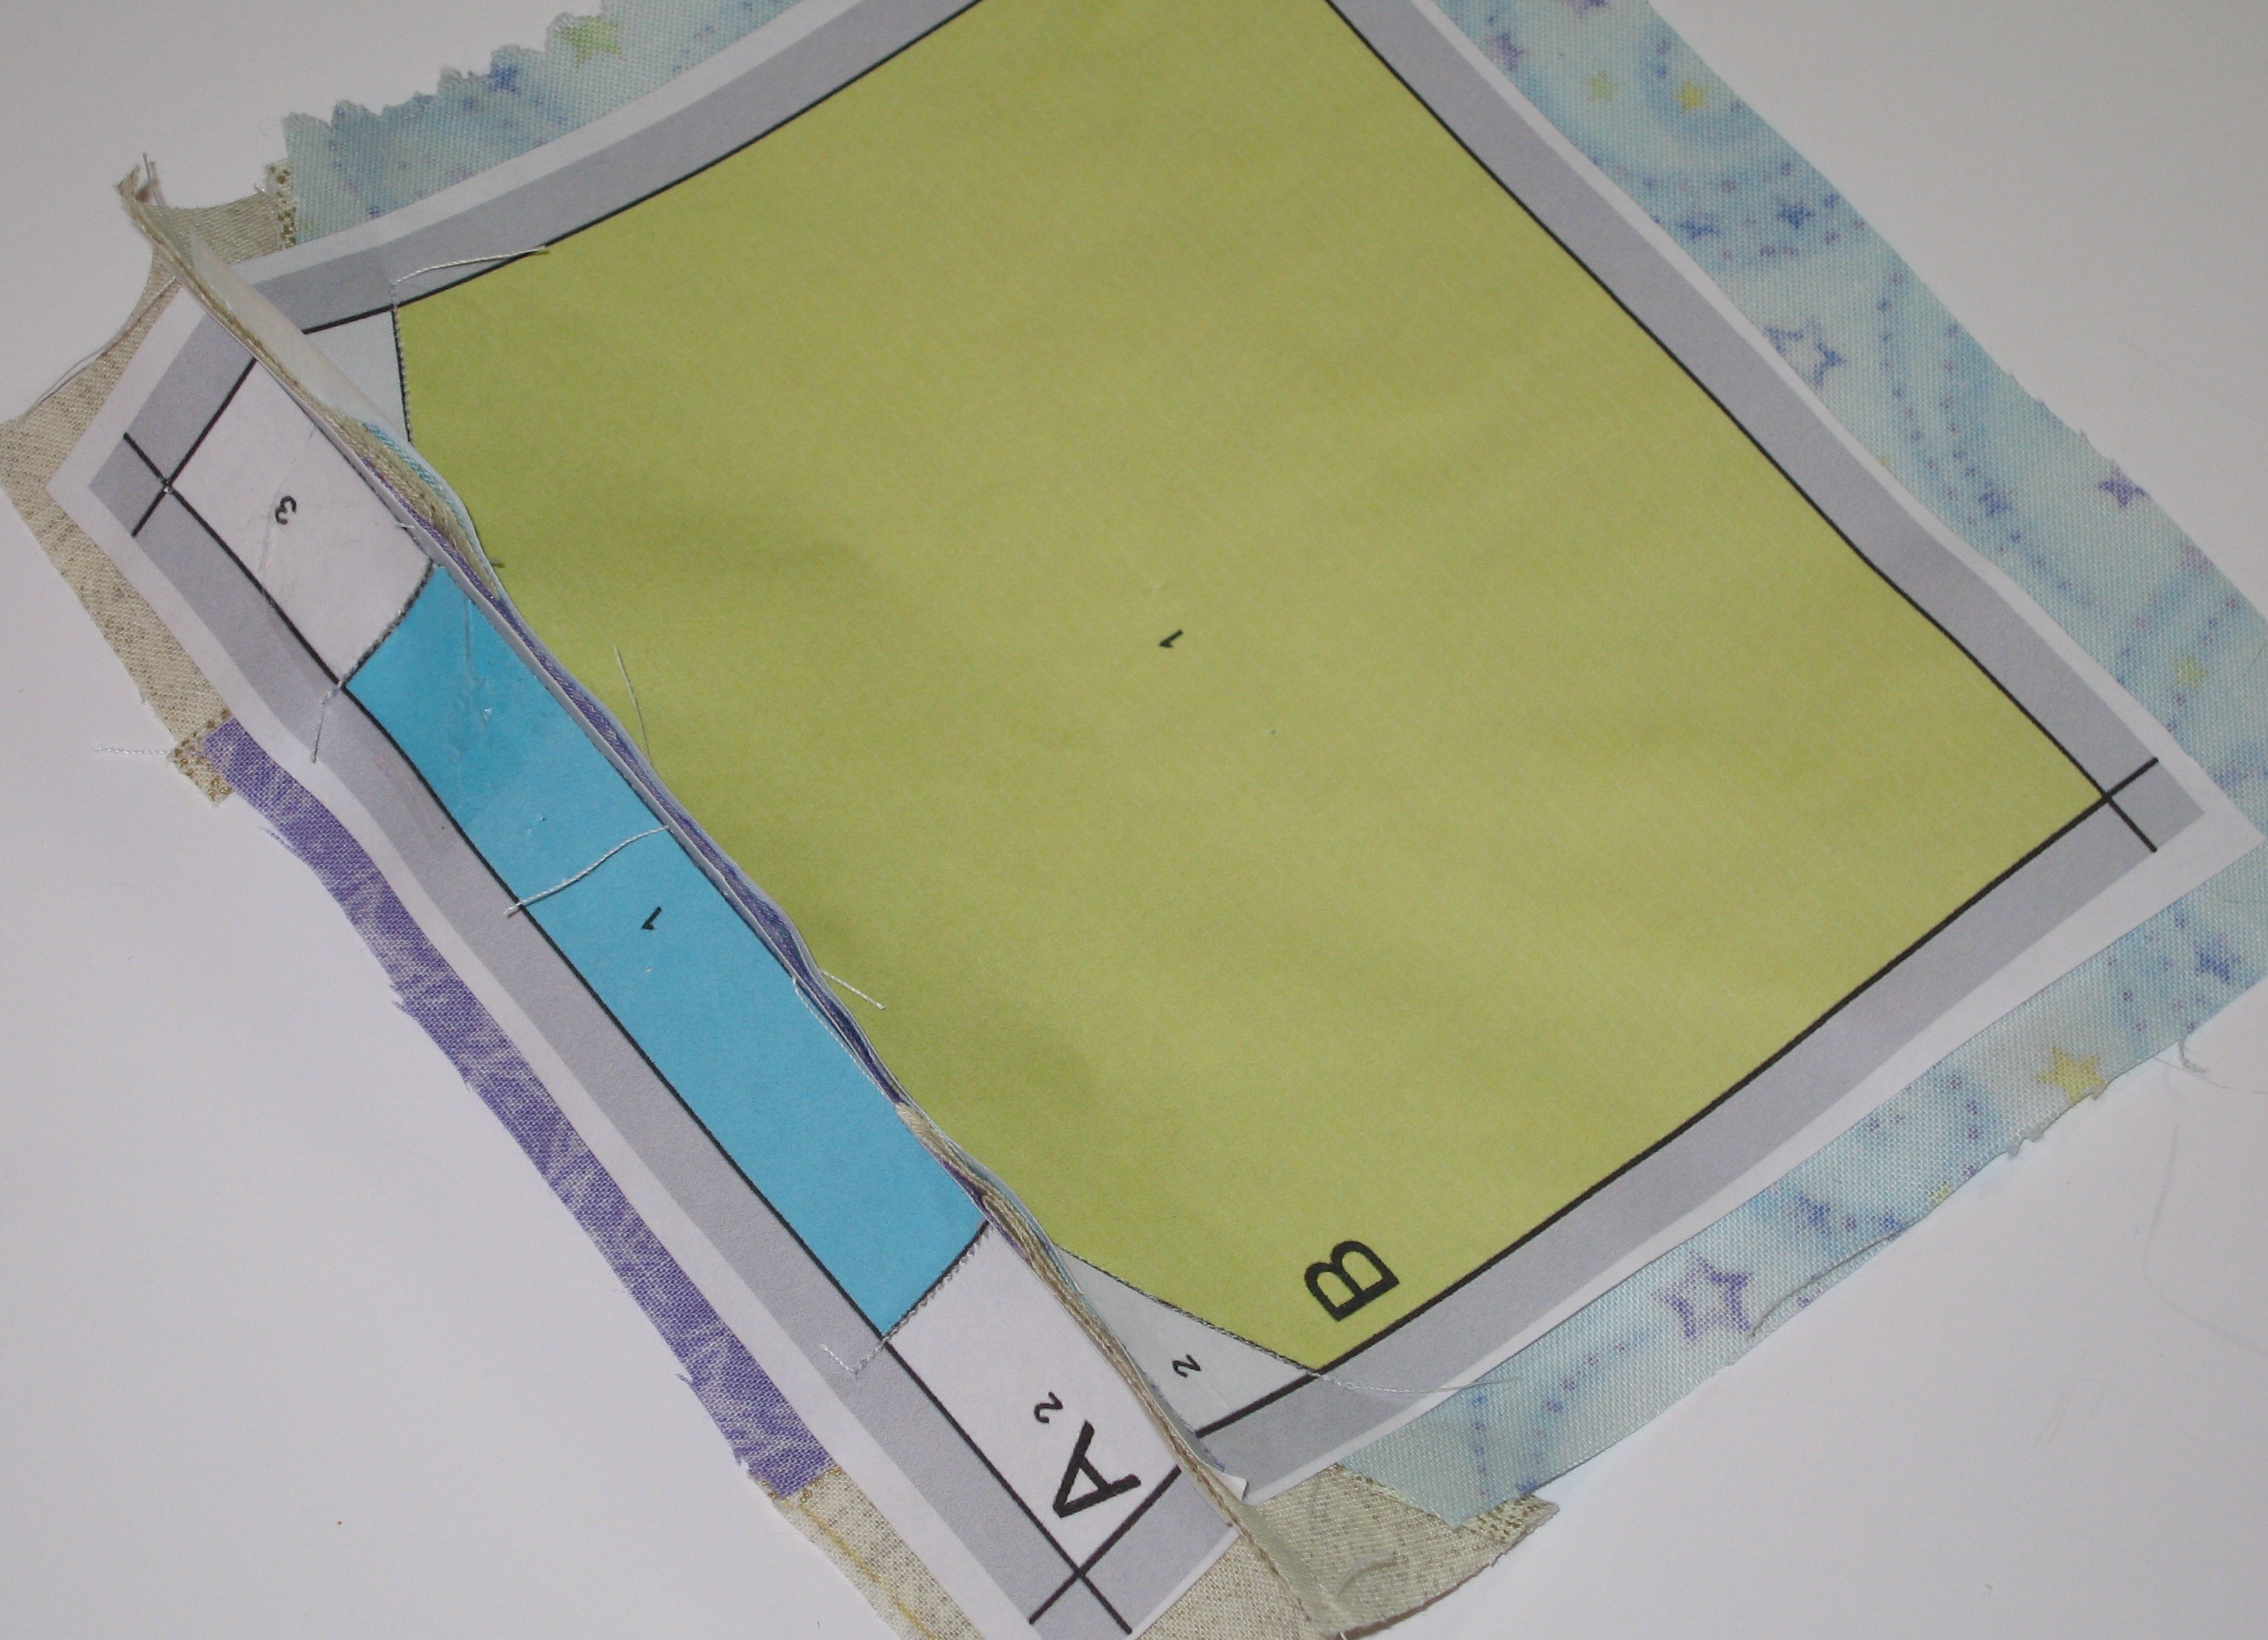
This is what you have now.

paper piecing tutorial (42)

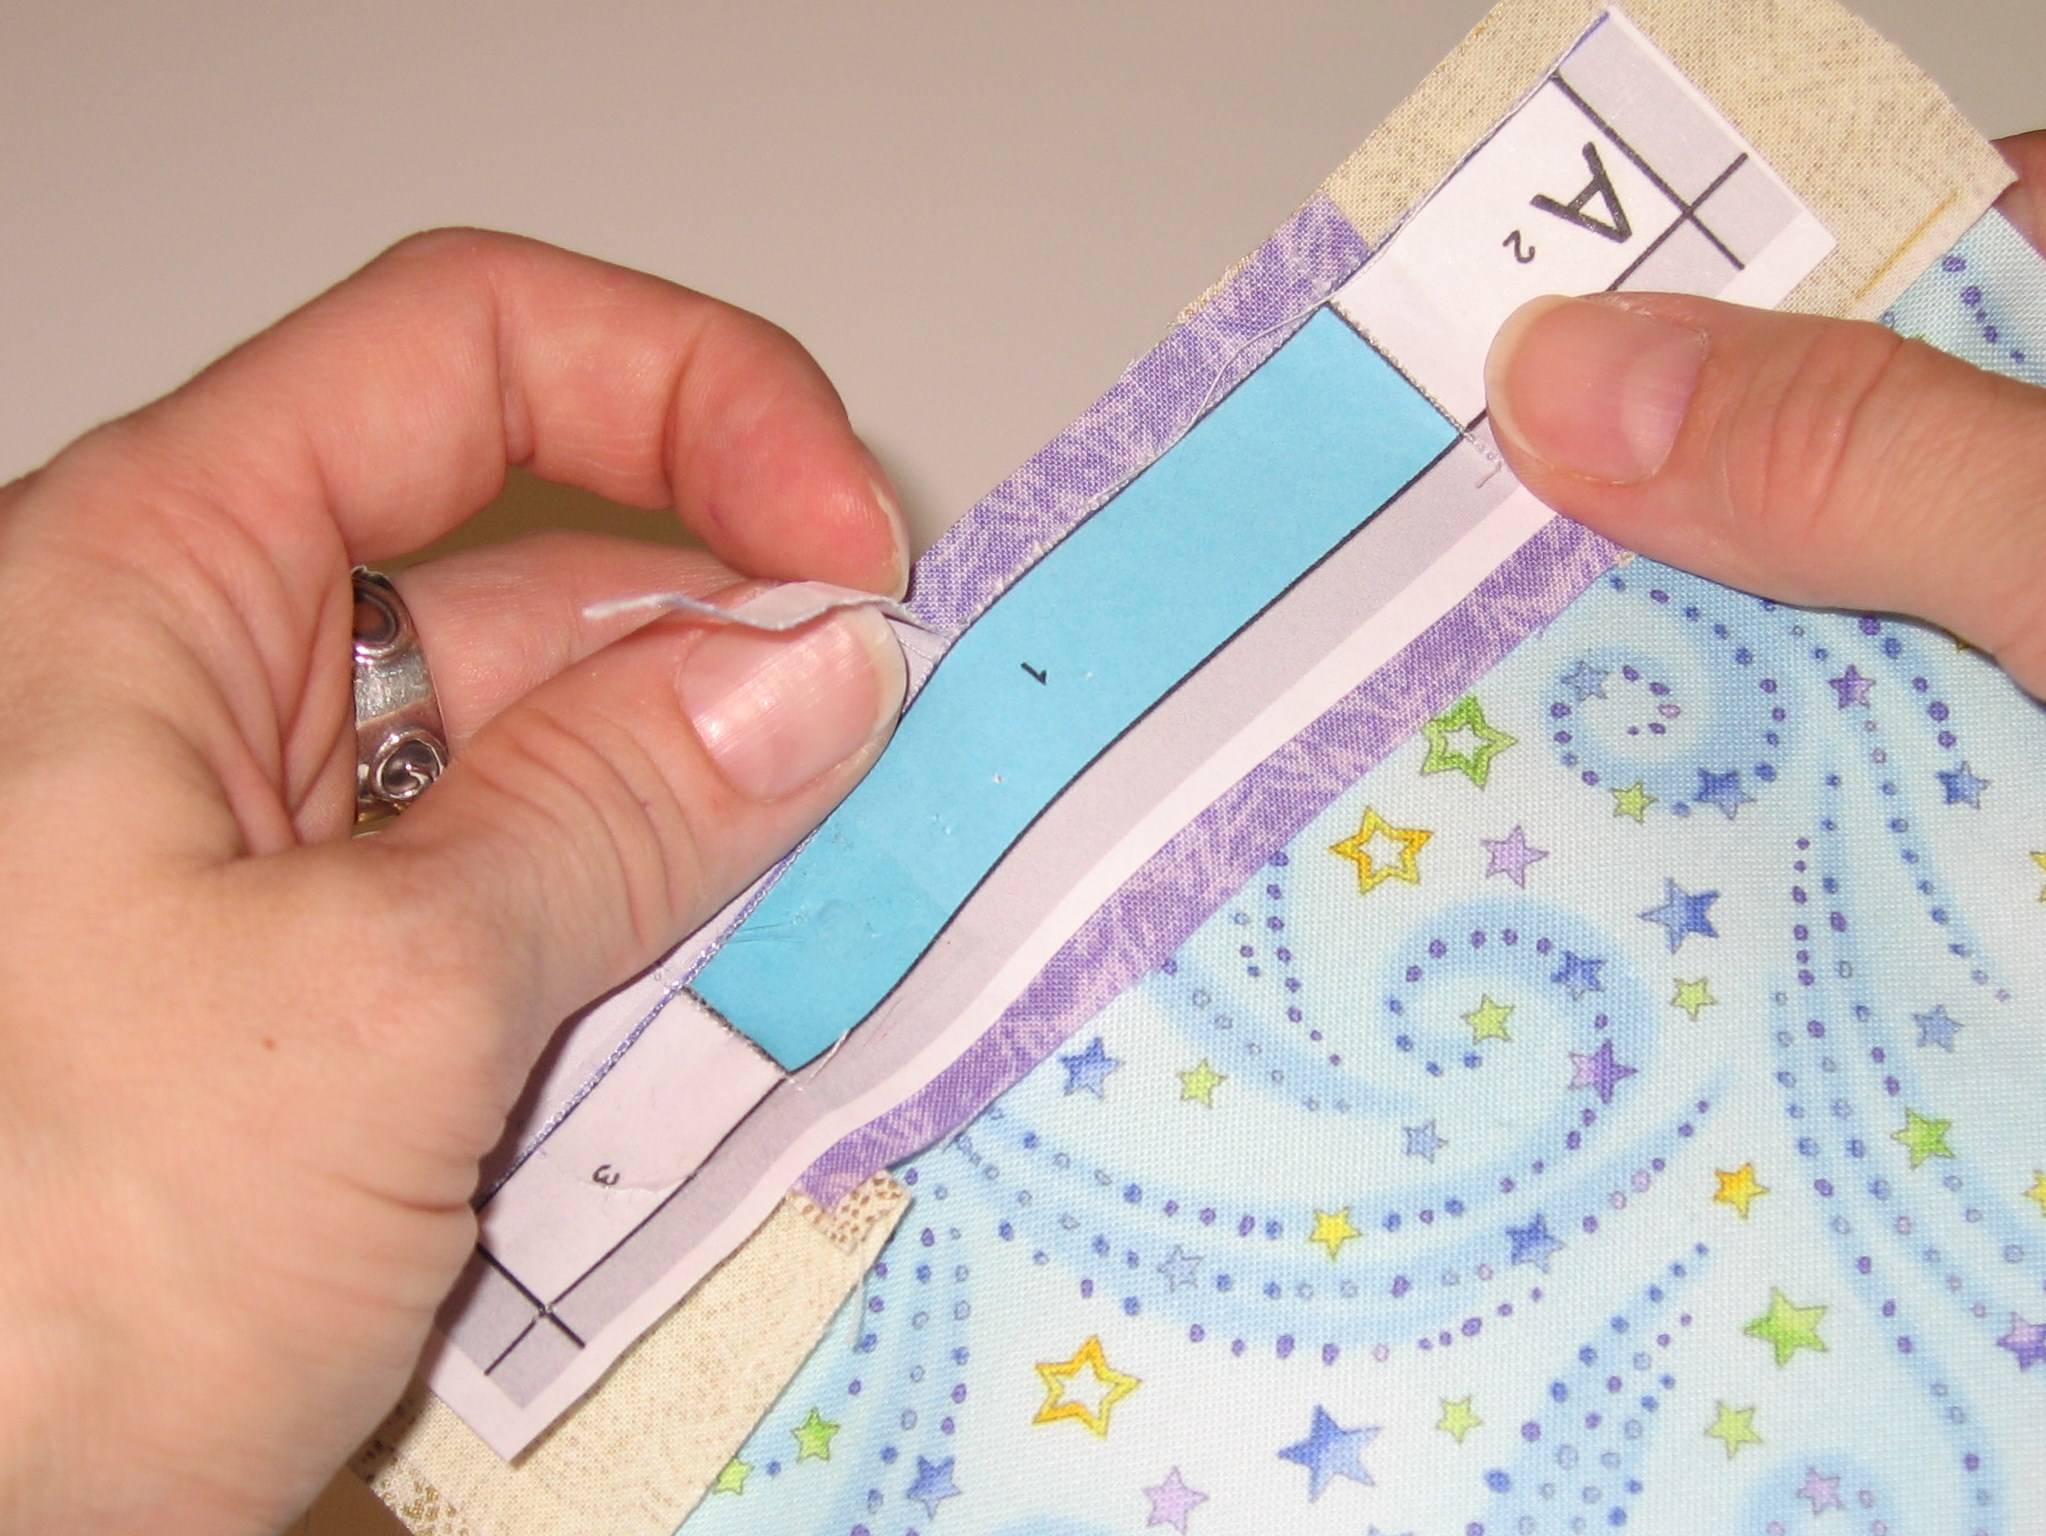
Remove the paper seam allowance that was just stitched on the “A” piece.

paper piecing tutorial (43)

Repeat for the “B” piece.

paper piecing tutorial (44)

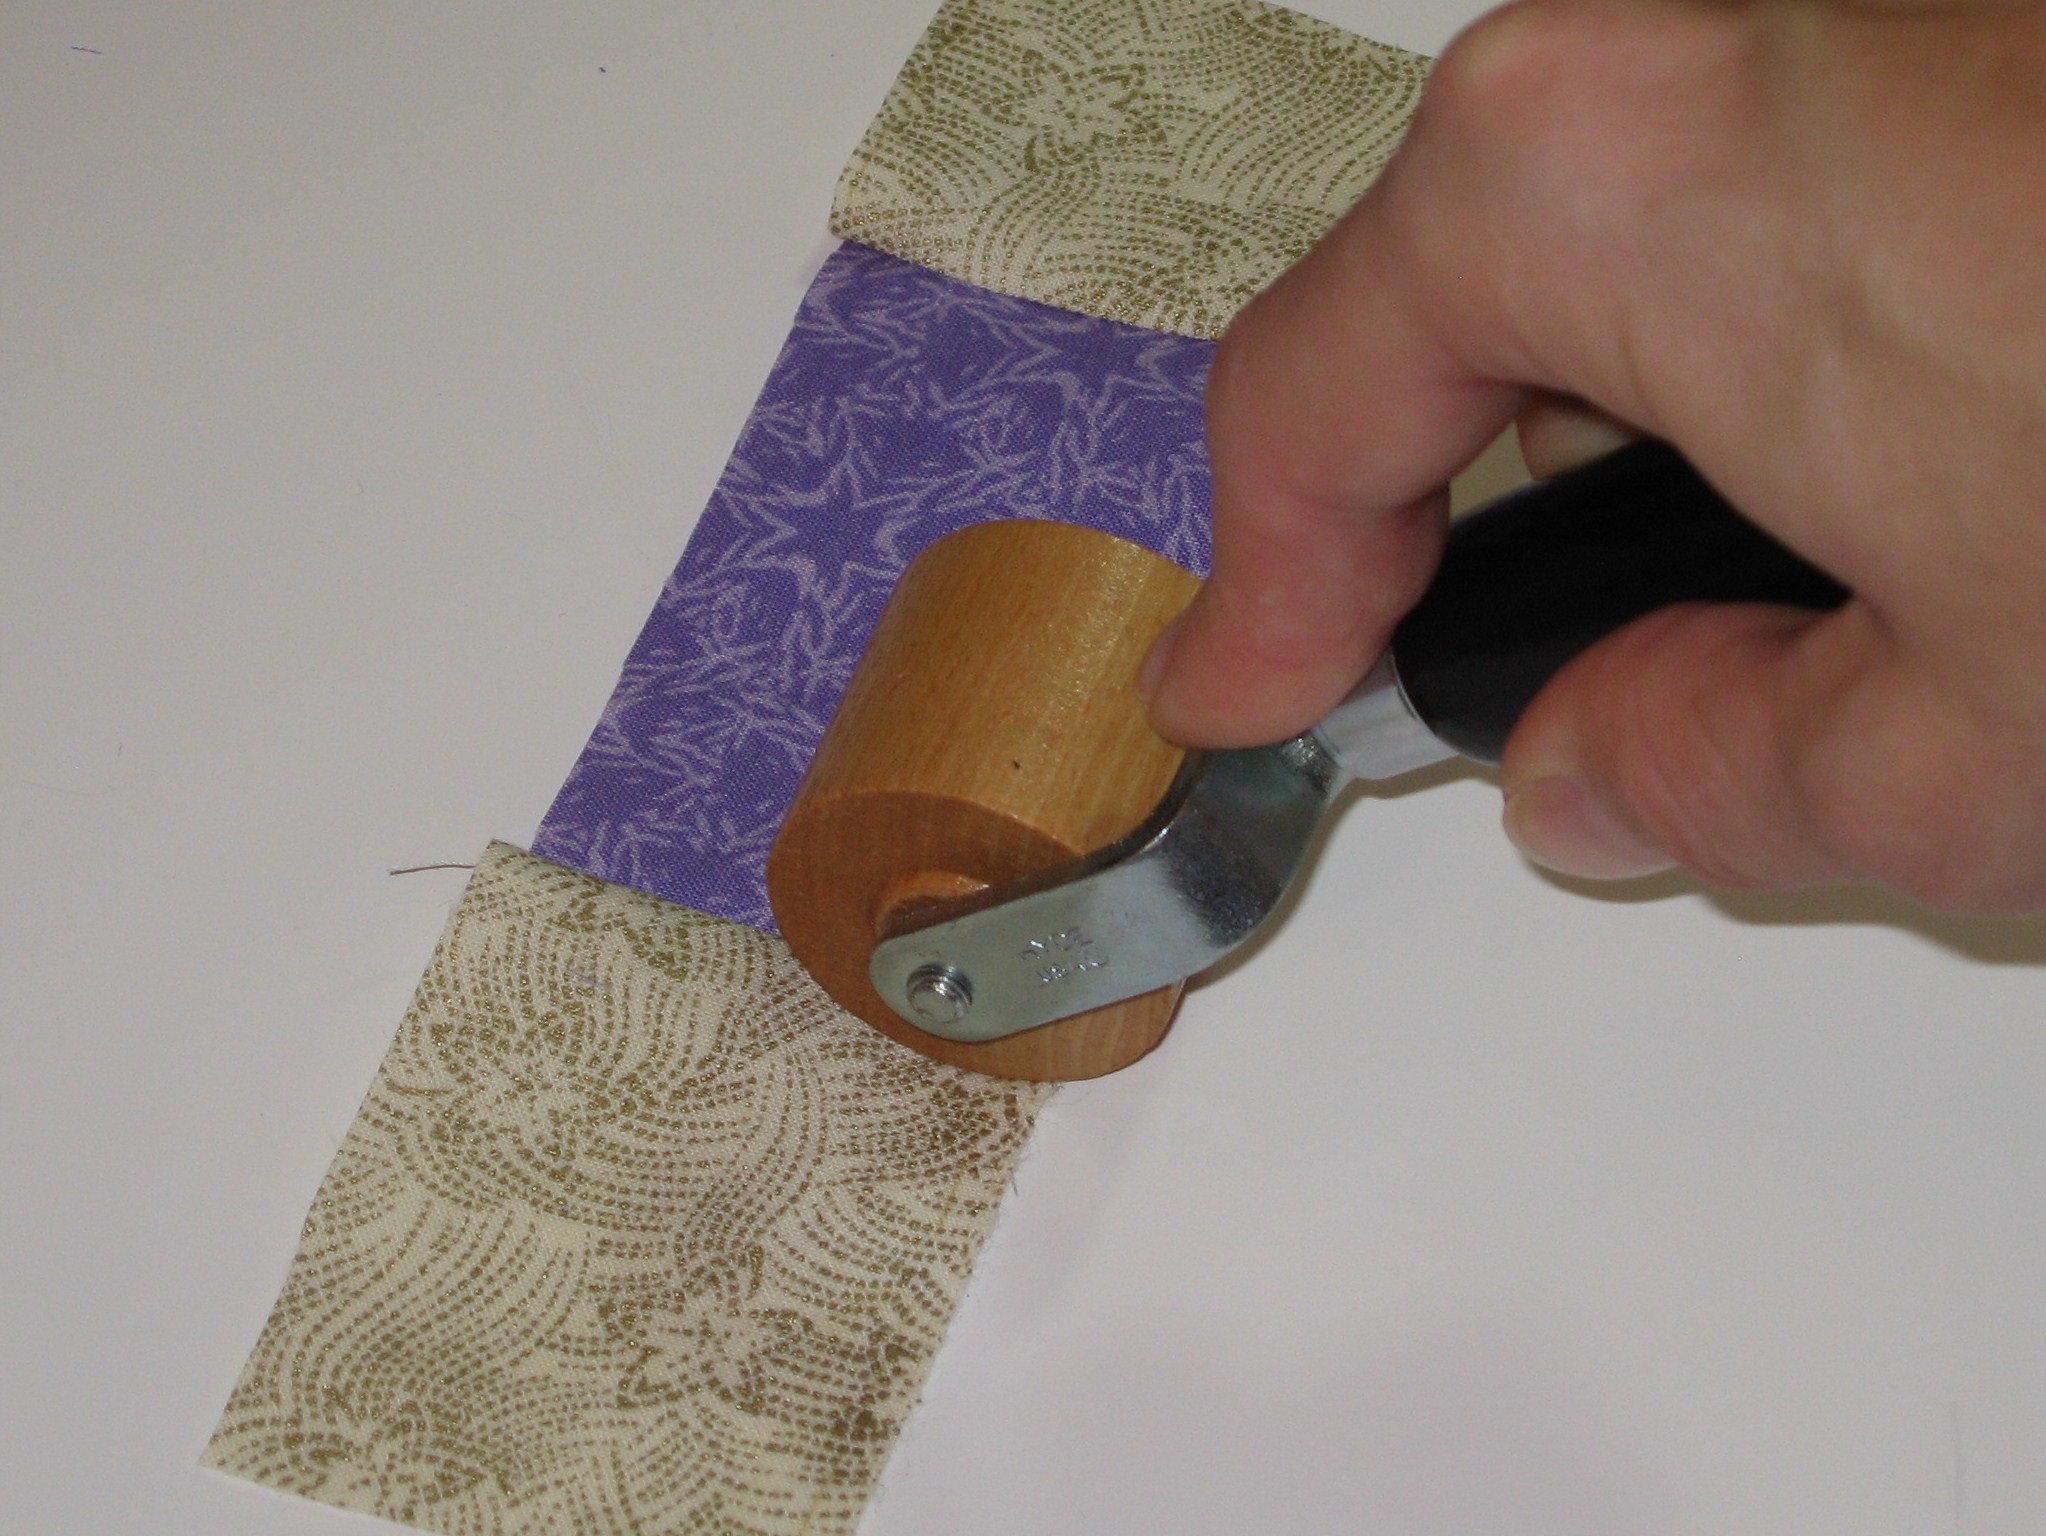
Open the block and press. The seam can be pressed to one side or pressed open. I usually let the fabric decide for me.

paper piecing tutorial (45).JPG

Now you have this from the front.

paper piecing tutorial (46).JPG

And you have this from the back.

paper piecing tutorial (48)

Time to square up the block! Align the ruler with the bottom edge with the seam allowance inside. Trim to 1/4″.

paper piecing tutorial (49).JPG

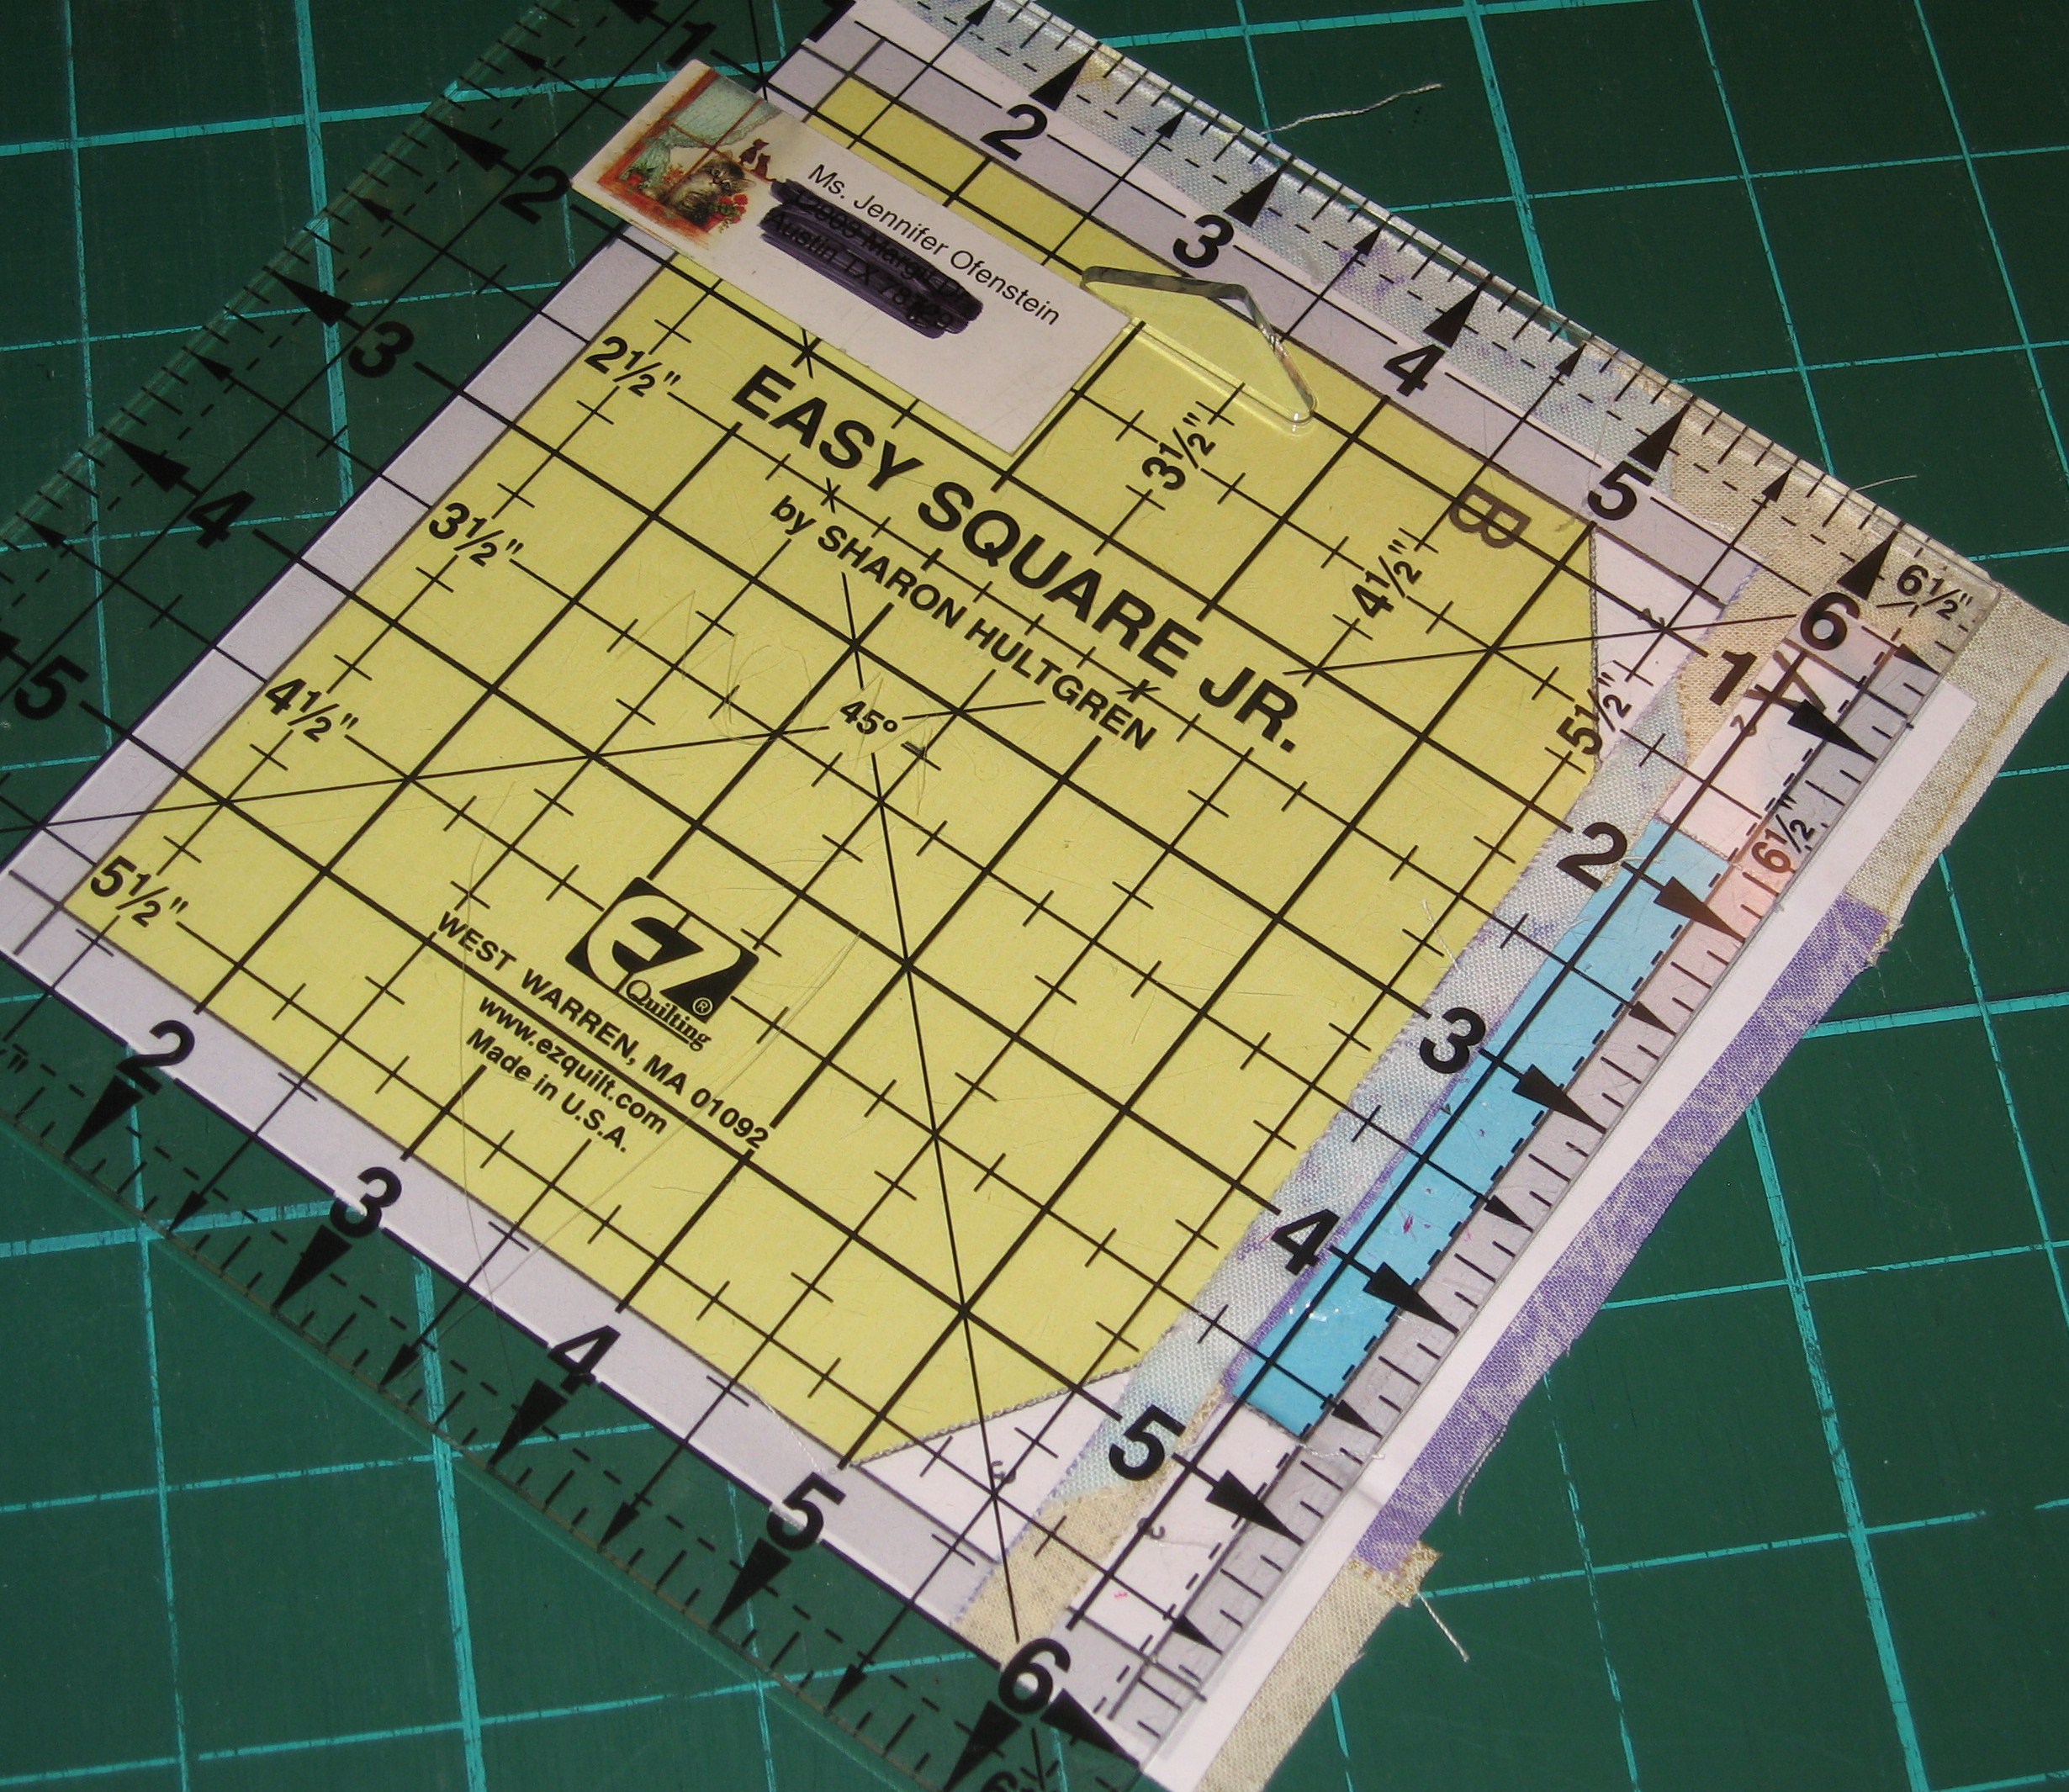
Using the first cut, square up the block to 5 1/2″. If the pattern is a little off, go with the ruler’s measurement and not the seam allowance on the pattern. Printers vary widely, as do patterns. You can make minor corrections by squaring up the block.

paper piecing tutorial (50).JPG

Now you have this…all squared up! Leave the paper attached until the block is in it’s final location. That will keep the bias seams from stretching.
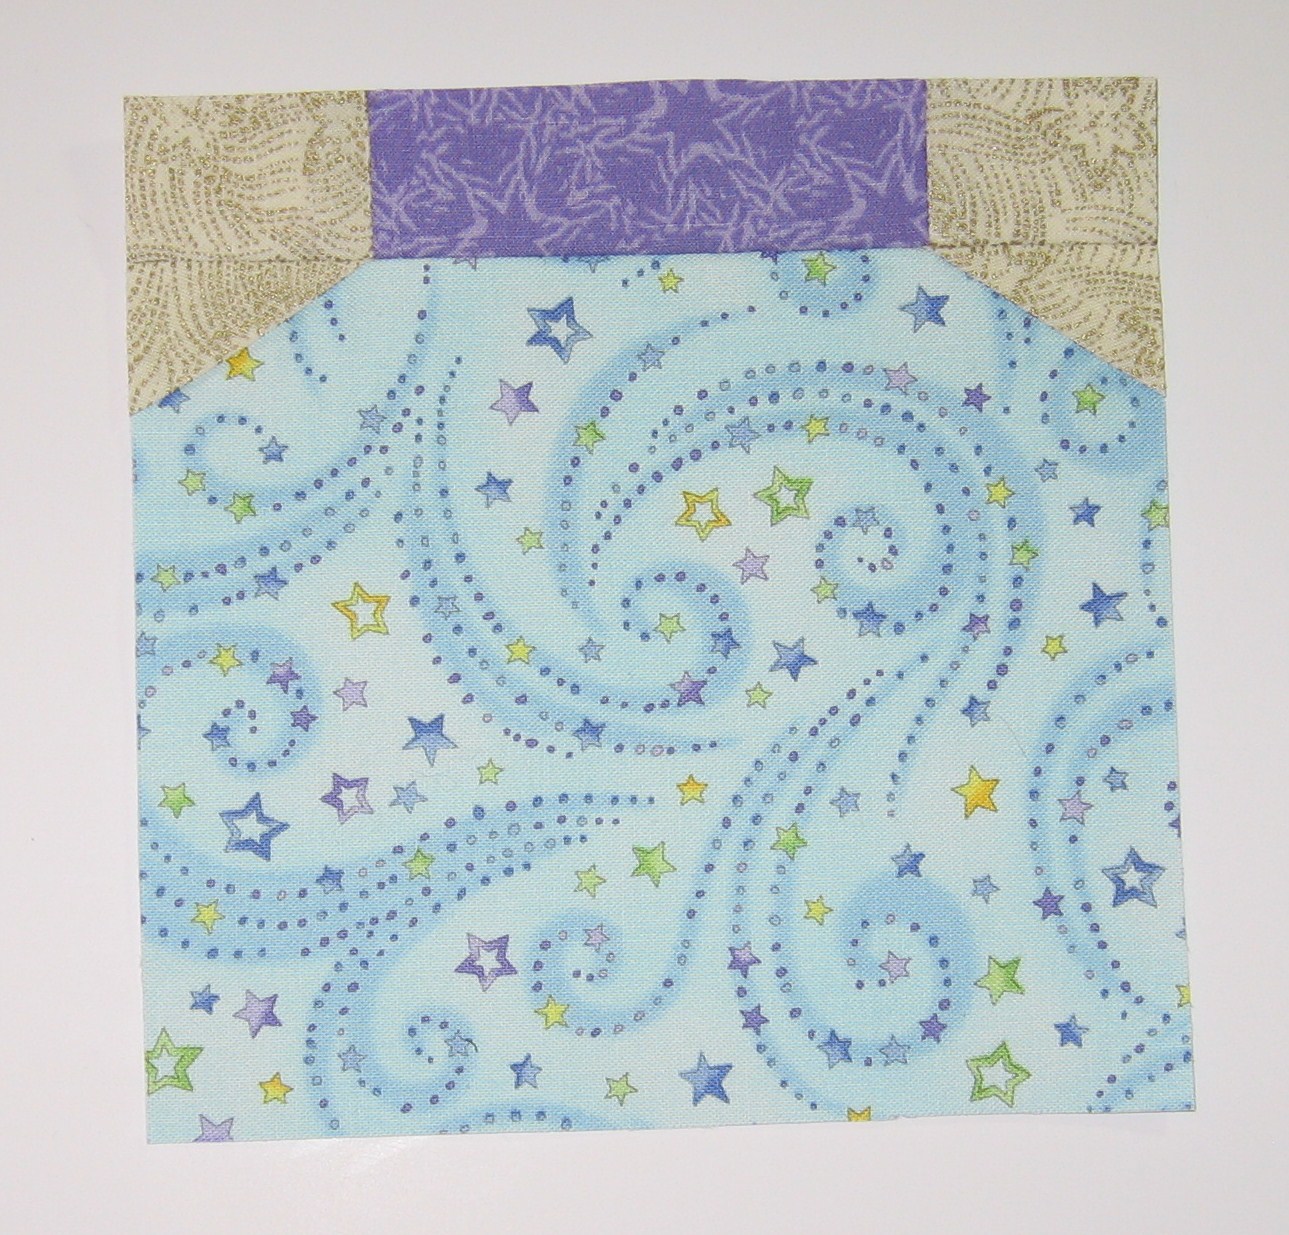
paper piecing tutorial (51)

From the front!

Use this block for quilts, pillows, bags, pot holders, wall hangings or anywhere else you’d use a square of fabric or a quilt block!

You can find lots of free patterns right here on Sewhooked!

Join the Sewhooked Facebook Group for community, support, & prizes!

signature-2016

Facebook ♥ Instagram 

Posts on this blog may contain affiliate links but I have no control over “sponsored posts” which are the price I pay for a less expensive website. Thank you for your understanding & support. ♥

Way Back Craft: Paper Piecing Evolution

Livejournal user lady_whitehaven turned on the Way Back Machine for me today when I found this post over at the Livejournal community quilting.

The dragon is an old design that I came up with way back in 2006 for a project that never quite made it to fruition.  That was probably a year after I started designing.  When I look at the original pattern, I can really see how much my design skill has evolved.

Sometime in 2007, when I had finally tested the dragon and realized how complicated it was, I pulled it off of sewhooked to be redesigned and then (apparently!) forgot about it.  I have since tried to be more careful about what patterns I post untested.  If I’m even a little unsure of the pattern design, I’ll hold onto it until I’ve had the chance to test it myself.

New, cleaned up and simplified version:


“Green Dragon” Pattern

The original version looks okay, but the pattern is scary, messy & has too many pieces!

First scary dragon pattern

When I woke up this morning, I had no intention of redrawing or reworking a pattern. I had kids to get to school (done!), a hubby to drop off at the airport (done!) and groceries to buy (um…not so done!).  Thank you, lady_whitehaven, for inspiring me to have a second look and give the “Green Dragon” a second life.

“Green Dragon” is now housed on the Paper Pieced Pattern page at sewhooked. If you give it a try, or any of my other patterns or projects a try, I’d love to see a photo. Email me or add it to the Friends of Sewhooked flickr group.

Have a happy weekend!

coming soon – Guest Designer profiles!

This is part of my “Way Back Craft” series’; patterns, crafts, tutorials and general crafty memories before the days of this craft blog.

Paper Piecing: Cluck Cluck

Chickens for hardhatcat

How about a new pattern for a beautiful Sunday?   I  designed a fun rooster for the above block which was gifted to hardhatcat for the LiveJournal group birthday_blocks. I had a lot of fun making this one and I think it’s fair to say it’s one of my new favorites!

For convenience, I created a both a left and a right pattern. Both work up to 5″ finished. The block above was made using one of each pattern alternated with a four patch. Easy-peasy and cute to boot!

Both patterns © Jennifer Ofenstein

Cat's Rooster (left)

Cat’s Rooster Pattern (left)

Cat's Rooster (right)

Cat’s Rooster Pattern (right)

If you make your own rooster, I’d love to see it! Post it in the Friends of Sewhooked Flickr Group.

Happy crafting!


signature-2016

downloads_wordmark_white_on_coral

Craftsy Pattern Shop ♥ Etsy Shop

Facebook ♥ Sewhooked on FB ♥ Sewhooked Facebook Group

Instagram ♥ Flickr ♥ Twitter

Posts on this blog contain affiliate links. Thank you for your support. ♥

Paper Piecing: Bag Lady

IMG_0360
Sue Upton, of PotterCast, receiving her Hufflepuff gift bag
during Lumos in Las Vegas, July 2006.

While I love all crafts, paper piecing is my One True Craft. (bold, capitalized, giant font ONE TRUE CRAFT). I love designing, making and sharing. The ideas come faster than I could ever possibly get them all down.

While paper piecing is definitely a quilting technique, quilting is definitely not just for quilts. I love using quilt elements in bags, pillows, clothing and art pieces.

I thought it would be fun to do a photo round up of some of the bags in which I’ve used paper piecing and other quilting elements.

All bags and block patterns were designed by me. Many of the patterns are available for free on sewhooked (see links below).

2 Hufflepuff gift bags
Hufflepuff Gift Bags (as seen above)
Gryffindor Gift bag for Melissa Anelli
Gryffindor Gift Bag, made for Melissa Anelli of PotterCast (gifted at Lumos 2006).
Slytherin gift bag for John Noe
Slytherin Gift Bag made for John Noe of PotterCast (gifted at Lumos 2006)
Hope's Messenger Bag for Vegas
Gryffindor Messenger Bag, made for Hope, 2006
Jen's Ravenclaw messenger bag for Vegas
Ravenclaw Messenger Bag, this one is mine all mine! Made in 2006.
mini-messenger Bday gift for Joseé
Ravenclaw mini-messenger, made for Josée, 2006.Gryffindor pencil bag
Gryffindor Pencil Bag made for E, 2006

Hufflepuff bag for delana - back
Hufflepuff bag made for Delana, 2007.
Pirate Computer Bag
Jolly Roger Computer Bag (this one is mine, too!), 2007.
Kimmer's Ravenclaw Bag
Ravenclaw Messenger made for Kimmers, 2007.
LIzzie's Pigwidgeon Bag
Pigwidgeon Messenger Bag made for Lizzie, 2007.
Yellow Submarine Bag
Yellow Submarine bag made for Steph, 2006.
Gareth's X-Men Bag
X-Men Messenger Bag made for G, 2006.

Recipe: Autumn Apple Cookies

Apple Cookies

Sometimes, the best treats are the ones that you never planned to make.

My kids have been under the weather and everyone has been feeling a little low. I wanted to make a treat to bring up the general household spirit, but a quick rummage through the kitchen (and the knowledge that tomorrow is my grocery day!) determined that I had precious little to work with. Among other things, I found a couple of apples and some nuts. Throw that together with some basic baking supplies and Autumn Apple Cookies were born.

Sweet and a little bit fluffy, they hit the spot and made everyone feel just a tiny bit better!

Autumn Apple Cookies
by Jennifer Ofenstein
http://www.sewhooked.org

3/4 cup shortening
1 1/4 cup light brown sugar, packed
1/4 cup milk
2 eggs
1 cup flour
1 cup whole wheat flour
1 cup whole oats
1 tsp cinnamon
1/4 tsp nutmeg
1 tsp baking soda
1/2 tsp salt
1 tsp vanilla
1 cup apples, peeled, cored & finely chopped
1/2 cup chopped walnuts or pecans

Heat oven to 375 degrees F. Cream shortening and sugar, add milk. Blend in eggs one at a time. In a separate bowl, mix flour, oats, cinnamon, nutmeg, baking soda and salt. Slowly add to creamed mixture. Stir in vanilla. Fold in apples and nuts.

Drop by teaspoonfuls (or with a cookie scoop) onto a cookie sheet lined with parchment paper. Bake for 10 minutes. Allow to cool two minutes then move to a wire rack to cool completely.

also posted on cut out + keep

Quilty Tie-In…

While we’re talking apples, how about an apple paper pieced block? It’s zero calories and just as fun to make!

For more patterns, visit Paper Piecing on sewhooked.