Feeling ambitious? Add some nine-patches or other 5″ blocks of your choice! This layout also includes a 1″ strip of background fabric between the pumpkin and other blocks.
For a slightly different look, try using the 10″ pumpkin pattern from Week 30 of the 2015 Project of Doom!
Are you making projects from 31 Days of Halloween? Share your photos with my flickr group! There will be a fun surprise after Halloween for one lucky winner!
Don’t want to applique? You can also hand embroider or even stencil this pattern!
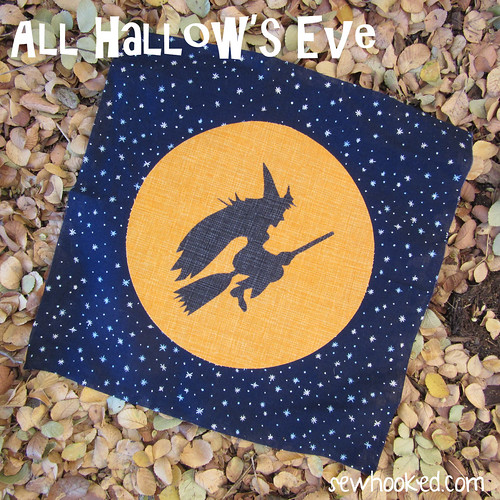
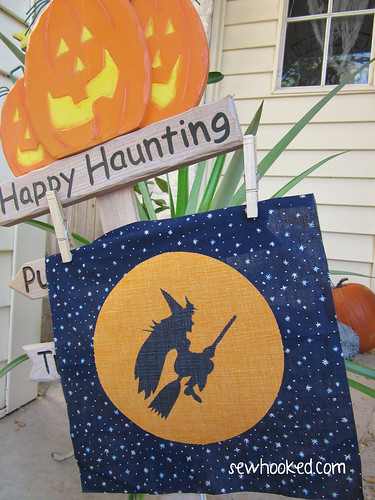
My opinion of the traditional Halloween witch has changed greatly since 1997, so our new friend here is much cuter and definitely curvier. I imagine she’s wearing her Halloween best as she rides her trusty broomstick to a fun party, perhaps in Hogsmeade!
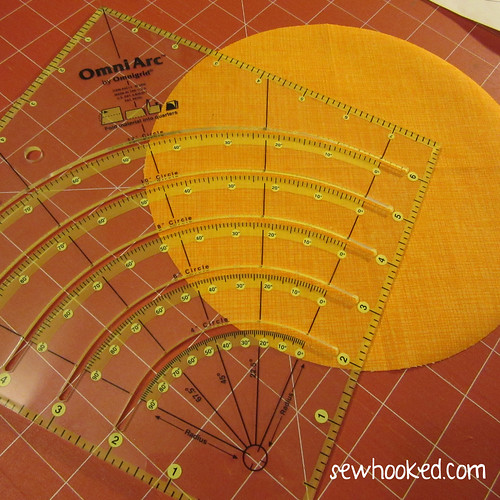
If you are lucky enough to have an OmniArc Ruler, try using the 8″ circle guide to create your moon.
I ironed my fusible webbing in place first and then folded the orange fabric before cutting with my rotary cutter. Follow the instructions as printed on the ruler.
Your moon will be about 1/2″ bigger than the one in the pattern, but it will still work great for, oh, say a 12″ quilt block or fun Halloween cushion!
No such luck? You can also cut around a ceramic plate with your rotary cutter!
Are you making projects from 31 Days of Halloween? Share your photos with my flickr group! There will be a fun surprise after Halloween for one lucky winner!
We’re doing something a little bit different today on 31 Days of Halloween! Below, you’ll find a fun recipe and video from my dear friend and fellow TTMTer, Cat Magraith.
The following Talk to Me Tuesday is a much-watch, with Cat’s young daughter Tara being the star of this Food Network worthy show!
As you probably noticed in her video, Cat is in Australia, so I’ve made a few recipe notations for my American friends. You’ll find those in italics. Her recipe is the bold text.
¾ cup Sugar – This cake is sweet, but not super sweet. If you prefer sweeter, bump your sugar up to 1 cup.
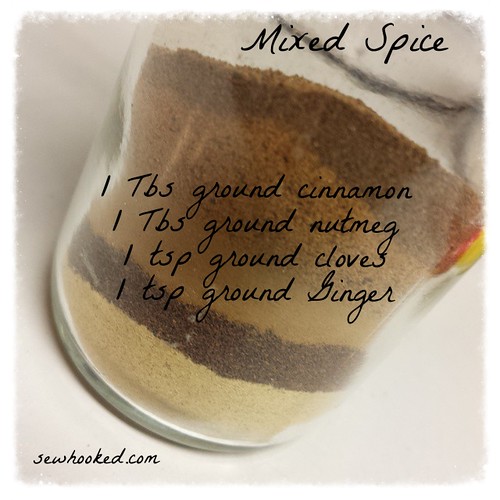
1 tsp Mixed Spice (or Chinese 5 spice)– Mixed Spice can be hard to come by in the U.S., but you can buy it here if you’d like to try it. In a pinch, you can use Pumpkin Pie Spice or make your own Mixed Spice (below).
Are you making projects from 31 Days of Halloween? Share your photos with my flickr group! There will be a fun surprise after Halloween for one lucky winner!
It’s been a tutorial kind of week here on Sewhooked, so I thought we’d keep it up by revisiting another old favorite for 31 Days of Halloween!
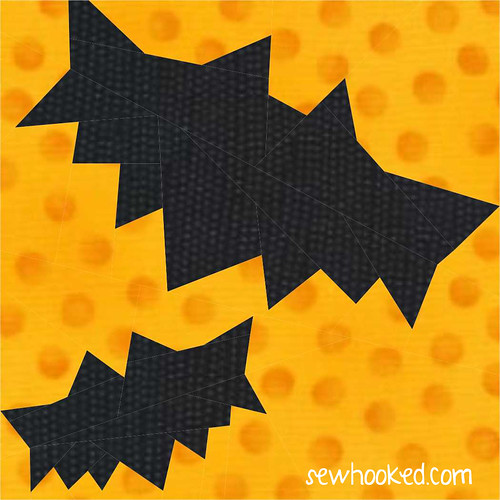
Bats are a fact of life here in Austin. Even though they aren’t just for Halloween around here, they are one of my family’s favorite way to decorate!
Are you making projects from 31 Days of Halloween? Share your photos with my flickr group! There will be a fun surprise after Halloween for one lucky winner!
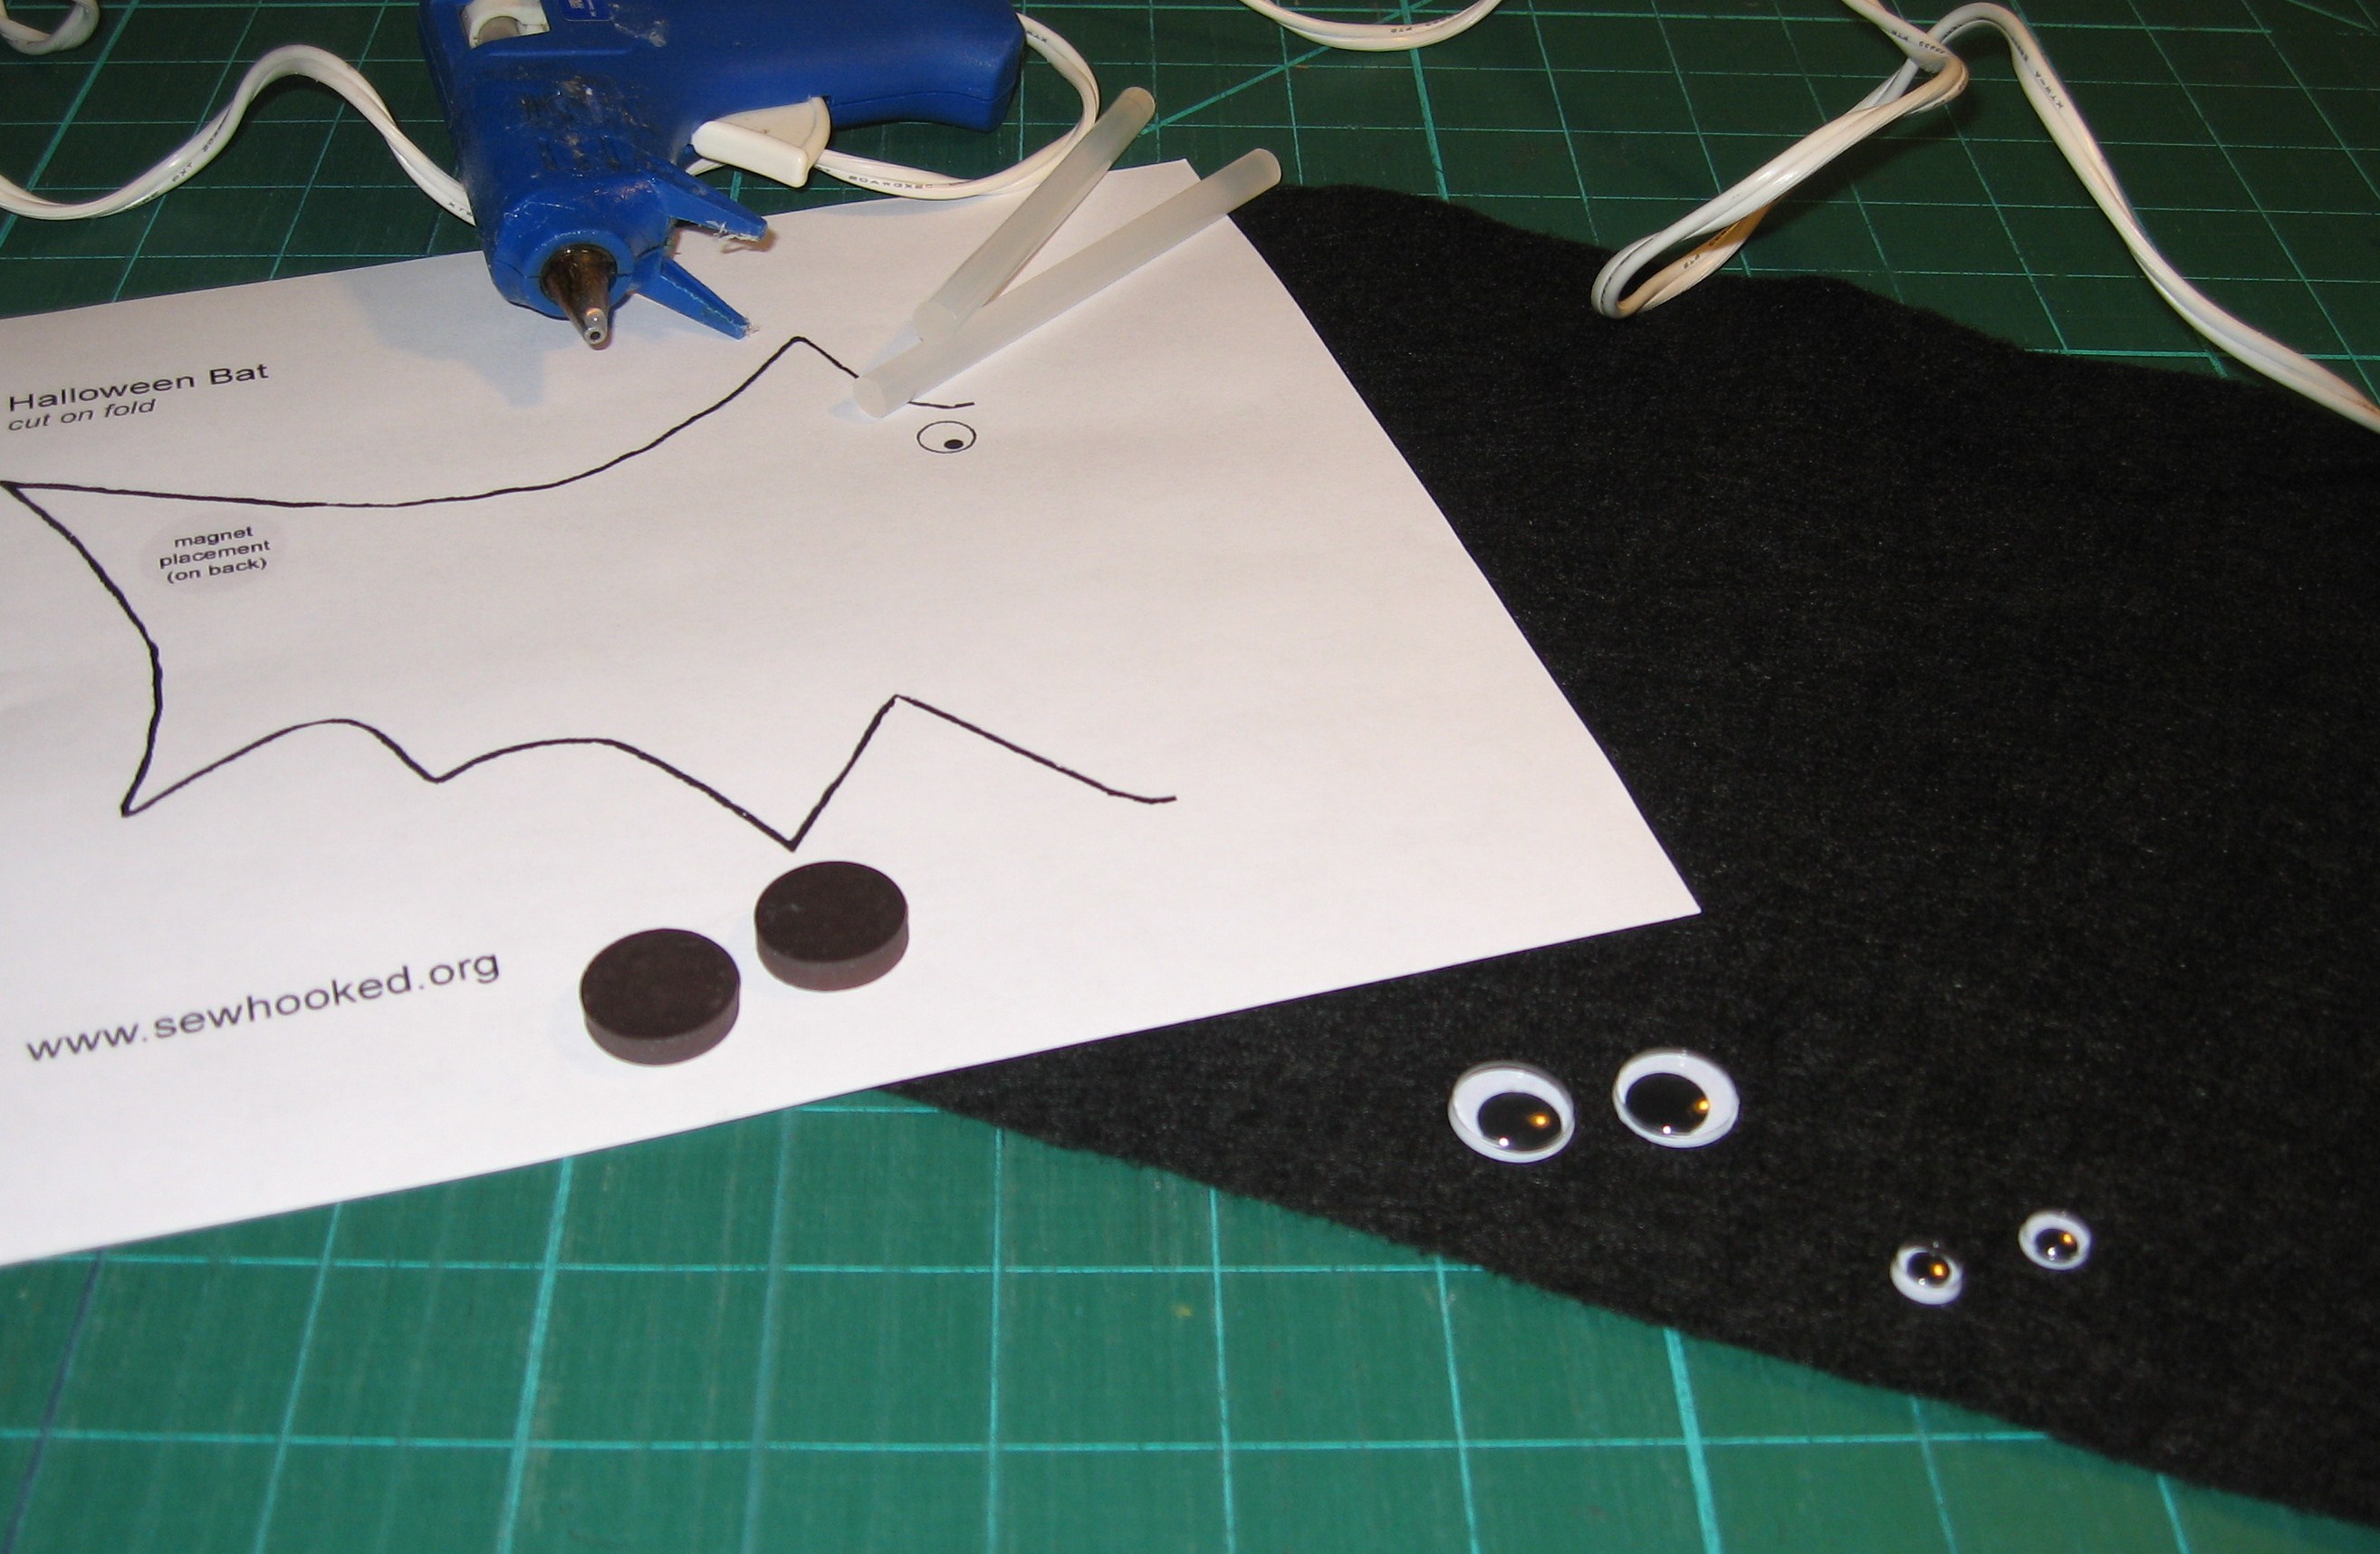
For almost 20 years now, my family and I have decorated our front door with felt bats. They are fun, fast and easy to make!
You’ll need:
Felt Bat Template (optional: increase or decrease the size depending on your needs)
Fold the acrylic felt lengthwise in half. Pin the Bat pattern on the fold.
Cut around the bat shaped pattern, leaving the fold intact. Fold fabric out. Use hot melt glue to attach google eyes, being careful to use only a dot of glue. Use pattern placement as a guide.
Use the same method to add the magnets to the back of the bat, using the placement shown on the pattern.
Two sizes of eyes.
I do love spelunking in old blog posts! My front door hasn’t been this color since 2013!
Are you making projects from 31 Days of Halloween? Share your photos with my flickr group! There will be a fun surprise after Halloween for one lucky winner!
♥ Jennifer O
Posts on this blog may contain affiliate links to help cover the cost of my website. I thank you for your generous support. ♥
First thing is first, a BIG HAPPY BIRTHDAY to my best girlfriend, Jewells!
*throws confetti*
Now, on to business!
Each Friday in October, I’ll be featuring some of my Halloween-inspired patterns that are available for sale in my Craftsy shop. Free Halloween goodness returns tomorrow!
Today, we’re revisiting one of my first-ever patterns made for sale, A Little Haunted.
This wonky little haunted house was inspired by a piece of artwork drawn by my son when he was still a little kid.
My little kiddo turns 18 in a couple of months, so that was some time ago!
A Little Haunted includes all the directions and pattern pieces you need to make the haunted house with boarded up windows or this simplified version, perfect for fussy cutting!
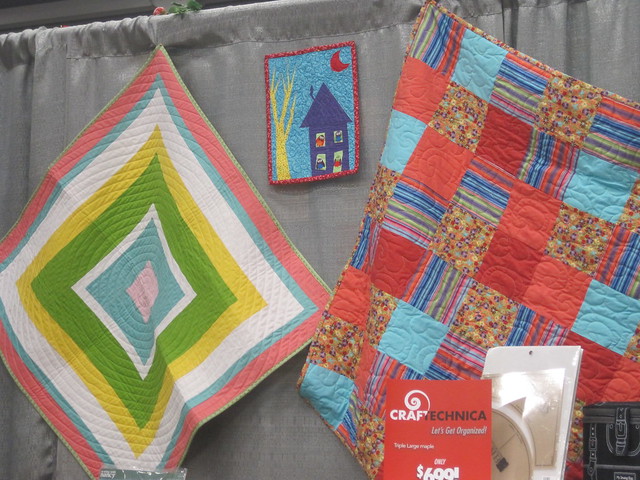
Spotted in the wild! A Little Haunted in the BabyLock Booth at QuiltCon 2013!
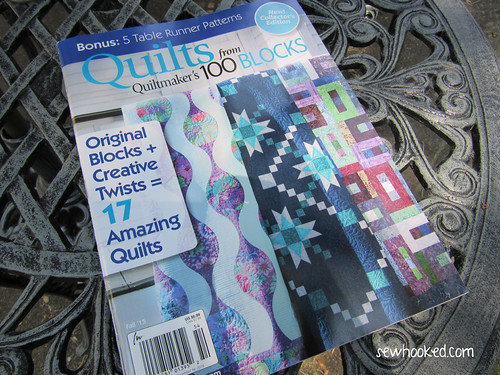
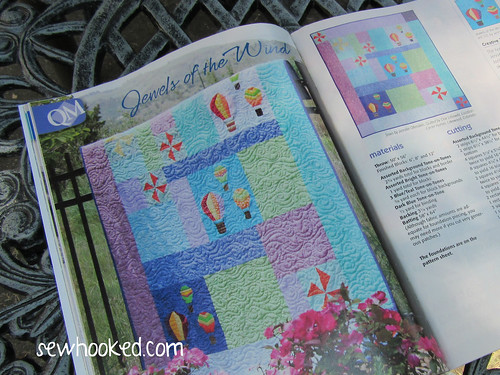
I still have a couple of copies of Quiltmaker’s Quilts From 100 Blocks in my Etsy shop. Included in this magazine is my quilt pattern, Jewels of the Wind. This quilt was inspired by the birthday girl herself. Thanks, Jewells, for always being an inspiration!
Are you making projects from 31 Days of Halloween? Share your photos with my flickr group! There will be a fun surprise after Halloween for one lucky winner!
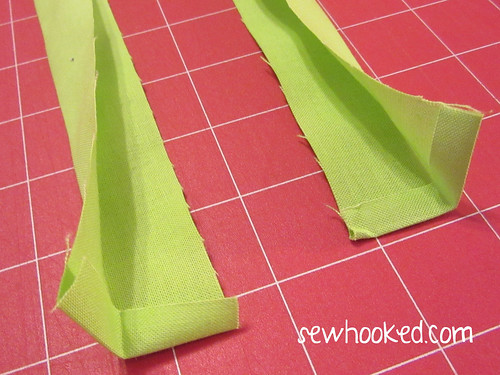
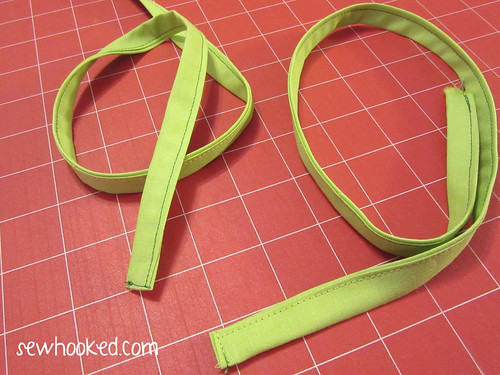
2 – 2″ x 22″ strips of green fabric (fat quarters work great or you can sub-cut a WOF)
fun thread color (optional)
pinking shears (optional)
sewing machine
iron
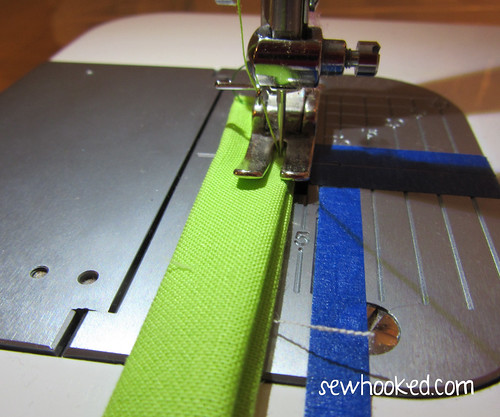
Press both 22″ strips in half, pressing one end of each strip under 1/4″. Press in half again.
Stitch across the turned under end and down the length of each green strip.
Now you’ll have this!
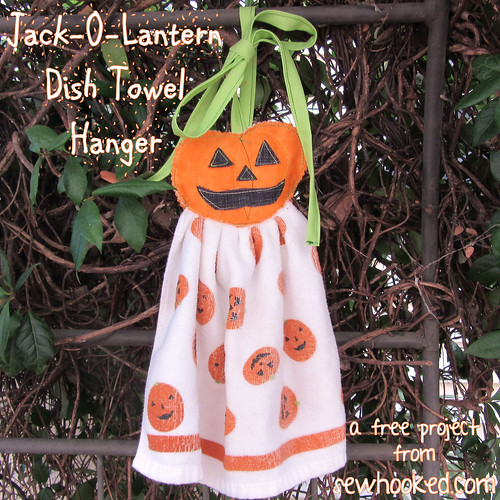
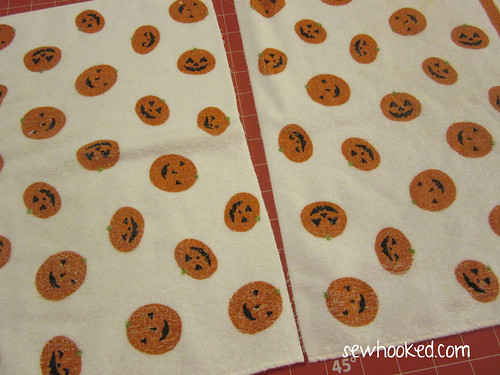
Depending on the size of your towel, you may need to cut it in half. My towel was 23″ long. If you don’t cut your towel in half, then cut the seam allowance off the top end.
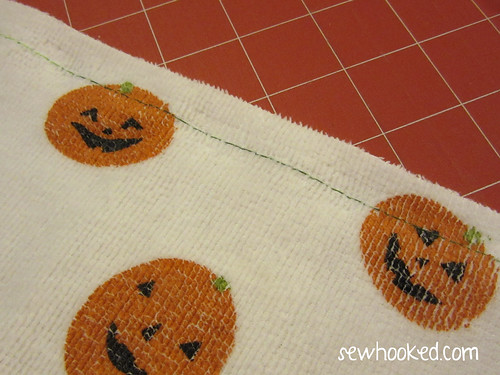
Run a long basting stitch along the raw edge, being sure to leave long tails on each end.
Use the basting to gather the towel. Now, set aside for the fun part!
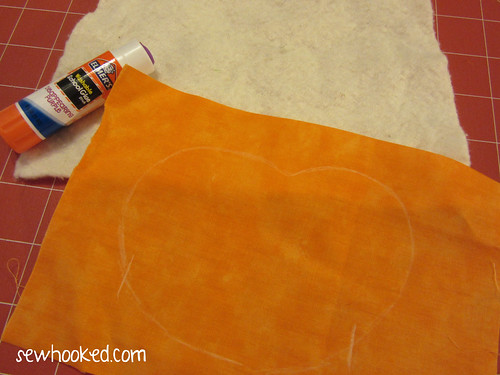
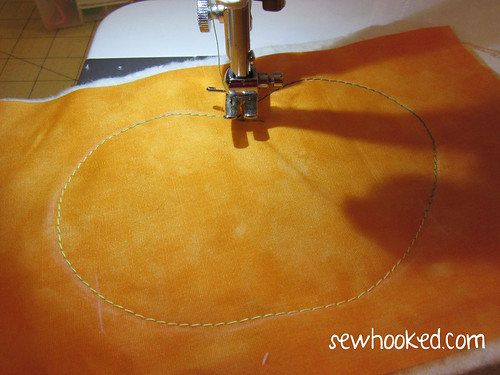
Cut your orange fabric into two pieces approximately 7″ square (mine was a little wider, so I just left it). Cut out and trace the Pumpkin Template onto the right side of one piece of orange fabric with an erasable fabric pencil. I used my white Sewline pencil.
I marked a four inch space to help with the opening later on. This is optional.
Baste the orange fabric you just traced on to the batting with a few dots of washable school glue.
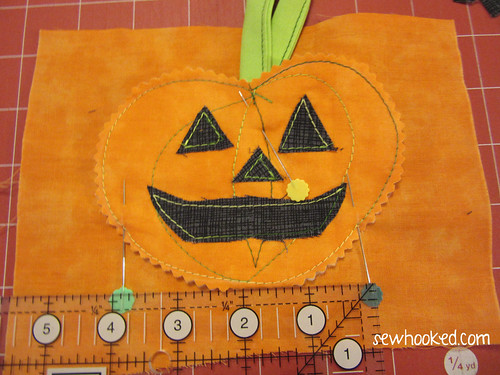
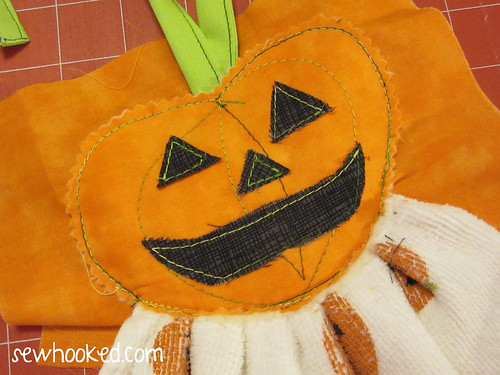
Using your fun thread and a wide stitch (I used a 3 on my Juki), trace the pumpkin line.
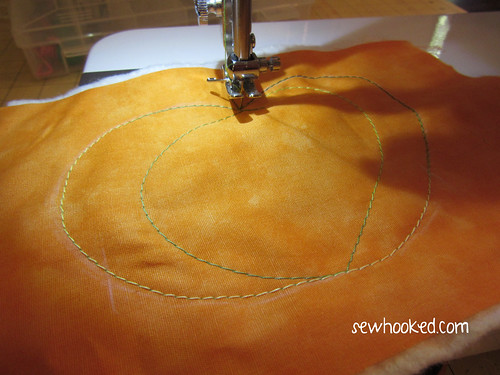
Starting at the top of the pumpkin, echo the shape an inch or so inside the line. You don’t have to be perfect here, every pumpkin is unique!
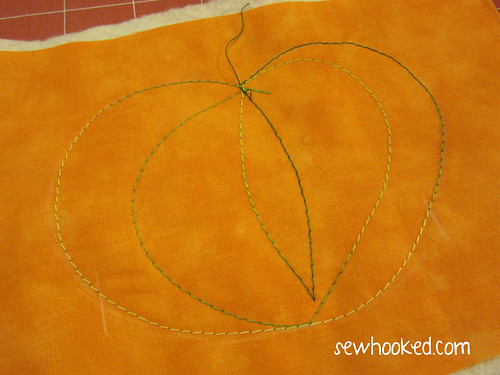
Mine looks like this.
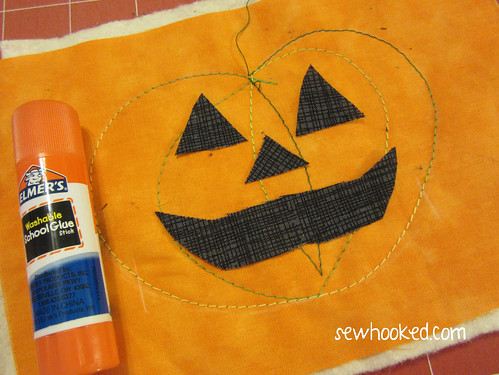
Using your black fabric scraps and a pair of scissors, cut out the face you’d like for your Jack-O-Lantern. I decided to go super simple, trimming as needed until it was just the way I wanted.
Baste these pieces on with the washable school glue. Hit it for a few seconds with your iron to dry the glue.
Using the same stitch as before, stitch around each facial feature, being sure to back stitch as needed.
Trim the entire thing with pinking shears. The face is done, yay!
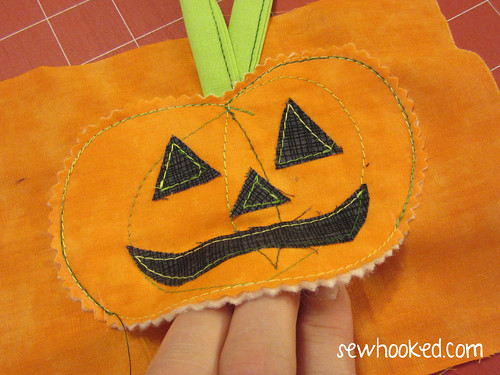
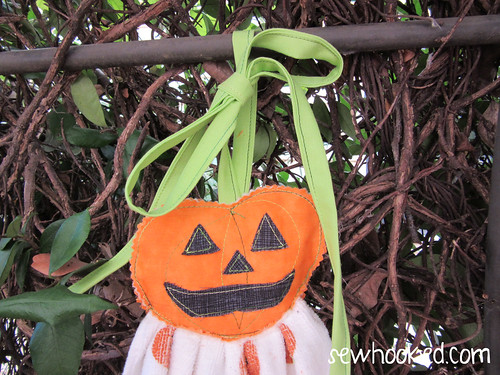
Place the completed face right side up on the remaining piece of orange fabric.
Slide the unstitched ends of the green ties into the top center and secure with a pin.
Measure a 4 inch opening at the bottom (this is what those marks were for back when I was tracing), Mark each side with a pen or erasable fabric pencil, marker, etc.
Sew around, on top of the original stitch, leaving the 4″ opening at the bottom. Back stitch at the beginning and end.
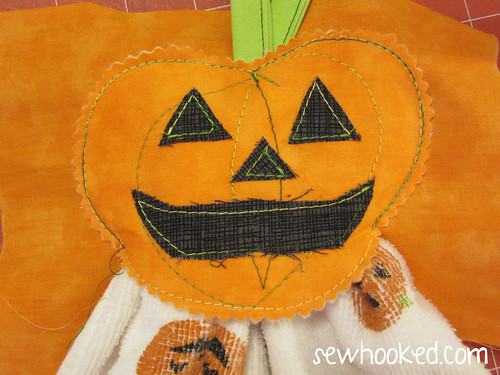
Insert the previously prepared towel in the opening (the back fabric is still untrimmed).
Adjust as needed until it is as even as possible.
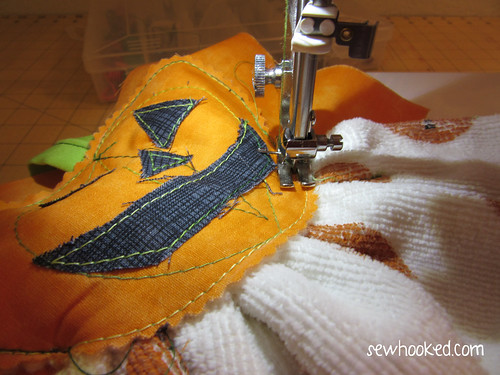
Sew the opening closed. Depending on your machine, you may need to raise your presser foot or use a walking foot. You know your machine best, so do what works best for you.
Now, it’s time to trim off the back! Use scissors or your pinking shears to trim close to the stitching, being sure not to cut the front fabric.
The end is near! There are just a couple of days left to take advantage of the awesome class deal from Craftsy JUST for Sewhooked readers!
Machine Quilting: Free Motion & Morehas everything you need. For just $19.99 (regularly $39.99), you’ll get unlimited access to the following lessons:
Lesson 1. Introduction
Lesson 2. Preparing Your Quilts
Lesson 3. Stabilizing the Quilt
Lesson 4. Walking Foot Stitch Designs
Lesson 5. Marking for Free-Motion Quilting
Lesson 6. Simple Free-Motion Quilting
Lesson 7. Complex Free-Motion Quilting
Lesson 8. Thread Talk
Lesson 9. Whole Cloth Quilting & Troubleshooting
Lesson 10. Bindings & Finishing Touches
Sewhooked readers get 50% off Machine Quilting: Free Motion & More until October 15, 12015! Original price is $39.99, get it now for $19.99! Offer good until 10/15/15 @11:59pm MT.
Are you making projects from 31 Days of Halloween? Share your photos with my flickr group! There will be a fun surprise after Halloween for one lucky winner!
*Don’t want to microwave? Try this under the broiler, but keep any eye on it, the candy will melt fast!
Slice and core the apple any way you like, I like to cut my apples in 8ths for a nice apple bite! Place apple slices on parchment lined microwave-safe plate.
Using toothpicks, attach one caramel to the center of each apple
Microwave until the caramel just starts to melt. It takes my microwave about 1 minute and 20 seconds. Time may very with yours, so keep an eye on it.
Some of your caramel slip off? That’s okay, just scoop it up and dump it back on top!
As a finishing touch, sprinkle chopped pecans or walnuts (shown) on top while the candy is still warm. I recommend eating these warm, but you can refrigerate them, too. The candy may settle a bit, but it’ll peel right off the parchment paper!
REMINDER: As a special bonus for my readers, get 50% off Machine Quilting: Free Motion & More until October 15, 12015! Original price is $39.99, get it now for $19.99! Offer good until 10/15/15 @11:59pm MT.
Are you making projects from 31 Days of Halloween? Share your photos with my flickr group! There will be a fun surprise after Halloween for one lucky winner!
Happy Sunday! Today, we’re revisiting a tried and true favorite for our 31 Days of Halloween!
While not new to Sewhooked, Cauldron Pin Cushions are one of my all time favorite super-easy crafty gift to make for Harry Potter & Halloween-loving friends who sew!
marbles, pony beads or whatever you like to weigh down the bottom (absolutely necessary or the cauldron will be top heavy and roll)
a small amount of polyfil
scrap of fabric
hand sewing needle needle
thread
scissors
hot melt glue gun
Gather your supplies (weights are in the bowl).
Cut a circle about twice the size of the cauldron out of the fabric. With the thread doubled on your needle, stitch a straight running stitch around the outside edge.
Pull the running stitch up about half way to gather the fabric circle. Add polyfil to the fabric circle & pull thread tight. Knot off securely.
Add weights to the bottom of the cauldron and top with polyfil.
Squeeze hot melt glue under the lip of the cauldron. Push fabric into the cauldron, pretty side up, making sure it catches under the lip.
Let dry and, we’re done! How fun and easy is that?
As a special bonus for my readers, get 50% off Machine Quilting: Free Motion & More until October 15, 12015! Original price is $39.99, get it now for $19.99! Offer good until 10/15/15 @11:59pm MT.
Are you making projects from 31 Days of Halloween? Share your photos with my flickr group! There will be a fun surprise after Halloween for one lucky winner!
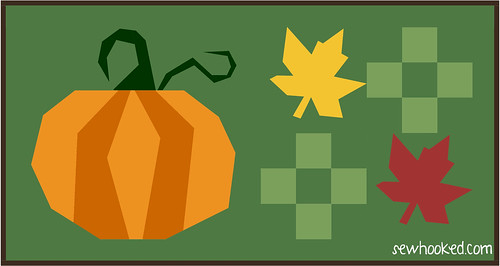
How about a fun quilt layout idea? I couldn’t resist!
Yeah, my kids are pretty much grown and I still love Sesame Street. 😉
As a special bonus for my readers, get 50% off Machine Quilting: Free Motion & More until October 15, 12015! Original price is $39.99, get it now for $19.99! Offer good until 10/15/15 @11:59pm MT.
Are you making projects from 31 Days of Halloween? Share your photos with my flickr group! There will be a fun surprise after Halloween for one lucky winner!


 FREE – 3″, 5″ and 6″ Maple Leaf Paper Pieced Pattern (Or get it on Craftsy!)
 FREE – 3″, 5″ and 6″ Pumpkin Paper Pieced Pattern (get it on Craftsy!)