Author Archives: Jennifer Ofenstein

Unknown's avatar

About Jennifer Ofenstein

Owner of sewhooked.com and fandominstitches.com. #quiltforgood advocate. Quilt designer, instructor, Talk to Me Tuesday founder & contributor, cat mom, and craft enabler.

Paper Piecing: Step By Step

Basic Paper Piecing Tutorial

I receive a lot of emails about paper piecing each week. While many of them are in reference to my Harry Potter patterns, even more of the messages are from new and experienced quilters alike, with comments about the technique itself. Most commonly, I hear one of two things. Either that the person emailing had never quilted and saw a pattern they really wanted to try and just went for it, then was surprised that it wasn’t as hard as they thought OR that they have wanted to try it for years and it looks too hard to them.

I’m always thrilled to hear from quilters of all skill levels, and any time I can help in whatever small way, it’s my great pleasure to do so.

Paper piecing can be daunting to someone that either hasn’t tried it before or tried a technique that confused them. I myself tried three separate tutorials before it stuck. It was a combination of those different tutorials that helped me understand it better, and while I do have my own How To now, I still recommend checking out several tutorials and deciding on what techniques are right for yourself.

That said, this is how I paper piece. Each pattern is the same. They all have the same basic set up and the same basic rules will always apply. Even thought designers sometimes draw their patterns differently, the technique remains the same.

How To Paper Piece
© Jennifer Ofenstein
click on tutorial images to see larger versions

paper piecing tutorial (1)

Supplies

  • pattern (Jar #3 used in this tutorial or similar pattern – NOTE: Jar #3 was updated in 2014 and looks a little different than the photos, but the lines are all in the same place)
  • quilting fabric
  • neutral thread
  • paper scissors
  • fabric scissor OR Add-A-Quarter Ruler.
  • postcard or thin straight edge
  • flathead pins
  • rotary cutter*
  • rotary ruler
  • wallpaper seam roller (available at home improvement stores)

*note – I keep two rotary cutters, one for traditional piecing and one for trimming paper pieced blocks. The “just fabric” cutter gets the new blade, and when it begins to dull, I transfer it to the “paper” rotary cutter.

Not shown above:

  • cutting mat
  • dry iron
  • sewing machine
  • open toe foot
  • light source

Start by making a copy or print out of the pattern you want to make. Use lightweight paper for your patterns, as it tears off easier. Recycled printer paper works well, as does tracing paper and some drawing papers. There are also a number of commercially available products just for paper piecing, such as Carol Doak’s Foundation Piecing Paper.

Choose fabrics you think will compliment the pattern. Always use good quality 100% cotton quilting fabric.

paper piecing tutorial (5)

Use paper scissors to trim outside the gray seam allowance of individual pieces of the pattern.

paper piecing tutorial (3).JPG

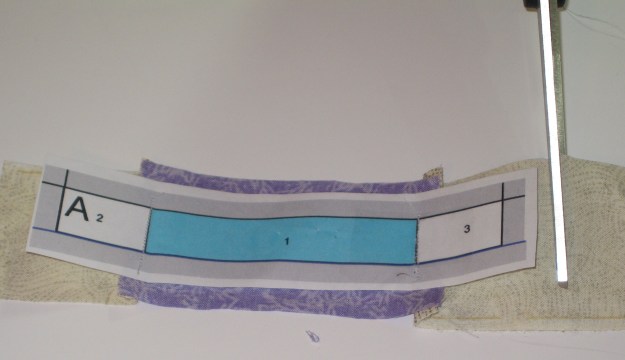
Starting with pattern piece “A,” use the postcard as a straight edge, fold the pattern piece on the line between 1 and 2. This is your stitching line.

paper piecing tutorial (4).JPG
Repeat for the line between 1 and 3.

paper piecing tutorial (6)

Place fabric 1 right side up on the back of the paper opposite piece 1.

Make sure you have a generous seam allowance (approximately 1/2″) all around.

Use a light source behind the pattern if you need it to make sure the fabric is big enough.
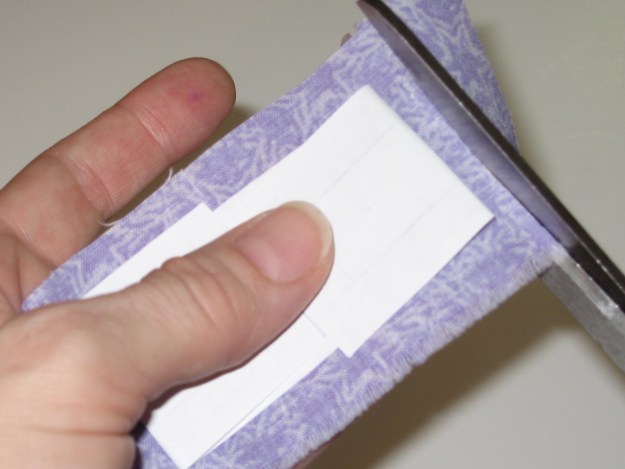
paper piecing tutorial (7)

Trim seam allowance to 1/4″. This can be done with fabric scissors or a rotary cutter.

paper piecing tutorial (9)

Place fabric 2 wrong side up on fabric 1. Make sure to slide both pieces of fabric 1/4” past the stitching line.

paper piecing tutorial (10)

Using a small stitch (10-12 stitches per inch, a 1.5 on most domestic sewing machines), start two stitches before the stitching line, stitch along the line and take two stitches after the end. By stitching slightly pass the line, it is less likely that the ends the stitches will pull out when the paper is removed.

paper piecing tutorial (14)

Trim thread to paper.

paper piecing tutorial (11)

Fold fabric two out. Gently dry press with an iron OR use the wallpaper seam roller (shown) to press out the seam. Be careful not to pull or tug on the fabric.

paper piecing tutorial (12)

Fold on the 1 > 3 line. Keep the paper folded then flip the pattern over. Trim a generous 1/4″ from piece 1 either with scissors or with your Add-A-Quarter Ruler.

Unfold the paper. Place fabric 3 wrong side up on fabric 1, matching the edges, which will be 1/4″ past the stitching line after being trimmed in the previous step.
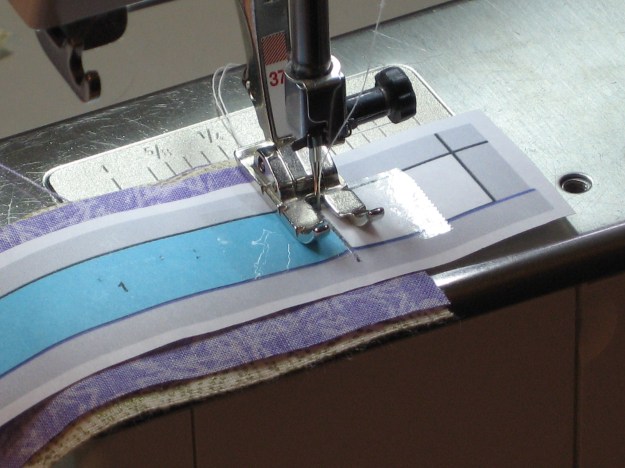
paper piecing tutorial (13)

Repeat stitching as for line 1 > 2.

paper piecing tutorial (15)
Press as before.

paper piecing tutorial (16).JPG

Trim fabric around pattern piece, leaving a generous amount for squaring up later.
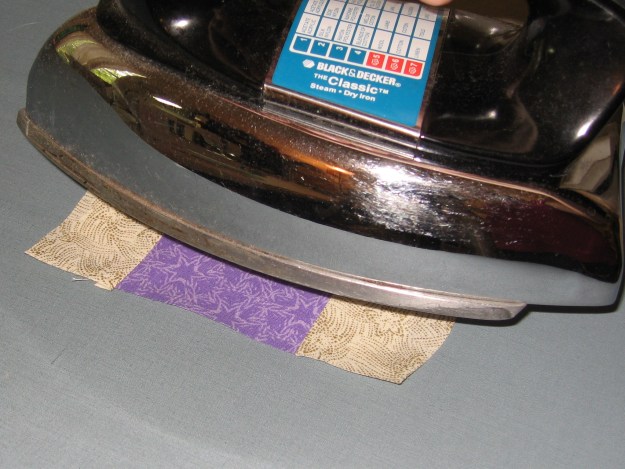
paper piecing tutorial (17).JPG

Press pattern piece “A” with a gentle up and down motion using a dry iron. Do not pull or tug the fabric.
paper piecing tutorial (19)

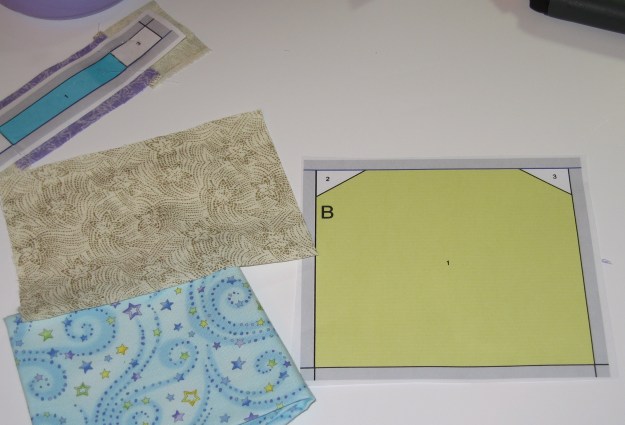
Now for pattern piece “B.”

paper piecing tutorial (20)

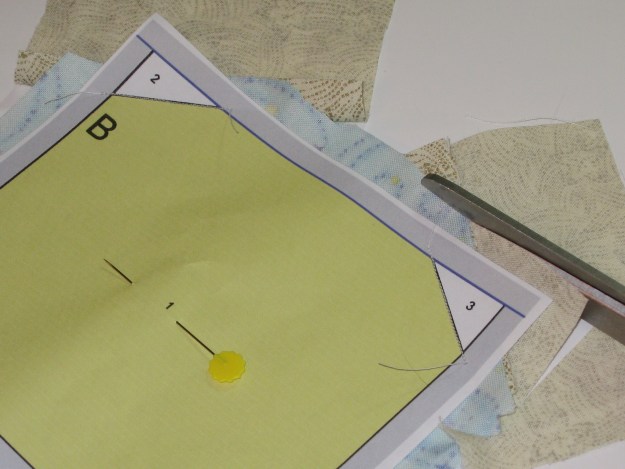
Using the postcard or straight edge, fold down the lines between section 1 > 2 and 1 > 3.
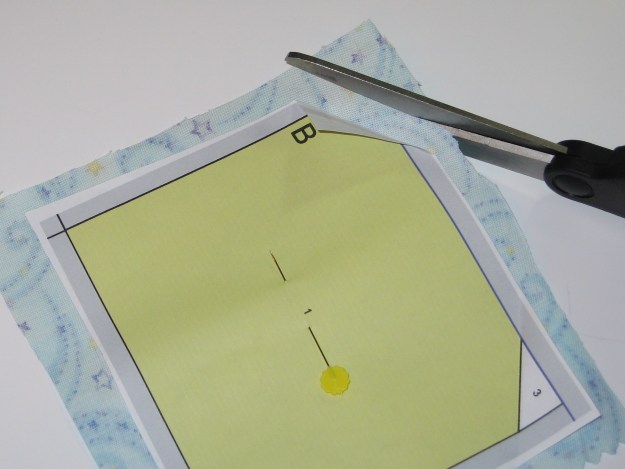
paper piecing tutorial (21)

Trim a generous 1/4″ seam allowance (with scissors or Add-A-Quarter ruler) for piece 1 >2. Repeat for 1 > 3.

paper piecing tutorial (23).JPG

Just as for pattern piece “A,” place fabric 1 right side up on the back of the paper opposite piece 1. Make sure you have a generous seam allowance (approximately 1/2″) all around.

paper piecing tutorial (24)

Stitch on the line between piece 1 > 2 as in previous steps.

Repeat for pieces 1 > 3.
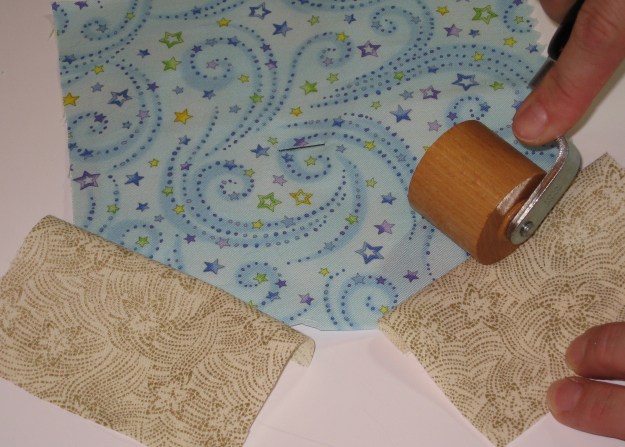
paper piecing tutorial (26).JPG

Press seams as before.

paper piecing tutorial (28)

Trim fabric, leaving a generous seam allowance around the outside edges for squaring up later.

paper piecing tutorial (29).JPG

Press as before.

paper piecing tutorial (30).JPG

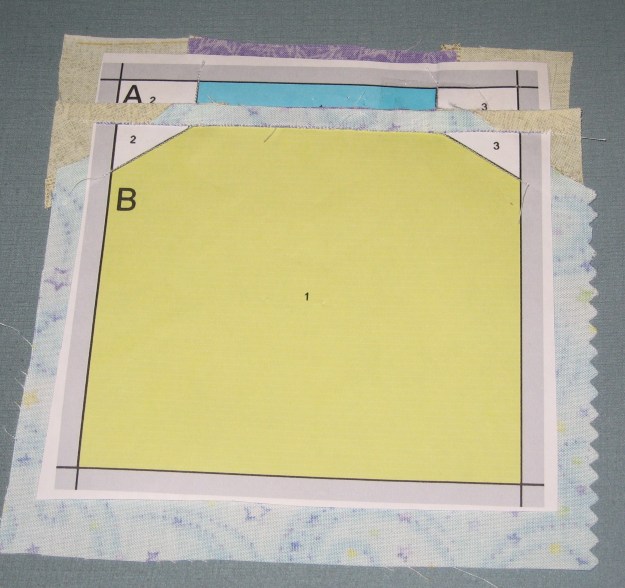
This is what you should have so far.

paper piecing tutorial (31).JPG

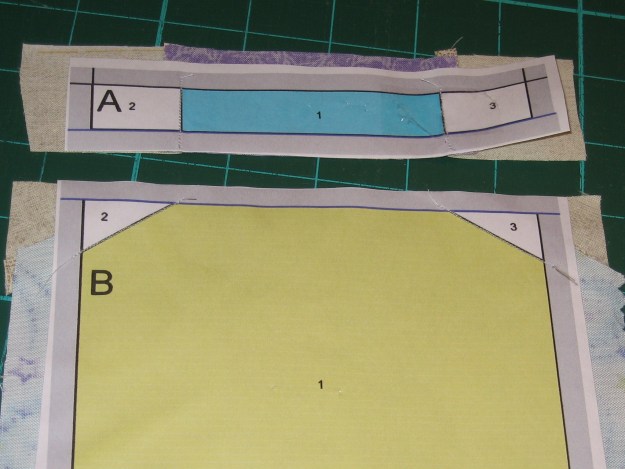
On your cutting mat and with your ruler, find the inside line at the top of unit “B”, where the jar will be stitched to the lid.
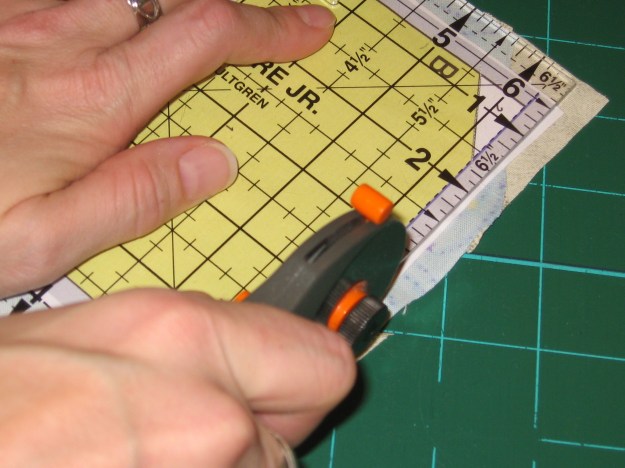
paper piecing tutorial (32).JPG

Using the pattern’s seam allowance as a guide, trim. (note: Not all paper pieced patterns include seam allowance. All of my patterns do, but if you’re ever working on a pattern without seam allowance, you can add it using this simple tutorial.)

paper piecing tutorial (34)

Find the corresponding seam on unit “A” and repeat the process.
paper piecing tutorial (36)

Now the “A” pattern piece is ready to join to the “B” pattern piece.

paper piecing tutorial (37)

Use a pin to find the outside corner. Push the pin through this point.

paper piecing tutorial (38)

Find the corresponding point on the other pattern piece. Push the pin through.

paper piecing tutorial (39)

Push the pin all the way through to line up the pattern pieces. This will assure that your pattern pieces align correctly when stitching.

paper piecing tutorial (40)

Using the pin keep the pattern aligned, stitch along the seam line.

Tip: Use Wonder Clips to hold the seam in place. (Not shown…Wonder Clips are awesome, but they came out after I originally wrote this tutorial!)

paper piecing tutorial (41)

This is what you have now.

paper piecing tutorial (42)

Remove the paper seam allowance that was just stitched on the “A” piece.

paper piecing tutorial (43)

Repeat for the “B” piece.

paper piecing tutorial (44)

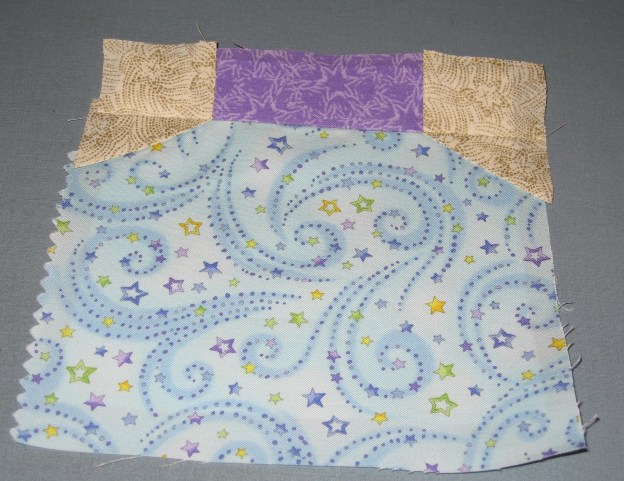
Open the block and press. The seam can be pressed to one side or pressed open. I usually let the fabric decide for me.
paper piecing tutorial (45).JPG

Now you have this from the front.

paper piecing tutorial (46).JPG

And you have this from the back.

paper piecing tutorial (48)

Time to square up the block! Align the ruler with the bottom edge with the seam allowance inside. Trim to 1/4″.

paper piecing tutorial (49).JPG

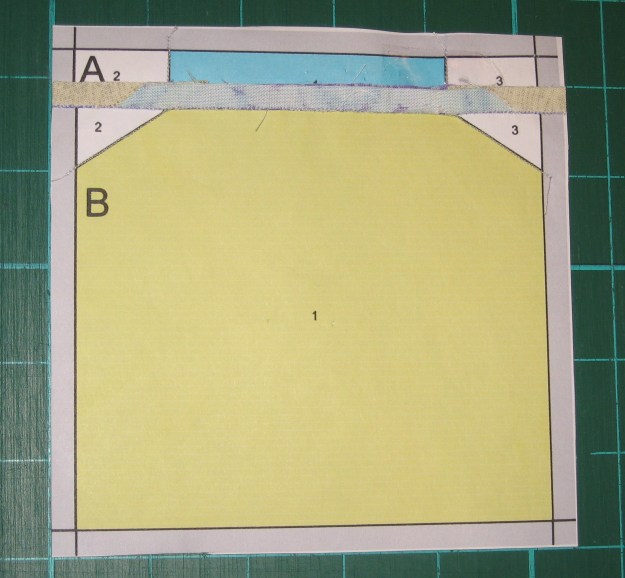
Using the first cut, square up the block to 5 1/2″. If the pattern is a little off, go with the ruler’s measurement and not the seam allowance on the pattern. Printers vary widely, as do patterns. You can make minor corrections by squaring up the block.
paper piecing tutorial (50).JPG

Now you have this…all squared up! Leave the paper attached until the block is in it’s final location. That will keep the bias seams from stretching.
paper piecing tutorial (51)

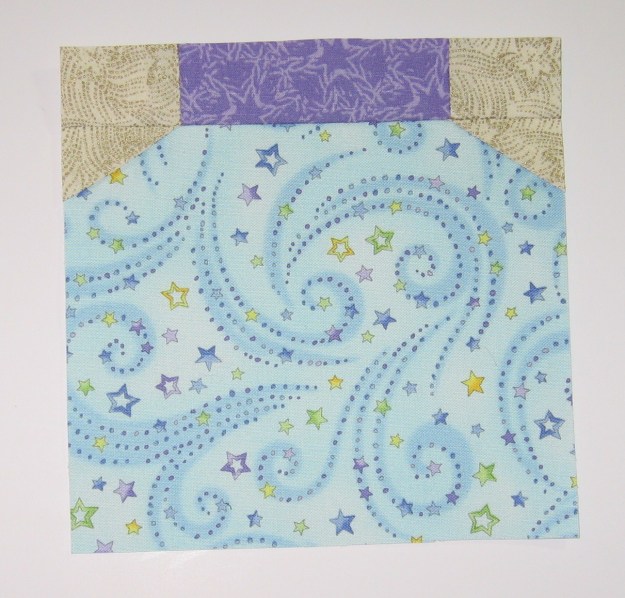
From the front!

Use this block for quilts, pillows, bags, pot holders, wall hangings or anywhere else you’d use a square of fabric or a quilt block!

You can find lots of free patterns right here on Sewhooked!

Join the Sewhooked Facebook Group for community, support, & prizes!

signature-2016

Facebook ♥ Instagram 

Posts on this blog may contain affiliate links but I have no control over “sponsored posts” which are the price I pay for a less expensive website. Thank you for your understanding & support. ♥

Way Back Craft: Paper Piecing Evolution

Livejournal user lady_whitehaven turned on the Way Back Machine for me today when I found this post over at the Livejournal community quilting.

The dragon is an old design that I came up with way back in 2006 for a project that never quite made it to fruition.  That was probably a year after I started designing.  When I look at the original pattern, I can really see how much my design skill has evolved.

Sometime in 2007, when I had finally tested the dragon and realized how complicated it was, I pulled it off of sewhooked to be redesigned and then (apparently!) forgot about it.  I have since tried to be more careful about what patterns I post untested.  If I’m even a little unsure of the pattern design, I’ll hold onto it until I’ve had the chance to test it myself.

New, cleaned up and simplified version:


“Green Dragon” Pattern

The original version looks okay, but the pattern is scary, messy & has too many pieces!

First scary dragon pattern

When I woke up this morning, I had no intention of redrawing or reworking a pattern. I had kids to get to school (done!), a hubby to drop off at the airport (done!) and groceries to buy (um…not so done!).  Thank you, lady_whitehaven, for inspiring me to have a second look and give the “Green Dragon” a second life.

“Green Dragon” is now housed on the Paper Pieced Pattern page at sewhooked. If you give it a try, or any of my other patterns or projects a try, I’d love to see a photo. Email me or add it to the Friends of Sewhooked flickr group.

Have a happy weekend!

coming soon – Guest Designer profiles!

This is part of my “Way Back Craft” series’; patterns, crafts, tutorials and general crafty memories before the days of this craft blog.

Snuggly Car Seat Blanket

Carseat Blanket

add this pattern to your ravelry queue!

Printable Pattern

It’s been many a moon since I had my own baby to crochet for, and while I do regularly make blankets for The Linus Connection, those are of the garden-variety baby blankets and afghans….definitely without holes!

My aunt recently had her second baby boy and was looking for a specific style of car seat blanket.  It’s a tiny blanket with a hole for threading the car seat straps through.  My understanding is that the blanket stays in place better, keeping the baby toasty and warm.  She sent me dimensions and a photo of a blanket she already has and I went to work.

The goal is a blanket that is both simple to make and warm to use.  The one below worked up in just a few hours, design time included.

  • 2 – 6 oz. skeins of Caron Simply Soft (315 yds each)
  • K hook

finished approxmiately 18″x21″

With two strands of yarn held together, chain 50
Row 1: hdc in second chain from hook and in each sc across (48 hdc)
Row 2: ch 1, turn, hdc across
Row 3 – 10: rep Row 2
Row 11: hdc in first 20 st, ch 8, sk 8 st, hdc in last 20 st. (48 hdc)
Row 12: ch 1, turn, hdc in first 20 st, hdc in 8 sc, hdc in last 20 st
Row 13: ch 1, turn, hdc across
Row 14 – 44: Rep Row 13

Optional:  Sc evenly around or add a decorative border

Finish off, weave in ends.

Happy crafting!

Add your Sewhooked-related photos to my flickr group and you might be featured in a future post!

Photobucket

Sewhooked Shop | FB | SHFB | Flickr | Twitter

Paper Piecing: Cluck Cluck

Chickens for hardhatcat

How about a new pattern for a beautiful Sunday?   I  designed a fun rooster for the above block which was gifted to hardhatcat for the LiveJournal group birthday_blocks. I had a lot of fun making this one and I think it’s fair to say it’s one of my new favorites!

For convenience, I created a both a left and a right pattern. Both work up to 5″ finished. The block above was made using one of each pattern alternated with a four patch. Easy-peasy and cute to boot!

Both patterns © Jennifer Ofenstein

Cat's Rooster (left)

Cat’s Rooster Pattern (left)

Cat's Rooster (right)

Cat’s Rooster Pattern (right)

If you make your own rooster, I’d love to see it! Post it in the Friends of Sewhooked Flickr Group.

Happy crafting!


signature-2016

downloads_wordmark_white_on_coral

Craftsy Pattern Shop ♥ Etsy Shop

Facebook ♥ Sewhooked on FB ♥ Sewhooked Facebook Group

Instagram ♥ Flickr ♥ Twitter

Posts on this blog contain affiliate links. Thank you for your support. ♥

Recycled Craft: Leo’s Sock

My family and I spent last weekend in Alpine, Texas for the wedding of my husband’s youngest brother, Mark, to his lovely new bride, Allison. It was a genuinely wonderful weekend, with lots of food, family and happiness all around.

Leo's recycled sock

While visiting, I came across a recycled creation made by my father-in-law, Leo. He took an old wool sock that was in much need of darning, cut off the toe and hung it with a bit of wire hanger.  This previous-sock is now the home to plastic bags for even more recycling. The bags go in the top and come out the bottom.

I’ve, of course, seen similar commercial creations as well as make-from-scratch patterns, but I am very much drawn to repurposing and am now on the lookout for my own long sock that is in need of recycling so I can make one for myself!

Happy Crafting,

sewhooked blog – a new home

Just a quick update to test all your RSS feeds out there!

The sewhooked craft blog has moved from http://www.sewhooked.org/blog to blog.sewhooked.org.

I do apologize for the confusion and having to shuffle the links about.  I’ve left the Blogspot format in favor of WordPress and I think you’ll find the new format much friendlier and easier to navigate.

New crafts coming your way asap!

T-Shirt Reconstruction: She-Shirt

The She-Shirt – Resizing a too big shirt to fit

It’s no secret among my friends that I’m a big Eddie Izzard fan. My family and I were lucky enough to get to see a live performance in June. Eddie was amazing, funny & brilliant, just as you might expect!

Also available as a video tutorial:

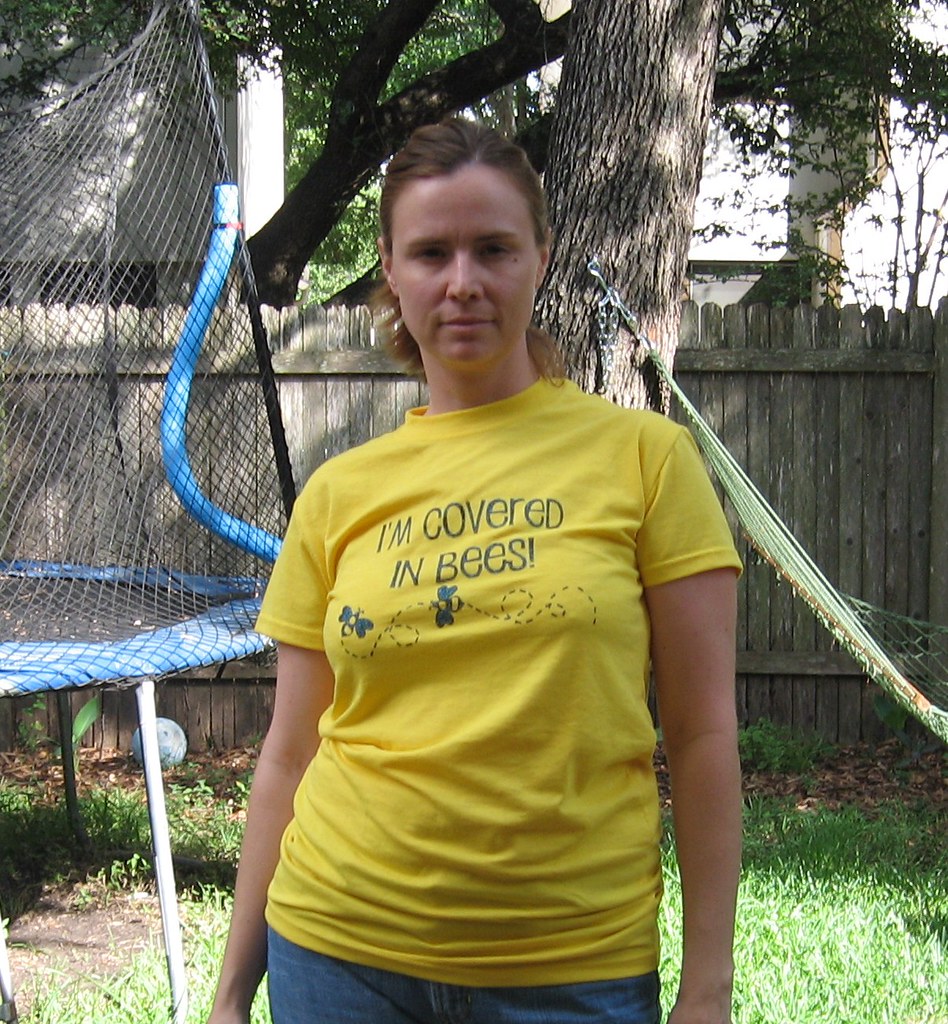
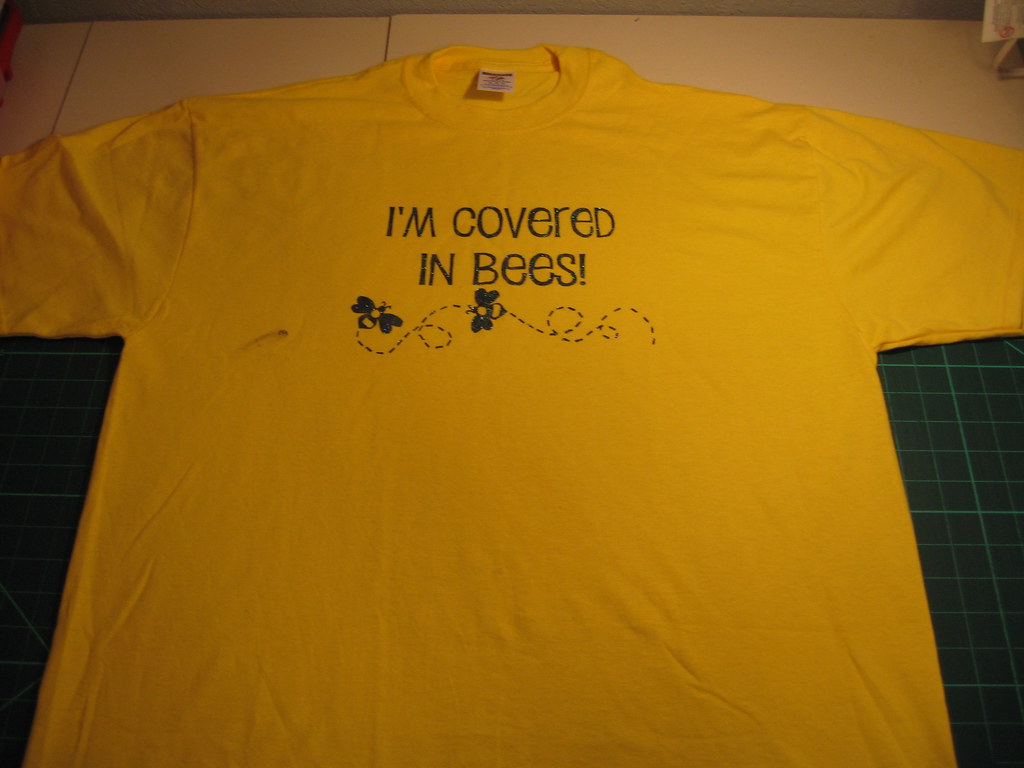
In honor of our shared Eddie-love, my good friend Shae stenciled this fantastic “Covered in Bees” t-shirt for me. She knew it would be too big and sent it with her crafty blessings to be reconstructed however I saw fit.

Resizing tees is the recon I do most often, making my shirts fit me better while still being long (and wide!) enough to go over my hips.

Use a favorite shirt that you already love the fit of and that has similar stretch to the fabric.

This is a fairly easy recon and usually takes about 30 minutes from start to finish.

Supplies:

  • Too Big t-shirt
  • smaller tee (guide)
  • pins
  • scissors
  • thread
  • sewing machine (optional)
  • ball point needle (for jersey fabrics)

The shirt, before resizing

 
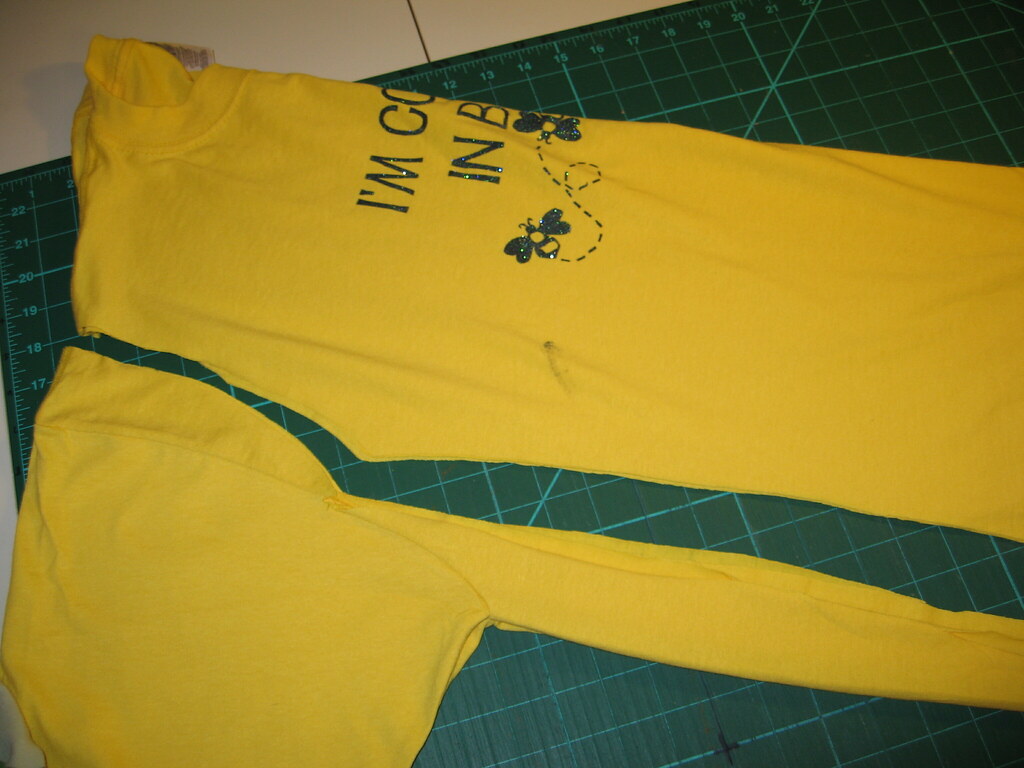
Resizing using a favorite shirt – cut about 1/2″ away from the original shirt so you have seam allowance. You’ll have to do a little guestimating on the sleeves, but if you take it slow and careful, it’ll work out fine.


Use my favorite recon technique and eyeball for the sleeve size, adjusting the sleeve under the body of the t-shirt until it’s the length and shape you want. Pencil a line on the existing sleeve using the cut on the t-shirt, and then added about 1/2″ for seam allowance.


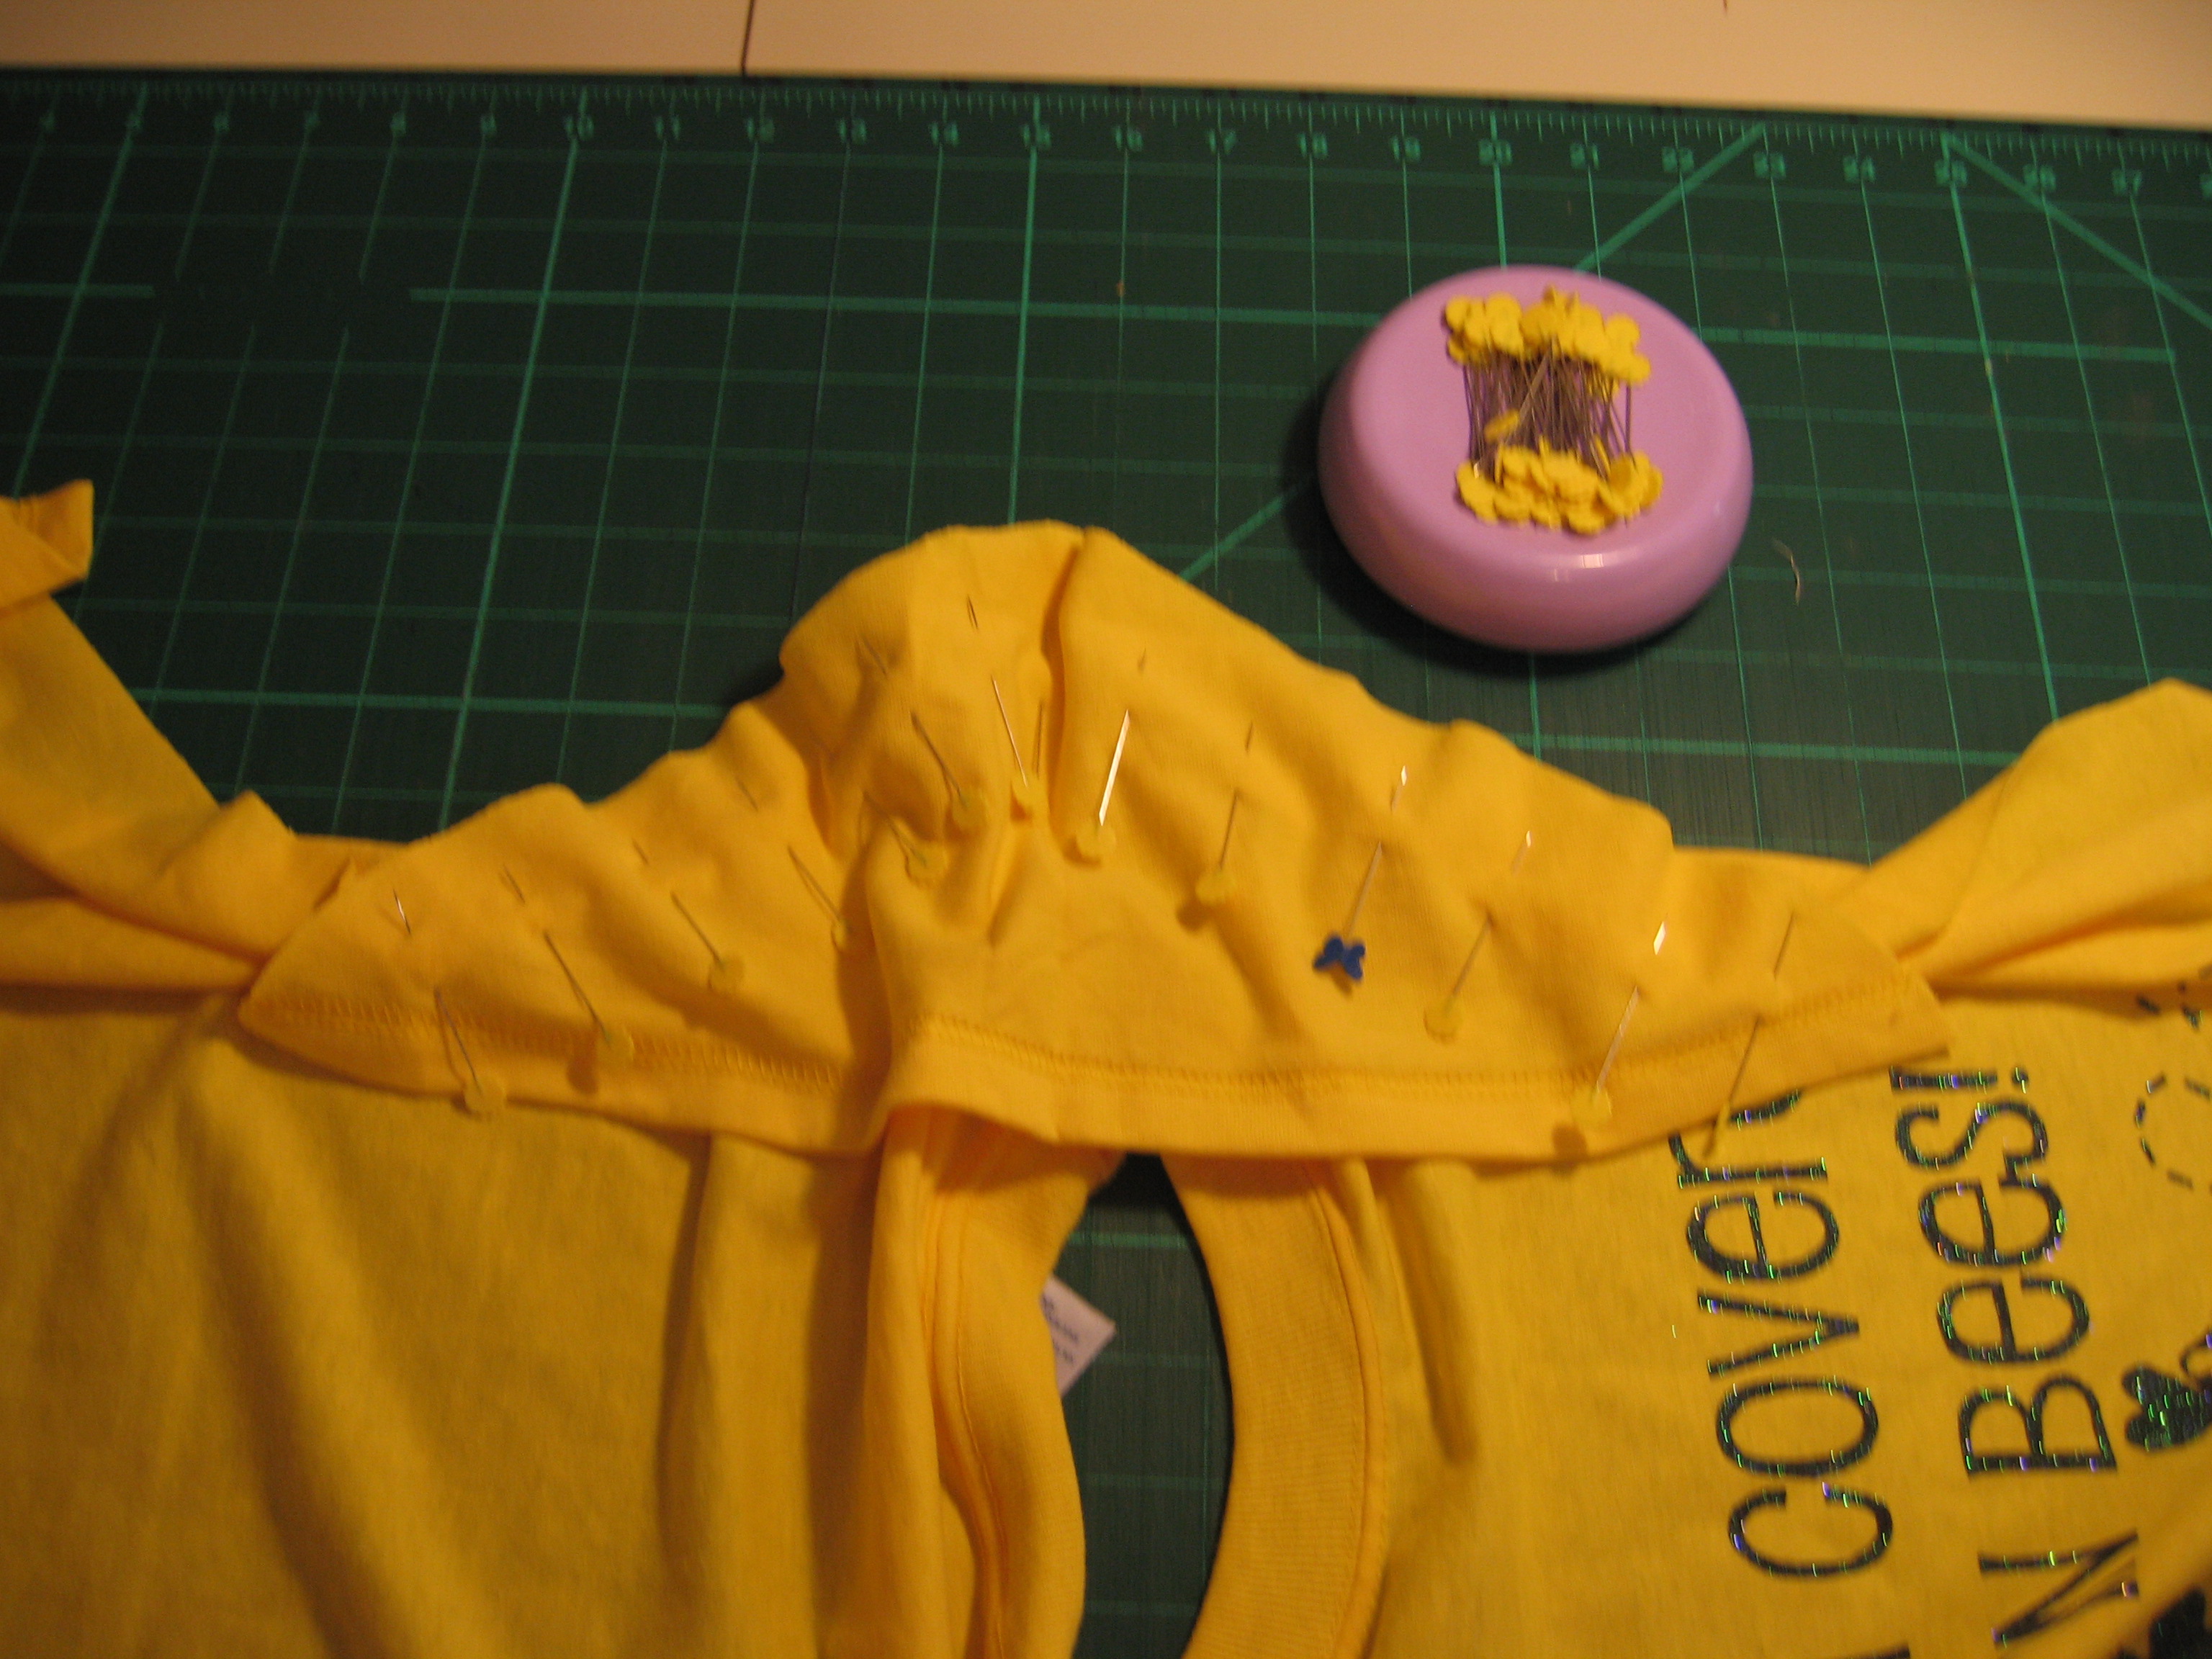
Find the center on the sleeves, pin to the seam allowance on the shirt. Pin along the sleeve, being careful not to pull or tug the fabric. Stitch using a stretch stitch and 1/2″ seam allowance.

(Note from 2025 Jennifer – while updating this tutorial I realized this photo was missing. It appears to be long gone from my files and I do apologize for the inconvenience.)


After stitching the sleeves, fold shirt in half, right sides together, matching the bottom hem. Stitch a 1/2″ seam under the sleeve and all the way down the side. Trim seam allowance, if you wish.

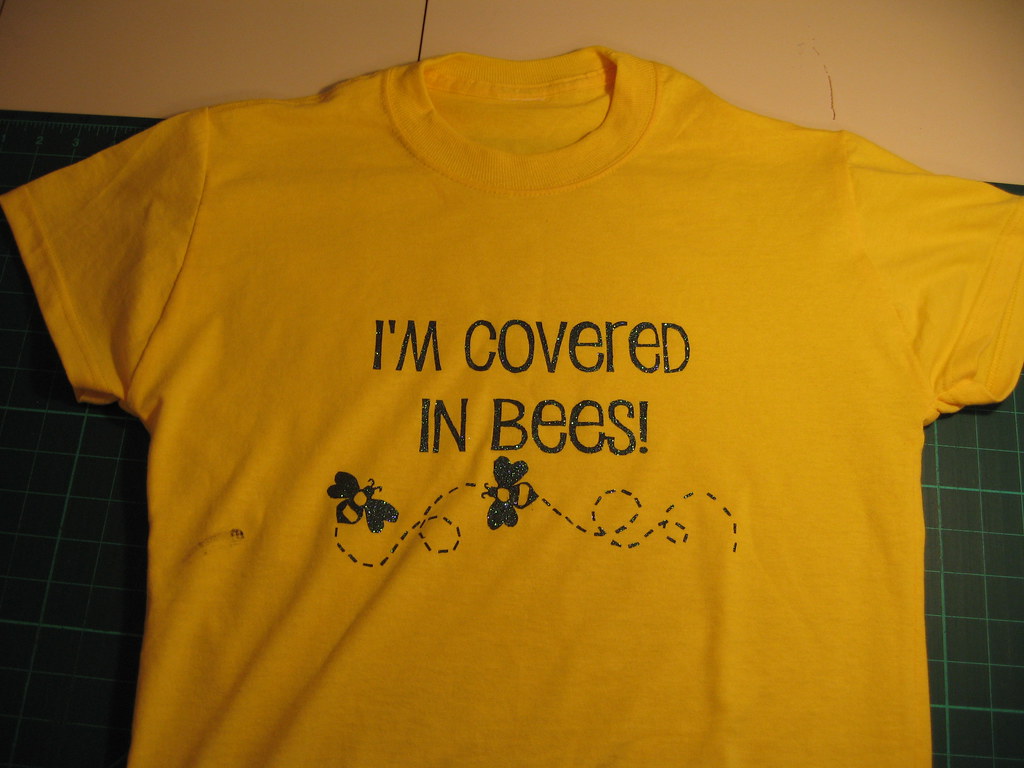
Because you leave the original hems for the sleeves and the shirt in place, the reconstruction is now complete!

Add your Sewhooked-related photos to my flickr group and you might be featured in a future post!

Happy Crafting!

Find my free patterns on Sewhooked & Fandom in Stitches.

♥ Jennifer O

Posts on this blog may contain affiliate links to help cover the cost of my website. I thank you for your generous support. ♥

Paper Piecing: Bag Lady

IMG_0360
Sue Upton, of PotterCast, receiving her Hufflepuff gift bag
during Lumos in Las Vegas, July 2006.

While I love all crafts, paper piecing is my One True Craft. (bold, capitalized, giant font ONE TRUE CRAFT). I love designing, making and sharing. The ideas come faster than I could ever possibly get them all down.

While paper piecing is definitely a quilting technique, quilting is definitely not just for quilts. I love using quilt elements in bags, pillows, clothing and art pieces.

I thought it would be fun to do a photo round up of some of the bags in which I’ve used paper piecing and other quilting elements.

All bags and block patterns were designed by me. Many of the patterns are available for free on sewhooked (see links below).

2 Hufflepuff gift bags
Hufflepuff Gift Bags (as seen above)
Gryffindor Gift bag for Melissa Anelli
Gryffindor Gift Bag, made for Melissa Anelli of PotterCast (gifted at Lumos 2006).
Slytherin gift bag for John Noe
Slytherin Gift Bag made for John Noe of PotterCast (gifted at Lumos 2006)
Hope's Messenger Bag for Vegas
Gryffindor Messenger Bag, made for Hope, 2006
Jen's Ravenclaw messenger bag for Vegas
Ravenclaw Messenger Bag, this one is mine all mine! Made in 2006.
mini-messenger Bday gift for Joseé
Ravenclaw mini-messenger, made for Josée, 2006.Gryffindor pencil bag
Gryffindor Pencil Bag made for E, 2006

Hufflepuff bag for delana - back
Hufflepuff bag made for Delana, 2007.
Pirate Computer Bag
Jolly Roger Computer Bag (this one is mine, too!), 2007.
Kimmer's Ravenclaw Bag
Ravenclaw Messenger made for Kimmers, 2007.
LIzzie's Pigwidgeon Bag
Pigwidgeon Messenger Bag made for Lizzie, 2007.
Yellow Submarine Bag
Yellow Submarine bag made for Steph, 2006.
Gareth's X-Men Bag
X-Men Messenger Bag made for G, 2006.

Halloween Bats Tutorial

Easy Felt Bats

Every year, my family and I break out our big orange and black box full of Halloween decorations, cauldrons and punched aluminum candle holders. Folded and tucked into the side of the box are these sweet bats we made years and years ago. They’ve adorned several front doors, including our current home of almost ten years.


Halloween Bat Door Decoration

Super easy and adorable to boot, these anything-but-scary Halloween bats take about five minutes to whip up.

Supplies:

  • Felt Bat Template
  • 1 piece of black acrylic felt for each bat
  • scissors
  • pin
  • hot melt glue gun & glue
  • google eyes
  • round magnets


Gather your supplies


Fold the acrylic felt lengthwise in half. Pin the Bat pattern on the fold.


Cut around the bat shaped pattern, leaving the fold intact. Fold fabric out.


Use hot melt glue to attach google eyes, being careful to use only a dot of glue. Use pattern placement as a guide.


Use the same method to add the magnets to the back of the bat, using the placement shown on the pattern.


Two sizes of eyes.


Looking great!

Once the glue has dried, your batty friends are ready to display!

This is part of my “Way Back Craft” series’; patterns, crafts, tutorials and general crafty memories before the days of this craft blog.

Happy Crafting!

Photobucket

FB | SHFB | Flickr | Twitter | Pinterest| Bloglovin

this tutorial also available on cut out + keep

Chocolate Chocolate Marshmallow Cookies

Chocolate Chocolate Marshmallow Cookies

This recipe was created by my son and I while trying to work out what we were going to do with half a bag of leftover marshmallows. We started with an existing cookie recipe, but altered this and tweaked that until we came up with what you see here.

I can definitely live with it. Yum!

1/2 c. shortening

1 c. sugar
1 egg
1/4 c. milk
1 3/4 c. flour
1/2 tsp. baking soda
1/2 cup cocoa
1/2 cup chopped pecans
1 tsp. vanilla

Miniature Marshmallows

Preheat oven to 350°.

Cream together shortening, sugar, milk and egg. In another bowl, combine dry ingredients. Combine with wet ingredients, add vanilla.

Using a tablespoon or cookie scoop, drop onto an ungreased cookie sheet or a cookie sheet covered with parchment paper. Bake 8 minutes. Remove from oven. Push three to four miniature marshmallows into each warm cookie. Place pan back in oven for up to two minutes. Allow cookies to rest on the cookie sheet for 2 minutes before removing to a rack for cooling.

Frosting:
2 c. powdered sugar
4 tbsp. cocoa
1/4 c. butter
2 tbs. half and half or milk

Place butter in microwave for 15 seconds. Add sugar, cocoa and half and half. Whip with a fork or whisk. Spoon onto cooled cookies.

Hint – Place cooling rack over a cookie sheet for this step to catch any drips.

Add your Sewhooked-related photos to my flickr group and you might be featured in a future post.

Photobucket

 
Sewhooked Shop | FB | SHFB | Flickr | Twitter | Bloglovin